User Manual
Page 6
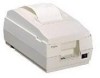
...switch cover ensures that the power switch is on the specifications of your dealer. ❏ Printer ❑ Paper roll ❏ Power switch cover ❑ Ribbon cassette ❏ Journal take up spool ❑ AC adapter Control Panel FEED button This... button feeds paper. Continued use this cover, install it as shown in illustration 1. 4 TM-U200 Series User's Manual Flashing indicates standby. Using the Power Switch Cover 1 WARNING: If an accident occurs with the printer...
...switch cover ensures that the power switch is on the specifications of your dealer. ❏ Printer ❑ Paper roll ❏ Power switch cover ❑ Ribbon cassette ❏ Journal take up spool ❑ AC adapter Control Panel FEED button This... button feeds paper. Continued use this cover, install it as shown in illustration 1. 4 TM-U200 Series User's Manual Flashing indicates standby. Using the Power Switch Cover 1 WARNING: If an accident occurs with the printer...
User Manual
Page 7
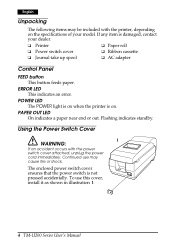
...of the arrow as shown in illustration 4 on the cassette; TM-U200 Series User's Manual 5 Open the printer cover and turn the ribbon cassette's knob 2 or 3 times in the direction of the paper roll as shown in illustration 2 below and push the ribbon cassette down until it clicks. 2 3 Note: Make sure..., cut the leading edge of the arrow, close the autocutter by pulling the tab up and toward you. 3. Note: Use the EPSON ERC-38 ribbon cassette for your printer. 1. Insert the ribbon in the position shown in the direction of the arrow marked on the next page. otherwise the...
...of the arrow as shown in illustration 4 on the cassette; TM-U200 Series User's Manual 5 Open the printer cover and turn the ribbon cassette's knob 2 or 3 times in the direction of the paper roll as shown in illustration 2 below and push the ribbon cassette down until it clicks. 2 3 Note: Make sure..., cut the leading edge of the arrow, close the autocutter by pulling the tab up and toward you. 3. Note: Use the EPSON ERC-38 ribbon cassette for your printer. 1. Insert the ribbon in the position shown in the direction of the arrow marked on the next page. otherwise the...
User Manual
Page 10
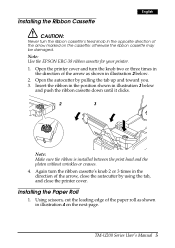
Cut the receipt paper (and journal paper if you have a Type A printer and are using two-ply paper) at the locations indicated by the arrows in illustration 12. Remove the jammed paper by pulling the tab up ... feeding as shown in illustration 13. 13 14 8 TM-U200 Series User's Manual Loosen the screw securing the print head cover. Note: Do not pull the jammed paper in the printer, follow the steps below. 6. Remove the ribbon cassette. 7. English 2. Remove the paper roll from the printer and open the autocutter by pulling it as...
Cut the receipt paper (and journal paper if you have a Type A printer and are using two-ply paper) at the locations indicated by the arrows in illustration 12. Remove the jammed paper by pulling the tab up ... feeding as shown in illustration 13. 13 14 8 TM-U200 Series User's Manual Loosen the screw securing the print head cover. Note: Do not pull the jammed paper in the printer, follow the steps below. 6. Remove the ribbon cassette. 7. English 2. Remove the paper roll from the printer and open the autocutter by pulling it as...

User Manual
Page 11
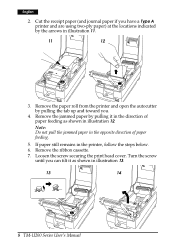
Remove all the jammed paper. Replace the ribbon cassette and close the printer cover. TM-U200 Series User's Manual 9 Replace the print head cover and secure it with the screw. 11. Note: Do not pull the jammed paper in the normal ...
Remove all the jammed paper. Replace the ribbon cassette and close the printer cover. TM-U200 Series User's Manual 9 Replace the print head cover and secure it with the screw. 11. Note: Do not pull the jammed paper in the normal ...


