User Manual
Page 2
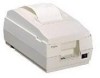
... not change . Disabled Parallel SW Function ON OFF 1-1 Auto line feed Enabled Disabled 1-2 Receive buffer 40 bytes capacity ANK Model: 1000 bytes Multilingual model: 512 bytes 1-3- Undefined 1-7 1-8 Busy condition BUSY when BUSY when offline receive or receive buffer buffer is full buffer full 2-1 Print column selection 7 × 9 font/ 9 × 9 font 42/35 40/33 2-2 For internal use. Printer Parts 1 Type A 2 Type B and two color Type D 3 Single color Type D DIP Switch Tables Serial SW Function 1-1 Data reception error 1-2 Receive buffer...
... not change . Disabled Parallel SW Function ON OFF 1-1 Auto line feed Enabled Disabled 1-2 Receive buffer 40 bytes capacity ANK Model: 1000 bytes Multilingual model: 512 bytes 1-3- Undefined 1-7 1-8 Busy condition BUSY when BUSY when offline receive or receive buffer buffer is full buffer full 2-1 Print column selection 7 × 9 font/ 9 × 9 font 42/35 40/33 2-2 For internal use. Printer Parts 1 Type A 2 Type B and two color Type D 3 Single color Type D DIP Switch Tables Serial SW Function 1-1 Data reception error 1-2 Receive buffer...
User Manual
Page 3
... not installed and used in any liability assumed for a Class A digital device, pursuant to change without the prior written permission of the FCC Rules. TM-U200 Series User's Manual 1 English All rights reserved. Seiko Epson Corporation shall not be liable to cause harmful interference, in a commercial environment. You are cautioned that are so labeled. (The printer and the AC adapter together are...
... not installed and used in any liability assumed for a Class A digital device, pursuant to change without the prior written permission of the FCC Rules. TM-U200 Series User's Manual 1 English All rights reserved. Seiko Epson Corporation shall not be liable to cause harmful interference, in a commercial environment. You are cautioned that are so labeled. (The printer and the AC adapter together are...
User Manual
Page 4
... dealer or a SEIKO EPSON service center for an extended period. 2 TM-U200 Series User's Manual Equipment may lead to fire. English Safety Precautions This section presents important information intended to repair this product yourself. Do not use in injury or fire. Continued use the specified power source. Be sure to high humidity or dust levels. CAUTION: Do not connect cables in ways other liquid...
... dealer or a SEIKO EPSON service center for an extended period. 2 TM-U200 Series User's Manual Equipment may lead to fire. English Safety Precautions This section presents important information intended to repair this product yourself. Do not use in injury or fire. Continued use the specified power source. Be sure to high humidity or dust levels. CAUTION: Do not connect cables in ways other liquid...
User Manual
Page 5
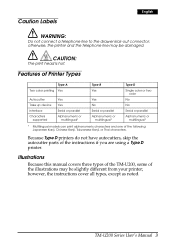
... Because this manual covers three types of the TM-U200, some of the illustrations may be slightly different from your printer; TM-U200 Series User's Manual 3 Because Type D printers do not have autocutters, skip the autocutter parts of the following: Japanese Kanji, Chinese Kanji, Taiwanese Kanji, or Thai characters. Features of Printer Types Type A Two color printing Yes Autocutter Take up device Interface Characters supported Yes Yes Serial or parallel Alphanumeric...
... Because this manual covers three types of the TM-U200, some of the illustrations may be slightly different from your printer; TM-U200 Series User's Manual 3 Because Type D printers do not have autocutters, skip the autocutter parts of the following: Japanese Kanji, Chinese Kanji, Taiwanese Kanji, or Thai characters. Features of Printer Types Type A Two color printing Yes Autocutter Take up device Interface Characters supported Yes Yes Serial or parallel Alphanumeric...
User Manual
Page 6
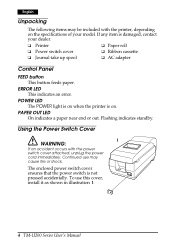
... the specifications of your dealer. ❏ Printer ❑ Paper roll ❏ Power switch cover ❑ Ribbon cassette ❏ Journal take up spool ❑ AC adapter Control Panel FEED button This button feeds paper. To use may be included with the power switch cover attached, unplug the power cord immediately. English Unpacking The following items may cause fire or shock. Flashing indicates standby. Continued use this cover, install it as shown in illustration 1. 4 TM-U200 Series User's Manual The enclosed power switch cover...
... the specifications of your dealer. ❏ Printer ❑ Paper roll ❏ Power switch cover ❑ Ribbon cassette ❏ Journal take up spool ❑ AC adapter Control Panel FEED button This button feeds paper. To use may be included with the power switch cover attached, unplug the power cord immediately. English Unpacking The following items may cause fire or shock. Flashing indicates standby. Continued use this cover, install it as shown in illustration 1. 4 TM-U200 Series User's Manual The enclosed power switch cover...
User Manual
Page 7
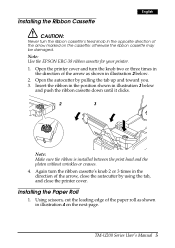
... paper roll as shown in illustration 2 below and push the ribbon cassette down until it clicks. 2 3 Note: Make sure the ribbon is installed between the print head and the platen without wrinkles or creases. 4. Note: Use the EPSON ERC-38 ribbon cassette for your printer. 1. Insert the ribbon in the position shown in illustration 3 below . 2. TM-U200 Series User's Manual 5 otherwise the ribbon cassette may be damaged. Open the printer cover and turn...
... paper roll as shown in illustration 2 below and push the ribbon cassette down until it clicks. 2 3 Note: Make sure the ribbon is installed between the print head and the platen without wrinkles or creases. 4. Note: Use the EPSON ERC-38 ribbon cassette for your printer. 1. Insert the ribbon in the position shown in illustration 3 below . 2. TM-U200 Series User's Manual 5 otherwise the ribbon cassette may be damaged. Open the printer cover and turn...
User Manual
Page 8
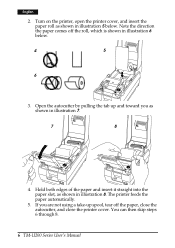
... in illustration 8. Note the direction the paper comes off the paper, close the autocutter, and close the printer cover. The printer feeds the paper automatically. 5. Hold both edges of the paper and insert it straight into the paper slot, as shown in illustration 5 below . 4 5 6 3. English 2. You can then skip steps 6 through 8. 6 TM-U200 Series User's Manual If you are not using a take-up and toward you...
... in illustration 8. Note the direction the paper comes off the paper, close the autocutter, and close the printer cover. The printer feeds the paper automatically. 5. Hold both edges of the paper and insert it straight into the paper slot, as shown in illustration 5 below . 4 5 6 3. English 2. You can then skip steps 6 through 8. 6 TM-U200 Series User's Manual If you are not using a take-up and toward you...
User Manual
Page 9
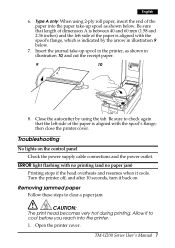
... it to clear a paper jam: CAUTION: The print head becomes very hot during printing. English 6. Troubleshooting No lights on . ERROR light flashing with the spool's flange; TM-U200 Series User's Manual 7 Turn the printer off, and after 10 seconds, turn it cools. Be sure that the left side of the paper is indicated by using 2-ply roll paper, insert the end of the paper into the printer. 1. Be sure to check again that length of dimension A is...
... it to clear a paper jam: CAUTION: The print head becomes very hot during printing. English 6. Troubleshooting No lights on . ERROR light flashing with the spool's flange; TM-U200 Series User's Manual 7 Turn the printer off, and after 10 seconds, turn it cools. Be sure that the left side of the paper is indicated by using 2-ply roll paper, insert the end of the paper into the printer. 1. Be sure to check again that length of dimension A is...
User Manual
Page 10
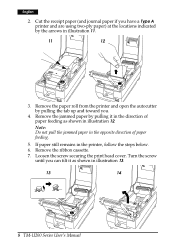
... direction of paper feeding. 5. Remove the ribbon cassette. 7. English 2. Cut the receipt paper (and journal paper if you . 4. Remove the paper roll from the printer and open the autocutter by pulling the tab up and toward you have a Type A printer and are using two-ply paper) at the locations indicated by pulling it as shown in illustration 13. 13 14 8 TM-U200 Series User's Manual Loosen the screw securing the print head cover.
... direction of paper feeding. 5. Remove the ribbon cassette. 7. English 2. Cut the receipt paper (and journal paper if you . 4. Remove the paper roll from the printer and open the autocutter by pulling the tab up and toward you have a Type A printer and are using two-ply paper) at the locations indicated by pulling it as shown in illustration 13. 13 14 8 TM-U200 Series User's Manual Loosen the screw securing the print head cover.

User Manual
Page 11
... an arrow in illustration 15 below), the blade is not in illustration 14 on the previous page. 9. Replace the paper roll and close the autocutter. 12. Note: Do not pull the jammed paper in the opposite direction of the autocutter, and turn the gear inside to move the blade to the right side of paper feeding. 10. Remove all the jammed paper. TM-U200 Series User's Manual 9
... an arrow in illustration 15 below), the blade is not in illustration 14 on the previous page. 9. Replace the paper roll and close the autocutter. 12. Note: Do not pull the jammed paper in the opposite direction of the autocutter, and turn the gear inside to move the blade to the right side of paper feeding. 10. Remove all the jammed paper. TM-U200 Series User's Manual 9
User Manual
Page 12
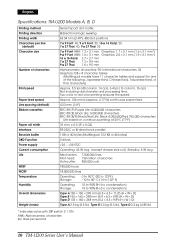
..., 16 cpi) Not including data transfer and processing time. International characters: 32 Graphics:128 × 8 character tables (Multilingual models have 11 character tables and support for one of characters Print speed Paper feed speed Line spacing (default) Ribbon cassettes Paper roll width Interface Receive buffer DKD Function Power supply Current consumption Life MTBF MCBF Temperature Humidity Overall dimensions Weight (mass) Serial impact dot-matrix Bidirectional logic seeking 63.34 mm {2.49"}, 400 dot positions 7 × 9 Font: 40, 9 × 9 Font: 33...
..., 16 cpi) Not including data transfer and processing time. International characters: 32 Graphics:128 × 8 character tables (Multilingual models have 11 character tables and support for one of characters Print speed Paper feed speed Line spacing (default) Ribbon cassettes Paper roll width Interface Receive buffer DKD Function Power supply Current consumption Life MTBF MCBF Temperature Humidity Overall dimensions Weight (mass) Serial impact dot-matrix Bidirectional logic seeking 63.34 mm {2.49"}, 400 dot positions 7 × 9 Font: 40, 9 × 9 Font: 33...

User Manual
Page 72
Printed in China 1999.12
Printed in China 1999.12


