Operation Guide
Page 8
... be sure to automatically send printer status changes. * In page mode, the print data for a page has been stored, it is stored in a specified printing area in this manual carefully before using your new EPSON printer. The main features of the TM-U295 and TM-U295P printers are terminal slip printers which use a 7-pin shuttle dot printing method, and provide the different...
... be sure to automatically send printer status changes. * In page mode, the print data for a page has been stored, it is stored in a specified printing area in this manual carefully before using your new EPSON printer. The main features of the TM-U295 and TM-U295P printers are terminal slip printers which use a 7-pin shuttle dot printing method, and provide the different...
Operation Guide
Page 10
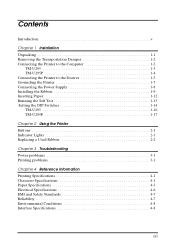
... the Ribbon 1-9 Inserting Paper 1-12 Running the Self Test 1-13 Setting the DIP Switches 1-14 TM-U295 1-16 TM-U295P 1-17 Chapter 2 Using the Printer Buttons 2-1 Indicator Lights 2-1 Replacing a Used Ribbon 2-2 Chapter 3 Troubleshooting Power problems 3-1 Printing problems 3-1 Chapter 4 Reference Information Printing Specifications 4-1 Character Specifications 4-1 Paper Specifications 4-3 Electrical Specifications 4-6 EMI and Safety Standards 4-7 Reliability 4-7 Environmental Conditions 4-8 Interface...
... the Ribbon 1-9 Inserting Paper 1-12 Running the Self Test 1-13 Setting the DIP Switches 1-14 TM-U295 1-16 TM-U295P 1-17 Chapter 2 Using the Printer Buttons 2-1 Indicator Lights 2-1 Replacing a Used Ribbon 2-2 Chapter 3 Troubleshooting Power problems 3-1 Printing problems 3-1 Chapter 4 Reference Information Printing Specifications 4-1 Character Specifications 4-1 Paper Specifications 4-3 Electrical Specifications 4-6 EMI and Safety Standards 4-7 Reliability 4-7 Environmental Conditions 4-8 Interface...

Operation Guide
Page 24
... on page 1-12. 2. It is working correctly. To perform the self test, follow the steps below . Check the PAPER OUT light. This shows whether your printer you can run the self test described below. Installation 1-13 Insert the paper from either the front or the side, as shown in the illustration.... 5. Running the Self Test Any time that you insert the paper correctly, the PAPER OUT light goes out. 4. The self test checks the control circuits, printer mechanisms, print quality, RAM, ROM version, and DIP switch settings. Insert a sheet of any other equipment or software.
... on page 1-12. 2. It is working correctly. To perform the self test, follow the steps below . Check the PAPER OUT light. This shows whether your printer you can run the self test described below. Installation 1-13 Insert the paper from either the front or the side, as shown in the illustration.... 5. Running the Self Test Any time that you insert the paper correctly, the PAPER OUT light goes out. 4. The self test checks the control circuits, printer mechanisms, print quality, RAM, ROM version, and DIP switch settings. Insert a sheet of any other equipment or software.

Operation Guide
Page 25
3. Setting the DIP Switches You can change any of the test. Make sure that the printer is off. 1-14 Installation The printer prints the current printer settings and then eject the paper. 5. After the printer prints a pattern, it prints the following message: ***completed*** The printer ejects the paper; then enters the normal mode. Press the RELEASE button to eject... the second part of these settings, follow the steps below: 1. Remove your finger from the RELEASE button. While holding down the RELEASE button, turn the printer back on. 4.
3. Setting the DIP Switches You can change any of the test. Make sure that the printer is off. 1-14 Installation The printer prints the current printer settings and then eject the paper. 5. After the printer prints a pattern, it prints the following message: ***completed*** The printer ejects the paper; then enters the normal mode. Press the RELEASE button to eject... the second part of these settings, follow the steps below: 1. Remove your finger from the RELEASE button. While holding down the RELEASE button, turn the printer back on. 4.
Operation Guide
Page 27
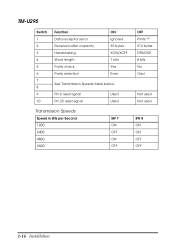
TM-U295 Switch 1 2 3 4 5 6 7 8 9 10 Function Data reception error Receive buffer capacity Handshaking Word length Parity check Parity selection ON Ignored 35 bytes XON/XOFF 7 bits Yes Even See Transmission Speeds table below. Pin 6 reset signal Pin 25 reset signal Used Used Transmission Speeds Speed in Bits per Second 1200 2400 4800 9600 SW 7 ON OFF ON OFF OFF Prints"?" 512 bytes DTR/DSR 8 bits No Odd Not used Not used SW 8 ON ON OFF OFF 1-16 Installation
TM-U295 Switch 1 2 3 4 5 6 7 8 9 10 Function Data reception error Receive buffer capacity Handshaking Word length Parity check Parity selection ON Ignored 35 bytes XON/XOFF 7 bits Yes Even See Transmission Speeds table below. Pin 6 reset signal Pin 25 reset signal Used Used Transmission Speeds Speed in Bits per Second 1200 2400 4800 9600 SW 7 ON OFF ON OFF OFF Prints"?" 512 bytes DTR/DSR 8 bits No Odd Not used Not used SW 8 ON ON OFF OFF 1-16 Installation

Operation Guide
Page 30
Replacing a Used Ribbon When your printing is not dark enough, it is time to indicate an error condition in the following cases: t Paper jam t Home position error t Timing error t Drive circuit error t Power supply voltage error If this light blinks, turn off the printer, make sure that no paper is jammed... light blinks to replace the ribbon. First follow steps 1 through 4 in the "Installing the Ribbon" in Chapter 1. 2-2 Using the Printer RELEASE This light is on when the printer is in the paper release mode and it back on when paper is not inserted or is in the paper release mode.
Replacing a Used Ribbon When your printing is not dark enough, it is time to indicate an error condition in the following cases: t Paper jam t Home position error t Timing error t Drive circuit error t Power supply voltage error If this light blinks, turn off the printer, make sure that no paper is jammed... light blinks to replace the ribbon. First follow steps 1 through 4 in the "Installing the Ribbon" in Chapter 1. 2-2 Using the Printer RELEASE This light is on when the printer is in the paper release mode and it back on when paper is not inserted or is in the paper release mode.
Operation Guide
Page 32
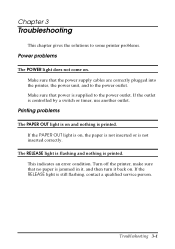
... and then turn it back on and nothing is printed. The RELEASE light is flashing and nothing is still flashing, contact a qualified service person. Turn off the printer, make sure that the power supply cables are correctly plugged into the printer, the power unit, and to the power outlet.... the outlet is not inserted correctly. If the RELEASE light is printed. This indicates an error condition. Make sure that no paper is supplied to the power outlet. Chapter 3 Troubleshooting This chapter gives the solutions to some printer problems. Power problems The POWER light does not come on , ...
... and then turn it back on and nothing is printed. The RELEASE light is flashing and nothing is still flashing, contact a qualified service person. Turn off the printer, make sure that the power supply cables are correctly plugged into the printer, the power unit, and to the power outlet.... the outlet is not inserted correctly. If the RELEASE light is printed. This indicates an error condition. Make sure that no paper is supplied to the power outlet. Chapter 3 Troubleshooting This chapter gives the solutions to some printer problems. Power problems The POWER light does not come on , ...
Operation Guide
Page 33
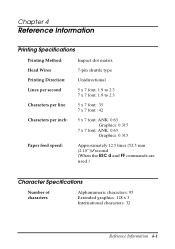
Chapter 4 Reference Information Printing Specifications Printing Method: Impact dot matrix Head Wires 7-pin shuttle type Printing Direction: Unidirectional Lines per second Characters per line 5 x 7 font: 1.9 to 2.3 7 x 7 font: 1.9 to 2.3 5 x 7 font: 35 7 x 7 font : 42 Characters per inch: 5 x 7 font: ANK: 0.63 Graphics: 0.315 7 x 7 font: ...
Chapter 4 Reference Information Printing Specifications Printing Method: Impact dot matrix Head Wires 7-pin shuttle type Printing Direction: Unidirectional Lines per second Characters per line 5 x 7 font: 1.9 to 2.3 7 x 7 font: 1.9 to 2.3 5 x 7 font: 35 7 x 7 font : 42 Characters per inch: 5 x 7 font: ANK: 0.63 Graphics: 0.315 7 x 7 font: ...

Operation Guide
Page 36
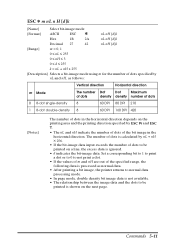
... paper so that it should be flat and the glue area should not be located at the paper edges. Copy capability and ambient temperature for printing: Copying capability is influenced by ESC c 4. Otherwise, the paper may become ink stained. If thick paper is lowered. 4-4 Reference Information t ... is used normallly. t Use thinner paper (N30 or equivalent) between ambient temperature and number of copies Number of copies Ambient temperature (print mode) Original + 1 to 2 copies 5° to 40°C (41° to disable the paper sensors by the ambient temperature...
... paper so that it should be flat and the glue area should not be located at the paper edges. Copy capability and ambient temperature for printing: Copying capability is influenced by ESC c 4. Otherwise, the paper may become ink stained. If thick paper is lowered. 4-4 Reference Information t ... is used normallly. t Use thinner paper (N30 or equivalent) between ambient temperature and number of copies Number of copies Ambient temperature (print mode) Original + 1 to 2 copies 5° to 40°C (41° to disable the paper sensors by the ambient temperature...

Operation Guide
Page 37
... paper edge is performed after the bottom edge is set at minimum top margin 65.84 (2.59") First printing position 5 (.20") Reverse paper feed Forward paper feed Paper feed roller Last printing position 26.5 (1.04") NOTE 4. 13.8 (.54") NOTE 5. 15.5 (.61") 27.3 (1.07")... form stopper is adjustable in the range 26.5 to 36.5 mm (1.04 to 11.8 mm (.46") (28 dots) after printing, the paper can be performed up to 1.44"). 2. TOF sensor (fixed) Printing position at the mechanical form stopper, the top margin can be adjusted. 3. Reference Information 4-5 10 (.39") NOTE...
... paper edge is performed after the bottom edge is set at minimum top margin 65.84 (2.59") First printing position 5 (.20") Reverse paper feed Forward paper feed Paper feed roller Last printing position 26.5 (1.04") NOTE 4. 13.8 (.54") NOTE 5. 15.5 (.61") 27.3 (1.07")... form stopper is adjustable in the range 26.5 to 36.5 mm (1.04 to 11.8 mm (.46") (28 dots) after printing, the paper can be performed up to 1.44"). 2. TOF sensor (fixed) Printing position at the mechanical form stopper, the top margin can be adjusted. 3. Reference Information 4-5 10 (.39") NOTE...

Operation Guide
Page 38
approx. 5.5 A at 24 VDC (full-column printing and data transmission of ANK characters) Standby: approx. 100 mA (at 24 VDC (full-column printing and data transmission of ANK characters) Peak - Electrical Specifications Supply voltage: Current consumption: +24 VDC ± 10% Operating (except for drawer kickout): Mean - approx. 600 mA at 24 VDC, 25°C (77°F) 4-6 Reference Information
approx. 5.5 A at 24 VDC (full-column printing and data transmission of ANK characters) Standby: approx. 100 mA (at 24 VDC (full-column printing and data transmission of ANK characters) Peak - Electrical Specifications Supply voltage: Current consumption: +24 VDC ± 10% Operating (except for drawer kickout): Mean - approx. 600 mA at 24 VDC, 25°C (77°F) 4-6 Reference Information
Operation Guide
Page 41
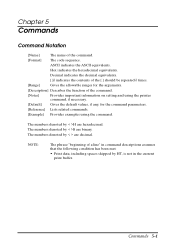
... The name of a line" in command descriptions assumes that the following condition has been met: • Print data, including spaces skipped by HT, is not in the current print buffer. ASCII indicates the ASCII equivalents. The numbers denoted by < > are decimal. The numbers denoted by... the allowable ranges for the arguments. [Description] Describes the function of the command. [Notes] Provides important information on setting and using the printer command, if necessary. [Default] Gives the default values, if any, for the command parameters. [Reference] Lists related commands. [Example]...
... The name of a line" in command descriptions assumes that the following condition has been met: • Print data, including spaces skipped by HT, is not in the current print buffer. ASCII indicates the ASCII equivalents. The numbers denoted by < > are decimal. The numbers denoted by... the allowable ranges for the arguments. [Description] Describes the function of the command. [Notes] Provides important information on setting and using the printer command, if necessary. [Default] Gives the default values, if any, for the command parameters. [Reference] Lists related commands. [Example]...
Operation Guide
Page 42
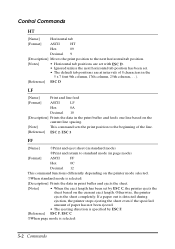
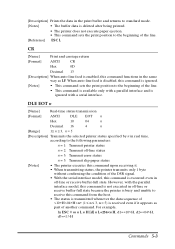
...ESC F, ESC C When page mode is detected during ejection, the printer stops ejecting the sheet even if the specified amount of the line. [Reference] ESC 2, ESC 3 FF [Name] ŒPrint and eject sheet (in print buffer and ejects the sheet. [Notes] [Reference] • When the eject...) [Format] ASCII FF Hex 0C Decimal 12 This command functions differently depending on the printer mode selected. ŒWhen standard mode is selected: [Description] Prints the data in standard mode) Print and return to the beginning of paper has not been ejected. • The ejecting ...
...ESC F, ESC C When page mode is detected during ejection, the printer stops ejecting the sheet even if the specified amount of the line. [Reference] ESC 2, ESC 3 FF [Name] ŒPrint and eject sheet (in print buffer and ejects the sheet. [Notes] [Reference] • When the eject...) [Format] ASCII FF Hex 0C Decimal 12 This command functions differently depending on the printer mode selected. ŒWhen standard mode is selected: [Description] Prints the data in standard mode) Print and return to the beginning of paper has not been ejected. • The ejecting ...
Operation Guide
Page 43
...n ≤ 3, n = 5 [Description] Transmits the selected printer status specified by n in real time, according to the following parameters: n = 1: Transmit printer status n = 2: Transmit off -line or receive buffer-full state. [Description] Prints the data in the print buffer and returns to standard mode. [Notes] • The ...buffer data is deleted after being printed. • The printer does not execute paper ejection. • This command sets the print position to the beginning of the line. [Reference] ESC L CR [Name] Print and carriage return [Format] ASCII CR Hex...
...n ≤ 3, n = 5 [Description] Transmits the selected printer status specified by n in real time, according to the following parameters: n = 1: Transmit printer status n = 2: Transmit off -line or receive buffer-full state. [Description] Prints the data in the print buffer and returns to standard mode. [Notes] • The ...buffer data is deleted after being printed. • The printer does not execute paper ejection. • This command sets the print position to the beginning of the line. [Reference] ESC L CR [Name] Print and carriage return [Format] ASCII CR Hex...

Operation Guide
Page 45
... to Off. Bit 5: On (printing stops due to paper-end) indicates printing stops as a result of the paper state and TOF or BOF sensor selected by the paper feed button. 4 On 10 16 Not used .Fixed to ...
... to Off. Bit 5: On (printing stops due to paper-end) indicates printing stops as a result of the paper state and TOF or BOF sensor selected by the paper feed button. 4 On 10 16 Not used .Fixed to ...

Operation Guide
Page 46
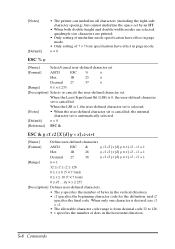
... n Decimal 27 32 n 0 ≤ n ≤ 32 5-6 Commands Fixed to On. ESC u, ESC v, GS a CAN [Name] Cancel print data in page mode [Format] ASCII CAN Hex 18 Decimal 24 [Description] In page mode, deletes all the print data in the current printable area. [Notes] • This command is enabled only in page mode...
... n Decimal 27 32 n 0 ≤ n ≤ 32 5-6 Commands Fixed to On. ESC u, ESC v, GS a CAN [Name] Cancel print data in page mode [Format] ASCII CAN Hex 18 Decimal 24 [Description] In page mode, deletes all the print data in the current printable area. [Notes] • This command is enabled only in page mode...

Operation Guide
Page 47
... 00 0 01 1 Character font 5 ! 7 selected. Undefined. Off 4 On 00 0 10 16 Double-height mode not selected. Commands 5-7 n [Name] Select print mode(s) [Format] ASCII ESC ! Character font 7 ! 7 selected. Double-height mode selected. Undefined. Off 2 On 00 0 04 4 Undefined Undefined. Underline mode selected...mode is twice the normal value. • The character spacing is set in increment of half dot. • In page mode, the actual dot positions shift by half dot. • This command sets values independently in standard mode and in page mode. [Default] ...
... 00 0 01 1 Character font 5 ! 7 selected. Undefined. Off 4 On 00 0 10 16 Double-height mode not selected. Commands 5-7 n [Name] Select print mode(s) [Format] ASCII ESC ! Character font 7 ! 7 selected. Double-height mode selected. Undefined. Off 2 On 00 0 04 4 Undefined Undefined. Underline mode selected...mode is twice the normal value. • The character spacing is set in increment of half dot. • In page mode, the actual dot positions shift by half dot. • This command sets values independently in standard mode and in page mode. [Default] ...
Operation Guide
Page 48
... character code range is from decimal code 32 to 126. • x specifies the number of dots in page mode. c1 + 1 Hex 1B 26 y c1 c2 [x [d] y ! When the...! 7 font) 0 ≤ x ≤ 10 (7 ! 7 font) 0 ≤ d1 ... [Notes] [Default] • The printer can underline all characters (including the right-side character spacing), but cannot underline the space set by an HT. • When both double-height ...and double-width modes are selected, quadruple size characters are printed. • Only setting of underline mode specification have effect in page mode....
... character code range is from decimal code 32 to 126. • x specifies the number of dots in page mode. c1 + 1 Hex 1B 26 y c1 c2 [x [d] y ! When the...! 7 font) 0 ≤ x ≤ 10 (7 ! 7 font) 0 ≤ d1 ... [Notes] [Default] • The printer can underline all characters (including the right-side character spacing), but cannot underline the space set by an HT. • When both double-height ...and double-width modes are selected, quadruple size characters are printed. • Only setting of underline mode specification have effect in page mode....

Operation Guide
Page 49
...printed. Define the character so that it does not include horizontally adjacent dots. [Default] The internal character set [Reference] ESC % [Example] •5 × 7 font when the dot pattern for code 32 (20H) is turned off. • If the values of y, c1, c2, or x are out of the specified range, the printer...8226; The data to define a user-defined character is (y × x) bytes. • Set a corresponding bit to 1 to print a dot or to 0 to not print a dot. • It is possible to define multiple characters for the characters. [Notes] • d is in the horizontal direction from ...
...printed. Define the character so that it does not include horizontally adjacent dots. [Default] The internal character set [Reference] ESC % [Example] •5 × 7 font when the dot pattern for code 32 (20H) is turned off. • If the values of y, c1, c2, or x are out of the specified range, the printer...8226; The data to define a user-defined character is (y × x) bytes. • Set a corresponding bit to 1 to print a dot or to 0 to not print a dot. • It is possible to define multiple characters for the characters. [Notes] • d is in the horizontal direction from ...
Operation Guide
Page 51
... following data is processed as normal data. • After printing a bit image, the printer returns to normal data processing mode. • In page mode, double density bit image data is not available. • The relationship between the image data and the dots to be printed is ignored. • d indicates the bit-image data. ESC...
... following data is processed as normal data. • After printing a bit image, the printer returns to normal data processing mode. • In page mode, double density bit image data is not available. • The relationship between the image data and the dots to be printed is ignored. • d indicates the bit-image data. ESC...


