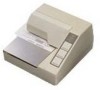
Epson TM U295 Support Question
Epson TM U295 Support Question
Find answers below for this question about Epson TM U295 - B/W Dot-matrix Printer.Need a Epson TM U295 manual? We have 2 online manuals for this item!
Question posted by Stephcorbitt1995 on November 19th, 2021
Printing Inverted
Installed a new indicator and now the printer is printing inverted. How to fix this
Current Answers
Answer #1: Posted by SonuKumar on November 21st, 2021 10:19 AM
SonuKumar

Member since:
May 9th, 2021 Points: 16,638,180

Member since:
May 9th, 2021 Points: 16,638,180
Please respond to my effort to provide you with the best possible solution by using the "Acceptable Solution" and/or the "Helpful" buttons when the answer has proven to be helpful.
Regards,
Sonu
Your search handyman for all e-support needs!!
Related Epson TM U295 Manual Pages
Operation Guide - Page 8
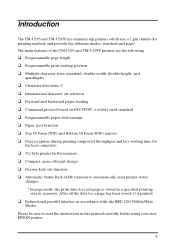
... for a page has been stored, it is stored in a specified printing area in this manual carefully before using your new EPSON printer. v After all the data for each page is printed. Introduction
The TM-U295 and TM-U295P are the following:
t Programmable page length t Programmable print starting position t Multiple character sizes (standard, double-width, double-height, and
quadruple...
Operation Guide - Page 10
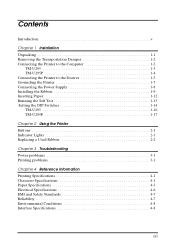
... TM-U295P 1-4 Connecting the Printer to the Drawer 1-5 Grounding the Printer 1-7 Connecting the Power Supply 1-8 Installing the Ribbon 1-9 Inserting Paper 1-12 Running the Self Test 1-13 Setting the DIP Switches 1-14 TM-U295 1-16 TM-U295P 1-17
Chapter 2 Using the Printer Buttons 2-1 Indicator Lights 2-1 Replacing a Used Ribbon 2-2
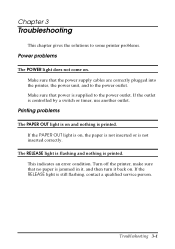
Chapter 3 Troubleshooting Power problems 3-1 Printing...
Operation Guide - Page 18
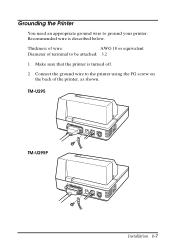
Make sure that the printer is described below.
Thickness of wire:
AWG 18 or equivalent
Diameter of terminal to the printer using the FG screw on the back of the printer, as shown. Recommended wire is turned off.
2.
Connect the ground wire to be attached: 3.2
1. TM-U295
TM-U295P
Installation 1-7 Grounding the Printer
You need an appropriate ground wire...
Operation Guide - Page 24

... form stopper. The self test checks the control circuits, printer mechanisms, print quality, RAM, ROM version, and DIP switch settings. Insert a sheet of your printer is independent of the printer can run the self test described below . Turn off the printer. This shows whether your printer you insert the paper correctly, the PAPER OUT light goes...
Operation Guide - Page 25

...new paper to change several interface settings by changing the DIP switch settings.
Setting the DIP Switches
You can change any of the test. The printer prints the current printer... RELEASE button. After the printer prints a pattern, it prints the following message: ***completed***
The printer ejects the paper; Make sure that the printer is off.
1-14 Installation
If you need to begin...
Operation Guide - Page 30

... If the light is not inserted correctly. Replacing a Used Ribbon
When your printing is not dark enough, it is time to indicate an error condition in the following cases: t Paper jam t Home position ...turn off when the printer is in the clamp mode. Paper can be inserted only when the printer is in Chapter 1.
2-2 Using the Printer First follow steps 1 through 4 in the "Installing the Ribbon" in...
Operation Guide - Page 32
... is still flashing, contact a qualified service person.
This indicates an error condition. Chapter 3
Troubleshooting
This chapter gives the solutions to the power outlet. If the outlet is jammed in it, and then turn it back on and nothing is printed. Turn off the printer, make sure that no paper is controlled by a switch...
Operation Guide - Page 33
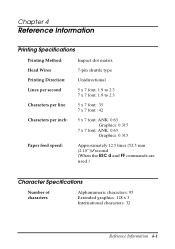
Chapter 4
Reference Information
Printing Specifications
Printing Method:
Impact dot matrix
Head Wires
7-pin shuttle type
Printing Direction:
Unidirectional
Lines per second Characters per line
5 x 7 font: 1.9 to 2.3 7 x 7 font: 1.9 to 2.3
5 x 7 font: 35 7 x 7 font : 42
Characters per inch:
5 x 7 font: ANK: 0.63 Graphics: 0.315
7 x 7 font: ...
Operation Guide - Page 34

Character structure: Character size:
5 x 7 with 1-dot spacing (normal dot) 7 x 7 with 3-dot spacing (half dot)
5 x 7 font: ANK: 1.6 mm (.063") x 2.9 mm (.114") Graphics: 1.9 mm (.075") x 2.9 mm (.114") 7 x 7 font: ANK: 1.3 mm (.051") x 2.9 mm (.114") Graphics: 1.6 mm (.063") x 2.9 mm (.114")
4-2 Reference Information
Operation Guide - Page 37

...
5 (.20")
Reverse paper feed Forward paper feed
Paper feed roller
Last printing position
26.5 (1.04")
NOTE 4. 13.8 (.54") NOTE 5. 15.5 (.61")
27.3 (1.07")
NOTE 2. Reference Information 4-5
BOF sensor (fixed)
12.5 (.49")
Notes
1. The TOF and BOF sensors are fixed and cannot be performed up to 21.2 mm (.83") by the paper feed roller...
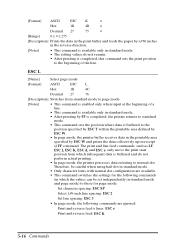
Operation Guide - Page 41
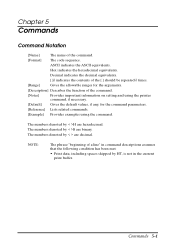
... of the command.
[Notes]
Provides important information on setting and using the printer command, if necessary.
[Default] Gives the default values, if any, for...
The phrase "beginning of a line" in the current print buffer. Commands 5-1
The numbers denoted by < > are binary.
Decimal indicates the decimal equivalents.
[ ]k indicates the contents of the [ ] should be repeated k ...
Operation Guide - Page 42
... return to standard mode (in page mode)
[Format] ASCII
FF
Hex
0C
Decimal 12
This command functions differently depending on the printer mode selected.
ŒWhen standard mode is selected:
[Description] Prints the data in the print buffer and feeds one line based on the current line spacing.
[Note]
This command sets the...
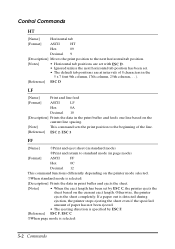
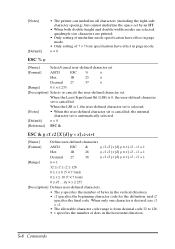
Operation Guide - Page 47

...n
Hex
1B
21
n
Decimal 27
33
n
[Range]
0 ≤ n ≤ 255
[Description] Selects print mode(s) using n as follows:
Bit Off/On Hex Decimal Function
Off 0
On
00 0 01 1
Character font....
• The character spacing is set in increment of half dot. • In page mode, the actual dot positions shift by half dot.
• This command sets values independently in standard mode and
in...
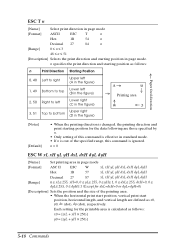
Operation Guide - Page 48
...x ≤ 255
[Description] Defines user-defined characters.
• The y specifies the number of dots in the horizontal direction.
5-8 Commands When only one character is desired, use c1 = c2. •...mode. [Notes] [Default]
• The printer can underline all characters (including the right-... modes are selected, quadruple size characters are printed.
• Only setting of underline mode ...
Operation Guide - Page 49

...] The internal character set
[Reference] ESC %
[Example]
•5 × 7 font when the dot pattern for code 32 (20H) is possible to not print a dot. • It is defined as normal data. • In 7 × 7 font, horizontally adjacent dots cannot be printed. Any remaining dots on right side are blank.
• The data to define a user-defined...
Operation Guide - Page 51
... normal data.
• After printing a bit image, the printer returns to normal data processing mode.
• In page mode, double density bit image data is not available. • The relationship between the image data and the dots to be
printed is shown on a line, the excess data is ignored.
• d indicates the bit-image data...
Operation Guide - Page 52

• The relationship between the image data and the dots to be printed is as follows:
76 54 32 1 0 Print data
Top
Bottom Bit image data
ESC 2
[Name]
Select 1/6-inch line spacing
[Format] ASCII
ESC 2
Hex
1B
32
Decimal 27
50
[Description] Selects 1/6-inch line ...
Operation Guide - Page 56
...line.
• This command is available only in standard mode. • After printing by FF is completed, the printer returns to standard
mode. • This command sets the position where data is ... commands (in which subsequent data is completed, this command sets the print position
to normal dot. [Format] ASCII
ESC K
n
Hex
1B
4B
n
Decimal 27
75
n
[Range]
0 ≤ n &#...
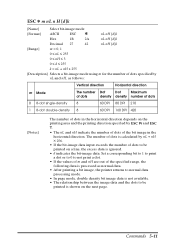
Operation Guide - Page 58
...
ESC T
n
Hex
1B
54
n
Decimal 27
84
n
[Range]
0 ≤ n ≤ 3
48 ≤ n ≤ 51
[Description] Selects the print direction and starting position for the printable area is calculated as x0, y0, dx (dot), dy (dot), respectively.
Each setting for the data following are those specified by n.
• Only setting of this command is...
Operation Guide - Page 59

...]
• The maximum printable area in the horizontal direction (x direction) is 210 dots.
• The maximum printable area in the vertical direction (y direction) is 480 dots.
• If the setting values exceed the printing area, it set to the maximum printing area automatically, depending on the values from xL to dyH.
• If (horizontal...
Similar Questions

Fx-890 All Lights Flashing - Epson Fx 890 B W Dot Matrix Printer
Fx-890 All Lights Flashing - Epson FX 890 B W Dot matrix Printer
Fx-890 All Lights Flashing - Epson FX 890 B W Dot matrix Printer
(Posted by shiva45666 7 years ago)

How Do You Change The Date & Time That Are Printed?
My printer showed the year 1970
My printer showed the year 1970
(Posted by majorinnovations 8 years ago)

Can I Adjust Where The Printer Starts Printing When Feeding A Check To Endorse
When I insert the check for endorsement it begins printing to low on the check. Can this be adjusted...
When I insert the check for endorsement it begins printing to low on the check. Can this be adjusted...
(Posted by npennacchio 9 years ago)

How To Print Self-test Pages For Epson Lq 2180 Dot Matrix Printer
(Posted by ashlenugi 10 years ago)

Won't Impact Enough To Print Triplicate Forms.
Won't impact enough to print triplicate forms.
Won't impact enough to print triplicate forms.
(Posted by drediger 11 years ago)