Warranty Statement
Page 1
... in this warranty. Any action for costs incurred. When warranty service involves the exchange of the product or of warranty or any court having jurisdiction thereof. Except as fire, flood, lightning, improper electrical currents, software problems, or interaction with factory-set switches, jumpers and operating systems. Customer data and applications cannot be restored and should be held responsible for...
... in this warranty. Any action for costs incurred. When warranty service involves the exchange of the product or of warranty or any court having jurisdiction thereof. Except as fire, flood, lightning, improper electrical currents, software problems, or interaction with factory-set switches, jumpers and operating systems. Customer data and applications cannot be restored and should be held responsible for...
Setup Guide
Page 6
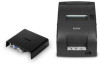
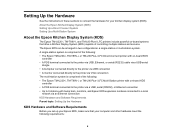
... network via a USB, serial (RS232), or Ethernet connection • Up to 9 stations with bump bars, monitors, and Epson KDS expansion modules connected to connect the hardware for your computer and other hardware meet the following requirements: 6 About the Epson Kitchen Display System (KDS) Setting Up a Direct Connect System Setting Up a Multi-Station System About the Epson Kitchen Display System (KDS) The Epson TM-U220-i, TM-T88V-i, and TM-L90 Plus-i LFC printers include powerful...
... network via a USB, serial (RS232), or Ethernet connection • Up to 9 stations with bump bars, monitors, and Epson KDS expansion modules connected to connect the hardware for your computer and other hardware meet the following requirements: 6 About the Epson Kitchen Display System (KDS) Setting Up a Direct Connect System Setting Up a Multi-Station System About the Epson Kitchen Display System (KDS) The Epson TM-U220-i, TM-T88V-i, and TM-L90 Plus-i LFC printers include powerful...
Setup Guide
Page 7
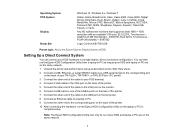
... to your TM-U220-i, TM-T88V-i, or TM-L90 Plus-i LFC printer. 3. Connect the other end of the cable to the corresponding port on the back of the printer. 10. Connect the other end of the cable to one of the USB-A ports on the back of the printer. 7. After connecting the hardware, run the Epson KDS Configuration Utility on the laptop or PC to the USB port on the same network. 7 Connect the...
... to your TM-U220-i, TM-T88V-i, or TM-L90 Plus-i LFC printer. 3. Connect the other end of the cable to the corresponding port on the back of the printer. 10. Connect the other end of the cable to one of the USB-A ports on the back of the printer. 7. After connecting the hardware, run the Epson KDS Configuration Utility on the laptop or PC to the USB port on the same network. 7 Connect the...
Setup Guide
Page 10
... Adding Menu Items and Recipes Completing Setup About the Epson KDS Configuration Utility The Epson KDS Configuration Utility lets you run the Epson KDS Configuration Utility on the PC that will run the Epson KDS Configuration Utility for the first time, you can download the Epson KDS Configuration Utility from the Epson support page for TCP packets. • Disable any available KDS devices. 1. Running the KDS Configuration Utility See the instructions in these sections to configure your product (Epson TM-U220-i, Epson TM-T88V-i or Epson TML90 Plus-i LFC...
... Adding Menu Items and Recipes Completing Setup About the Epson KDS Configuration Utility The Epson KDS Configuration Utility lets you run the Epson KDS Configuration Utility on the PC that will run the Epson KDS Configuration Utility for the first time, you can download the Epson KDS Configuration Utility from the Epson support page for TCP packets. • Disable any available KDS devices. 1. Running the KDS Configuration Utility See the instructions in these sections to configure your product (Epson TM-U220-i, Epson TM-T88V-i or Epson TML90 Plus-i LFC...
Setup Guide
Page 14
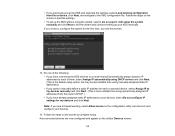
... to load the settings. • To set up the KDS and exported the settings, select Load existing configuration from the router's DHCP.) • If you have connected the KDS devices to a router that will automatically assign dynamic IP addresses to each of them, select Assign IP automatically using DHCP service and click Next. (This is the fastest setup option, but may be less reliable than using manually...
... to load the settings. • To set up the KDS and exported the settings, select Load existing configuration from the router's DHCP.) • If you have connected the KDS devices to a router that will automatically assign dynamic IP addresses to each of them, select Assign IP automatically using DHCP service and click Next. (This is the fastest setup option, but may be less reliable than using manually...
Configuration Guide
Page 3
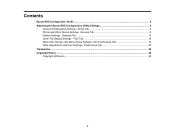
Setup Tab 6 Printer and Other Device Settings - Devices Tab 9 Display Settings - Contents Epson KDS Configuration Guide ...5 Adjusting the Epson KDS Configuration Utility Settings 6 General Configuration Settings - Preferences Tab 20 Trademarks ...25 Copyright Notice ...26 Copyright Attribution...26 3 Tiles Tab 16 Menu Item, Recipe, and Menu Group Settings - Displays Tab...12 Order Tile Display Settings - Menu & Recipes Tab 18 Utility Appearance and User Settings -
Setup Tab 6 Printer and Other Device Settings - Devices Tab 9 Display Settings - Contents Epson KDS Configuration Guide ...5 Adjusting the Epson KDS Configuration Utility Settings 6 General Configuration Settings - Preferences Tab 20 Trademarks ...25 Copyright Notice ...26 Copyright Attribution...26 3 Tiles Tab 16 Menu Item, Recipe, and Menu Group Settings - Displays Tab...12 Order Tile Display Settings - Menu & Recipes Tab 18 Utility Appearance and User Settings -

Configuration Guide
Page 6
..., and Menu Group Settings - Preferences Tab General Configuration Settings - Site Wide Settings Click the Site Wide Settings tab to select these sections to adjust the Epson KDS Configuration Utility settings. Menu & Recipes Tab Utility Appearance and User Settings - Adjusting the Epson KDS Configuration Utility Settings See the instructions in these settings. Devices Tab Display Settings - Setting Name Options - Setup Tab Printer and Other Device Settings - For instructions on the Setup tab let you adjust general KDS configuration settings. General Configuration Settings...
..., and Menu Group Settings - Preferences Tab General Configuration Settings - Site Wide Settings Click the Site Wide Settings tab to select these sections to adjust the Epson KDS Configuration Utility settings. Menu & Recipes Tab Utility Appearance and User Settings - Adjusting the Epson KDS Configuration Utility Settings See the instructions in these settings. Devices Tab Display Settings - Setting Name Options - Setup Tab Printer and Other Device Settings - For instructions on the Setup tab let you adjust general KDS configuration settings. General Configuration Settings...
Configuration Guide
Page 9
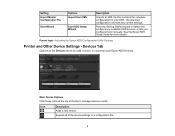
..., remove, or customize your KDS. Parent topic: Adjusting the Epson KDS Configuration Utility Settings Printer and Other Device Settings - Exports all of the tab to a configuration file. 9 Main Device Options Click these icons at the top of the device settings to manage devices overall. Runs the Getting Started wizard to detect and configure any current settings. Icon Description Adds a new device. See the Epson KDS Setup Guide for your Epson KDS...
..., remove, or customize your KDS. Parent topic: Adjusting the Epson KDS Configuration Utility Settings Printer and Other Device Settings - Exports all of the tab to a configuration file. 9 Main Device Options Click these icons at the top of the device settings to manage devices overall. Runs the Getting Started wizard to detect and configure any current settings. Icon Description Adds a new device. See the Epson KDS Setup Guide for your Epson KDS...

Configuration Guide
Page 11
... address for the device. only TM-U220-i, TM-T88V-i, or TM-L90 Plus-i LFC printers can be master devices. If you enter the MAC address for the printer attached to print a tile when the order is bumped off an order. Sets the current device as its location or specific function. Description Select to print a chit when an order is placed for a device that controls the KDS. Select...
... address for the device. only TM-U220-i, TM-T88V-i, or TM-L90 Plus-i LFC printers can be master devices. If you enter the MAC address for the printer attached to print a tile when the order is bumped off an order. Sets the current device as its location or specific function. Description Select to print a chit when an order is placed for a device that controls the KDS. Select...

Users Manual
Page 6
... the last letters are "US", use the "STD" tables. Off 40/33 Disabled Not used Disabled Parallel (DIP Switch 1) SW Function 1 Auto line feed 2 Receive buffer capacity 3~7 Undefined 8 BUSY condition On Enabled 40 bytes Receive buffer full Off Disabled 4 KB Receive buffer full or Offline Parallel (DIP Switch 2) SW Function 1 Print column selection 2 For internal use only (autocutter) 3 Undefined 4 Pin 31 reset signal 5 Undefined 6 For internal use only (flash memory rewriting) 7 Undefined 8 Serial interface selection On Ignored 40 bytes XON...
... the last letters are "US", use the "STD" tables. Off 40/33 Disabled Not used Disabled Parallel (DIP Switch 1) SW Function 1 Auto line feed 2 Receive buffer capacity 3~7 Undefined 8 BUSY condition On Enabled 40 bytes Receive buffer full Off Disabled 4 KB Receive buffer full or Offline Parallel (DIP Switch 2) SW Function 1 Print column selection 2 For internal use only (autocutter) 3 Undefined 4 Pin 31 reset signal 5 Undefined 6 For internal use only (flash memory rewriting) 7 Undefined 8 Serial interface selection On Ignored 40 bytes XON...

Users Manual
Page 7
...Data receive error 2 Receive buffer capacity 3 Handshaking 4 Word length 5 Parity check 6 Parity selection 7 Transmission speed BUSY condition 8 Serial (DIP Switch 2) SW Function 1 Print column 2 For internal use only (autocutter) 3 Undefined 4 Serial interface selection 5 Undefined 6 For internal use only (flash memory rewriting) 7 Undefined 8 Pin 31 reset signal On 42/35 Enabled Enabled Used Off 40/33 Disabled Disabled Not used Used Used Not used Not used Features of Printer Types See illustration A. Receive buffer Receive full buffer full or Offline Parallel (DIP...
...Data receive error 2 Receive buffer capacity 3 Handshaking 4 Word length 5 Parity check 6 Parity selection 7 Transmission speed BUSY condition 8 Serial (DIP Switch 2) SW Function 1 Print column 2 For internal use only (autocutter) 3 Undefined 4 Serial interface selection 5 Undefined 6 For internal use only (flash memory rewriting) 7 Undefined 8 Pin 31 reset signal On 42/35 Enabled Enabled Used Off 40/33 Disabled Disabled Not used Used Used Not used Not used Features of Printer Types See illustration A. Receive buffer Receive full buffer full or Offline Parallel (DIP...
Users Manual
Page 8
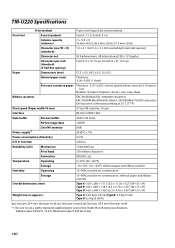
... TM-U220 Specifications Print method 9-pin serial impact dot matrix method Print font Font (standard) Font A: 7 × 9, Font B: 9 × 9 Column capacity (columns) Character size (W × H) (standard) 7 × 9/9 × 9: 76 mm: 40/33, 69.5 mm: 36/30, 57.5 mm: 30/25 1.2 × 3.1 mm/1.6 × 3.1 mm (excluding horizontal spacing) Character set 95 Alphanumeric, 48 International,128 × 12 Graphic Paper Characters per inch) *1: Be sure to use a safety-standards-applied power source that meets the following specifications. Number...
... TM-U220 Specifications Print method 9-pin serial impact dot matrix method Print font Font (standard) Font A: 7 × 9, Font B: 9 × 9 Column capacity (columns) Character size (W × H) (standard) 7 × 9/9 × 9: 76 mm: 40/33, 69.5 mm: 36/30, 57.5 mm: 30/25 1.2 × 3.1 mm/1.6 × 3.1 mm (excluding horizontal spacing) Character set 95 Alphanumeric, 48 International,128 × 12 Graphic Paper Characters per inch) *1: Be sure to use a safety-standards-applied power source that meets the following specifications. Number...

Users Manual
Page 9
... contained herein. EPSON is assumed with Seiko Epson Corporation's operating and maintenance instructions. NOTICE: The contents of Seiko Epson Corporation. They are subject to the use of any options or any damages or problems arising from your printer; however, the instructions cover all types, except as Original Epson Products or Epson Approved Products by letters (A, B, C . . .). Illustration A 1. Roll paper cover 2. Control panel 4. No part of this manual are identified by...
... contained herein. EPSON is assumed with Seiko Epson Corporation's operating and maintenance instructions. NOTICE: The contents of Seiko Epson Corporation. They are subject to the use of any options or any damages or problems arising from your printer; however, the instructions cover all types, except as Original Epson Products or Epson Approved Products by letters (A, B, C . . .). Illustration A 1. Roll paper cover 2. Control panel 4. No part of this manual are identified by...
Users Manual
Page 11
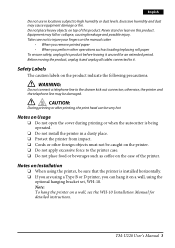
... product, unplug it and unplug all cables connected to it unused for detailed instructions. otherwise, the printer and the telephone line may be very hot. TM-U220 User's Manual 3 Notes on Installation ❏ When using the optional hanging bracket set, WH-10. Safety Labels The caution labels on top of the printer. WARNING: Do not connect a telephone line to high humidity or dust levels. Do not...
... product, unplug it and unplug all cables connected to it unused for detailed instructions. otherwise, the printer and the telephone line may be very hot. TM-U220 User's Manual 3 Notes on Installation ❏ When using the optional hanging bracket set, WH-10. Safety Labels The caution labels on top of the printer. WARNING: Do not connect a telephone line to high humidity or dust levels. Do not...
Users Manual
Page 12
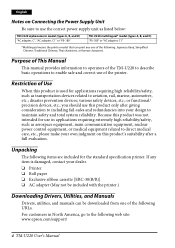
..., etc., please make your dealer. ❏ Printer ❏ Roll paper ❏ Exclusive ribbon cassette [ERC-38(B/R)] ❏ AC adapter (May not be included with the printer.) Downloading Drivers, Utilities, and Manuals Drivers, utilities, and manuals can print any item is damaged, contact your own judgment on Connecting the Power Supply Unit Be sure to use the correct power supply unit as listed below: TM-U220 alphanumeric model (types A, B, and D) "AC adapter, C", "AC adapter, C1...
..., etc., please make your dealer. ❏ Printer ❏ Roll paper ❏ Exclusive ribbon cassette [ERC-38(B/R)] ❏ AC adapter (May not be included with the printer.) Downloading Drivers, Utilities, and Manuals Drivers, utilities, and manuals can print any item is damaged, contact your own judgment on Connecting the Power Supply Unit Be sure to use the correct power supply unit as listed below: TM-U220 alphanumeric model (types A, B, and D) "AC adapter, C", "AC adapter, C1...
Users Manual
Page 13
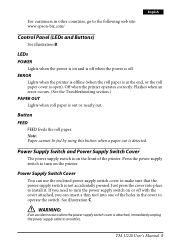
... the following web site: www.epson-biz.com/ Control Panel (LEDs and Buttons) See illustration B. Off when the printer operates correctly. If you need to turn on or off . TM-U220 User's Manual 5 Power Supply Switch and Power Supply Switch Cover The power supply switch is off with the cover attached, you can use the enclosed power supply switch cover to avoid fire. Flashes when an error occurs. (See the Troubleshooting section.) PAPER OUT Lights when roll paper is detected...
... the following web site: www.epson-biz.com/ Control Panel (LEDs and Buttons) See illustration B. Off when the printer operates correctly. If you need to turn on or off . TM-U220 User's Manual 5 Power Supply Switch and Power Supply Switch Cover The power supply switch is off with the cover attached, you can use the enclosed power supply switch cover to avoid fire. Flashes when an error occurs. (See the Troubleshooting section.) PAPER OUT Lights when roll paper is detected...

Users Manual
Page 14
... the ribbon cassette cover by using the power supply switch on the sides of the arrow marked on the cassette; Again turn it clicks. Otherwise your fingers might be injured. 6 TM-U220 User's Manual Note: Make sure the ribbon is hot and you might be burned. Be sure not to store the printer or leave it to use roll paper that meets the specifications. English If...
... the ribbon cassette cover by using the power supply switch on the sides of the arrow marked on the cassette; Again turn it clicks. Otherwise your fingers might be injured. 6 TM-U220 User's Manual Note: Make sure the ribbon is hot and you might be burned. Be sure not to store the printer or leave it to use roll paper that meets the specifications. English If...
Users Manual
Page 15
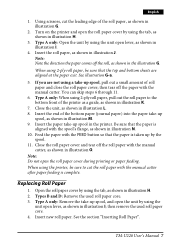
... remove the used roll paper core. 3. Using scissors, cut the roll paper with the manual cutter. Turn on the printer and open the roll paper cover during printing or paper feeding. Note: Note the direction the paper comes off the roll paper with the spool's flange, as shown in illustration I . 4. Close the unit, as shown in illustration L. 8. Open the roll paper cover by the spool. 11. TM-U220 User's Manual 7 Type A only: Remove...
... remove the used roll paper core. 3. Using scissors, cut the roll paper with the manual cutter. Turn on the printer and open the roll paper cover during printing or paper feeding. Note: Note the direction the paper comes off the roll paper with the spool's flange, as shown in illustration I . 4. Close the unit, as shown in illustration L. 8. Open the roll paper cover by the spool. 11. TM-U220 User's Manual 7 Type A only: Remove...
Users Manual
Page 16
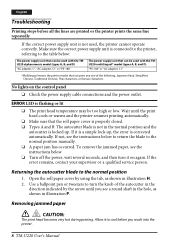
... to turn it is a simple lock-up . If it on the control panel ❏ Check the power supply cable connections and the power outlet. To remove the jammed paper, see the instructions below : The power supply unit that can be used , the printer cannot operate correctly. Use a ballpoint pen or tweezers to the normal position 1. If the error remains, contact your supervisor or a qualified service person. No lights on again. English Troubleshooting Printing stops before...
... to turn it is a simple lock-up . If it on the control panel ❏ Check the power supply cable connections and the power outlet. To remove the jammed paper, see the instructions below : The power supply unit that can be used , the printer cannot operate correctly. Use a ballpoint pen or tweezers to the normal position 1. If the error remains, contact your supervisor or a qualified service person. No lights on again. English Troubleshooting Printing stops before...
Warranty Statement - KDS-Box
Page 1
...software problems, or interaction with factory‐set switches, jumpers and operating systems. Customer data and applications cannot be restored and should be free from like‐new components and parts which usage may expire before the expiration of a part, the item replaced becomes Epson property. If a claimed defect cannot be new or previously repaired to the Epson... from service performed by other than Epson or an Epson Authorized Servicer. 7) Service where the printer label, logo, rating label, or serial number has been removed. 8) Any damage caused by using improper packaging...
...software problems, or interaction with factory‐set switches, jumpers and operating systems. Customer data and applications cannot be restored and should be free from like‐new components and parts which usage may expire before the expiration of a part, the item replaced becomes Epson property. If a claimed defect cannot be new or previously repaired to the Epson... from service performed by other than Epson or an Epson Authorized Servicer. 7) Service where the printer label, logo, rating label, or serial number has been removed. 8) Any damage caused by using improper packaging...


