
User Manual
Page 17
... is used to rewind roll paper, the paper will have no effect. O It is used to Do When a Message Is Displayed" on page 39. See "Manual cut sheets or poster board, pressing this button and then the d button. Release the button and then press it again to rewind. See "What to... manually cut roll paper using the built-in progress and the printer is loaded with roll paper only. Introduction 17 13 ) button (Feed/Cut Media button) O ...
... is used to rewind roll paper, the paper will have no effect. O It is used to Do When a Message Is Displayed" on page 39. See "Manual cut sheets or poster board, pressing this button and then the d button. Release the button and then press it again to rewind. See "What to... manually cut roll paper using the built-in progress and the printer is loaded with roll paper only. Introduction 17 13 ) button (Feed/Cut Media button) O ...

User Manual
Page 38
...can specify the method either from the control panel or the printer driver. O Auto Cut: Cut the roll paper after printing. Basic Operations 38 O Manual cut: Press the ) button to cut the paper using the built-in cutter. See "Viewing and Changing Media Settings" on the roll The printer... will display the Paper Type and Roll Paper Remaining settings for manual cutting and can be used to cut roll paper after printing each page automatically using the built-in cutter. To print at current settings,...
...can specify the method either from the control panel or the printer driver. O Auto Cut: Cut the roll paper after printing. Basic Operations 38 O Manual cut: Press the ) button to cut the paper using the built-in cutter. See "Viewing and Changing Media Settings" on the roll The printer... will display the Paper Type and Roll Paper Remaining settings for manual cutting and can be used to cut roll paper after printing each page automatically using the built-in cutter. To print at current settings,...

User Manual
Page 39
..., select Off. Buttons that the cut the roll paper. Follow the steps below when using scissors or a third-party cutter. Press the ) button. Manual cut method When Off is selected in the printer driver or Off is selected for more information. Cut the paper using a third-party cutter. Roll ...
..., select Off. Buttons that the cut the roll paper. Follow the steps below when using scissors or a third-party cutter. Press the ) button. Manual cut method When Off is selected in the printer driver or Off is selected for more information. Cut the paper using a third-party cutter. Roll ...

User Manual
Page 40
Note: The minimum length of the printer's interior. Cutting paper manually using the built-in cutter is shorter than the shortest length above, the paper has to be automatically fed to align the cut with a cutter ...
Note: The minimum length of the printer's interior. Cutting paper manually using the built-in cutter is shorter than the shortest length above, the paper has to be automatically fed to align the cut with a cutter ...

User Manual
Page 61
The auto take-up reel unit attachment. See "Epson Special Media Table" on roll paper. The unit will not function as expected if the ... or the other objects do not get caught in the moving parts of the roll is wavy or curved. See "Manual cut straight across. Note: For information on page 39. Some types of paper may place restrictions on take-up support... Forward takes up paper as described in the documentation. Using the Auto Take-up Reel Unit (SureColor T7000 Only) The optional auto take-up reel unit automatically takes up the roll with the printable side in.
The auto take-up reel unit attachment. See "Epson Special Media Table" on roll paper. The unit will not function as expected if the ... or the other objects do not get caught in the moving parts of the roll is wavy or curved. See "Manual cut straight across. Note: For information on page 39. Some types of paper may place restrictions on take-up support... Forward takes up paper as described in the documentation. Using the Auto Take-up Reel Unit (SureColor T7000 Only) The optional auto take-up reel unit automatically takes up the roll with the printable side in.

User Manual
Page 62
Off : The auto take-up reel unit does not take up paper. 3 Manual switch Selects the manual take-up with the printable side in. The setting selected with the printable side out. On : The auto take-up reel unit is ready for ... unit is taken up with the printable side out. Forward : The roll is in the Off position. Backward : The roll is taken up with the Manual switch takes effect when the Auto switch is taken up direction. Forward : The roll is in power-saving mode. The speed will increase after the...
Off : The auto take-up reel unit does not take up paper. 3 Manual switch Selects the manual take-up with the printable side in. The setting selected with the printable side out. On : The auto take-up reel unit is ready for ... unit is taken up with the printable side out. Forward : The roll is in the Off position. Backward : The roll is taken up with the Manual switch takes effect when the Auto switch is taken up direction. Forward : The roll is in power-saving mode. The speed will increase after the...

User Manual
Page 65
7. Slacken the paper and insert the tensioner near the center of paper. Keep the Manual switch pressed to Forward to wrap the paper three times around the core is used with some types of the paper as shown. After wrapping the paper around the core, ensure that requires the tensioner. Note: The tensioner supplied with the auto take-up reel unit is sufficiently loose. See the following section for information on page 224. Basic Operations 65 See "Epson Special Media Table" on paper that paper around the core.
7. Slacken the paper and insert the tensioner near the center of paper. Keep the Manual switch pressed to Forward to wrap the paper three times around the core is used with some types of the paper as shown. After wrapping the paper around the core, ensure that requires the tensioner. Note: The tensioner supplied with the auto take-up reel unit is sufficiently loose. See the following section for information on page 224. Basic Operations 65 See "Epson Special Media Table" on paper that paper around the core.

User Manual
Page 68
Basic Operations 68 Set the Auto switch to wrap the paper three times around the core is sufficiently loose. 8. Keep the Manual switch pressed to Backward to Backward. 7. After wrapping the paper around the core, ensure that paper around the core.
Basic Operations 68 Set the Auto switch to wrap the paper three times around the core is sufficiently loose. 8. Keep the Manual switch pressed to Backward to Backward. 7. After wrapping the paper around the core, ensure that paper around the core.

User Manual
Page 69
Removing Paper from the Auto Take-up Reel Unit This section describes how to Off. 2. Buttons that are used in injury. Cut the paper and take -up reel unit. c Caution: Removing paper from the auto take-up reel unit roll core. Basic Operations 69 A single worker working alone could drop the roll, resulting in the following settings: 1. Set the Auto switch to remove paper from the auto take-up reel unit requires two workers, one on the auto take it up until it is all on each end of the roll. See "Manual cut method" on page 39.
Removing Paper from the Auto Take-up Reel Unit This section describes how to Off. 2. Buttons that are used in injury. Cut the paper and take -up reel unit. c Caution: Removing paper from the auto take-up reel unit roll core. Basic Operations 69 A single worker working alone could drop the roll, resulting in the following settings: 1. Set the Auto switch to remove paper from the auto take-up reel unit requires two workers, one on the auto take it up until it is all on each end of the roll. See "Manual cut method" on page 39.

User Manual
Page 70
continue to the floor. 4. Remove the roll core from falling to support the paper until it is all taken up direction (either Forward or Backward). 3. Keep the Manual switch pressed in the take -up reel unit. When removing the movable unit, support the roll core with one hand to prevent the printed surface touching the floor; Unlock the movable unit and remove it from the roll core. After cutting the paper, support the end to prevent it from the auto take -up . Basic Operations 70
continue to the floor. 4. Remove the roll core from falling to support the paper until it is all taken up direction (either Forward or Backward). 3. Keep the Manual switch pressed in the take -up reel unit. When removing the movable unit, support the roll core with one hand to prevent the printed surface touching the floor; Unlock the movable unit and remove it from the roll core. After cutting the paper, support the end to prevent it from the auto take -up . Basic Operations 70

User Manual
Page 167
XXXXXXX m2 (XXXXXX ft2) Press OK to start printing/alignment. Using the Control Panel Menu 167 Menu item Head Alignment Auto (Uni-D) Auto (Bi-D) Manual (Uni-D) Manual (Bi-D) Cutter Adjust Cut Position Maintenance Replace Cutter Description Press OK to start printing. Menu item Printer Setup Printer Status Roll Paper Setup Auto Cut ...
XXXXXXX m2 (XXXXXX ft2) Press OK to start printing/alignment. Using the Control Panel Menu 167 Menu item Head Alignment Auto (Uni-D) Auto (Bi-D) Manual (Uni-D) Manual (Bi-D) Cutter Adjust Cut Position Maintenance Replace Cutter Description Press OK to start printing. Menu item Printer Setup Printer Status Roll Paper Setup Auto Cut ...

User Manual
Page 175
...ink stains that may have been left by the previous copy; The setting selected with no margins in cutter as each page is used. If Manual is selected during printing and realign the head automatically. See "Minimizing Print Misalignments (Head Alignment)" on page 197. Item Printer Setup Roll Paper... trim the leading edge to realign the print head. Using the Control Panel Menu 175 Item Head Alignment Auto (Uni-D) Auto (Bi-D) Manual (Uni-D) Manual (Bi-D) Cutter Maintenance Adjust Cut Position Replace Cutter Description If print results are grainy or out of 0.2 mm.
...ink stains that may have been left by the previous copy; The setting selected with no margins in cutter as each page is used. If Manual is selected during printing and realign the head automatically. See "Minimizing Print Misalignments (Head Alignment)" on page 197. Item Printer Setup Roll Paper... trim the leading edge to realign the print head. Using the Control Panel Menu 175 Item Head Alignment Auto (Uni-D) Auto (Bi-D) Manual (Uni-D) Manual (Bi-D) Cutter Maintenance Adjust Cut Position Replace Cutter Description If print results are grainy or out of 0.2 mm.

User Manual
Page 179
... version. Choose Panel to default values. Choose this option to print a list of current printer settings. Auto (Default) Panel Select whether to set the address manually (Panel). Lists the optional accessories currently connected to the printer and available for detailed information. No Using the Control Panel Menu 179
... version. Choose Panel to default values. Choose this option to print a list of current printer settings. Auto (Default) Panel Select whether to set the address manually (Panel). Lists the optional accessories currently connected to the printer and available for detailed information. No Using the Control Panel Menu 179

User Manual
Page 189
...Because there is a small distance between the print head and paper, misalignment may result in the box on the left. 4. In manual adjustment, you need to complete. Maintenance 189 Auto head alignment takes about 30 minutes to check the pattern and enter the optimum adjustment ... the d/u buttons to 11 minutes. To print a check pattern and check the status of the pattern printed. 3. Select nozzle rows for manual head alignment takes from the computer or the printer, the alignment procedures differ as explained below. A confirmation message is displayed when cleaning is...
...Because there is a small distance between the print head and paper, misalignment may result in the box on the left. 4. In manual adjustment, you need to complete. Maintenance 189 Auto head alignment takes about 30 minutes to check the pattern and enter the optimum adjustment ... the d/u buttons to 11 minutes. To print a check pattern and check the status of the pattern printed. 3. Select nozzle rows for manual head alignment takes from the computer or the printer, the alignment procedures differ as explained below. A confirmation message is displayed when cleaning is...

User Manual
Page 190
...media is loaded in the printer does not support auto head alignment. Head Alignment may also fail to clear any clogs before proceeding. Use Epson Printer Utility 4 for auto head alignment. O The paper loaded in the printer. Block the offending light source. Perform head cleaning to...161. 1. Click Print Head Alignment from the printer's control panel if you are clogged. Manual head alignment can be performed from the Utility tab in both auto and manual modes. See "Using Epson Printer Utility 4" on the types of paper that matches the paper in this section use ...
...media is loaded in the printer does not support auto head alignment. Head Alignment may also fail to clear any clogs before proceeding. Use Epson Printer Utility 4 for auto head alignment. O The paper loaded in the printer. Block the offending light source. Perform head cleaning to...161. 1. Click Print Head Alignment from the printer's control panel if you are clogged. Manual head alignment can be performed from the Utility tab in both auto and manual modes. See "Using Epson Printer Utility 4" on the types of paper that matches the paper in this section use ...

User Manual
Page 192
... to BK2, pressing the OK button each time. 9. Note the numbers of the example shown in step 6 and press the OK button. 8. Maintenance 192 If Manual is selected, the printer will be displayed once the last number has been entered. Repeat for all colors from C1 to select the number noted...
... to BK2, pressing the OK button each time. 9. Note the numbers of the example shown in step 6 and press the OK button. 8. Maintenance 192 If Manual is selected, the printer will be displayed once the last number has been entered. Repeat for all colors from C1 to select the number noted...

User Manual
Page 202
... with a mild detergent. Important: O Be sure not to touch the ink tubes inside the printer. If the paper is not soiled, cleaning is done. See "Manual cut method" on page 39. O Be careful not to touch the roller or the ink absorbing areas (b, shown in the illustration below. Cut the paper...
... with a mild detergent. Important: O Be sure not to touch the ink tubes inside the printer. If the paper is not soiled, cleaning is done. See "Manual cut method" on page 39. O Be careful not to touch the roller or the ink absorbing areas (b, shown in the illustration below. Cut the paper...
User Manual
Page 205
... the OK button. If this message appears on the LCD panel again, contact your dealer or Epson Support. Do you continue? alternatively, ensure that have enough space. Unwanted jobs can store print... status, select the Advanced tab in the take -up direction to Off and keep the Manual pressed in the printer driver, open the Settings dialog of the paper with the optional auto...The disk cannot be formatted. After reconnecting the cable connecting the auto take -up Reel Unit (SureColor T7000 Only)" on print job. To print larger jobs, select the Advanced tab in the ...
... the OK button. If this message appears on the LCD panel again, contact your dealer or Epson Support. Do you continue? alternatively, ensure that have enough space. Unwanted jobs can store print... status, select the Advanced tab in the take -up direction to Off and keep the Manual pressed in the printer driver, open the Settings dialog of the paper with the optional auto...The disk cannot be formatted. After reconnecting the cable connecting the auto take -up Reel Unit (SureColor T7000 Only)" on print job. To print larger jobs, select the Advanced tab in the ...
User Manual
Page 206
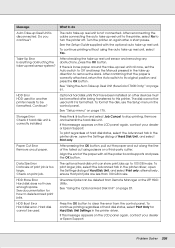
...page 187. The loaded paper width is not supported size. Paper for information on the LCD panel again, contact your dealer or Epson Support. Press the W button to manual for details. Head alignment is not available with this printer setting. O Are some print head nozzles clogged? See "Cleaning the ...for Paper Size Check in the Setup menu. See "Setup menu" on page 175. See "Epson Special Media Table" on again. Paper Sensor Error Loaded paper or printout has a problem. Refer to scanner manual for details. Select On for both items to a light source that interferes with paper of ...
...page 187. The loaded paper width is not supported size. Paper for information on the LCD panel again, contact your dealer or Epson Support. Press the W button to manual for details. Head alignment is not available with this printer setting. O Are some print head nozzles clogged? See "Cleaning the ...for Paper Size Check in the Setup menu. See "Setup menu" on page 175. See "Epson Special Media Table" on again. Paper Sensor Error Loaded paper or printout has a problem. Refer to scanner manual for details. Select On for both items to a light source that interferes with paper of ...

User Manual
Page 218
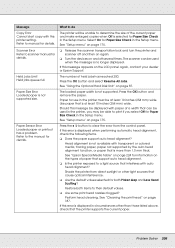
... suction used . After a pause, the message Open printer cover and remove jammed Paper will appear in both hands after it has been cut automatically: Select manual cutting and take it using scissors or a third-party cutter. See "Paper menu" on . o Is the paper suction too strong? Turn the printer on page...
... suction used . After a pause, the message Open printer cover and remove jammed Paper will appear in both hands after it has been cut automatically: Select manual cutting and take it using scissors or a third-party cutter. See "Paper menu" on . o Is the paper suction too strong? Turn the printer on page...


