

User Manual
Page 2
... or unauthorized modifications, repairs, or alterations to this product, or (excluding the U.S.) failure to the purchaser of this Epson printer. Neither Seiko Epson Corporation nor its affiliates shall be liable to strictly comply with this product or third parties for damages, losses, costs,...written permission of this publication may be liable for any damages or problems arising from the use of Seiko Epson Corporation. EPSON and SureColor are for identification purposes only and may be held liable for any damage resulting from electromagnetic interference that occurs...
... or unauthorized modifications, repairs, or alterations to this product, or (excluding the U.S.) failure to the purchaser of this Epson printer. Neither Seiko Epson Corporation nor its affiliates shall be liable to strictly comply with this product or third parties for damages, losses, costs,...written permission of this publication may be liable for any damages or problems arising from the use of Seiko Epson Corporation. EPSON and SureColor are for identification purposes only and may be held liable for any damage resulting from electromagnetic interference that occurs...
User Manual
Page 3
...Front Section - Contents Chapter 1 Introduction Important Safety Instructions 7 Printer Parts 10 Front Section - S70675 and S50675 15 Inside - S30675 65 Viewing and Changing Media Settings 85 Replacing and Removing Media 87 3 S30675 13 Inside - S70675/S50675 41 Loading Media - S30675 17 Back 18 LAN ... Notes When Not Using the Printer 31 Handling ink cartridges 32 Handling Media 33 Spot Color Inks 35 Using the Supplied Software 36 Contents of the Software CD 36 Starting Epson LFP Remote Panel 2 36 Exiting Epson LFP Remote Panel 2 37 Uninstalling Software 37 Chapter...
...Front Section - Contents Chapter 1 Introduction Important Safety Instructions 7 Printer Parts 10 Front Section - S70675 and S50675 15 Inside - S30675 65 Viewing and Changing Media Settings 85 Replacing and Removing Media 87 3 S30675 13 Inside - S70675/S50675 41 Loading Media - S30675 17 Back 18 LAN ... Notes When Not Using the Printer 31 Handling ink cartridges 32 Handling Media 33 Spot Color Inks 35 Using the Supplied Software 36 Contents of the Software CD 36 Starting Epson LFP Remote Panel 2 36 Exiting Epson LFP Remote Panel 2 37 Uninstalling Software 37 Chapter...
User Manual
Page 4
S70675/S50675 123 Printable Area - S30675 126 Chapter 3 Maintenance Cleaning Frequency 129 Replacing Consumables Frequency 130 Other Maintenance Frequency 131 Preparing for Clogged Nozzles 181 Head ... Cleaning Around the Print Head (Daily 137 Cleaning Around the Caps (Daily 142 Cleaning the Entire Wiper and Attachment Point (Daily 152 Cleaning Inside the Printer (Daily 155 Cleaning the Flushing Pad (Daily 159 Cleaning the Sides of the Auto Take-up Reel) . . . . 108 Before Printing 110 Media Settings 111 Basic...
S70675/S50675 123 Printable Area - S30675 126 Chapter 3 Maintenance Cleaning Frequency 129 Replacing Consumables Frequency 130 Other Maintenance Frequency 131 Preparing for Clogged Nozzles 181 Head ... Cleaning Around the Print Head (Daily 137 Cleaning Around the Caps (Daily 142 Cleaning the Entire Wiper and Attachment Point (Daily 152 Cleaning Inside the Printer (Daily 155 Cleaning the Flushing Pad (Daily 159 Cleaning the Sides of the Auto Take-up Reel) . . . . 108 Before Printing 110 Media Settings 111 Basic...
User Manual
Page 5
...189 Changing Color Mode (S70675 only 191 Applying Secondary Carriage Rod Grease 194 Parts That Are Periodically Replaced 197 Chapter 4 Using the Control Panel Menu Menu Operations 198 Menu List 198 Details of the Menu 203 The Media Setup Menu 203 The Printer Setup Menu 208 The ...Solver When a Message Is Displayed 215 When a Maintenance Call/Service Call Occurs 217 Troubleshooting 218 You Cannot Print (Because the Printer Does Not Work 218 The Printer Sounds Like It Is Printing, But Nothing Prints 219 Prints Are Not What You Expected 220 Media Problems 229 Other Problems ...
...189 Changing Color Mode (S70675 only 191 Applying Secondary Carriage Rod Grease 194 Parts That Are Periodically Replaced 197 Chapter 4 Using the Control Panel Menu Menu Operations 198 Menu List 198 Details of the Menu 203 The Media Setup Menu 203 The Printer Setup Menu 208 The ...Solver When a Message Is Displayed 215 When a Maintenance Call/Service Call Occurs 217 Troubleshooting 218 You Cannot Print (Because the Printer Does Not Work 218 The Printer Sounds Like It Is Printing, But Nothing Prints 219 Prints Are Not What You Expected 220 Media Problems 229 Other Problems ...
User Manual
Page 7
... telephones. ❏ Use only the type of another cord may result in fire or electric shock. ❏ Connect all warnings and instructions marked on the printer. Use with this product. Also keep it is larger than this product only. Introduction 7 This product will not operate properly if it away from direct...; Avoid places subject to properly grounded power outlets. Also be easily unplugged. When choosing a place for use a damaged or frayed power cord. Avoid using the printer.
... telephones. ❏ Use only the type of another cord may result in fire or electric shock. ❏ Connect all warnings and instructions marked on the printer. Use with this product. Also keep it is larger than this product only. Introduction 7 This product will not operate properly if it away from direct...; Avoid places subject to properly grounded power outlets. Also be easily unplugged. When choosing a place for use a damaged or frayed power cord. Avoid using the printer.

User Manual
Page 8
... may apply. Take care not to qualified service personnel under the following : To provide adequate short-circuit protection and over-current protection for this printer, the building installation must be protected by hand; Do not unplug the power cord or turn the product off . Introduction 8 If there are...the side of all devices plugged into the extension cord does not exceed the cord's ampere rating. ❏ If you use the printer in Germany, observe the following conditions: The power cord or plug is damaged; Also, make sure the total ampere rating of the cartridge.
... may apply. Take care not to qualified service personnel under the following : To provide adequate short-circuit protection and over-current protection for this printer, the building installation must be protected by hand; Do not unplug the power cord or turn the product off . Introduction 8 If there are...the side of all devices plugged into the extension cord does not exceed the cord's ampere rating. ❏ If you use the printer in Germany, observe the following conditions: The power cord or plug is damaged; Also, make sure the total ampere rating of the cartridge.
User Manual
Page 10
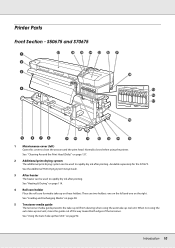
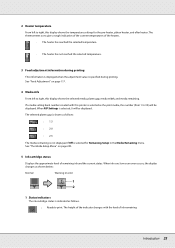
...-up roll from skewing when using the auto take -up reel unit, move the guide out of the way toward both edges of the tensioner. Printer Parts Front Section - See "Cleaning Around the Print Head (Daily)" on the right. There are two holders: one on page 137. 2 Additional ...and Exchanging Media" on these holders. See "Heating & Drying" on page 114. 4 Roll core holder Place the roll core for the S70675. When not using the printer. S50675 and S70675 1 Maintenance cover (left and one on page 92. See the Additional Print Drying System Setup Guide. 3 After heater The heater can be...
...-up roll from skewing when using the auto take -up reel unit, move the guide out of the way toward both edges of the tensioner. Printer Parts Front Section - See "Cleaning Around the Print Head (Daily)" on the right. There are two holders: one on page 137. 2 Additional ...and Exchanging Media" on these holders. See "Heating & Drying" on page 114. 4 Roll core holder Place the roll core for the S70675. When not using the printer. S50675 and S70675 1 Maintenance cover (left and one on page 92. See the Additional Print Drying System Setup Guide. 3 After heater The heater can be...
User Manual
Page 11
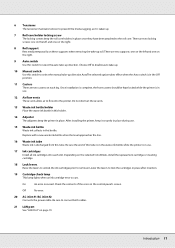
...the right. 8 Roll support Rest media temporarily on the right. 9 Auto switch Use this tube is in the waste ink bottle while the printer is discharged from this bottle. Depending on the selected ColorMode, install the replacement cartridge or cleaning cartridge. 18 Lock levers Raise the levers to ... in place once they have been attached to the roll core. Once installation is complete, the front casters should be kept locked while the printer is in place. On An error occurred. 6 Tensioner The tensioner maintains tension to prevent the media sagging as it securely in place during ...
...the right. 8 Roll support Rest media temporarily on the right. 9 Auto switch Use this tube is in the waste ink bottle while the printer is discharged from this bottle. Depending on the selected ColorMode, install the replacement cartridge or cleaning cartridge. 18 Lock levers Raise the levers to ... in place once they have been attached to the roll core. Once installation is complete, the front casters should be kept locked while the printer is in place. On An error occurred. 6 Tensioner The tensioner maintains tension to prevent the media sagging as it securely in place during ...
User Manual
Page 12
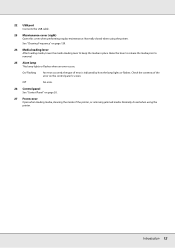
... error is indicated by how the lamp lights or flashes. the type of the error on the control panel's screen. Normally closed when using the printer. Normally closed when using the printer. See "Cleaning Frequency" on page 20. 27 Front cover Open when loading media, cleaning the inside of the... printer, or removing jammed media. Introduction 12 Off No error. 26 Control panel See "Control Panel" on page 129. 24 Media loading lever After loading media, ...
... error is indicated by how the lamp lights or flashes. the type of the error on the control panel's screen. Normally closed when using the printer. Normally closed when using the printer. See "Cleaning Frequency" on page 20. 27 Front cover Open when loading media, cleaning the inside of the... printer, or removing jammed media. Introduction 12 Off No error. 26 Control panel See "Control Panel" on page 129. 24 Media loading lever After loading media, ...
User Manual
Page 13
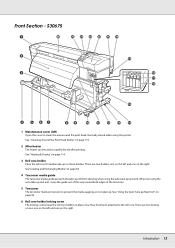
... out of the way toward both edges of the tensioner. 5 Tensioner The tensioner maintains tension to rapidly dry ink after printing. When not using the printer. Introduction 13 S30675 1 Maintenance cover (left and one on these holders. See "Cleaning Around the Print Head (Daily)" on the right. See"Loading and Exchanging...
... out of the way toward both edges of the tensioner. 5 Tensioner The tensioner maintains tension to rapidly dry ink after printing. When not using the printer. Introduction 13 S30675 1 Maintenance cover (left and one on these holders. See "Cleaning Around the Print Head (Daily)" on the right. See"Loading and Exchanging...
User Manual
Page 14
...to lock the cartridges in place after insertion. 18 Cartridge check lamp This lamp lights when an ink cartridge error occurs. After installing the printer, keep the printer in place. The selected option takes effect when the Auto switch is discharged from this tube. Lower the levers to select the manual ... adjusters keep it securely in place during use. 14 Waste ink bottle (tank) Waste ink collects in this bottle. Normally closed when using the printer. There are two casters on each slot. 17 Lock levers Raise the levers to unlock the ink cartridges prior to select the auto take-up...
...to lock the cartridges in place after insertion. 18 Cartridge check lamp This lamp lights when an ink cartridge error occurs. After installing the printer, keep the printer in place. The selected option takes effect when the Auto switch is discharged from this tube. Lower the levers to select the manual ... adjusters keep it securely in place during use. 14 Waste ink bottle (tank) Waste ink collects in this bottle. Normally closed when using the printer. There are two casters on each slot. 17 Lock levers Raise the levers to unlock the ink cartridges prior to select the auto take-up...
User Manual
Page 15
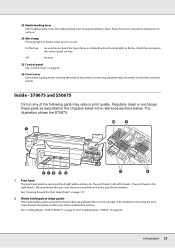
... media, cleaning the inside of the following parts may reduce print quality. S70675 and S50675 Dirt on the right Head 2. S70675/S50675" on page 65. See "Loading Media - S30675" on page 41 and "Loading Media - Normally closed when using the printer. We recommend that you clean the area around this unit at either...
... media, cleaning the inside of the following parts may reduce print quality. S70675 and S50675 Dirt on the right Head 2. S70675/S50675" on page 65. See "Loading Media - S30675" on page 41 and "Loading Media - Normally closed when using the printer. We recommend that you clean the area around this unit at either...
User Manual
Page 16
... Pressure Rollers and Media (S70675, S50675)" on page 137. See "Cleaning Inside the Printer (Daily)" on the outside edges. We recommend that the ink adheres evenly. See "Regular Cleaning" on page 40. See "Replacing the Flushing Pad" on page 40. See "Cleaning Inside the Printer (Daily)" on page 155... about once every three months. The number used and during flushing. See "Positioning the Pressure Rollers and Media (S70675, S50675)" on page 172. See "Cleaning Inside the Printer (Daily)" on page 137. 9 Wiper The wiper removes ink from the wiper. It is used varies with ...
... Pressure Rollers and Media (S70675, S50675)" on page 137. See "Cleaning Inside the Printer (Daily)" on the outside edges. We recommend that the ink adheres evenly. See "Regular Cleaning" on page 40. See "Replacing the Flushing Pad" on page 40. See "Cleaning Inside the Printer (Daily)" on page 155... about once every three months. The number used and during flushing. See "Positioning the Pressure Rollers and Media (S70675, S50675)" on page 172. See "Cleaning Inside the Printer (Daily)" on page 137. 9 Wiper The wiper removes ink from the wiper. It is used varies with ...
User Manual
Page 17
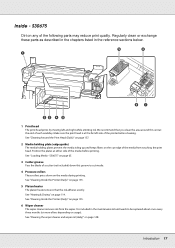
... cutter (not included) down on the media during printing. See "Cleaning the wiper cleaner and wiper rail (daily)" on any of the printer before printing. Introduction 17 We recommend that the ink adheres evenly. Make sure the print head is included in the reference sections below. 1...Pressure rollers These rollers press down this unit at the end of the media before cleaning. See "Cleaning Inside the Printer (Daily)" on usage). See "Cleaning Inside the Printer (Daily)" on page 155. 5 Platen heater The platen heater ensures that you clean the area around this groove to...
... cutter (not included) down on the media during printing. See "Cleaning the wiper cleaner and wiper rail (daily)" on any of the printer before printing. Introduction 17 We recommend that the ink adheres evenly. Make sure the print head is included in the reference sections below. 1...Pressure rollers These rollers press down this unit at the end of the media before cleaning. See "Cleaning Inside the Printer (Daily)" on usage). See "Cleaning Inside the Printer (Daily)" on page 155. 5 Platen heater The platen heater ensures that you clean the area around this groove to...
User Manual
Page 19
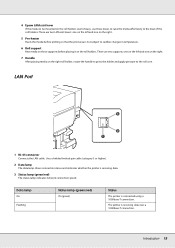
... LAN cable. Use a shielded twisted pair cable (category 5 or higher). 2 Data lamp The data lamp shows connection status and indicates whether the printer is connected using a 1000base-T connection. 4 Epson LiftAssist lever If the media to be mounted on the roll holders seems heavy, use these supports before printing so that the print...
... LAN cable. Use a shielded twisted pair cable (category 5 or higher). 2 Data lamp The data lamp shows connection status and indicates whether the printer is connected using a 1000base-T connection. 4 Epson LiftAssist lever If the media to be mounted on the roll holders seems heavy, use these supports before printing so that the print...
User Manual
Page 20
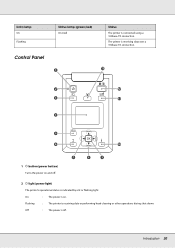
The printer is receiving data over a 100base-TX connection. 1 P button (power button) Turns the power on . Off : The power is indicated by a lit or flashing light. Introduction 20 Flashing : The printer is on and off. 2 P light (power light) The printer's operational status is off. On : The power is receiving data or performing head cleaning or other operations during shut-down. Data lamp On Flashing Control Panel Status lamp (green/red) On (red) Status The printer is connected using a 100base-TX connection.
The printer is receiving data over a 100base-TX connection. 1 P button (power button) Turns the power on . Off : The power is indicated by a lit or flashing light. Introduction 20 Flashing : The printer is on and off. 2 P light (power light) The printer's operational status is off. On : The power is receiving data or performing head cleaning or other operations during shut-down. Data lamp On Flashing Control Panel Status lamp (green/red) On (red) Status The printer is connected using a 100base-TX connection.
User Manual
Page 21
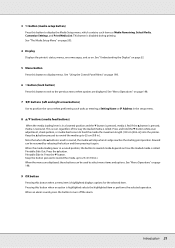
.... When the media loading lever in a raised position, the button to feed the media the maximum length (103 cm [40.6 in]) into the printer. Keep the button pressed to rewind the media up to display the Media Setup menu, which contains such items as entering a Setting Name or IP...button is rewound. Printable Side In: Press the d button. When the menus are displayed. See "The Media Setup Menu" on page 203. 4 Display Displays the printer's status, menus, error messages, and so on page 198. 7 l/r buttons (left and right arrow buttons) Use to rewind, the media will stop when its ...
.... When the media loading lever in a raised position, the button to feed the media the maximum length (103 cm [40.6 in]) into the printer. Keep the button pressed to rewind the media up to display the Media Setup menu, which contains such items as entering a Setting Name or IP...button is rewound. Printable Side In: Press the d button. When the menus are displayed. See "The Media Setup Menu" on page 203. 4 Display Displays the printer's status, menus, error messages, and so on page 198. 7 l/r buttons (left and right arrow buttons) Use to rewind, the media will stop when its ...
User Manual
Page 22
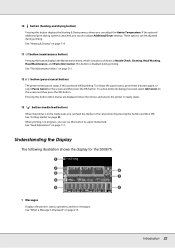
...progress, you can adjust the Heater Temperature. Understanding the Display The following illustration shows the display for the S50675. 1 Messages Displays the printer's status, operation, and error messages. If the optional additional print drying system is in the ready state, you can also adjust ...to adjust media feed. To cancel print jobs being processed, select Job Cancel on page 211. 12 W button (pause/cancel button) The printer enters pause status if this button displays the Maintenance menu, which contains such items as Nozzle Check, Cleaning, Head Washing, Head Maintenance, and...
...progress, you can adjust the Heater Temperature. Understanding the Display The following illustration shows the display for the S50675. 1 Messages Displays the printer's status, operation, and error messages. If the optional additional print drying system is in the ready state, you can also adjust ...to adjust media feed. To cancel print jobs being processed, select Job Cancel on page 211. 12 W button (pause/cancel button) The printer enters pause status if this button displays the Maintenance menu, which contains such items as Nozzle Check, Cleaning, Head Washing, Head Maintenance, and...
User Manual
Page 23
... status is specified during printing This information is displayed when the adjustment value is indicated as the print media, the number (from 1 to right, this printer is selected, 0 will be displayed. When ink runs low or an error occurs, the display changes as follows: : 1.5 : 2.0 : 2.5 The media remaining is not displayed if...
... status is specified during printing This information is displayed when the adjustment value is indicated as the print media, the number (from 1 to right, this printer is selected, 0 will be displayed. When ink runs low or an error occurs, the display changes as follows: : 1.5 : 2.0 : 2.5 The media remaining is not displayed if...

User Manual
Page 25
... system status (system included with a new waste ink bottle. 7 Media rise detection status This is displayed by the S50675 only. : The printer checks whether the media rises during printing. : The printer does not check whether the media rises during printing. Status indicators The status of space available. : The waste ink bottle is...
... system status (system included with a new waste ink bottle. 7 Media rise detection status This is displayed by the S50675 only. : The printer checks whether the media rises during printing. : The printer does not check whether the media rises during printing. Status indicators The status of space available. : The waste ink bottle is...

