
User Manual
Page 3
... Color Inks 35 Using the Supplied Software 36 Contents of the Software CD 36 Starting Epson LFP Remote Panel 2 36 Exiting Epson LFP Remote Panel 2 37 Uninstalling Software 37 Chapter 2 Basic Operations Loading and Exchanging Media 38 Notes on Loading Media 38 Positioning the Pressure Rollers and Media (S70675, S50675 40 Loading Media - S30675 65 Viewing and Changing Media Settings 85 Replacing and Removing Media 87 3 Contents Chapter 1 Introduction Important Safety Instructions 7 Printer Parts 10 Front Section - S70675/S50675 41 Loading Media...
... Color Inks 35 Using the Supplied Software 36 Contents of the Software CD 36 Starting Epson LFP Remote Panel 2 36 Exiting Epson LFP Remote Panel 2 37 Uninstalling Software 37 Chapter 2 Basic Operations Loading and Exchanging Media 38 Notes on Loading Media 38 Positioning the Pressure Rollers and Media (S70675, S50675 40 Loading Media - S30675 65 Viewing and Changing Media Settings 85 Replacing and Removing Media 87 3 Contents Chapter 1 Introduction Important Safety Instructions 7 Printer Parts 10 Front Section - S70675/S50675 41 Loading Media...
User Manual
Page 4
... Removing the Take-up Roll (Using the Optional Heavy Roll Auto Take-up Reel Unit (Daily 161 Regular Cleaning Check Sheet 162 Replacing Consumables 163 Replacing and Shaking Ink Cartridges 163 Disposing of Waste Ink 166 Replacing the Wiper and Wiper Cleaner 168 Replacing the Flushing Pad 172 Replacing the Media Holding Plates 174 Disposal of Used Consumables 179 Consumable Replacement Check Sheet 180 Other Maintenance 181 Checking for Clogged Nozzles 181 Head Cleaning 183 Head Washing 186 4 S70675...
... Removing the Take-up Roll (Using the Optional Heavy Roll Auto Take-up Reel Unit (Daily 161 Regular Cleaning Check Sheet 162 Replacing Consumables 163 Replacing and Shaking Ink Cartridges 163 Disposing of Waste Ink 166 Replacing the Wiper and Wiper Cleaner 168 Replacing the Flushing Pad 172 Replacing the Media Holding Plates 174 Disposal of Used Consumables 179 Consumable Replacement Check Sheet 180 Other Maintenance 181 Checking for Clogged Nozzles 181 Head Cleaning 183 Head Washing 186 4 S70675...
User Manual
Page 5
... Maintenance 189 Changing Color Mode (S70675 only 191 Applying Secondary Carriage Rod Grease 194 Parts That Are Periodically Replaced 197 Chapter 4 Using the Control Panel Menu Menu Operations 198 Menu List 198 Details of the Menu 203 The Media Setup Menu 203 The Printer Setup Menu 208 The Maintenance Menu 211 The Ink Level Menu 212 The Print Logs Menu 212 The Printer Status Menu 213 The Network Setup Menu 213 The Preference Menu 214 The Reset All Settings Menu 214 Chapter 5 Problem Solver When a Message Is Displayed 215 When a Maintenance Call/Service...
... Maintenance 189 Changing Color Mode (S70675 only 191 Applying Secondary Carriage Rod Grease 194 Parts That Are Periodically Replaced 197 Chapter 4 Using the Control Panel Menu Menu Operations 198 Menu List 198 Details of the Menu 203 The Media Setup Menu 203 The Printer Setup Menu 208 The Maintenance Menu 211 The Ink Level Menu 212 The Print Logs Menu 212 The Printer Status Menu 213 The Network Setup Menu 213 The Preference Menu 214 The Reset All Settings Menu 214 Chapter 5 Problem Solver When a Message Is Displayed 215 When a Maintenance Call/Service...

User Manual
Page 8
... turn off the product until the Power light stops flashing. ❏ This device has two power systems. There is pressed, the Power light flashes briefly then goes off using this product ❏ Do not block or cover the openings in performance. ❏ Do not move the print heads by a 10 or 16 amp circuit breaker. ❏ If damage occurs to the plug, replace the cord set...
... turn off the product until the Power light stops flashing. ❏ This device has two power systems. There is pressed, the Power light flashes briefly then goes off using this product ❏ Do not block or cover the openings in performance. ❏ Do not move the print heads by a 10 or 16 amp circuit breaker. ❏ If damage occurs to the plug, replace the cord set...
User Manual
Page 11
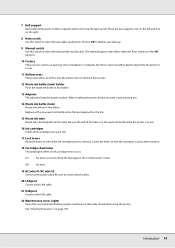
... levers Raise the levers to unlock the ink cartridges prior to connect both cables. 21 LAN port See "LAN Port" on each slot. Check the contents of this holder. 14 Adjuster The adjusters keep the printer in use. 17 Ink cartridges Install all ink cartridges into the printer. Do not obstruct these supports when removing the take -up direction. Replace with a new waste ink bottle when the level approaches the line. 16 Waste ink tube Waste ink is in place. Off No error...
... levers Raise the levers to unlock the ink cartridges prior to connect both cables. 21 LAN port See "LAN Port" on each slot. Check the contents of this holder. 14 Adjuster The adjusters keep the printer in use. 17 Ink cartridges Install all ink cartridges into the printer. Do not obstruct these supports when removing the take -up direction. Replace with a new waste ink bottle when the level approaches the line. 16 Waste ink tube Waste ink is in place. Off No error...
User Manual
Page 14
.... 18 Cartridge check lamp This lamp lights when an ink cartridge error occurs. Replace with a new waste ink bottle when the level approaches the line. 15 Waste ink tube Waste ink is in the Off position. 10 Casters There are two supports: one on the left and one on the right. 8 Auto switch Use this tube. Check the message on page 129. See "Cleaning Frequency" on the control panel's screen. 7 Roll support Rest media temporarily on these vents. 12 Waste ink bottle (tank...
.... 18 Cartridge check lamp This lamp lights when an ink cartridge error occurs. Replace with a new waste ink bottle when the level approaches the line. 15 Waste ink tube Waste ink is in the Off position. 10 Casters There are two supports: one on the left and one on the right. 8 Auto switch Use this tube. Check the message on page 129. See "Cleaning Frequency" on the control panel's screen. 7 Roll support Rest media temporarily on these vents. 12 Waste ink bottle (tank...

User Manual
Page 27
... Color Inks" on transparent media (window graphics). Never having to attach spindles before installing media. High Print Quality Smooth tone gradations, high-fidelity color reproduction The S70675 is recommended when using the S70675 with white and metallic silver inks or the S50675 with other models) can be used for a variety of metallic colors. Support for high-fidelity color reproduction. This not only improves the work environment during installation, the printer offers lift levers...
... Color Inks" on transparent media (window graphics). Never having to attach spindles before installing media. High Print Quality Smooth tone gradations, high-fidelity color reproduction The S70675 is recommended when using the S70675 with white and metallic silver inks or the S50675 with other models) can be used for a variety of metallic colors. Support for high-fidelity color reproduction. This not only improves the work environment during installation, the printer offers lift levers...
User Manual
Page 206
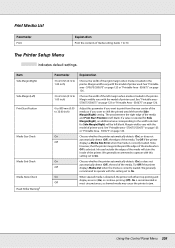
... using special media or when a problem such as head striking or banding is installed (supplied with the S50675 and optional with the heaters when the Heat Off Timer expires. Select this option if the media will turn back on when the heaters resume operation. The additional print drying system will be cut before the next job starts. Using the Control Panel Menu 206 Increasing the drying time increases the time needed...
... using special media or when a problem such as head striking or banding is installed (supplied with the S50675 and optional with the heaters when the Heat Off Timer expires. Select this option if the media will turn back on when the heaters resume operation. The additional print drying system will be cut before the next job starts. Using the Control Panel Menu 206 Increasing the drying time increases the time needed...
User Manual
Page 208
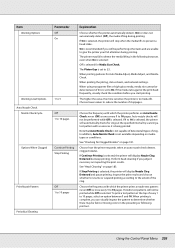
... jam. Adjust this setting set to shift the printed area left blank. See "Printable area - S30675" on page 123 or "Printable Area - When skewed media is left from the Side Margin(Right) setting. S70675/S50675" on page 126. On is loaded in most circumstances, as skewed media may print beyond the edges of the media when Off is loaded in the printer. Item Side Margin(Right) Side Margin(Left) Print Start Position Media Size Check Media End Check Media Skew Check Head Strike...
... jam. Adjust this setting set to shift the printed area left blank. See "Printable area - S30675" on page 123 or "Printable Area - When skewed media is left from the Side Margin(Right) setting. S70675/S50675" on page 126. On is loaded in most circumstances, as skewed media may print beyond the edges of the media when Off is loaded in the printer. Item Side Margin(Right) Side Margin(Left) Print Start Position Media Size Check Media End Check Media Skew Check Head Strike...
User Manual
Page 209
... Auto Nozzle Check is selected for Auto Media Adjust, Media Adjust, and Nozzle Check. In addition, Auto Nozzle Check is recommended if you judge it is set to On. When printing the job log, status sheets, and network settings. When printing is complete, you start printing. Choose lower values to reduce the number of the clog. To print a test pattern at the specified interval by scanning a test pattern with which the printer prints a nozzle test pattern: never (Off) or once every 1 to 10 pages. When printing patterns for Media Size Check...
... Auto Nozzle Check is selected for Auto Media Adjust, Media Adjust, and Nozzle Check. In addition, Auto Nozzle Check is recommended if you judge it is set to On. When printing the job log, status sheets, and network settings. When printing is complete, you start printing. Choose lower values to reduce the number of the clog. To print a test pattern at the specified interval by scanning a test pattern with which the printer prints a nozzle test pattern: never (Off) or once every 1 to 10 pages. When printing patterns for Media Size Check...
User Manual
Page 213
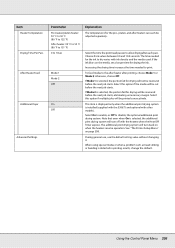
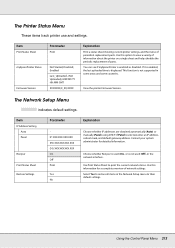
... network status. View the printer Firmware Version. Use this option to view a variety of information about the printer on a single sheet and help schedule the periodic replacement of periodical replacement parts. The Network Setup Menu indicates default settings. Contact your system administrator for a complete overview of network settings. Using the Control Panel Menu 213 You can see if myEpsonPrinter is not used (Off), in some areas and some countries. Item IP Address Setting Auto Panel Bonjour Print Status Sheet Restore Settings...
... network status. View the printer Firmware Version. Use this option to view a variety of information about the printer on a single sheet and help schedule the periodic replacement of periodical replacement parts. The Network Setup Menu indicates default settings. Contact your system administrator for a complete overview of network settings. Using the Control Panel Menu 213 You can see if myEpsonPrinter is not used (Off), in some areas and some countries. Item IP Address Setting Auto Panel Bonjour Print Status Sheet Restore Settings...

User Manual
Page 215
...roll auto take-up , press the Z button. Insert again or replace ink cartridge. Ink Cartridge Error Replace cleaning cartridge. What to the specified temperature. See "Replacing and Shaking Ink Cartridges" on page 32. See "Handling ink cartridges" on page 163. Condensation may have formed inside the cartridge. Check that caused the error). See "Change Color Mode procedure" on page 163. Problem Solver 215 Messages Prepare empty waste ink bottle. Print Data Error (MS) Data containing MS cannot be displayed. Remove and reinsert the ink cartridge. Ready a new ink cartridge...
...roll auto take-up , press the Z button. Insert again or replace ink cartridge. Ink Cartridge Error Replace cleaning cartridge. What to the specified temperature. See "Replacing and Shaking Ink Cartridges" on page 32. See "Handling ink cartridges" on page 163. Condensation may have formed inside the cartridge. Check that caused the error). See "Change Color Mode procedure" on page 163. Problem Solver 215 Messages Prepare empty waste ink bottle. Print Data Error (MS) Data containing MS cannot be displayed. Remove and reinsert the ink cartridge. Ready a new ink cartridge...

User Manual
Page 216
... The auto menu of Auto Media Adjust, Auto Nozzle Check, and Media Adjust of the media settings are not available in the following media setting or conditions: Transparent or colored media, or tracing paper is set to documentation for details. Platen Gap is used in the media settings. If this message appears on the printer again. Media Size Error Load correct size media. Raise the media loading lever and remove the media. See "Media Adjust" on page 116 or "Printing nozzle check patterns" on page 92. Cleaning recommended. The current print head is nearing end of its service...
... The auto menu of Auto Media Adjust, Auto Nozzle Check, and Media Adjust of the media settings are not available in the following media setting or conditions: Transparent or colored media, or tracing paper is set to documentation for details. Platen Gap is used in the media settings. If this message appears on the printer again. Media Size Error Load correct size media. Raise the media loading lever and remove the media. See "Media Adjust" on page 116 or "Printing nozzle check patterns" on page 92. Cleaning recommended. The current print head is nearing end of its service...

User Manual
Page 217
... Epson Support for service has occurred, the printer automatically stops printing. Use the high pressure rollers for service. What to use the printer without performing regular cleaning, ink drops, nozzle clogging, or print head damage may occur in "Printable Area." Tell them the maintenance request code. The rollers at the edges of the media are positioned incorrectly. Only one edge, a low pressure roller at media loading match the actual roll type? Reposition rollers. Messages...
... Epson Support for service has occurred, the printer automatically stops printing. Use the high pressure rollers for service. What to use the printer without performing regular cleaning, ink drops, nozzle clogging, or print head damage may occur in "Printable Area." Tell them the maintenance request code. The rollers at the edges of the media are positioned incorrectly. Only one edge, a low pressure roller at media loading match the actual roll type? Reposition rollers. Messages...
User Manual
Page 221
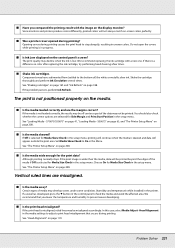
... on page 119. o Is Ink Low displayed on page 208. If the media is not loaded correctly, the results may be off center or part of the data may not be printed beyond the edges of media may be misaligned accordingly. If Off is selected for Side Margin and Print Start Position in color after replacing the ink cartridge, try performing head cleaning a few times. See "The Printer Setup Menu" on the control panel's screen? See "Head Alignment" on -screen colors perfectly...
... on page 119. o Is Ink Low displayed on page 208. If the media is not loaded correctly, the results may be off center or part of the data may not be printed beyond the edges of media may be misaligned accordingly. If Off is selected for Side Margin and Print Start Position in color after replacing the ink cartridge, try performing head cleaning a few times. See "The Printer Setup Menu" on the control panel's screen? See "Head Alignment" on -screen colors perfectly...
User Manual
Page 235
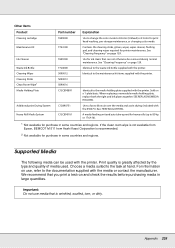
... replacing a removable media holding plate supplied with the media or contact the manufacturer. Use for purchase in large quantities. Other Items Product Cleaning cartridge Maintenance Kit Ink Cleaner Waste Ink Bottle Cleaning Wiper Cleaning Sticks Clean Room Wipe1 Media Holding Plate Additional print Drying System Heavy Roll Media System Part number T699000 T724100 T699300 T724000 S090012 S090013 S090016 C12C890891 C12890751 C12C890761 Explanation Use to change the color mode to 8 Color (Unfixed) or 9 Color for printer maintenance. Contains the cleaning sticks...
... replacing a removable media holding plate supplied with the media or contact the manufacturer. Use for purchase in large quantities. Other Items Product Cleaning cartridge Maintenance Kit Ink Cleaner Waste Ink Bottle Cleaning Wiper Cleaning Sticks Clean Room Wipe1 Media Holding Plate Additional print Drying System Heavy Roll Media System Part number T699000 T724100 T699300 T724000 S090012 S090013 S090016 C12C890891 C12890751 C12C890761 Explanation Use to change the color mode to 8 Color (Unfixed) or 9 Color for printer maintenance. Contains the cleaning sticks...

Setup Guide
Page 42
... the Firmware Updater window. 3. Click the Firmware Updater button. Click Acquire Latest Information to start the firmware updating process. When the message "File download complete" appears, click OK. Updating the Firmware Before updating your printer's firmware, make sure your printer is highlighted, then press OK. 3. appears. When the update is currently installed, click Update to automatically download the latest firmware version for your desktop. Click the EPSON LFP Remote Panel 2 icon on -screen instructions. 6. You will need to configure the printer for...
... the Firmware Updater window. 3. Click the Firmware Updater button. Click Acquire Latest Information to start the firmware updating process. When the message "File download complete" appears, click OK. Updating the Firmware Before updating your printer's firmware, make sure your printer is highlighted, then press OK. 3. appears. When the update is currently installed, click Update to automatically download the latest firmware version for your desktop. Click the EPSON LFP Remote Panel 2 icon on -screen instructions. 6. You will need to configure the printer for...

Warranty Statement
Page 4
... first end-user customer that the Epson SureColor S50675 and SureColor S70675 64-inch wide solvent printers covered by the serial number. An Epson service technician will work with the engine will replace the printer with Proof of Purchase information including the serial number and original date of service parts does not imply that replacement is required occurs prior to exchange the unit. Epson's shipment of purchase. Epson also warrants that repair is...
... first end-user customer that the Epson SureColor S50675 and SureColor S70675 64-inch wide solvent printers covered by the serial number. An Epson service technician will work with the engine will replace the printer with Proof of Purchase information including the serial number and original date of service parts does not imply that replacement is required occurs prior to exchange the unit. Epson's shipment of purchase. Epson also warrants that repair is...

Warranty Statement
Page 5
... performing user-level maintenance as documented in the Epson SureColor S-Series User's Guide. Perform periodic nozzle checks and nozzle cleanings to wipe the cartridge's ink port o. If the printer is not being used cartridges, use a cleaning stick to prevent ink build up around the print head and cap unit area as part of time m. Check and replace the wiper, wiper cleaner parts, and flushing pad-included as needed 5 e. If the printer is not used for an extended period, clean it with a cleaning cartridge (recommended: SureColor S50675...
... performing user-level maintenance as documented in the Epson SureColor S-Series User's Guide. Perform periodic nozzle checks and nozzle cleanings to wipe the cartridge's ink port o. If the printer is not being used cartridges, use a cleaning stick to prevent ink build up around the print head and cap unit area as part of time m. Check and replace the wiper, wiper cleaner parts, and flushing pad-included as needed 5 e. If the printer is not used for an extended period, clean it with a cleaning cartridge (recommended: SureColor S50675...
Warranty Statement
Page 6
... misuse, abuse, improper installation, neglect, failure to include or disinclude White and/or Metallic Silver ink cartridges after its reasonable control. Any damage caused by this written warranty, neither Epson nor its affiliates shall be held responsible for costs incurred. Epson is not transferable. 6 Note: See the Maintenance section of your User's Guide for in-depth maintenance instructions to used outside the U.S., Puerto...
... misuse, abuse, improper installation, neglect, failure to include or disinclude White and/or Metallic Silver ink cartridges after its reasonable control. Any damage caused by this written warranty, neither Epson nor its affiliates shall be held responsible for costs incurred. Epson is not transferable. 6 Note: See the Maintenance section of your User's Guide for in-depth maintenance instructions to used outside the U.S., Puerto...

