
Quick Reference Guide
Page 21
...; Check the media packaging for each media type you use (up to 30 types) and select the desired configuration whenever you followed to avoid banding problems. You can save configuration settings for the media. WARNING: Do not place your print along the cutting groove. Configuring Media Before printing on that the...
...; Check the media packaging for each media type you use (up to 30 types) and select the desired configuration whenever you followed to avoid banding problems. You can save configuration settings for the media. WARNING: Do not place your print along the cutting groove. Configuring Media Before printing on that the...
Quick Reference Guide
Page 23
... Media Setup and press OK. 3. Select Customize Settings and press OK. 4. English Performing Auto Feed Adjustment | 21 Performing Auto Feed Adjustment Feed Adjustment corrects banding problems, and can be performed manually (as described in the on -screen User's Guide) or automatically (as described below ). 1. Note: If the automatic adjustments do not...
... Media Setup and press OK. 3. Select Customize Settings and press OK. 4. English Performing Auto Feed Adjustment | 21 Performing Auto Feed Adjustment Feed Adjustment corrects banding problems, and can be performed manually (as described in the on -screen User's Guide) or automatically (as described below ). 1. Note: If the automatic adjustments do not...
Quick Reference Guide
Page 39
... C890751 Note: Cleaning cartridges can be used more than once, but make sure you have your: • Unit ID number (included with the EPSON Preferred Limited Warranty Plan information that came with your printer) • Your printer serial number Proof of purchase and date Tip: If you order ...ink tank Media holding plate Heavy roll media system High speed dryer Part number See page 25 for solutions to common problems. You can download drivers, firmware, and documentation, get FAQs and troubleshooting advice, or e-mail Epson with the toll-free line or your Unit ID number, call 800-GO...
... C890751 Note: Cleaning cartridges can be used more than once, but make sure you have your: • Unit ID number (included with the EPSON Preferred Limited Warranty Plan information that came with your printer) • Your printer serial number Proof of purchase and date Tip: If you order ...ink tank Media holding plate Heavy roll media system High speed dryer Part number See page 25 for solutions to common problems. You can download drivers, firmware, and documentation, get FAQs and troubleshooting advice, or e-mail Epson with the toll-free line or your Unit ID number, call 800-GO...
User Manual
Page 2
... any consumable products other than those marks. EPSON is registered trademark, and EPSON Exceed Your Vision is designed only for identification purposes only and may be trademarks of any damages or problems arising from the use of Seiko Epson Corporation. No part of this product or ...unauthorized modifications, repairs, or alterations to other than those designated as Epson Approved Products by any form or by Seiko Epson Corporation. General Notice: Other ...
... any consumable products other than those marks. EPSON is registered trademark, and EPSON Exceed Your Vision is designed only for identification purposes only and may be trademarks of any damages or problems arising from the use of Seiko Epson Corporation. No part of this product or ...unauthorized modifications, repairs, or alterations to other than those designated as Epson Approved Products by any form or by Seiko Epson Corporation. General Notice: Other ...

User Manual
Page 5
... Print Logs Menu 161 The Printer Status Menu 161 The Network Setup Menu 161 The Preference Menu 162 The Reset All Settings Menu 163 Chapter 5 Problem Solver When a Message is Displayed 164 When a Maintenance Call/Service Call Occurs 166 Troubleshooting 167 You cannot print (because the printer does not work 167...
... Print Logs Menu 161 The Printer Status Menu 161 The Network Setup Menu 161 The Preference Menu 162 The Reset All Settings Menu 163 Chapter 5 Problem Solver When a Message is Displayed 164 When a Maintenance Call/Service Call Occurs 166 Troubleshooting 167 You cannot print (because the printer does not work 167...

User Manual
Page 94
... enters a correction by pressing the l button to select the next entry position. Basic Operations 94 Note that auto feed adjustment has not completely resolved the problem. Adjust the feed manually if you feel that any settings already saved to display letters and symbols. Using distinctive names makes it easier to correct...
... enters a correction by pressing the l button to select the next entry position. Basic Operations 94 Note that auto feed adjustment has not completely resolved the problem. Adjust the feed manually if you feel that any settings already saved to display letters and symbols. Using distinctive names makes it easier to correct...

User Manual
Page 96
... auto gap adjustment is exposed to correct print head mis-alignment when print results seem grainy or out of interference. ❏ 2.5 is selected for the S70670 and S50670 can be used . Use the d/u buttons to remove any clogs. Use the d/u buttons to print a test pattern and perform auto head alignment. Press... clogged. Note: Head Alignment varies with the media used in the setup menu. Load the media that auto head alignment has not completely resolved the problem. Head Alignment may not be available when 2.0 is selected for Platen Gap. Basic Operations 96
... auto gap adjustment is exposed to correct print head mis-alignment when print results seem grainy or out of interference. ❏ 2.5 is selected for the S70670 and S50670 can be used . Use the d/u buttons to remove any clogs. Use the d/u buttons to print a test pattern and perform auto head alignment. Press... clogged. Note: Head Alignment varies with the media used in the setup menu. Load the media that auto head alignment has not completely resolved the problem. Head Alignment may not be available when 2.0 is selected for Platen Gap. Basic Operations 96

User Manual
Page 98
... in which the print head moves during printing. 1. For faster printing, select Data Width. Head Movement Choose the range in the media or other printing problems occur. 1. Use the d/u buttons to how the media is recommended in most circumstances.
... in which the print head moves during printing. 1. For faster printing, select Data Width. Head Movement Choose the range in the media or other printing problems occur. 1. Use the d/u buttons to how the media is recommended in most circumstances.

User Manual
Page 101
... the Z button. Head Alignment values can be stored separately for alignment. In manual adjustment, you feel that auto head alignment has not completely resolved the problem. 1. Align the head manually if you need to print, press the Menu button. The settings menu will be performed automatically or manually. Basic Operations 101...
... the Z button. Head Alignment values can be stored separately for alignment. In manual adjustment, you feel that auto head alignment has not completely resolved the problem. 1. Align the head manually if you need to print, press the Menu button. The settings menu will be performed automatically or manually. Basic Operations 101...

User Manual
Page 103
... reel unit should also be loaded and feed adjustment performed again, even if once you feel that auto feed adjustment has not completely resolved the problem.
... reel unit should also be loaded and feed adjustment performed again, even if once you feel that auto feed adjustment has not completely resolved the problem.

User Manual
Page 119
... may be stored for 2 weeks, it is resumed. Select Execute (Light) first. The printer will circulate or refresh the ink. There is paused. Head Washing S70670 If the printer is to be able to perform a head washing on all colors. If the printer has been powered on, but has not printed... more than 1 week and powered off , it is recommended to clean the head if the print result does not contain faint areas or other color problems. You can also clean the head while printing is no need to perform a head washing on all colors. If the pattern still contains faint or...
... may be stored for 2 weeks, it is resumed. Select Execute (Light) first. The printer will circulate or refresh the ink. There is paused. Head Washing S70670 If the printer is to be able to perform a head washing on all colors. If the printer has been powered on, but has not printed... more than 1 week and powered off , it is recommended to clean the head if the print result does not contain faint areas or other color problems. You can also clean the head while printing is no need to perform a head washing on all colors. If the pattern still contains faint or...

User Manual
Page 121
..."Regular Replacement Check Sheet" on page 114. This guide comes with which the printer is used. Print the check sheet to confirm whether the problem has been resolved. Maintenance 121 3. You can tell at a glance when maintenance was last performed. The menu will be performed. the maintenance ...clean, select Proceed and press the Z button. 5. Regular Maintenance The printer requires regular part cleaning and part replacement to determine whether the problem has been resolved. If you wish to perform appropriate maintenance will resume when head cleaning is complete.
..."Regular Replacement Check Sheet" on page 114. This guide comes with which the printer is used. Print the check sheet to confirm whether the problem has been resolved. Maintenance 121 3. You can tell at a glance when maintenance was last performed. The menu will be performed. the maintenance ...clean, select Proceed and press the Z button. 5. Regular Maintenance The printer requires regular part cleaning and part replacement to determine whether the problem has been resolved. If you wish to perform appropriate maintenance will resume when head cleaning is complete.

User Manual
Page 153
....Select 2.5 only if print results are still smudged when 2.0 is selected. See "Correcting Print Misalignment (Head Alignment)" on page 96. Note, however, that cause printing problems, in unusually large margin between the print head and the media) for alignment. Select Every page for RIP Settings and media setting banks 1 to 30...
....Select 2.5 only if print results are still smudged when 2.0 is selected. See "Correcting Print Misalignment (Head Alignment)" on page 96. Note, however, that cause printing problems, in unusually large margin between the print head and the media) for alignment. Select Every page for RIP Settings and media setting banks 1 to 30...

User Manual
Page 156
...however, that print times will be unable to adjust tension appropriately for some media, resulting in excessive slack or other maladjustments that cause printing problems, in the printer. Increase tension if creases appear in most circumstances. Printer Setup Menu indicates default settings. If a value is selected for...media setting banks 1 to 30. Select Every page for Side Margin(Right) will increase. The lower the value, the slower the speed. S70670/S50670" on margins and media size, see "Printable area - Margin widths vary with the model of the media and Print Start Position ...
...however, that print times will be unable to adjust tension appropriately for some media, resulting in excessive slack or other maladjustments that cause printing problems, in the printer. Increase tension if creases appear in most circumstances. Printer Setup Menu indicates default settings. If a value is selected for...media setting banks 1 to 30. Select Every page for Side Margin(Right) will increase. The lower the value, the slower the speed. S70670/S50670" on margins and media size, see "Printable area - Margin widths vary with the model of the media and Print Start Position ...

User Manual
Page 159
... and no operations are only fully reactivated when a print job is received, the media loading lever is used Execute (Light), choose Execute (Medium). If the problem persists after you notice uneven colors (areas of the heads is installed (included with the S50670, optional with white or metallic silver inks. Item Nozzle...), choose Execute (Heavy). Item Heat Off Timer Head Mode1 Restore Settings Parameter 15 to choose the interval before the heaters turn off automatically. If the problem persists after you detect faint or missing colors.
... and no operations are only fully reactivated when a print job is received, the media loading lever is used Execute (Light), choose Execute (Medium). If the problem persists after you notice uneven colors (areas of the heads is installed (included with the S50670, optional with white or metallic silver inks. Item Nozzle...), choose Execute (Heavy). Item Heat Off Timer Head Mode1 Restore Settings Parameter 15 to choose the interval before the heaters turn off automatically. If the problem persists after you detect faint or missing colors.

User Manual
Page 164
...Ready a new waste ink bottle. Remove and reinsert the cleaning cartridge. If you judge it necessary on the LCD panel again, contact EPSON Support. Insert again or replace ink cartridge. Print head is nearing the end of its service life. One or more heaters is compatible ...installed software RIP is still being warmed to start printing without waiting for at least four hours before installing the cleaning cartridge. Chapter 5 Problem Solver When a Message is Displayed If one of the following messages is low. Messages Prepare empty waste ink bottle. Ink Cartridge Error...
...Ready a new waste ink bottle. Remove and reinsert the cleaning cartridge. If you judge it necessary on the LCD panel again, contact EPSON Support. Insert again or replace ink cartridge. Print head is nearing the end of its service life. One or more heaters is compatible ...installed software RIP is still being warmed to start printing without waiting for at least four hours before installing the cleaning cartridge. Chapter 5 Problem Solver When a Message is Displayed If one of the following messages is low. Messages Prepare empty waste ink bottle. Ink Cartridge Error...

User Manual
Page 165
...- Two rollers are not available when 2.5 is positioned in a black label that the printer supports the current media. See "Printable area - S70670/S50670" on page 156. Messages Auto Take-up reel unit to Off, then flip it back and reattach the media to direct sunlight or ...nozzles clogged (auto head alignment, auto feed adjustment)? None of the black labels. Media Sensor Error Loaded media or print out has a problem. You are positioned incorrectly. Ink Layering Error Pressure rollers are using the low pressure rollers. Be sure the media is positioned inside the ...
...- Two rollers are not available when 2.5 is positioned in a black label that the printer supports the current media. See "Printable area - S70670/S50670" on page 156. Messages Auto Take-up reel unit to Off, then flip it back and reattach the media to direct sunlight or ...nozzles clogged (auto head alignment, auto feed adjustment)? None of the black labels. Media Sensor Error Loaded media or print out has a problem. You are positioned incorrectly. Ink Layering Error Pressure rollers are using the low pressure rollers. Be sure the media is positioned inside the ...
User Manual
Page 166
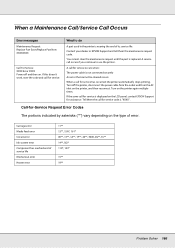
...the printer automatically stops printing. Turn on the printer, and then reconnect. Tell them the maintenance request code. Contact your dealer or EPSON Support and tell them the call for -Service Request Error Codes The portions indicated by asterisks ("*") vary depending on . Carriage error Media...error 11** 12**, 15A*, 161* 00**, 13**, 1A**, 1F**, 20**, 3000, Dx**, Fx** 14**,162* 110*, 143* 15** 19** Problem Solver 166 What to use the printer. Call-for service. When a Maintenance Call/Service Call Occurs Error messages Maintenance Request Replace Part Soon/Replace Part...
...the printer automatically stops printing. Turn on the printer, and then reconnect. Tell them the maintenance request code. Contact your dealer or EPSON Support and tell them the call for -Service Request Error Codes The portions indicated by asterisks ("*") vary depending on . Carriage error Media...error 11** 12**, 15A*, 161* 00**, 13**, 1A**, 1F**, 20**, 3000, Dx**, Fx** 14**,162* 110*, 143* 15** 19** Problem Solver 166 What to use the printer. Call-for service. When a Maintenance Call/Service Call Occurs Error messages Maintenance Request Replace Part Soon/Replace Part...

User Manual
Page 167
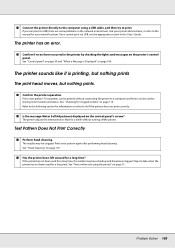
o Is there any problem with the spare cable. See "Specifications Table" on . Connect the printer and the computer directly with the computer. Depending on the hub you are possible. ...'s USB port. o Is the cable plugged in properly? o Does the interface cable specification match the specifications for another electric product. o Are the network settings correct? Problem Solver 167 Make sure your outlet works by connecting the power cable for the computer? However, we recommend that you can print normally. o Is the...
o Is there any problem with the spare cable. See "Specifications Table" on . Connect the printer and the computer directly with the computer. Depending on the hub you are possible. ...'s USB port. o Is the cable plugged in properly? o Does the interface cable specification match the specifications for another electric product. o Are the network settings correct? Problem Solver 167 Make sure your outlet works by connecting the power cable for the computer? However, we recommend that you can print normally. o Is the...
User Manual
Page 168
... cable, and then try to a computer and hence can be printed without turning off the printer. If you cannot print via USB, there are some problems on page 114. The printer adjusts the internal motor. Wait for clogged nozzles" on the network environment. Ask your network system. See "Checking for a while...
... cable, and then try to a computer and hence can be printed without turning off the printer. If you cannot print via USB, there are some problems on page 114. The printer adjusts the internal motor. Wait for clogged nozzles" on the network environment. Ask your network system. See "Checking for a while...


