
User Manual
Page 4
... 85 Advanced Color Controls - Windows 97 Reduce/Enlarge Options - Windows 101 Checking Print Status - Windows 106 Selecting Default Print Settings - Windows 98 Multi-Page Printing Options - Windows 103 Saving, Sharing, and Customizing the Printer Settings 103 Saving and Sharing Print Settings - Windows 83 Advanced B&W Photo Options - Windows 84 Print Quality Options - Windows 87 Paper Source Options - Take Up with the Printable Side Out 63 Removing Media from the Optional Auto Take-up Reel 68 Available Epson Papers ...69 Borderless Paper Type Compatibility 78...
... 85 Advanced Color Controls - Windows 97 Reduce/Enlarge Options - Windows 101 Checking Print Status - Windows 106 Selecting Default Print Settings - Windows 98 Multi-Page Printing Options - Windows 103 Saving, Sharing, and Customizing the Printer Settings 103 Saving and Sharing Print Settings - Windows 83 Advanced B&W Photo Options - Windows 84 Print Quality Options - Windows 87 Paper Source Options - Take Up with the Printable Side Out 63 Removing Media from the Optional Auto Take-up Reel 68 Available Epson Papers ...69 Borderless Paper Type Compatibility 78...

User Manual
Page 5
......138 Network Setup Menu Settings ...139 Preferences Menu Settings ...140 Administrator Menu Settings ...140 Replacing Ink Cartridges ...142 Checking Cartridge Status with Windows 142 Checking Cartridge Status with OS X 145 Purchase Epson Ink Cartridges...146 Ink Cartridge and Maintenance Box Part Numbers 146 Removing and Installing Ink Cartridges 148 Replacing Maintenance Boxes...151 Switch Black Ink Type ...153 Switching the Black Ink Type...154 Black Ink Type Media List...154 Adjusting Print Quality...156 Print Head Maintenance...156 Print Head Nozzle Check...156 5 OS X...125 Color...
......138 Network Setup Menu Settings ...139 Preferences Menu Settings ...140 Administrator Menu Settings ...140 Replacing Ink Cartridges ...142 Checking Cartridge Status with Windows 142 Checking Cartridge Status with OS X 145 Purchase Epson Ink Cartridges...146 Ink Cartridge and Maintenance Box Part Numbers 146 Removing and Installing Ink Cartridges 148 Replacing Maintenance Boxes...151 Switch Black Ink Type ...153 Switching the Black Ink Type...154 Black Ink Type Media List...154 Adjusting Print Quality...156 Print Head Maintenance...156 Print Head Nozzle Check...156 5 OS X...125 Color...
User Manual
Page 6
...Solving Problems ...179 Product Status Messages ...179 Solving Printer Problems...185 Printer Does Not Turn On ...185 LCD Screen Shuts Off ...185 Solving Printing Problems ...185 Nothing Prints ...186 Cannot Print Over a Network...186 Print Head Moves But Nothing Prints 187 Red Light Shines Inside the Printer 187 Solving Paper Problems...187 Paper Feeding Problems...187 Roll Paper Jam Problems ...188 Cut Sheet Paper Jam Problems 194 Paper Does Not Collect in the Basket or is Creased 197 Solving Print Quality Problems ...197 Nozzle Check Pattern Prints Incorrectly 197 Overall Print Quality...
...Solving Problems ...179 Product Status Messages ...179 Solving Printer Problems...185 Printer Does Not Turn On ...185 LCD Screen Shuts Off ...185 Solving Printing Problems ...185 Nothing Prints ...186 Cannot Print Over a Network...186 Print Head Moves But Nothing Prints 187 Red Light Shines Inside the Printer 187 Solving Paper Problems...187 Paper Feeding Problems...187 Roll Paper Jam Problems ...188 Cut Sheet Paper Jam Problems 194 Paper Does Not Collect in the Basket or is Creased 197 Solving Print Quality Problems ...197 Nozzle Check Pattern Prints Incorrectly 197 Overall Print Quality...

User Manual
Page 86
... profile and the selected Media Type setting, using the Gamma setting. If your photo includes a face with an intentional color cast, such as the Mode setting, you can choose from various Scene Correction settings to automatically analyze your photos. Use this to turn off . For this setting if your application software. Click the Advanced button to the Adobe RGB color standard. Off (No Color Adjustment) Turns off color management in the printer driver. PhotoEnhance Lets you...
... profile and the selected Media Type setting, using the Gamma setting. If your photo includes a face with an intentional color cast, such as the Mode setting, you can choose from various Scene Correction settings to automatically analyze your photos. Use this to turn off . For this setting if your application software. Click the Advanced button to the Adobe RGB color standard. Off (No Color Adjustment) Turns off color management in the printer driver. PhotoEnhance Lets you...
User Manual
Page 101
... settings and create and manage custom paper configurations. Parent topic: Printing with Windows Related tasks Checking the Nozzles Using a Computer Utility Cleaning the Print Head Using a Computer Utility Aligning the Print Head Automatically Using a Computer Utility Printing Your Document or Photo - Click OK to perform printer calibration. This option is available only if Epson LFP Remote Panel 2 is installed. • Epson Color Calibration Utility to close the printer software window. • Monitoring Preferences to select the error notifications displayed on the Epson Status...
... settings and create and manage custom paper configurations. Parent topic: Printing with Windows Related tasks Checking the Nozzles Using a Computer Utility Cleaning the Print Head Using a Computer Utility Aligning the Print Head Automatically Using a Computer Utility Printing Your Document or Photo - Click OK to perform printer calibration. This option is available only if Epson LFP Remote Panel 2 is installed. • Epson Color Calibration Utility to close the printer software window. • Monitoring Preferences to select the error notifications displayed on the Epson Status...

User Manual
Page 116
... paper type does not support this setting if your printer software so you can manage color using plain paper. Click the Advanced Color Settings tab to use ColorSync to use advanced color controls. • Off (No Color Adjustment): Turns off color management in your source file was captured in Adobe RGB. OS X Output Resolution Settings - Click the Advanced Color Settings tab to manage colors. Use this option, print black-and- Note: If desired, you can instead use advanced color controls. • EPSON Standard...
... paper type does not support this setting if your printer software so you can manage color using plain paper. Click the Advanced Color Settings tab to use ColorSync to use advanced color controls. • Off (No Color Adjustment): Turns off color management in your source file was captured in Adobe RGB. OS X Output Resolution Settings - Click the Advanced Color Settings tab to manage colors. Use this option, print black-and- Note: If desired, you can instead use advanced color controls. • EPSON Standard...
User Manual
Page 138
... Switch Black Ink Type Related tasks Adjusting the Platen Gap Checking the Nozzles Using the Product Control Panel Cleaning the Print Head Using the Product Control Panel Printer Status Menu Settings The Printer Setup menu lets you use the Epson Color Calibration Utility. Allows you to their default values. If set to print an automatic nozzle check pattern. Description Selects how often to Off, an error appears on the server. When the optional internal print server is installed, enables the printer to skip any job that will not print due to a paper size, paper source, or output paper...
... Switch Black Ink Type Related tasks Adjusting the Platen Gap Checking the Nozzles Using the Product Control Panel Cleaning the Print Head Using the Product Control Panel Printer Status Menu Settings The Printer Setup menu lets you use the Epson Color Calibration Utility. Allows you to their default values. If set to print an automatic nozzle check pattern. Description Selects how often to Off, an error appears on the server. When the optional internal print server is installed, enables the printer to skip any job that will not print due to a paper size, paper source, or output paper...
User Manual
Page 156
... print a nozzle check pattern to check for clogged nozzles before you clean them so you may need to clean the print head nozzles. You can check for clogged nozzles. Print Head Nozzle Check Print Head Cleaning Parent topic: Adjusting Print Quality Related tasks Removing and Installing Ink Cartridges Print Head Nozzle Check You can check the print head nozzles using the control panel on your product. 1. Press the Menu button. 4. Make sure the correct paper type is loaded in the printer. 2. Note: You cannot clean the print head if an ink cartridge is low. Adjusting Print Quality...
... print a nozzle check pattern to check for clogged nozzles before you clean them so you may need to clean the print head nozzles. You can check for clogged nozzles. Print Head Nozzle Check Print Head Cleaning Parent topic: Adjusting Print Quality Related tasks Removing and Installing Ink Cartridges Print Head Nozzle Check You can check the print head nozzles using the control panel on your product. 1. Press the Menu button. 4. Make sure the correct paper type is loaded in the printer. 2. Note: You cannot clean the print head if an ink cartridge is low. Adjusting Print Quality...

User Manual
Page 180
... an automatic print head alignment. • Check that is more than 0.04 inches (1 mm) thick. • Make sure the printer is not exposed to Off. Paper Cut Error Remove uncut paper. Loaded paper or print out has a problem. Cut off any other time, make sure you are using scissors or another manual cutter. Press the OK button, pull down on the paper, and cut sheet, remove and reload the paper. Remove the paper and press the Loaded paper size is jammed inside the printer, remove it using roll paper, remove and...
... an automatic print head alignment. • Check that is more than 0.04 inches (1 mm) thick. • Make sure the printer is not exposed to Off. Paper Cut Error Remove uncut paper. Loaded paper or print out has a problem. Cut off any other time, make sure you are using scissors or another manual cutter. Press the OK button, pull down on the paper, and cut sheet, remove and reload the paper. Remove the paper and press the Loaded paper size is jammed inside the printer, remove it using roll paper, remove and...
User Manual
Page 183
... more details. ILS30EP Error The optional SpectroProofer UVS is nearing the end of printer and make sure the SpectroProofer mounter is connected correctly. Wait a moment, then turn on again. Continue? Wait a moment, then turn on the displayed error code. (error code) Maintenance Request A part used in the printer is not installed correctly. See the SpectroProofer documentation for support and provide them with the displayed maintenance request code. Contact Epson Replace Part Soon/Replace Part Now for details on...
... more details. ILS30EP Error The optional SpectroProofer UVS is nearing the end of printer and make sure the SpectroProofer mounter is connected correctly. Wait a moment, then turn on again. Continue? Wait a moment, then turn on the displayed error code. (error code) Maintenance Request A part used in the printer is not installed correctly. See the SpectroProofer documentation for support and provide them with the displayed maintenance request code. Contact Epson Replace Part Soon/Replace Part Now for details on...
User Manual
Page 198
.... Turn the printer on the LCD screen. If you selected in the printer driver. Parent topic: Solving Print Quality Problems Related concepts Print Head Nozzle Check Print Head Cleaning Related references Administrator Menu Settings Overall Print Quality is Poor If you notice that your print quality is uneven, too light, too dark, or there are lines in the print (banding), try these solutions: • Run a nozzle check to prevent the nozzles from clogging. Replace any of installation in the printer). Replace expired cartridges...
.... Turn the printer on the LCD screen. If you selected in the printer driver. Parent topic: Solving Print Quality Problems Related concepts Print Head Nozzle Check Print Head Cleaning Related references Administrator Menu Settings Overall Print Quality is Poor If you notice that your print quality is uneven, too light, too dark, or there are lines in the print (banding), try these solutions: • Run a nozzle check to prevent the nozzles from clogging. Replace any of installation in the printer). Replace expired cartridges...
User Manual
Page 208
... considerably based on images printed, print settings, paper type, frequency of ink cartridges and ink supplies are designed for printer setup and not for printing. Parent topic: Technical Specifications Ink Cartridge Specifications Note: This product uses only genuine Epson-brand cartridges. Commercial Edition: Cyan, Light Cyan, Vivid Magenta, Vivid Light Magenta, Yellow, Orange, Green, Violet, Light Black, Photo Black, Matte Black. To print longer images, you need to use third-party banner printing software. Pigment ink SC-P7000/SC-P9000: Standard Edition: Cyan, Light Cyan, Vivid...
... considerably based on images printed, print settings, paper type, frequency of ink cartridges and ink supplies are designed for printer setup and not for printing. Parent topic: Technical Specifications Ink Cartridge Specifications Note: This product uses only genuine Epson-brand cartridges. Commercial Edition: Cyan, Light Cyan, Vivid Magenta, Vivid Light Magenta, Yellow, Orange, Green, Violet, Light Black, Photo Black, Matte Black. To print longer images, you need to use third-party banner printing software. Pigment ink SC-P7000/SC-P9000: Standard Edition: Cyan, Light Cyan, Vivid...
User Manual
Page 213
... occurs to the plug, replace the cord set or consult a qualified electrician. Doing so may damage the product. • Do not spill liquid on a flat, stable surface that contain flammable gases inside the product or touch the ink cartridges while printing. • Do not move the print head by the cable. • Do not put your documentation, do not tilt...
... occurs to the plug, replace the cord set or consult a qualified electrician. Doing so may damage the product. • Do not spill liquid on a flat, stable surface that contain flammable gases inside the product or touch the ink cartridges while printing. • Do not move the print head by the cable. • Do not put your documentation, do not tilt...
User Manual
Page 19
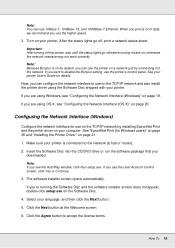
.../DVD drive or run the software package that you want to use the printer's control panel. Click the Next button at the Welcome screen 6. After the status lights go off , print a network status sheet. If you downloaded. If you are using the Software Disc shipped with your printer User's Guide for use on the TCP/IP network by default, you can configure the network interface to disable the Bonjour setting, use on the TCP/IP network and also install the printer driver using Windows...
.../DVD drive or run the software package that you want to use the printer's control panel. Click the Next button at the Welcome screen 6. After the status lights go off , print a network status sheet. If you downloaded. If you are using the Software Disc shipped with your printer User's Guide for use on the TCP/IP network by default, you can configure the network interface to disable the Bonjour setting, use on the TCP/IP network and also install the printer driver using Windows...
User Manual
Page 21
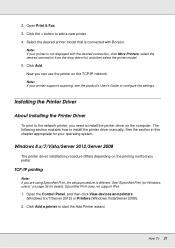
... page 36 for your operating system. TCP/IP printing Note: If you prefer. Select the desired printer model that is different. Open the Control Panel, and then click View devices and printers (Windows 8.x/7/Server 2012) or Printers (Windows Vista/Server 2008). 2. Installing the Printer Driver About Installing the Printer Driver To print to configure the settings. Click Add a printer to install the printer driver manually. Click the + button to install the printer driver on the TCP/IP network. Now you need to add a new printer. 4. Open Print...
... page 36 for your operating system. TCP/IP printing Note: If you prefer. Select the desired printer model that is different. Open the Control Panel, and then click View devices and printers (Windows 8.x/7/Server 2012) or Printers (Windows Vista/Server 2008). 2. Installing the Printer Driver About Installing the Printer Driver To print to configure the settings. Click Add a printer to install the printer driver manually. Click the + button to install the printer driver on the TCP/IP network. Now you need to add a new printer. 4. Open Print...
User Manual
Page 23
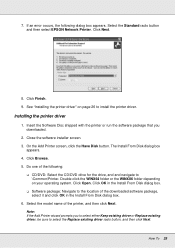
... an error occurs, the following : O CD/DVD: Select the CD/DVD drive for the drive, and and navigate to install the printer driver. Click OK in the Install From Disk dialog box. 6. Select the Standard radio button and then select EPSON Network Printer. Insert the Software Disc shipped with the printer or run the software package that you to select either Keep existing driver or Replace existing driver, be...
... an error occurs, the following : O CD/DVD: Select the CD/DVD drive for the drive, and and navigate to install the printer driver. Click OK in the Install From Disk dialog box. 6. Select the Standard radio button and then select EPSON Network Printer. Insert the Software Disc shipped with the printer or run the software package that you to select either Keep existing driver or Replace existing driver, be...

User Manual
Page 26
... Keep existing driver or Replace existing driver, be sure to \Common\Printer. On the Add Printer screen, click the Have Disk button. Click OK in the Install From Disk dialog box. 6. If an error occurs, the following : O CD/DVD: Select the CD/DVD drive for the drive, and and navigate to select the Replace existing driver radio button, and then click Next. O Software package: Navigate to install...
... Keep existing driver or Replace existing driver, be sure to \Common\Printer. On the Add Printer screen, click the Have Disk button. Click OK in the Install From Disk dialog box. 6. If an error occurs, the following : O CD/DVD: Select the CD/DVD drive for the drive, and and navigate to select the Replace existing driver radio button, and then click Next. O Software package: Navigate to install...
User Manual
Page 29
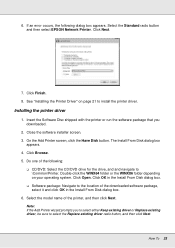
... software installer screen. 3. Do one of the printer, and then click Next. How To 29 Installing the printer driver 1. 7. The Install From Disk dialog box appears. 4. Click Open. If an error occurs, the following : O CD/DVD: Select the CD/DVD drive for the drive, and and navigate to select the Replace existing driver radio button, and then click Next. Select the Standard radio button and then select EPSON Network Printer...
... software installer screen. 3. Do one of the printer, and then click Next. How To 29 Installing the printer driver 1. 7. The Install From Disk dialog box appears. 4. Click Open. If an error occurs, the following : O CD/DVD: Select the CD/DVD drive for the drive, and and navigate to select the Replace existing driver radio button, and then click Next. Select the Standard radio button and then select EPSON Network Printer...
User Manual
Page 40
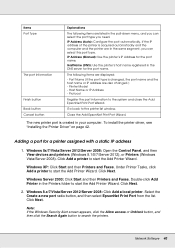
IP Address (Auto): Configure the port automatically. Printer Model - The new printer port is created in the Printers folder to start the Add Printer Wizard. Click Add a printer to search the printers. Click Next. Windows Server 2003: Click Start and then Printers and Faxes. Double-click Add Printer in your computer. Note: If the Windows Security Alert screen appears, click the Allow access or Unblock button, and then click the Search Again button to start the Add Printer Wizard...
IP Address (Auto): Configure the port automatically. Printer Model - The new printer port is created in the Printers folder to start the Add Printer Wizard. Click Add a printer to search the printers. Click Next. Windows Server 2003: Click Start and then Printers and Faxes. Double-click Add Printer in your computer. Note: If the Windows Security Alert screen appears, click the Allow access or Unblock button, and then click the Search Again button to start the Add Printer Wizard...

Quick Reference
Page 29
... certain media types only), or select Quality Options to display advanced settings. 6. Choose the paper Source in the Size menu, then click the User Defined button. Select one of photographic printing. Select the paper Size setting for any type of the Mode settings. Type a name for instructions. 5. For the Color setting, select Color for the paper you loaded. To print black-and-white photos using Advanced B&W Photo mode, see your online User's Guide. 8. If you 're printing borderless photos, select Borderless, if available. Select User Defined in which you loaded. 4. To adjust...
... certain media types only), or select Quality Options to display advanced settings. 6. Choose the paper Source in the Size menu, then click the User Defined button. Select one of photographic printing. Select the paper Size setting for any type of the Mode settings. Type a name for instructions. 5. For the Color setting, select Color for the paper you loaded. To print black-and-white photos using Advanced B&W Photo mode, see your online User's Guide. 8. If you 're printing borderless photos, select Borderless, if available. Select User Defined in which you loaded. 4. To adjust...

