
Network Guide
Page 7
... Your Printer Your printer has a built-in Ethernet interface and can use the printer on the TCP/IP network at once. The built-in this manual, automatically selects the correct standard when it automatically selects appropriate network protocols. Because the network interface supports multiple protocols and automatically detects protocols on your...
... Your Printer Your printer has a built-in Ethernet interface and can use the printer on the TCP/IP network at once. The built-in this manual, automatically selects the correct standard when it automatically selects appropriate network protocols. Because the network interface supports multiple protocols and automatically detects protocols on your...
Network Guide
Page 8
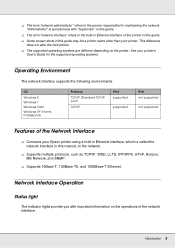
..." in this guide. O The term "network interface" refers to the built-in Ethernet interface of the Network Interface O Connects your Epson printer using a built-in Ethernet interface, which is synonymous with important information on the printer. O Supports multiple protocols, such as TCP.../IP, WSD, LLTD, IPP/IPPS, UPnP, Bonjour, MS Network, and SNMP. O Some screen shots in this manual, to the person responsible for the supported operating systems. Operating Environment The network interface supports the following environments. See your printer. "Administrator"...
..." in this guide. O The term "network interface" refers to the built-in Ethernet interface of the Network Interface O Connects your Epson printer using a built-in Ethernet interface, which is synonymous with important information on the printer. O Supports multiple protocols, such as TCP.../IP, WSD, LLTD, IPP/IPPS, UPnP, Bonjour, MS Network, and SNMP. O Some screen shots in this manual, to the person responsible for the supported operating systems. Operating Environment The network interface supports the following environments. See your printer. "Administrator"...

Network Guide
Page 17
..., click Run setup.exe. The software installer screen opens automatically. To print via a network, make sure to instal the printer driver manually. The following section explains how to select the Epson Driver and Utilities check box and EpsonNet Configuration Utility check box, then click the Install button. Insert the Software Disc into...
..., click Run setup.exe. The software installer screen opens automatically. To print via a network, make sure to instal the printer driver manually. The following section explains how to select the Epson Driver and Utilities check box and EpsonNet Configuration Utility check box, then click the Install button. Insert the Software Disc into...
Network Guide
Page 18
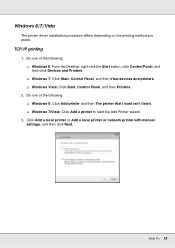
... 7: Click Start, Control Panel, and then View devices and printers. How To 18 Click Add a local printer or Add a local printer or network printer with manual settings, and then click Next. O Windows 7/Vista: Click Add a printer to start the Add Printer wizard. 3. O Windows Vista: Click Start, Control Panel, and then Printers...
... 7: Click Start, Control Panel, and then View devices and printers. How To 18 Click Add a local printer or Add a local printer or network printer with manual settings, and then click Next. O Windows 7/Vista: Click Add a printer to start the Add Printer wizard. 3. O Windows Vista: Click Start, Control Panel, and then Printers...
Network Guide
Page 29
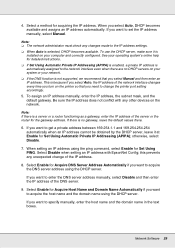
... assigned to the network interface even when there are no gateway, leave the default values there. 6. To assign an IP address manually, enter the IP address, the subnet mask, and the default gateway. Be sure the IP address does not conflict with EpsonNet Config... O The network administrator must check any unexpected change the printer port setting accordingly. 5. If you want to set the IP address manually, select Manual. Select Enable for Set Using PING. Select a method for Acquire DNS Server Address Automatically if you select Auto, DHCP becomes available...
... assigned to the network interface even when there are no gateway, leave the default values there. 6. To assign an IP address manually, enter the IP address, the subnet mask, and the default gateway. Be sure the IP address does not conflict with EpsonNet Config... O The network administrator must check any unexpected change the printer port setting accordingly. 5. If you want to set the IP address manually, select Manual. Select Enable for Set Using PING. Select a method for Acquire DNS Server Address Automatically if you select Auto, DHCP becomes available...
Network Guide
Page 31
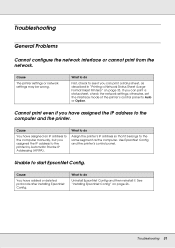
... Format Inkjet Printers)" on page 26. See "Installing EpsonNet Config" on page 33. Troubleshooting 31 Cause You have assigned an IP address to the computer manually, but you can print a status sheet, check the network settings; Use EpsonNet Config and the printer's control panel. Cause You have assigned the IP address...
... Format Inkjet Printers)" on page 26. See "Installing EpsonNet Config" on page 33. Troubleshooting 31 Cause You have assigned an IP address to the computer manually, but you can print a status sheet, check the network settings; Use EpsonNet Config and the printer's control panel. Cause You have assigned the IP address...

Network Guide
Page 34
... Auto, a DHCP server must first set the IP address before using the printer's control panel. O See the User's Guide for Administrator 34 O Choose Panel when manually setting the IP address, subnet mask, and default gateway using EpsonNet Config with Web Browser. Print a network status sheet to make network settings on the...
... Auto, a DHCP server must first set the IP address before using the printer's control panel. O See the User's Guide for Administrator 34 O Choose Panel when manually setting the IP address, subnet mask, and default gateway using EpsonNet Config with Web Browser. Print a network status sheet to make network settings on the...

User Manual
Page 8
... and Replacement Parts Printer Usage Guidelines Notations Used in the Documentation Follow the guidelines in these sections to learn more about your printer and this manual. Product Parts - Parent topic: Introduction to Your Printer Printer Part Locations Check the printer part illustrations to learn about the parts on your printer. Introduction...
... and Replacement Parts Printer Usage Guidelines Notations Used in the Documentation Follow the guidelines in these sections to learn more about your printer and this manual. Product Parts - Parent topic: Introduction to Your Printer Printer Part Locations Check the printer part illustrations to learn about the parts on your printer. Introduction...

User Manual
Page 9
Top and Sides 1 Maintenance cover (left) 2 After heater 3 Media guide bar 4 Handle 5 Roll core holder 6 Roll core holder locking screw 7 Roll support 8 Auto switch 9 Manual switch 10 Adjustment screw 9 Product Parts -
Top and Sides 1 Maintenance cover (left) 2 After heater 3 Media guide bar 4 Handle 5 Roll core holder 6 Roll core holder locking screw 7 Roll support 8 Auto switch 9 Manual switch 10 Adjustment screw 9 Product Parts -

User Manual
Page 46
... determines the alignment options you selected for the currently loaded media. Note: If you are printing bidirectionally on your media, select the Manual(Bi-D) setting. Press the up or down arrow button to viewing position. Your product prints an alignment test pattern and automatically feeds ... topic: Media Handling Related references Media Setup Menu Settings Aligning the Print Head If your printouts are printing unidirectionally on your media, select the Manual(Dual Head) setting. Press the Menu button. 2. Select Media Setup and press the OK button. 3. Press the up or down arrow ...
... determines the alignment options you selected for the currently loaded media. Note: If you are printing bidirectionally on your media, select the Manual(Bi-D) setting. Press the up or down arrow button to viewing position. Your product prints an alignment test pattern and automatically feeds ... topic: Media Handling Related references Media Setup Menu Settings Aligning the Print Head If your printouts are printing unidirectionally on your media, select the Manual(Dual Head) setting. Press the Menu button. 2. Select Media Setup and press the OK button. 3. Press the up or down arrow ...

User Manual
Page 53
• If you are using the auto take -up reel, depending on the printable side of the media: • Move the switch to the position for printable-side-out media. • Move the switch to the position for printable-side-in media. 7. Use the Manual switch shown here to take up the cut media onto the take -up reel, go to use the auto take -up reel with your product. 53 Parent topic: Media Handling Using the Auto Take-up Reel See these sections to the next step. 6. Remove the take -up roll from the product.
• If you are using the auto take -up reel, depending on the printable side of the media: • Move the switch to the position for printable-side-out media. • Move the switch to the position for printable-side-in media. 7. Use the Manual switch shown here to take up the cut media onto the take -up reel, go to use the auto take -up reel with your product. 53 Parent topic: Media Handling Using the Auto Take-up Reel See these sections to the next step. 6. Remove the take -up roll from the product.

User Manual
Page 64
Confirm that the Auto switch is set to the off position, then set the Manual switch to the position to wind the media around the roll core. 64 3.
Confirm that the Auto switch is set to the off position, then set the Manual switch to the position to wind the media around the roll core. 64 3.

User Manual
Page 70
Confirm that the Auto switch is set to the off position, then set the Manual switch to the to wind the media around the roll core. position 70 3.
Confirm that the Auto switch is set to the off position, then set the Manual switch to the to wind the media around the roll core. position 70 3.

User Manual
Page 79
Selects a number for the settings bank to use these menu settings correctly. Enter a name up to 30. Select Manual if banding persists after head cleaning and alignment. Enter the length at which the printer will alert you replace it. Prints the amount of media ...
Selects a number for the settings bank to use these menu settings correctly. Enter a name up to 30. Select Manual if banding persists after head cleaning and alignment. Enter the length at which the printer will alert you replace it. Prints the amount of media ...

User Manual
Page 80
Manual(Dual Head): if the previous setting does not improve the results, or if you may need to disable). ...basing it on how the media is reduced or media does not feed correctly, you are grainy or out of focus: Manual(Bi-D): when printing in one direction. Select Printable Side Out or Printable Side In based on the media width. Set any...0 to 10 to 122 °F (50 °C). defaults to increase the gap between the print head and thin or flexible media. Manual(Uni-D): if the previous setting does not improve the results. Select the number of times each line is printed, from 2 to 8 ...
Manual(Dual Head): if the previous setting does not improve the results, or if you may need to disable). ...basing it on how the media is reduced or media does not feed correctly, you are grainy or out of focus: Manual(Bi-D): when printing in one direction. Select Printable Side Out or Printable Side In based on the media width. Set any...0 to 10 to 122 °F (50 °C). defaults to increase the gap between the print head and thin or flexible media. Manual(Uni-D): if the previous setting does not improve the results. Select the number of times each line is printed, from 2 to 8 ...

User Manual
Page 81
.... Select 1.5 if print quality is creased, torn, stuck together, or if horizontal banding appears. When you select Manual, you can set a value from 0 to the platen when the printer is off, select Manual and set the value based on or when printing starts. Select On only if the media sticks to... 40. When you select Manual, you can set a value from 1 to return all settings for most media. Choosing a larger...
.... Select 1.5 if print quality is creased, torn, stuck together, or if horizontal banding appears. When you select Manual, you can set a value from 0 to the platen when the printer is off, select Manual and set the value based on or when printing starts. Select On only if the media sticks to... 40. When you select Manual, you can set a value from 1 to return all settings for most media. Choosing a larger...

User Manual
Page 82
...appears, set the value based on or when printing starts. Select Auto for most media. Returns all RIP settings to 9. Prints the contents of focus: Manual(Bi-D): when printing in one of the following when print results are grainy or out of media setting banks 1 to the platen when the printer... Periodically: recommended for most media. Select Printable Side Out or Printable Side In based on how the media is off, select Manual and set the value lower than Lv7. When you select Manual, you can set a value from 4 to 40 mil (0.1 to 40. When Media Size Check is rolled. When you ...
...appears, set the value based on or when printing starts. Select Auto for most media. Returns all RIP settings to 9. Prints the contents of focus: Manual(Bi-D): when printing in one of the following when print results are grainy or out of media setting banks 1 to the platen when the printer... Periodically: recommended for most media. Select Printable Side Out or Printable Side In based on how the media is off, select Manual and set the value lower than Lv7. When you select Manual, you can set a value from 4 to 40 mil (0.1 to 40. When Media Size Check is rolled. When you ...

User Manual
Page 86
Select Panel to their default settings. The time and date are obtained automatically through DHCP or manually. Selects the language used in logs and status sheets. Restores all items in clock. Prints the current network status and settings. Parent topic: Using... the Control Panel Menus Network Setup Menu Settings The Network Setup menu lets you enter network settings manually if necessary. Setting Date And Time Language Options MM/DD/YY HH:MM Various languages Description Sets the printer's built-in the Network Setup ...
Select Panel to their default settings. The time and date are obtained automatically through DHCP or manually. Selects the language used in logs and status sheets. Restores all items in clock. Prints the current network status and settings. Parent topic: Using... the Control Panel Menus Network Setup Menu Settings The Network Setup menu lets you enter network settings manually if necessary. Setting Date And Time Language Options MM/DD/YY HH:MM Various languages Description Sets the printer's built-in the Network Setup ...

User Manual
Page 96
Do not move the print head manually or you move the print head as described here before performing the task. 1. Dip a fresh cleaning stick into the ink cleaner and let any excess drip into the cup. 2. Caution: Always move the print head as described here. Parent topic: Preparing for Maintenance Moving the Print Head for Maintenance Certain maintenance tasks require that you may cause your product to malfunction. 96 Place the cup on a try and pour approximately 0.3 ounce (10 ml) of ink cleaner into the cup. Recap the ink cleaner bottle. 3.
Do not move the print head manually or you move the print head as described here before performing the task. 1. Dip a fresh cleaning stick into the ink cleaner and let any excess drip into the cup. 2. Caution: Always move the print head as described here. Parent topic: Preparing for Maintenance Moving the Print Head for Maintenance Certain maintenance tasks require that you may cause your product to malfunction. 96 Place the cup on a try and pour approximately 0.3 ounce (10 ml) of ink cleaner into the cup. Recap the ink cleaner bottle. 3.

User Manual
Page 117
... used the printer for an extended period of time. You can select how often the product performs a nozzle check in the Printer Setup menu. • Manually run a nozzle check from the product control panel, as necessary: • Nozzle Check: Check for clogged nozzles before each print job. Nozzles are gaps in...
... used the printer for an extended period of time. You can select how often the product performs a nozzle check in the Printer Setup menu. • Manually run a nozzle check from the product control panel, as necessary: • Nozzle Check: Check for clogged nozzles before each print job. Nozzles are gaps in...


