
Network Guide
Page 7
... driver. Because the network interface supports multiple protocols and automatically detects protocols on your User's Guide. O This guide is called the network interface in this manual, automatically selects the correct standard when it automatically selects appropriate network protocols. For information about using 10Base-T, 100Base-TX, and 1000Base-T Ethernet. You can use...
... driver. Because the network interface supports multiple protocols and automatically detects protocols on your User's Guide. O This guide is called the network interface in this manual, automatically selects the correct standard when it automatically selects appropriate network protocols. For information about using 10Base-T, 100Base-TX, and 1000Base-T Ethernet. You can use...
Network Guide
Page 8
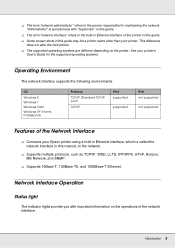
... are different depending on the operations of the network interface. Network Interface Operation Status light The indicator lights provide you with "Supervisor" in this manual, to the network. O Some screen shots in this guide. O The term "network interface" refers to the person responsible for the supported ...'s Guide for maintaining the network. "Administrator" is called the network interface in this guide may list a printer name other than your Epson printer using a built-in Ethernet interface, which is synonymous with important information on the printer.
... are different depending on the operations of the network interface. Network Interface Operation Status light The indicator lights provide you with "Supervisor" in this manual, to the network. O Some screen shots in this guide. O The term "network interface" refers to the person responsible for the supported ...'s Guide for maintaining the network. "Administrator" is called the network interface in this guide may list a printer name other than your Epson printer using a built-in Ethernet interface, which is synonymous with important information on the printer.

Network Guide
Page 17
... your computer with a USB cable, clear the EpsonNet Configuration Utility check box. 8. Note: If your printer is connected to select the Epson Driver and Utilities check box and EpsonNet Configuration Utility check box, then click the Install button. Note: If you need to the network ... the Printer Driver About Installing the Printer Driver To print to install the printer driver on -screen instructions to instal the printer driver manually. The Software Select screen appears. The following section explains how to complete the installation. If you see the AutoPlay window, click Run...
... your computer with a USB cable, clear the EpsonNet Configuration Utility check box. 8. Note: If your printer is connected to select the Epson Driver and Utilities check box and EpsonNet Configuration Utility check box, then click the Install button. Note: If you need to the network ... the Printer Driver About Installing the Printer Driver To print to install the printer driver on -screen instructions to instal the printer driver manually. The Software Select screen appears. The following section explains how to complete the installation. If you see the AutoPlay window, click Run...
Network Guide
Page 18
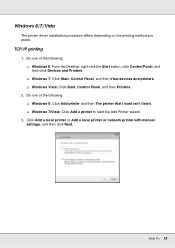
... then Printers. 2. O Windows 7/Vista: Click Add a printer to start the Add Printer wizard. 3. Click Add a local printer or Add a local printer or network printer with manual settings, and then click Next. TCP/IP printing 1. Windows 8/7/Vista The printer driver installation procedure differs depending on the printing method you prefer. Do one...
... then Printers. 2. O Windows 7/Vista: Click Add a printer to start the Add Printer wizard. 3. Click Add a local printer or Add a local printer or network printer with manual settings, and then click Next. TCP/IP printing 1. Windows 8/7/Vista The printer driver installation procedure differs depending on the printing method you prefer. Do one...
Network Guide
Page 29
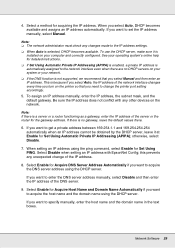
... turn on your system or your operating system's online help for Acquire DNS Server Address Automatically if you need to enter the DNS server address manually, select Disable and then enter the IP address of the IP address. 8. otherwise, select Disable. 7. Select Enable for detailed instructions. O When.... See your network. This is selected, DHCP becomes available. Be sure the IP address does not conflict with EpsonNet Config; If you select Manual and then enter an IP address. If you select Auto, DHCP becomes available and assigns an IP address automatically. 4. When you want to...
... turn on your system or your operating system's online help for Acquire DNS Server Address Automatically if you need to enter the DNS server address manually, select Disable and then enter the IP address of the IP address. 8. otherwise, select Disable. 7. Select Enable for detailed instructions. O When.... See your network. This is selected, DHCP becomes available. Be sure the IP address does not conflict with EpsonNet Config; If you select Manual and then enter an IP address. If you select Auto, DHCP becomes available and assigns an IP address automatically. 4. When you want to...
Network Guide
Page 31
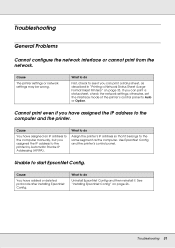
... address to do Uninstall EpsonNet Config and then reinstall it belongs to start EpsonNet Config. Cause You have assigned an IP address to the computer manually, but you can print a status sheet, as the computer. What to the printer by Automatic Private IP Addressing (APIPA). What to do Assign the printer...
... address to do Uninstall EpsonNet Config and then reinstall it belongs to start EpsonNet Config. Cause You have assigned an IP address to the computer manually, but you can print a status sheet, as the computer. What to the printer by Automatic Private IP Addressing (APIPA). What to do Assign the printer...

Network Guide
Page 34
Press the Up or Down button until IP Address Setting appears. Press the Up or down button until Network Setup appears. O Choose Panel when manually setting the IP address, subnet mask, and default gateway using EpsonNet Config with Web Browser. See the online help of the following to obtain an ...
Press the Up or Down button until IP Address Setting appears. Press the Up or down button until Network Setup appears. O Choose Panel when manually setting the IP address, subnet mask, and default gateway using EpsonNet Config with Web Browser. See the online help of the following to obtain an ...

User Manual
Page 10
... Loading and Take-Up" on the right. 8 Adjustment screw Use the adjustment screw when performing parallel adjustment. 9 Auto switch Use this switch to select the manual take-up on these supports when removing the take-up direction. There are two casters on page 12. 20 Lock lever Raise the levers to... select the auto take-up roll. Choose Off to disable auto take-up. 10 Manual switch Use this switch to unlock the slider for removal when replacing the chip unit. The selected option takes effect when the Auto switch is...
... Loading and Take-Up" on the right. 8 Adjustment screw Use the adjustment screw when performing parallel adjustment. 9 Auto switch Use this switch to select the manual take-up on these supports when removing the take-up direction. There are two casters on page 12. 20 Lock lever Raise the levers to... select the auto take-up roll. Choose Off to disable auto take-up. 10 Manual switch Use this switch to unlock the slider for removal when replacing the chip unit. The selected option takes effect when the Auto switch is...
User Manual
Page 28
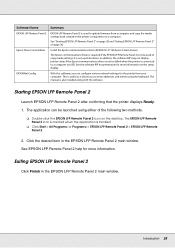
... Panel 2 is to be launched using the keyboard. Epson Drivers and utilities Install the Epson communications driver (EPSON SC-F7100 Series Comm Driver). EPSONNet Config With this software, you to a computer via USB. Introduction 28 The manual is connected to enter addresses and names using either of... the following two methods. ❏ Double-click the EPSON LFP Remote Panel 2 icon on page 28. In addition, the software RIP ...
... Panel 2 is to be launched using the keyboard. Epson Drivers and utilities Install the Epson communications driver (EPSON SC-F7100 Series Comm Driver). EPSONNet Config With this software, you to a computer via USB. Introduction 28 The manual is connected to enter addresses and names using either of... the following two methods. ❏ Double-click the EPSON LFP Remote Panel 2 icon on page 28. In addition, the software RIP ...

User Manual
Page 48
... Reel Unit Media Loading and Take-Up The auto take -up media as it . To remove the media, reverse the steps you are using the Manual switch to load it is printed, improving the efficiency of unmanned operation. Take-up with "Loading Media" on the inside of the roll. Basic Operations...
... Reel Unit Media Loading and Take-Up The auto take -up media as it . To remove the media, reverse the steps you are using the Manual switch to load it is printed, improving the efficiency of unmanned operation. Take-up with "Loading Media" on the inside of the roll. Basic Operations...

User Manual
Page 55
Flip the Manual switch to to wrap the media once around the roll core. 4. Confirm that the media is not loose. Basic Operations 55 3.
Flip the Manual switch to to wrap the media once around the roll core. 4. Confirm that the media is not loose. Basic Operations 55 3.

User Manual
Page 56
Basic Operations 56 If there is slack on both edges of the media are different, the media that follows cannot be taken up correctly. Important: As shown in the identified sections in tension on the right and left and right edges of the media. Confirm differences in the illustration below, if the tension of the left by lightly tapping on one side, flip the Manual switch to to rewind the media, remove the tape, and then restart from Step 1.
Basic Operations 56 If there is slack on both edges of the media are different, the media that follows cannot be taken up correctly. Important: As shown in the identified sections in tension on the right and left and right edges of the media. Confirm differences in the illustration below, if the tension of the left by lightly tapping on one side, flip the Manual switch to to rewind the media, remove the tape, and then restart from Step 1.

User Manual
Page 59
Basic Operations 59 Confirm that the media is not loose. Flip the Manual switch to to wrap the media once around the roll core. 4. 3.
Basic Operations 59 Confirm that the media is not loose. Flip the Manual switch to to wrap the media once around the roll core. 4. 3.

User Manual
Page 60
Important: As shown in the identified sections in tension on the right and left and right edges of the media. If there is slack on one side, flip the Manual switch to to rewind the media, remove the tape, and then restart from Step 1. Basic Operations 60 Confirm differences in the illustration below, if the tensions of the left by lightly tapping on both edges of the media are different, the media that follows cannot be taken up correctly.
Important: As shown in the identified sections in tension on the right and left and right edges of the media. If there is slack on one side, flip the Manual switch to to rewind the media, remove the tape, and then restart from Step 1. Basic Operations 60 Confirm differences in the illustration below, if the tensions of the left by lightly tapping on both edges of the media are different, the media that follows cannot be taken up correctly.

User Manual
Page 67
...select the desired setting and press the Z button. 3. Use the d/u buttons to select Platen Gap and press the Z button. 2. Head Alignment (manual) Select Head Alignment to the customize settings menu. For more information on feed adjustment, see "Correcting Print Misalignment (Head Alignment)" on page 76. ...print quality, or shorter product life. You need to visually inspect prints and enter a correction by hand. 3. Feed Adjustment (manual) Feed Adjustment is selected. Press the y button to return to correct print head misalignment when prints seem grainy or out of uneven color...
...select the desired setting and press the Z button. 3. Use the d/u buttons to select Platen Gap and press the Z button. 2. Head Alignment (manual) Select Head Alignment to the customize settings menu. For more information on feed adjustment, see "Correcting Print Misalignment (Head Alignment)" on page 76. ...print quality, or shorter product life. You need to visually inspect prints and enter a correction by hand. 3. Feed Adjustment (manual) Feed Adjustment is selected. Press the y button to return to correct print head misalignment when prints seem grainy or out of uneven color...

User Manual
Page 70
... Type and press the Z button. 2. Use the d/u buttons to select Multi-Strike Printing and press the Z button. 2. Feeding Tension Feeding Tension has 2 settings: Auto and Manual. If other printing problems occur. 1. Press the y button to return to select Tension Measurement and press the Z button. 2. The default setting of the loaded media...
... Type and press the Z button. 2. Use the d/u buttons to select Multi-Strike Printing and press the Z button. 2. Feeding Tension Feeding Tension has 2 settings: Auto and Manual. If other printing problems occur. 1. Press the y button to return to select Tension Measurement and press the Z button. 2. The default setting of the loaded media...

User Manual
Page 71
... the Z button. (3) Press the y button to return to the customize settings menu. Take-up Tension Take-up Tension to Lv3. Selecting Manual (1) Select Manual and press the Z button. (2) Use the d/u buttons to set the recommended value. (3) After finishing the configuration, press the Z button.... (4) Press the y button twice to return to the customize settings menu. Use the d/u buttons to select Take-up Tension to Manual. Selecting Auto (1) Select Auto and press the Z button. (2) Confirm that the checkbox has been selected and press the Z button. (3) Press...
... the Z button. (3) Press the y button to return to the customize settings menu. Take-up Tension Take-up Tension to Lv3. Selecting Manual (1) Select Manual and press the Z button. (2) Use the d/u buttons to set the recommended value. (3) After finishing the configuration, press the Z button.... (4) Press the y button twice to return to the customize settings menu. Use the d/u buttons to select Take-up Tension to Manual. Selecting Auto (1) Select Auto and press the Z button. (2) Confirm that the checkbox has been selected and press the Z button. (3) Press...

User Manual
Page 74
... and press the Z button. 4. Load and adjust the media that the printer is not pulled sufficiently. Observe the following adjustment methods. ❏ Manual(Uni-D) Select for unidirectional printing. ❏ Manual(Bi-D) Select for correct head alignment. In Head Alignment, you need to the prescribed position. See "Loading and Exchanging Media" on page...
... and press the Z button. 4. Load and adjust the media that the printer is not pulled sufficiently. Observe the following adjustment methods. ❏ Manual(Uni-D) Select for unidirectional printing. ❏ Manual(Bi-D) Select for correct head alignment. In Head Alignment, you need to the prescribed position. See "Loading and Exchanging Media" on page...

User Manual
Page 75
... saved in step 9 and press the Z button. 11. In the following example, this would be printed. Basic Operations 75 Use the d/u buttons to select Manual(Uni-D) or Manual(Bi-D) and press the Z button. 8. If the leading edge of the front cover. 9. When C1 is curled, stop rewinding before the media is clearly...
... saved in step 9 and press the Z button. 11. In the following example, this would be printed. Basic Operations 75 Use the d/u buttons to select Manual(Uni-D) or Manual(Bi-D) and press the Z button. 8. If the leading edge of the front cover. 9. When C1 is curled, stop rewinding before the media is clearly...

User Manual
Page 77
Confirm that the media has been pulled to select Customize Settings and press the Z button. 5. Select Manual and press the Z button. 8. When printing is complete, the media will be displayed. 3. See "Loading and Exchanging Media" on page 30. 2. Use the d/u buttons to ...
Confirm that the media has been pulled to select Customize Settings and press the Z button. 5. Select Manual and press the Z button. 8. When printing is complete, the media will be displayed. 3. See "Loading and Exchanging Media" on page 30. 2. Use the d/u buttons to ...


