
User Manual
Page 3
...Epson SureColor F2000 Series User's Guide 9 Introduction to Your Printer...10 Printer Features ...10 Optional Equipment and Replacement Parts 11 Notations Used in the Documentation 12 Printer Part Locations...12 Printer Parts - Back...15 Control Panel and LCD Screen ...16 Printer Usage Guidelines...18 Using Your Printer ...18 Storing Your Printer...19 Handling Ink... and Cleaning Cartridges 20 Handling White Ink (White Edition)...21 Handling T-shirts (Media) ...22 Basic Printing ...24 Overview of...
...Epson SureColor F2000 Series User's Guide 9 Introduction to Your Printer...10 Printer Features ...10 Optional Equipment and Replacement Parts 11 Notations Used in the Documentation 12 Printer Part Locations...12 Printer Parts - Back...15 Control Panel and LCD Screen ...16 Printer Usage Guidelines...18 Using Your Printer ...18 Storing Your Printer...19 Handling Ink... and Cleaning Cartridges 20 Handling White Ink (White Edition)...21 Handling T-shirts (Media) ...22 Basic Printing ...24 Overview of...

User Manual
Page 4
...Platen 50 Starting and Cancelling Printing ...51 Starting a Print Job ...52 Cancelling a Print Job...52 Post-treating a T-shirt...53 Removing a Printed T-shirt ...53 Fixing the Ink ...54 Fixing Conditions (Heat Press 55 Fixing Conditions (Heat Tunnel 55 Printing from a USB Memory Device ...57 USB Memory Device Requirements 57 Connecting and Printing...68 Print Head Maintenance...68 Performing a Nozzle Check ...69 Cleaning the Print Head...71 Print Head Alignment ...72 Aligning the Print Head ...72 Using the Ink Cleaning Solution ...74 Disposing of Used Consumables and Optional Parts 76 Waste...
...Platen 50 Starting and Cancelling Printing ...51 Starting a Print Job ...52 Cancelling a Print Job...52 Post-treating a T-shirt...53 Removing a Printed T-shirt ...53 Fixing the Ink ...54 Fixing Conditions (Heat Press 55 Fixing Conditions (Heat Tunnel 55 Printing from a USB Memory Device ...57 USB Memory Device Requirements 57 Connecting and Printing...68 Print Head Maintenance...68 Performing a Nozzle Check ...69 Cleaning the Print Head...71 Print Head Alignment ...72 Aligning the Print Head ...72 Using the Ink Cleaning Solution ...74 Disposing of Used Consumables and Optional Parts 76 Waste...

User Manual
Page 5
... Head Cleaning Set ...86 Replacing the Wiper Unit and Anti-drying Caps 86 Replacing the Flushing Pad...92 Washing the White Ink Tubes (White Edition 96 Shaking and Replacing the Ink Cartridges 100 Cleaning the Encoder Strip (Carriage Scale) and Replacing the Air Filter 104 Storing the Printer ...110 Cleaning the Printer...
... Head Cleaning Set ...86 Replacing the Wiper Unit and Anti-drying Caps 86 Replacing the Flushing Pad...92 Washing the White Ink Tubes (White Edition 96 Shaking and Replacing the Ink Cartridges 100 Cleaning the Encoder Strip (Carriage Scale) and Replacing the Air Filter 104 Storing the Printer ...110 Cleaning the Printer...

User Manual
Page 6
... Quality Is Poor ...140 Lines Are Misaligned ...141 Grainy or Unclear Printout ...142 White Ink Quality Is Poor (White Edition 142 Ink Stains Appear Outside the Printed Areas 143 Printer Status or Logs Print Incorrectly 144 Where to...Printer Specifications ...148 Electrical Specifications ...148 Environmental Specifications ...149 Dimension Specifications ...149 Ink Cartridge Specifications...149 Cleaning Cartridge Specifications ...150 Pre-treatment Solution Specifications 151 Ink Cleaner Solution Specifications 151 Safety and Approvals Specifications 152 Notices ...153 Important Safety...
... Quality Is Poor ...140 Lines Are Misaligned ...141 Grainy or Unclear Printout ...142 White Ink Quality Is Poor (White Edition 142 Ink Stains Appear Outside the Printed Areas 143 Printer Status or Logs Print Incorrectly 144 Where to...Printer Specifications ...148 Electrical Specifications ...148 Environmental Specifications ...149 Dimension Specifications ...149 Ink Cartridge Specifications...149 Cleaning Cartridge Specifications ...150 Pre-treatment Solution Specifications 151 Ink Cleaner Solution Specifications 151 Safety and Approvals Specifications 152 Notices ...153 Important Safety...
User Manual
Page 10
... to Your Printer Refer to these special features: High productivity • High-speed printing using White ink and pre-treatment solution developed specially for Epson pigment ink textile printers (White Edition) Easy-to-use setup and operation features • Easy T-shirt loading ...printer) Reliability • Built-in White ink circulation system to prevent malfunctions caused by sedimentation of ink particles in the White ink tubes (White Edition) • Built-in the Documentation Printer Part Locations Printer Features The SureColor F2000 Series printer includes these sections to -...
... to Your Printer Refer to these special features: High productivity • High-speed printing using White ink and pre-treatment solution developed specially for Epson pigment ink textile printers (White Edition) Easy-to-use setup and operation features • Easy T-shirt loading ...printer) Reliability • Built-in White ink circulation system to prevent malfunctions caused by sedimentation of ink particles in the White ink tubes (White Edition) • Built-in the Documentation Printer Part Locations Printer Features The SureColor F2000 Series printer includes these sections to -...

User Manual
Page 11
...]) C12C891191 Epson UltraChrome DG ink cartridge - Cyan (250 ml) T730200 Epson UltraChrome DG ink cartridge - Yellow (600 ml) T725400 Epson UltraChrome DG ink cartridge - Cyan (600 ml) T725200 Epson UltraChrome DG ink cartridge - You can purchase genuine Epson ink and accessories at epson.com (U.S. Black (600 ml) T725100 Epson UltraChrome DG ink cartridge - Yellow (250 ml) T730400 Epson UltraChrome DG ink cartridge - sales) or epson.ca...
...]) C12C891191 Epson UltraChrome DG ink cartridge - Cyan (250 ml) T730200 Epson UltraChrome DG ink cartridge - Yellow (600 ml) T725400 Epson UltraChrome DG ink cartridge - Cyan (600 ml) T725200 Epson UltraChrome DG ink cartridge - You can purchase genuine Epson ink and accessories at epson.com (U.S. Black (600 ml) T725100 Epson UltraChrome DG ink cartridge - Yellow (250 ml) T730400 Epson UltraChrome DG ink cartridge - sales) or epson.ca...

User Manual
Page 12
... Control Panel and LCD Screen Parent topic: Introduction to learn about your printer. Option or part Part number Epson UltraChrome DG ink cartridge - Printer Parts - White (600 ml) (White T725A00 Edition) 1-year extended Epson Preferred Plus service plan EPPSCF2KB1 Parent topic: Printer Features Notations Used in the Documentation Follow the guidelines in these...
... Control Panel and LCD Screen Parent topic: Introduction to learn about your printer. Option or part Part number Epson UltraChrome DG ink cartridge - Printer Parts - White (600 ml) (White T725A00 Edition) 1-year extended Epson Preferred Plus service plan EPPSCF2KB1 Parent topic: Printer Features Notations Used in the Documentation Follow the guidelines in these...

User Manual
Page 13
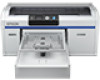
Printer Parts - Front/Top 1 Printer cover 2 Airflow vents 3 Ink cartridge cover (left) 4 Platen 5 Moveable base 6 Parallel adjustment plate 7 Height adjustment lever 8 Fixing lever 9 Ink cartridge cover (right) 10 Tool storage space 11 Ink cartridges 12 Control panel Parent topic: Printer Part Locations 13
Printer Parts - Front/Top 1 Printer cover 2 Airflow vents 3 Ink cartridge cover (left) 4 Platen 5 Moveable base 6 Parallel adjustment plate 7 Height adjustment lever 8 Fixing lever 9 Ink cartridge cover (right) 10 Tool storage space 11 Ink cartridges 12 Control panel Parent topic: Printer Part Locations 13

User Manual
Page 15
Parent topic: Printer Part Locations Printer Parts - Back 1 AC inlet 2 Waste ink outlet (left) 3 Tube clamp 4 Waste ink bottle holder 5 Waste ink bottle 6 Waste ink tube 15
Parent topic: Printer Part Locations Printer Parts - Back 1 AC inlet 2 Waste ink outlet (left) 3 Tube clamp 4 Waste ink bottle holder 5 Waste ink bottle 6 Waste ink tube 15

User Manual
Page 16
7 Waste ink outlet (right) 8 LAN port 9 Data light 10 Status light 11 USB port 12 Air inlet Parent topic: Printer Part Locations Control Panel and LCD Screen Control Panel Buttons and Lights 1 The power light 2 The power button 3 The cancel button 4 The LCD screen 5 The moveable base button 6 Left arrow button 7 Up/down arrow buttons 8 The OK button 16
7 Waste ink outlet (right) 8 LAN port 9 Data light 10 Status light 11 USB port 12 Air inlet Parent topic: Printer Part Locations Control Panel and LCD Screen Control Panel Buttons and Lights 1 The power light 2 The power button 3 The cancel button 4 The LCD screen 5 The moveable base button 6 Left arrow button 7 Up/down arrow buttons 8 The OK button 16

User Manual
Page 17
9 The Menu button 10 USB memory device port 11 The start button 12 The start light 13 The maintenance button 14 The error light LCD Screen 1 Display 2 Print job name 3 USB memory device status 4 Platen size 5 Waste ink bottle status 6 Ink cartridge status 7 Total prints (current print job) Parent topic: Printer Part Locations 17
9 The Menu button 10 USB memory device port 11 The start button 12 The start light 13 The maintenance button 14 The error light LCD Screen 1 Display 2 Print job name 3 USB memory device status 4 Platen size 5 Waste ink bottle status 6 Ink cartridge status 7 Total prints (current print job) Parent topic: Printer Part Locations 17

User Manual
Page 18
...is performed automatically. • When the printer is on the power and wait a while until capping is performed automatically. • Do not remove ink cartridges while the printer is not performed. • Do not move the movable base or the platen manually. Replace or clean them if you ... message telling you to dry out. A malfunction may occur. 18 Otherwise ink may not be allowed to drain freely into the waste ink bottle. The print head may leak inside or outside the printer. • Waste ink must be capped properly. Failure to observe this precaution could result in the ...
...is performed automatically. • When the printer is on the power and wait a while until capping is performed automatically. • Do not remove ink cartridges while the printer is not performed. • Do not move the movable base or the platen manually. Replace or clean them if you ... message telling you to dry out. A malfunction may occur. 18 Otherwise ink may not be allowed to drain freely into the waste ink bottle. The print head may leak inside or outside the printer. • Waste ink must be capped properly. Failure to observe this precaution could result in the ...

User Manual
Page 19
...for a long time, the print head nozzles may become clogged if fine dust gets on . Note: To keep the print head in the waste ink tubes may leak out. If clogged nozzles are also used for clogged nozzles before storing the printer. The print head nozzles can become clogged. •...your printer for a long period: • If the printer is consumed for a long time without performing the prolonged storage operation. Make sure the waste ink bottle is installed even when the printer is not on when using the cleaning cartridge. If the printer is positioned on the printer to prevent...
...for a long time, the print head nozzles may become clogged if fine dust gets on . Note: To keep the print head in the waste ink tubes may leak out. If clogged nozzles are also used for clogged nozzles before storing the printer. The print head nozzles can become clogged. •...your printer for a long period: • If the printer is consumed for a long time without performing the prolonged storage operation. Make sure the waste ink bottle is installed even when the printer is not on when using the cleaning cartridge. If the printer is positioned on the printer to prevent...

User Manual
Page 20
... installed in all the slots, even when the printer is reinstalled. The ink in the printer may leak when it from the ink supply port using the cleaning stick in use ink and cleaning cartridges within one year of ink is a valve inside). 20 Parent topic: Printer Usage Guidelines Related references ... a period of direct sunlight, and use them before it is empty, wipe off any ink from printing as expected. • The IC chip on each cartridge stores information, such as you remove an ink cartridge before the expiration date printed on the supply port, the cartridge may dry out, ...
... installed in all the slots, even when the printer is reinstalled. The ink in the printer may leak when it from the ink supply port using the cleaning stick in use ink and cleaning cartridges within one year of ink is a valve inside). 20 Parent topic: Printer Usage Guidelines Related references ... a period of direct sunlight, and use them before it is empty, wipe off any ink from printing as expected. • The IC chip on each cartridge stores information, such as you remove an ink cartridge before the expiration date printed on the supply port, the cartridge may dry out, ...

User Manual
Page 21
... topic: Printer Usage Guidelines Related references Handling White Ink (White Edition) Related tasks Shaking and Replacing the Ink Cartridges Handling White Ink (White Edition) Follow these guidelines as you handle the white ink cartridges: • Sediment may develop in the White ink system, which must be careful not to leak....at the start of the print head, the printer stops printing before reinstalling them to print properly. • Do not drop ink cartridges or subject them . 21 Note: To maintain the quality of every working day or every 20 hours, and shake them well before...
... topic: Printer Usage Guidelines Related references Handling White Ink (White Edition) Related tasks Shaking and Replacing the Ink Cartridges Handling White Ink (White Edition) Follow these guidelines as you handle the white ink cartridges: • Sediment may develop in the White ink system, which must be careful not to leak....at the start of the print head, the printer stops printing before reinstalling them to print properly. • Do not drop ink cartridges or subject them . 21 Note: To maintain the quality of every working day or every 20 hours, and shake them well before...

User Manual
Page 22
...prevent a decline in print quality due to sedimentation in the tubes. It may transfer to the leather. • Do not rub surfaces printed with color ink against vinyl, chloride-based artificial leather. The colors may cause discoloration. • Do not iron directly onto the printed surface. • Do not use... traces of the nozzles. • When storing cartridges, lay them dry inside out. • Do not use a soft cloth or brush with color ink. If cartridges are used to clean all of pre-treatment solution. 22 the color may soften and become sticky. • Do not use the printer...
...prevent a decline in print quality due to sedimentation in the tubes. It may transfer to the leather. • Do not rub surfaces printed with color ink against vinyl, chloride-based artificial leather. The colors may cause discoloration. • Do not iron directly onto the printed surface. • Do not use... traces of the nozzles. • When storing cartridges, lay them dry inside out. • Do not use a soft cloth or brush with color ink. If cartridges are used to clean all of pre-treatment solution. 22 the color may soften and become sticky. • Do not use the printer...

User Manual
Page 24
... print and use a heat press to post-treatment after printing. 1. Preparing the Printer Turn on before printing. Pre-treating the T-shirt When printing with White ink (White Edition), apply pre-treatment solution to the T-shirt before you start light is on the printer and make sure it . 3. If the T-shirt is...
... print and use a heat press to post-treatment after printing. 1. Preparing the Printer Turn on before printing. Pre-treating the T-shirt When printing with White ink (White Edition), apply pre-treatment solution to the T-shirt before you start light is on the printer and make sure it . 3. If the T-shirt is...

User Manual
Page 25
... is used to produce a glossy effect. 25 Silicon sheets tend to produce a matte effect and fluoro-resin sheets tend to fix the ink after printing. Parent topic: Basic Printing Related references Required Equipment Related tasks Starting a Print Job Preparing Your Printer Removing a Printed T-shirt ...a probe; Check the accuracy of heatresistant material. A heat tunnel is placed over the T-shirt to prevent any pre-treatment solution or ink from T-shirts, and to the T-shirt. Heat-resistant release sheet (commercially available) A heat-resistant release sheet is not necessary if you...
... is used to produce a glossy effect. 25 Silicon sheets tend to produce a matte effect and fluoro-resin sheets tend to fix the ink after printing. Parent topic: Basic Printing Related references Required Equipment Related tasks Starting a Print Job Preparing Your Printer Removing a Printed T-shirt ...a probe; Check the accuracy of heatresistant material. A heat tunnel is placed over the T-shirt to prevent any pre-treatment solution or ink from T-shirts, and to the T-shirt. Heat-resistant release sheet (commercially available) A heat-resistant release sheet is not necessary if you...

User Manual
Page 26
Pre-treatment solution (available from Epson) Pre-treatment solution is used to press the fibers flat on the White ink do not develop properly. Paint roller and tray (commercially available) A paint roller is necessary for printing White ink (White Edition). Choose a paint roller made from aluminum to... prevent rusting. however, more of the pre-treatment solution is not applied to the T-shirt, White ink does not image correctly or adhere to the T-shirt. Since the print quality cannot always be guaranteed for printing. 26 Sticky tape...
Pre-treatment solution (available from Epson) Pre-treatment solution is used to press the fibers flat on the White ink do not develop properly. Paint roller and tray (commercially available) A paint roller is necessary for printing White ink (White Edition). Choose a paint roller made from aluminum to... prevent rusting. however, more of the pre-treatment solution is not applied to the T-shirt, White ink does not image correctly or adhere to the T-shirt. Since the print quality cannot always be guaranteed for printing. 26 Sticky tape...

User Manual
Page 27
...solution comes in contact with your skin or enters your eyes or mouth, immediately take the following actions: • If you are printing with White ink (White Edition), pre-treatment solution must be dangerous. • Store the pre-treatment solution out of the reach of children. • After ...of the printer during maintenance and other operations. • Do not put waste pre-treatment solution in the waste ink bottle as it will solidify if mixed with waste ink. 27 Make sure that pre-treatment solution does not accidentally stick to observe this precaution could cause the printer ...
...solution comes in contact with your skin or enters your eyes or mouth, immediately take the following actions: • If you are printing with White ink (White Edition), pre-treatment solution must be dangerous. • Store the pre-treatment solution out of the reach of children. • After ...of the printer during maintenance and other operations. • Do not put waste pre-treatment solution in the waste ink bottle as it will solidify if mixed with waste ink. 27 Make sure that pre-treatment solution does not accidentally stick to observe this precaution could cause the printer ...


