Network Guide
Page 3
... such as to imply Info-ZIP will provide support for the altered versions. ❏ Info-ZIP retains the right to use this software for any purpose, including commercial applications, and to alter it and redistribute it freely, subject to the above disclaimer and the following ... condition is redistribution of a standard UnZipSFX binary (including SFXWiz) as such and must not be trademarks of Info-ZIP. Trademarks Epson and Epson Stylus are for identification purposes only and may be misrepresented as being the original source or, if binaries, compiled from Info-ZIP--must...
... such as to imply Info-ZIP will provide support for the altered versions. ❏ Info-ZIP retains the right to use this software for any purpose, including commercial applications, and to alter it and redistribute it freely, subject to the above disclaimer and the following ... condition is redistribution of a standard UnZipSFX binary (including SFXWiz) as such and must not be trademarks of Info-ZIP. Trademarks Epson and Epson Stylus are for identification purposes only and may be misrepresented as being the original source or, if binaries, compiled from Info-ZIP--must...
Network Guide
Page 4
..., and Notes 7 Operating Environment 7 Features of the Network Interface 8 Network Interface Operation 9 Status lights 9 Network connector 9 About the Software 10 Terms and Concepts 10 Chapter 2 Setting Up Your System for Network Printing Overview 11 Installing Network Components on Your Computer 12 Windows 7...Network 15 Configuring the Network Interface 16 Printing a Network Status Sheet 18 Installing the Printer Software 18 Adding the Network Port 19 Chapter 3 Network Software EpsonNet Config 22 About EpsonNet Config 22 Accessing the EpsonNet Config User's Guide 22 EpsonNet ...
..., and Notes 7 Operating Environment 7 Features of the Network Interface 8 Network Interface Operation 9 Status lights 9 Network connector 9 About the Software 10 Terms and Concepts 10 Chapter 2 Setting Up Your System for Network Printing Overview 11 Installing Network Components on Your Computer 12 Windows 7...Network 15 Configuring the Network Interface 16 Printing a Network Status Sheet 18 Installing the Printer Software 18 Adding the Network Port 19 Chapter 3 Network Software EpsonNet Config 22 About EpsonNet Config 22 Accessing the EpsonNet Config User's Guide 22 EpsonNet ...
Network Guide
Page 6
... TCP/IP and SNMP network protocols, use may vary depending on your network. It includes how to set up the network interface, install the configuration software, and configure your printer, and allows you can print from Microsoft® Windows® and Mac OS® X applications. The built-in Ethernet interface and...
... TCP/IP and SNMP network protocols, use may vary depending on your network. It includes how to set up the network interface, install the configuration software, and configure your printer, and allows you can print from Microsoft® Windows® and Mac OS® X applications. The built-in Ethernet interface and...

Network Guide
Page 10
... configuration utility that allows you to configure the network interface. Terms and Concepts Configuration -- DHCP -- Protocol -- Computers and software cannot communicate with each other using different protocols. See "EpsonNet Config with Web Browser" on a network. 10 Introduction a...information is exchanged through a network. a dynamic host configuration protocol. TCP/IP -- About the Software The software CD provided with your printer includes the following network software. ❏ EpsonNet Config is a protocol that assigns dynamic IP addresses to devices on a network...
... configuration utility that allows you to configure the network interface. Terms and Concepts Configuration -- DHCP -- Protocol -- Computers and software cannot communicate with each other using different protocols. See "EpsonNet Config with Web Browser" on a network. 10 Introduction a...information is exchanged through a network. a dynamic host configuration protocol. TCP/IP -- About the Software The software CD provided with your printer includes the following network software. ❏ EpsonNet Config is a protocol that assigns dynamic IP addresses to devices on a network...
Network Guide
Page 17
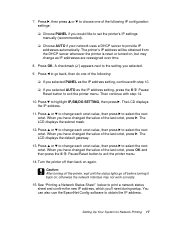
.... 11. The LCD displays the default gateway. 13. Turn the printer off before turning it back on again. You can also use the EpsonNet Config software to select the next octet. 7. Press l to print a network status sheet and confirm the new IP address, which you have changed the value of the...
.... 11. The LCD displays the default gateway. 13. Turn the printer off before turning it back on again. You can also use the EpsonNet Config software to select the next octet. 7. Press l to print a network status sheet and confirm the new IP address, which you have changed the value of the...
Network Guide
Page 18
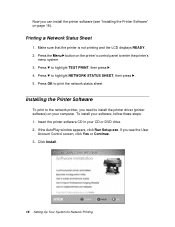
... d to highlight TEST PRINT, then press r. 4. Press OK to enter the printer's menu system. 3. Installing the Printer Software To print to the network printer, you can install the printer software (see the User Account Control screen, click Yes or Continue. 3. Printing a Network Status Sheet 1. Insert the printer... software CD in your software, follow these steps: 1. Click Install. 18 Setting Up Your System for Network Printing To install your CD or DVD drive...
... d to highlight TEST PRINT, then press r. 4. Press OK to enter the printer's menu system. 3. Installing the Printer Software To print to the network printer, you can install the printer software (see the User Account Control screen, click Yes or Continue. 3. Printing a Network Status Sheet 1. Insert the printer... software CD in your software, follow these steps: 1. Click Install. 18 Setting Up Your System for Network Printing To install your CD or DVD drive...
Network Guide
Page 19
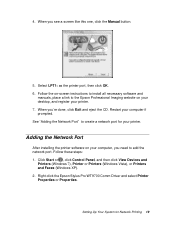
...: as the printer port, then click OK. 6. See "Adding the Network Port" to the Epson Professional Imaging website on your desktop, and register your printer. Right-click the Epson Stylus Pro WT9700 Comm Driver and select Printer Properties or Properties. Setting Up Your System for your printer. 7.... When you need to add the network port. 4. Follow the on your computer if prompted. Adding the Network Port After installing the printer software on ...
...: as the printer port, then click OK. 6. See "Adding the Network Port" to the Epson Professional Imaging website on your desktop, and register your printer. Right-click the Epson Stylus Pro WT9700 Comm Driver and select Printer Properties or Properties. Setting Up Your System for your printer. 7.... When you need to add the network port. 4. Follow the on your computer if prompted. Adding the Network Port After installing the printer software on ...
Network Guide
Page 22
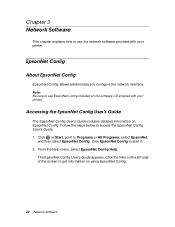
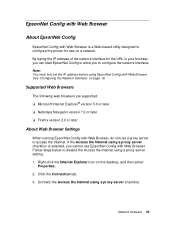
... menu, select EpsonNet Config Help. Click or Start, point to get information on using EpsonNet Config. 22 Network Software Note: Be sure to use the network software provided with your printer. The EpsonNet Config User's Guide appears. Click the links on the left side of the... screen to Programs or All Programs, select EpsonNet, and then select EpsonNet Config. Chapter 3 Network Software This chapter explains how to use EpsonNet Config included on the software CD shipped with your printer. Accessing the EpsonNet Config User's Guide The EpsonNet Config User's Guide contains...
... menu, select EpsonNet Config Help. Click or Start, point to get information on using EpsonNet Config. 22 Network Software Note: Be sure to use the network software provided with your printer. The EpsonNet Config User's Guide appears. Click the links on the left side of the... screen to Programs or All Programs, select EpsonNet, and then select EpsonNet Config. Chapter 3 Network Software This chapter explains how to use EpsonNet Config included on the software CD shipped with your printer. Accessing the EpsonNet Config User's Guide The EpsonNet Config User's Guide contains...
Network Guide
Page 23
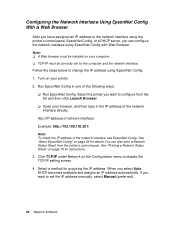
... the printer for the URL in your browser, you can start EpsonNet Config to allow you cannot use a proxy server to access the Internet. Network Software 23 See "Configuring the Network Interface" on the desktop, and then select Properties. 2.
... the printer for the URL in your browser, you can start EpsonNet Config to allow you cannot use a proxy server to access the Internet. Network Software 23 See "Configuring the Network Interface" on the desktop, and then select Properties. 2.
Network Guide
Page 24
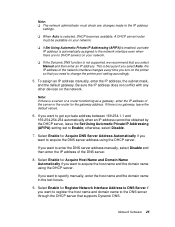
...: ❏ A Web browser must be installed on your computer. ❏ TCP/IP must be correctly set the IP address manually, select Manual (preferred). 24 Network Software Turn on your printer. 2. Select the printer you select Auto, DHCP becomes available and assigns an IP address automatically.
...: ❏ A Web browser must be installed on your computer. ❏ TCP/IP must be correctly set the IP address manually, select Manual (preferred). 24 Network Software Turn on your printer. 2. Select the printer you select Auto, DHCP becomes available and assigns an IP address automatically.
Network Guide
Page 25
... is no DHCP servers on the network. If you want to the network interface even when there are no gateway, leave the default values. 6. Network Software 25 This is because if you select Auto, the IP address of the network interface changes every time you turn on your network. ❏ If...
... is no DHCP servers on the network. If you want to the network interface even when there are no gateway, leave the default values. 6. Network Software 25 This is because if you select Auto, the IP address of the network interface changes every time you turn on your network. ❏ If...
Network Guide
Page 26
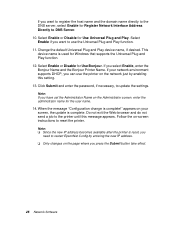
... supports the Universal Plug and Play function. 12. Follow the on your network environment supports DHCP, you press the Submit button take effect. 26 Network Software If you need to restart EpsonNet Config by enabling this message appears. Change the default Universal Plug and Play device name, if desired. This device...
... supports the Universal Plug and Play function. 12. Follow the on your network environment supports DHCP, you press the Submit button take effect. 26 Network Software If you need to restart EpsonNet Config by enabling this message appears. Change the default Universal Plug and Play device name, if desired. This device...
Network Guide
Page 27
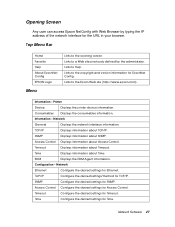
... information for Timeout. Links to Help. Timeout Configure the desired settings for EpsonNet Config. Network Software 27 TCP/IP Configure the desired settings/method for Access Control. Top Menu Bar Home Favorite Help About EpsonNet Config EPSON Logo Menu Links to a Web site previously defined by typing the IP address of the...
... information for Timeout. Links to Help. Timeout Configure the desired settings for EpsonNet Config. Network Software 27 TCP/IP Configure the desired settings/method for Access Control. Top Menu Bar Home Favorite Help About EpsonNet Config EPSON Logo Menu Links to a Web site previously defined by typing the IP address of the...

Network Guide
Page 28
Optional Administrator Type the name of the administrator and a link to the default settings. Configuration - Reset Resets the printer and returns to a favorite Web site. Password Set the password to protect settings. 28 Network Software
Optional Administrator Type the name of the administrator and a link to the default settings. Configuration - Reset Resets the printer and returns to a favorite Web site. Password Set the password to protect settings. 28 Network Software
Network Guide
Page 29
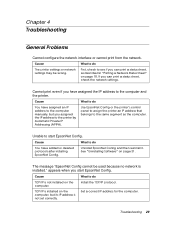
... have assigned an IP address to do The printer settings or network settings may be used because no network is not set correctly. See "Uninstalling Software" on the computer. The message "EpsonNet Config cannot be wrong.
... have assigned an IP address to do The printer settings or network settings may be used because no network is not set correctly. See "Uninstalling Software" on the computer. The message "EpsonNet Config cannot be wrong.
Network Guide
Page 31
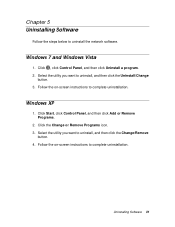
... , click Control Panel, and then click Uninstall a program. 2. Follow the on -screen instructions to complete uninstallation. Uninstalling Software 31 Click Start, click Control Panel, and then click Add or Remove Programs. 2. Chapter 5 Uninstalling Software Follow the steps below to complete uninstallation. Windows 7 and Windows Vista 1. Follow the on -screen instructions to uninstall...
... , click Control Panel, and then click Uninstall a program. 2. Follow the on -screen instructions to complete uninstallation. Uninstalling Software 31 Click Start, click Control Panel, and then click Add or Remove Programs. 2. Chapter 5 Uninstalling Software Follow the steps below to complete uninstallation. Windows 7 and Windows Vista 1. Follow the on -screen instructions to uninstall...

Network Guide
Page 32
..., 9 connector, 9 printing status sheet, 18 protocols, 6 Network interface configuring, 16 to 17 connecting to network, 15 to 16 Network port Windows, 19 to 21 Network software, uninstalling, 31 O Operating environment, 7 P Password, EpsonNet Config with Web Browser, 28 Printer driver installing in Windows, 18 to 19 Problems, solving, 29 to 30 Protocols...
..., 9 connector, 9 printing status sheet, 18 protocols, 6 Network interface configuring, 16 to 17 connecting to network, 15 to 16 Network port Windows, 19 to 21 Network software, uninstalling, 31 O Operating environment, 7 P Password, EpsonNet Config with Web Browser, 28 Printer driver installing in Windows, 18 to 19 Problems, solving, 29 to 30 Protocols...

Network Guide
Page 33
Status sheet, printing, 18 Subnet mask, 17, 25 T TCP/IP, 24 definition, 10 setting up in Windows, 12 to 15 Troubleshooting, 29 to 30 U Uninstalling network software, 31 Universal Plug and Play, 26 W Windows adding network port, 19 to 21 installing printer driver, 18 to 19 network settings, 12 to 15 Index 33
Status sheet, printing, 18 Subnet mask, 17, 25 T TCP/IP, 24 definition, 10 setting up in Windows, 12 to 15 Troubleshooting, 29 to 30 U Uninstalling network software, 31 Universal Plug and Play, 26 W Windows adding network port, 19 to 21 installing printer driver, 18 to 19 network settings, 12 to 15 Index 33
Product Brochure
Page 4
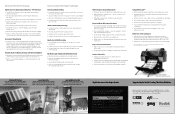
... reducing the physical size of the ink cartridges „ Eleven individual ink cartridges - most leading third-party software RIPs and work flow. Epson Stylus Pro WT7900 Shown with virtually instant-dry capability. Supported by most are when printing uni-directional on -site service „...Head Exotic Thin Film Piezo print head technology. High Performance Print Engine Speeds Utilizing our latest print head technology, the Epson Stylus Pro WT7900 is required, will automatically clean the print head „ Built-in sensor performs highly precise print head alignments of ...
... reducing the physical size of the ink cartridges „ Eleven individual ink cartridges - most leading third-party software RIPs and work flow. Epson Stylus Pro WT7900 Shown with virtually instant-dry capability. Supported by most are when printing uni-directional on -site service „...Head Exotic Thin Film Piezo print head technology. High Performance Print Engine Speeds Utilizing our latest print head technology, the Epson Stylus Pro WT7900 is required, will automatically clean the print head „ Built-in sensor performs highly precise print head alignments of ...

Warranty Statement
Page 7
... repair at all times while a technician is on -site service territory, you . Epson's shipment of quality. (The replacement printer will not include promotional materials, accessories, stands, documentation, manuals, software, or cables.) The customer must be able to properly prepare the printer for shipping ...to unpack, re-install optional components (interface cards, roll paper spindle, etc.), and set up by a carrier designated by Epson. Areas outside Epson's on -site. The repacked defective printer will be present at your responsibility to you must be available to accept the ...
... repair at all times while a technician is on -site service territory, you . Epson's shipment of quality. (The replacement printer will not include promotional materials, accessories, stands, documentation, manuals, software, or cables.) The customer must be able to properly prepare the printer for shipping ...to unpack, re-install optional components (interface cards, roll paper spindle, etc.), and set up by a carrier designated by Epson. Areas outside Epson's on -site. The repacked defective printer will be present at your responsibility to you must be available to accept the ...


