Quick Reference Guide
Page 5
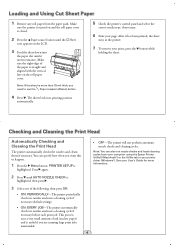
.... Checking and Cleaning the Print Head Automatically Checking and Cleaning the Print Head The printer automatically checks the nozzles and cleans them if necessary. Note: You can specify how often you want this to use the Paper release (ePlaten) button. 4 Press . See your print, press the button while holding... the sheet. Loading and Using Cut Sheet Paper 1 Remove any roll paper from your computer using the Epson Printer Utility3 (Macintosh®) or the Utility tab in the printer. 7...
.... Checking and Cleaning the Print Head Automatically Checking and Cleaning the Print Head The printer automatically checks the nozzles and cleans them if necessary. Note: You can specify how often you want this to use the Paper release (ePlaten) button. 4 Press . See your print, press the button while holding... the sheet. Loading and Using Cut Sheet Paper 1 Remove any roll paper from your computer using the Epson Printer Utility3 (Macintosh®) or the Utility tab in the printer. 7...
Quick Reference Guide
Page 6
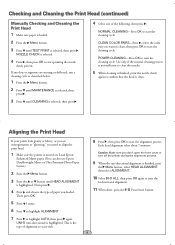
...also use Epson Doubleweight Matte or Ultra Premium Photo Paper Luster.) 2 Press the Menu button. 3 Press the or button until HEAD ALIGNMENT is clean. CLEAN COLOR PAIRS-Press , select the color pair you need to start the cleaning cycle. Aligning the Print Head If your prints look grainy ...selected. 4 Press , then press OK to start printing the nozzle check pattern. Checking and Cleaning the Print Head (continued) Manually Checking and Cleaning the Print Head 1 Make sure paper is loaded. 2 Press the Menu button. 3 Press until TEST PRINT is turned on. NOZZLE CHECK is the type of ...
...also use Epson Doubleweight Matte or Ultra Premium Photo Paper Luster.) 2 Press the Menu button. 3 Press the or button until HEAD ALIGNMENT is clean. CLEAN COLOR PAIRS-Press , select the color pair you need to start the cleaning cycle. Aligning the Print Head If your prints look grainy ...selected. 4 Press , then press OK to start printing the nozzle check pattern. Checking and Cleaning the Print Head (continued) Manually Checking and Cleaning the Print Head 1 Make sure paper is loaded. 2 Press the Menu button. 3 Press until TEST PRINT is turned on. NOZZLE CHECK is the type of ...

Quick Reference Guide
Page 13
Control Panel Lights and Buttons Paper light Power light and button Pause/reset light and button Ink light Print head cleaning button Paper feed up button Paper release (ePlaten™) light and button Menu button Paper cut button Ink cover open button OK button Paper feed down button Left arrow or paper source button Printed in USA CPD-27718
Control Panel Lights and Buttons Paper light Power light and button Pause/reset light and button Ink light Print head cleaning button Paper feed up button Paper release (ePlaten™) light and button Menu button Paper cut button Ink cover open button OK button Paper feed down button Left arrow or paper source button Printed in USA CPD-27718

User's Guide
Page 8
... Status From the Printer Driver 151 Checking and Cleaning the Print Head 152 Running the Nozzle Check and Head Cleaning Utilities 152 Checking and Cleaning the Print Head Using the Control Panel . . 154 Automatically Checking and Cleaning the Print Head 154 Running Cleaning Cycles 155 Aligning the Print Head 156 Replacing Ink Cartridges 157 Changing the Date and Time...
... Status From the Printer Driver 151 Checking and Cleaning the Print Head 152 Running the Nozzle Check and Head Cleaning Utilities 152 Checking and Cleaning the Print Head Using the Control Panel . . 154 Automatically Checking and Cleaning the Print Head 154 Running Cleaning Cycles 155 Aligning the Print Head 156 Replacing Ink Cartridges 157 Changing the Date and Time...

User's Guide
Page 11
... its best, and provides troubleshooting tips in case you use and printer maintenance-loading paper, replacing ink cartridges and other components, cleaning and aligning the print head, and using the printer's menu system. Tips contain additional hints on a network. It also tells you how to maintain your printer on how to your... paper, using your printer. 11 Cautions must be observed to avoid damage to get the most out of procedures for setting up and using the Epson printer drivers, and replacing ink cartridges.
... its best, and provides troubleshooting tips in case you use and printer maintenance-loading paper, replacing ink cartridges and other components, cleaning and aligning the print head, and using the printer's menu system. Tips contain additional hints on a network. It also tells you how to maintain your printer on how to your... paper, using your printer. 11 Cautions must be observed to avoid damage to get the most out of procedures for setting up and using the Epson printer drivers, and replacing ink cartridges.

User's Guide
Page 16
... light flashes. the printer does not operate normally or exhibits a distinct change in performance. • Before transporting the printer, make sure the print head is damaged; liquid has entered the printer; Do not unplug the printer or turn the printer off and the P power light stops flashing. Also...Introduction Caution: Always turn off the power to the printer until the panel shuts off using the P power button. This ensures that the print head is safely capped. • If you may apply, See www.dtsc.ca.gov/hazardouswaste/perchlorate. 16 the printer has been dropped or the...
... light flashes. the printer does not operate normally or exhibits a distinct change in performance. • Before transporting the printer, make sure the print head is damaged; liquid has entered the printer; Do not unplug the printer or turn the printer off and the P power light stops flashing. Also...Introduction Caution: Always turn off the power to the printer until the panel shuts off using the P power button. This ensures that the print head is safely capped. • If you may apply, See www.dtsc.ca.gov/hazardouswaste/perchlorate. 16 the printer has been dropped or the...

User's Guide
Page 17
Doing so may affect normal operation and printing. 17 This could damage the print head. • After bringing an ink cartridge inside from a cold storage site, allow it to warm up at room temperature for at least three hours before ...installing them for best results. • Do not use an ink cartridge beyond the date printed on the cartridge carton. • Use...
Doing so may affect normal operation and printing. 17 This could damage the print head. • After bringing an ink cartridge inside from a cold storage site, allow it to warm up at room temperature for at least three hours before ...installing them for best results. • Do not use an ink cartridge beyond the date printed on the cartridge carton. • Use...
User's Guide
Page 19
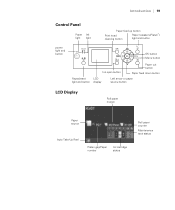
Introduction | 19 Control Panel Paper Ink light light Paper feed up button Print head cleaning button Paper release (ePlaten™) light and button power light and button OK button Menu button Ink open button Paper cut button Paper feed down button Pause/reset LCD light and button display Left arrow or paper source button LCD Display Roll paper margin Paper source Auto Take-Up Reel Platen gap/Paper number Ink cartridge status Roll paper counter Maintenance tank status 19
Introduction | 19 Control Panel Paper Ink light light Paper feed up button Print head cleaning button Paper release (ePlaten™) light and button power light and button OK button Menu button Ink open button Paper cut button Paper feed down button Pause/reset LCD light and button display Left arrow or paper source button LCD Display Roll paper margin Paper source Auto Take-Up Reel Platen gap/Paper number Ink cartridge status Roll paper counter Maintenance tank status 19
User's Guide
Page 56
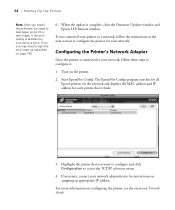
...appropriate IP address. If necessary, contact your network administrator for instructions on the printer. 2. If the print quality is satisfactory, your setup is complete, close the Firmware Updater window and Epson LFP Remote window. For more information on configuring the printer, see the on page 156. 6. ... your network. If not, you want to configure and click Configuration to align the print head, as described on -screen Network Guide. 56 The EpsonNet Config program searches for all Epson printers on the network and displays the MAC address and IP address for each printer ...
...appropriate IP address. If necessary, contact your network administrator for instructions on the printer. 2. If the print quality is satisfactory, your setup is complete, close the Firmware Updater window and Epson LFP Remote window. For more information on configuring the printer, see the on page 156. 6. ... your network. If not, you want to configure and click Configuration to align the print head, as described on -screen Network Guide. 56 The EpsonNet Config program searches for all Epson printers on the network and displays the MAC address and IP address for each printer ...
User's Guide
Page 83
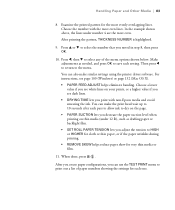
Choose the number with non-Epson media and avoid smearing the ink. For instructions, see dark lines. • DRYING TIME lets you print with the most even. When done, press . Examine the printed pattern for each one. 83 After printing the pattern, THICKNESS NUMBER is highlighted. 9. You can make ... or d to the menu. Then press l to return to select the number that you can use the TEST PRINT menu to 10 seconds after each setting. Handling Paper and Other Media | 83 8. You can also make the print head wait up to print out a list of the menu options shown below.
Choose the number with non-Epson media and avoid smearing the ink. For instructions, see dark lines. • DRYING TIME lets you print with the most even. When done, press . Examine the printed pattern for each one. 83 After printing the pattern, THICKNESS NUMBER is highlighted. 9. You can make ... or d to the menu. Then press l to return to select the number that you can use the TEST PRINT menu to 10 seconds after each setting. Handling Paper and Other Media | 83 8. You can also make the print head wait up to print out a list of the menu options shown below.

User's Guide
Page 101
...selecting Paper Configuration settings, click OK. 101 You can make the print head wait up to 5 seconds after each pass to allow ink to dry on the page. • Drying Time per Print Head Pass lets you print with non-Epson media and avoid smearing the ink. • Paper Feed Adjustment helps... reduce banding. Printing With Epson Drivers for various paper thicknesses. • Roll Paper Back Tension lets you adjust ...
...selecting Paper Configuration settings, click OK. 101 You can make the print head wait up to 5 seconds after each pass to allow ink to dry on the page. • Drying Time per Print Head Pass lets you print with non-Epson media and avoid smearing the ink. • Paper Feed Adjustment helps... reduce banding. Printing With Epson Drivers for various paper thicknesses. • Roll Paper Back Tension lets you adjust ...

User's Guide
Page 109
...the printer runs at maximum speed. This involves image compression and decompression, and does not affect the quality of your settings. 109 Printing will take longer to start. • Coarse Rendering allows you to change the resolution of your output. • Change Standard ... output processing to save your output. 3. Use this setting if print speed is extremely slow or the print head stops for a few minutes while printing. Printing With Epson Drivers for Windows | 109 • Page Rendering Mode speeds printing by the printer. Click OK to be performed by rendering the ...
...the printer runs at maximum speed. This involves image compression and decompression, and does not affect the quality of your settings. 109 Printing will take longer to start. • Coarse Rendering allows you to change the resolution of your output. • Change Standard ... output processing to save your output. 3. Use this setting if print speed is extremely slow or the print head stops for a few minutes while printing. Printing With Epson Drivers for Windows | 109 • Page Rendering Mode speeds printing by the printer. Click OK to be performed by rendering the ...

User's Guide
Page 119
... Drying Time per Page lets you print with non-Epson media and avoid smearing the ink. Select the correct settings to match your custom color profile was created to optimize D-max and color gamut. You see this screen: 2. You can make the print head wait up to 5 seconds after ...; Drying Time per Print Head Pass lets you need to change the Color Density setting if your ICC profile. These settings override any paper configuration settings you may need to fine-tune its performance. 1. Select Advanced Media Control from the drop-down menu. Printing With Epson Drivers for Macintosh |...
... Drying Time per Page lets you print with non-Epson media and avoid smearing the ink. Select the correct settings to match your custom color profile was created to optimize D-max and color gamut. You see this screen: 2. You can make the print head wait up to 5 seconds after ...; Drying Time per Print Head Pass lets you need to change the Color Density setting if your ICC profile. These settings override any paper configuration settings you may need to fine-tune its performance. 1. Select Advanced Media Control from the drop-down menu. Printing With Epson Drivers for Macintosh |...

User's Guide
Page 133
You see this mode when you print with non-Epson media and avoid smearing the ink. You can make the print head wait up to 5 seconds after each pass to allow ink to fine-tune its performance. 1. Select Paper Configuration from the drop-down menu. See page ...141 for Macintosh | 133 Note: You may have made using non-Epson media and you need to dry on the page. • Drying Time per Print Head Pass lets you may need to change the Color Density setting if your custom color profile was created to...
You see this mode when you print with non-Epson media and avoid smearing the ink. You can make the print head wait up to 5 seconds after each pass to allow ink to fine-tune its performance. 1. Select Paper Configuration from the drop-down menu. See page ...141 for Macintosh | 133 Note: You may have made using non-Epson media and you need to dry on the page. • Drying Time per Print Head Pass lets you may need to change the Color Density setting if your custom color profile was created to...

User's Guide
Page 149
...printer settings. This chapter describes the following routine procedures: • Checking printer status • Checking and cleaning the print head • Aligning the print head • Replacing ink cartridges • Changing the date and time • Performing additional maintenance tasks • Replacing ...at their best. For more information, see page 151). 149 149 Chapter 6: Maintaining and Transporting the Printer The Epson Stylus Pro 7700 and Pro 9700 require little maintenance to the features described in the next section), or view the printer's status on the printer ...
...printer settings. This chapter describes the following routine procedures: • Checking printer status • Checking and cleaning the print head • Aligning the print head • Replacing ink cartridges • Changing the date and time • Performing additional maintenance tasks • Replacing ...at their best. For more information, see page 151). 149 149 Chapter 6: Maintaining and Transporting the Printer The Epson Stylus Pro 7700 and Pro 9700 require little maintenance to the features described in the next section), or view the printer's status on the printer ...
User's Guide
Page 152
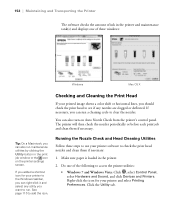
... icon for your printer software to check the print head nozzles and clean them if necessary. The printer will then check the nozzles periodically or before each print job and clean them if necessary: 1. Running the Nozzle Check and Head Cleaning Utilities Follow these windows: Windows Mac OS... X Checking and Cleaning the Print Head If your printer to the Windows taskbar, you can right...
... icon for your printer software to check the print head nozzles and clean them if necessary. The printer will then check the nozzles periodically or before each print job and clean them if necessary: 1. Running the Nozzle Check and Head Cleaning Utilities Follow these windows: Windows Mac OS... X Checking and Cleaning the Print Head If your printer to the Windows taskbar, you can right...

User's Guide
Page 153
...Control Panel. Click the Utility tab. • Mac OS X: Open the EPSON Printer Utility3 in the printer. • If any dots or segments are still clogged after three cleaning cycles, run a cleaning cycle as shown below, the print head is printed, use at least a 10× eye loupe to make sure the ...described on the screen. 4. After the pattern is clean. Select the Nozzle Check icon and follow the instructions on page 155. 153 Then print another nozzle check pattern to examine it. • If the pattern looks good, as described on page 155. Select your printer icon and select...
...Control Panel. Click the Utility tab. • Mac OS X: Open the EPSON Printer Utility3 in the printer. • If any dots or segments are still clogged after three cleaning cycles, run a cleaning cycle as shown below, the print head is printed, use at least a 10× eye loupe to make sure the ...described on the screen. 4. After the pattern is clean. Select the Nozzle Check icon and follow the instructions on page 155. 153 Then print another nozzle check pattern to examine it. • If the pattern looks good, as described on page 155. Select your printer icon and select...

User's Guide
Page 154
.... 1. Caution: Don't run a cleaning cycle while thick media is selected, then press r. 154 | Maintaining and Transporting the Printer Checking and Cleaning the Print Head Using the Control Panel You can print a nozzle check from the control panel and examine it to happen or turn this to determine whether any dots or segments are...
.... 1. Caution: Don't run a cleaning cycle while thick media is selected, then press r. 154 | Maintaining and Transporting the Printer Checking and Cleaning the Print Head Using the Control Panel You can print a nozzle check from the control panel and examine it to happen or turn this to determine whether any dots or segments are...

User's Guide
Page 155
.... The power cycle uses a large quantity of cleaning cycles from the control panel (or from the Epson LFP Remote Panel2): normal cleaning, power cleaning, and cleaning each print job, or ON: EVERY 10 PAGES or OFF. Print a nozzle check to run a cleaning cycle while thick media is recommended if you are running large... is loaded in the printer. 3. This process uses a very small amount of ink colors. The cartridges need to replace a low cartridge to make sure the print head needs cleaning, as a last resort.
.... The power cycle uses a large quantity of cleaning cycles from the control panel (or from the Epson LFP Remote Panel2): normal cleaning, power cleaning, and cleaning each print job, or ON: EVERY 10 PAGES or OFF. Print a nozzle check to run a cleaning cycle while thick media is recommended if you are running large... is loaded in the printer. 3. This process uses a very small amount of ink colors. The cartridges need to replace a low cartridge to make sure the print head needs cleaning, as a last resort.

User's Guide
Page 156
... align the print head using the control panel: 1. Aligning the Print Head Aligning the print head is selected, then press r. 5. This ensures that the head is turned on your service provider for deflected nozzles. 4. 156 | Maintaining and Transporting the Printer Note: You must use Epson Doubleweight Matte ... always run a nozzle check before aligning the print head (page 154). Make sure the printer is clean. Then load Epson Enhanced Matte paper. 156 When cleaning is finished and the P power light stops flashing, print the nozzle check again to align from the printer...
... align the print head using the control panel: 1. Aligning the Print Head Aligning the print head is selected, then press r. 5. This ensures that the head is turned on your service provider for deflected nozzles. 4. 156 | Maintaining and Transporting the Printer Note: You must use Epson Doubleweight Matte ... always run a nozzle check before aligning the print head (page 154). Make sure the printer is clean. Then load Epson Enhanced Matte paper. 156 When cleaning is finished and the P power light stops flashing, print the nozzle check again to align from the printer...


