
Quick Reference Guide
Page 3
... the tension lever on both ends of the roll paper. Loading Roll Paper 1 Open the roll paper cover. 2 Push down the tension levers to secure them. 6 Move the roll paper all the way to the right. 3 Place the roll paper on top of the printer. 7 Slide the roll paper holder to fit the core size of the... roll. Then push down the lock lever, then move the roll paper holder to the left adapter with the...
... the tension lever on both ends of the roll paper. Loading Roll Paper 1 Open the roll paper cover. 2 Push down the tension levers to secure them. 6 Move the roll paper all the way to the right. 3 Place the roll paper on top of the printer. 7 Slide the roll paper holder to fit the core size of the... roll. Then push down the lock lever, then move the roll paper holder to the left adapter with the...

Quick Reference Guide
Page 4
...up the tension levers, then remove the adapters from the roll. 4 Roll the paper forward to the top of the printer. 5 Pull up the lock lever to lock the paper in its original package. 3 Loading Roll Paper (continued) 9 Slide the roll paper holder to the right to secure it in the printer. 11 If the... Paper release light is not on, press the button. 12 Insert the paper into the slot and pull it from the...
...up the tension levers, then remove the adapters from the roll. 4 Roll the paper forward to the top of the printer. 5 Pull up the lock lever to lock the paper in its original package. 3 Loading Roll Paper (continued) 9 Slide the roll paper holder to the right to secure it in the printer. 11 If the... Paper release light is not on, press the button. 12 Insert the paper into the slot and pull it from the...
Quick Reference Guide
Page 5
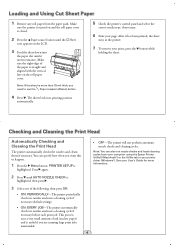
... checks its nozzles and runs a cleaning cycle if necessary before each print job. Make sure the printer is turned on and the roll paper cover is straight and aligned with the vertical line on the LCD. 3 Feed the sheet down into printing position automatically. 5 Check the...and select the correct media type, if necessary. 6 Print your page. Note: If the sheet is highlighted. Loading and Using Cut Sheet Paper 1 Remove any roll paper from your computer using the Epson Printer Utility3 (Macintosh®) or the Utility tab in the printer. 7 To remove your print, press the...
... checks its nozzles and runs a cleaning cycle if necessary before each print job. Make sure the printer is turned on and the roll paper cover is straight and aligned with the vertical line on the LCD. 3 Feed the sheet down into printing position automatically. 5 Check the...and select the correct media type, if necessary. 6 Print your page. Note: If the sheet is highlighted. Loading and Using Cut Sheet Paper 1 Remove any roll paper from your computer using the Epson Printer Utility3 (Macintosh®) or the Utility tab in the printer. 7 To remove your print, press the...
Quick Reference Guide
Page 6
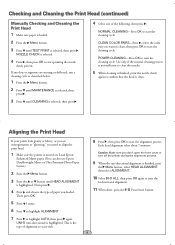
...5 Each head alignment takes about 7 minutes. Checking and Cleaning the Print Head (continued) Manually Checking and Cleaning the Print Head 1 Make sure paper is loaded. 2 Press the Menu button. 3 Press until CLEANING is selected, then press . 4 Select one of the following, then press : NORMAL ... print head. 1 Make sure the printer is the type of alignment to start the alignment process. Load Epson Enhanced Matte paper. (You can also use Epson Doubleweight Matte or Ultra Premium Photo Paper Luster.) 2 Press the Menu button. 3 Press the or button until HEAD ALIGNMENT is highlighted. CLEAN...
...5 Each head alignment takes about 7 minutes. Checking and Cleaning the Print Head (continued) Manually Checking and Cleaning the Print Head 1 Make sure paper is loaded. 2 Press the Menu button. 3 Press until CLEANING is selected, then press . 4 Select one of the following, then press : NORMAL ... print head. 1 Make sure the printer is the type of alignment to start the alignment process. Load Epson Enhanced Matte paper. (You can also use Epson Doubleweight Matte or Ultra Premium Photo Paper Luster.) 2 Press the Menu button. 3 Press the or button until HEAD ALIGNMENT is highlighted. CLEAN...
Quick Reference Guide
Page 11
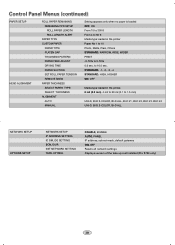
..., PANEL IP address, subnet mask, default gateway ON, OFF Resets all network settings Displays version of the take-up reel installed (Pro 9700 only) 10 STANDARD, -1, -2, -3, -4 STANDARD, HIGH, HIGHER ON, OFF Media type loaded in the printer Paper No 1 to 10 Photo, Matte, Plain, Others STANDARD, NARROW, WIDE, WIDER PRINT -0.70% to 10.0 sec.
..., PANEL IP address, subnet mask, default gateway ON, OFF Resets all network settings Displays version of the take-up reel installed (Pro 9700 only) 10 STANDARD, -1, -2, -3, -4 STANDARD, HIGH, HIGHER ON, OFF Media type loaded in the printer Paper No 1 to 10 Photo, Matte, Plain, Others STANDARD, NARROW, WIDE, WIDER PRINT -0.70% to 10.0 sec.
User's Guide
Page 6
...Identification 61 Placing the Paper in the Printer 62 Loading the Paper for Printing 67 Cutting Paper Manually with the Built-in Cutter 69 Printing Trim Lines 69 Removing Paper from the Printer 70 Using Cut Sheet Paper 73 Loading Cut Sheets 73 Loading Thick Sheets 75 ...the Printer 79 Storing the Paper Basket 81 Optimizing the Settings for Your Paper 82 Creating Paper Configurations 82 Printing Your Paper Configurations 84 Selecting Paper Configurations 84 3 Printing With Epson Drivers for Windows Sizing Images for Borderless Printing on Roll Paper 86 Choosing Basic Print Options...
...Identification 61 Placing the Paper in the Printer 62 Loading the Paper for Printing 67 Cutting Paper Manually with the Built-in Cutter 69 Printing Trim Lines 69 Removing Paper from the Printer 70 Using Cut Sheet Paper 73 Loading Cut Sheets 73 Loading Thick Sheets 75 ...the Printer 79 Storing the Paper Basket 81 Optimizing the Settings for Your Paper 82 Creating Paper Configurations 82 Printing Your Paper Configurations 84 Selecting Paper Configurations 84 3 Printing With Epson Drivers for Windows Sizing Images for Borderless Printing on Roll Paper 86 Choosing Basic Print Options...
User's Guide
Page 9
... 195 Dimensions and Weight 196 Printer Interfaces 196 Safety Approvals 196 Media 196 Roll Paper 196 Cut Sheets 198 Printable Area 201 Ink Cartridges 201 B Using the Optional Auto Take-Up Reel Loading Roll Paper Onto the Take-Up Reel 204 Winding Prints Forward 205 Winding Prints Backward 206... Printing Using the Auto Take-Up Reel 207 Reversing the Paper Stops for a 2-inch Paper Reel Core 208 Installing a Take-Up Reel Core 210 ...
... 195 Dimensions and Weight 196 Printer Interfaces 196 Safety Approvals 196 Media 196 Roll Paper 196 Cut Sheets 198 Printable Area 201 Ink Cartridges 201 B Using the Optional Auto Take-Up Reel Loading Roll Paper Onto the Take-Up Reel 204 Winding Prints Forward 205 Winding Prints Backward 206... Printing Using the Auto Take-Up Reel 207 Reversing the Paper Stops for a 2-inch Paper Reel Core 208 Installing a Take-Up Reel Core 210 ...

User's Guide
Page 11
It also tells you how to maintain your printer to keep it to your printer for setting up and using your printer, loading paper, using the Epson printer drivers, and replacing ink cartridges. Tips contain additional hints on setting up and using the printer's menu system. For ...handy summary of your printer. 11 Attach it working at its best, and provides troubleshooting tips in case you use and printer maintenance-loading paper, replacing ink cartridges and other components, cleaning and aligning the print head, and using your printer on the CD-ROM provides instructions...
It also tells you how to maintain your printer to keep it to your printer for setting up and using your printer, loading paper, using the Epson printer drivers, and replacing ink cartridges. Tips contain additional hints on setting up and using the printer's menu system. For ...handy summary of your printer. 11 Attach it working at its best, and provides troubleshooting tips in case you use and printer maintenance-loading paper, replacing ink cartridges and other components, cleaning and aligning the print head, and using your printer on the CD-ROM provides instructions...

User's Guide
Page 48
... sure your computer's network interface, you need to a network hub, you need an RJ-45 CAT-5 crossover cable. 1. Never turn off . 48 To connect to load paper before READY will appear on the display. See page 57 for instructions. To connect directly to Your System You can use USB and/or Ethernet...
... sure your computer's network interface, you need to a network hub, you need an RJ-45 CAT-5 crossover cable. 1. Never turn off . 48 To connect to load paper before READY will appear on the display. See page 57 for instructions. To connect directly to Your System You can use USB and/or Ethernet...
User's Guide
Page 56
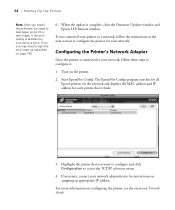
... printer that you want to configure and click Configuration to access the TCP/IP selection screen. 4. The EpsonNet Config program searches for all Epson printers on the network and displays the MAC address and IP address for instructions on page 156. 6. If necessary, contact your network. Turn... window and Epson LFP Remote window. If not, you may need to align the print head, as described on assigning an appropriate IP address. When the update is done. Start EpsonNet Config. 56 | Setting Up the Printer Note: After you install the software, you need to load paper and print...
... printer that you want to configure and click Configuration to access the TCP/IP selection screen. 4. The EpsonNet Config program searches for all Epson printers on the network and displays the MAC address and IP address for instructions on page 156. 6. If necessary, contact your network. Turn... window and Epson LFP Remote window. If not, you may need to align the print head, as described on assigning an appropriate IP address. When the update is done. Start EpsonNet Config. 56 | Setting Up the Printer Note: After you install the software, you need to load paper and print...
User's Guide
Page 59
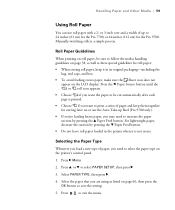
... automatically after each page is a simple process. Selecting the Paper Type Whenever you load a new type of paper, you are using as these special guidelines for roll paper: • When storing roll paper, keep them together for the Pro 9700. Press r Menu. 2. Select the paper that you need to save the setting. 5. Manually switching ... sure the Sheet icon does not appear on or use the Auto Take-up Reel (Pro 9700 only). • If you're loading heavy paper, you want the paper to be sure to follow the media handling guidelines on page 58, as well as listed on page 60, then press ...
... automatically after each page is a simple process. Selecting the Paper Type Whenever you load a new type of paper, you are using as these special guidelines for roll paper: • When storing roll paper, keep them together for the Pro 9700. Press r Menu. 2. Select the paper that you need to save the setting. 5. Manually switching ... sure the Sheet icon does not appear on or use the Auto Take-up Reel (Pro 9700 only). • If you're loading heavy paper, you want the paper to be sure to follow the media handling guidelines on page 58, as well as listed on page 60, then press ...

User's Guide
Page 73
... cm) for the Pro 9700. This 1. Make sure the printer is turned on the LCD display. 73 This helps hold the paper in the portrait orientation (short edge first). Note: For heavy paper, you load paper in place during loading and printing. Paper release button. The printer accepts sheets in the printer when you load the paper depends on its...
... cm) for the Pro 9700. This 1. Make sure the printer is turned on the LCD display. 73 This helps hold the paper in the portrait orientation (short edge first). Note: For heavy paper, you load paper in place during loading and printing. Paper release button. The printer accepts sheets in the printer when you load the paper depends on its...

User's Guide
Page 75
... and vertical lines on and the roll paper cover is more than 19 mil (0.5 mm) thick and 28.6 inches (728 mm) long, which should be loaded in landscape orientation (Pro 9700 only). 1. Press the Paper release button. 4. Press the l Paper Source button until the Sheet icon appears ...on the LCD display. This helps hold the paper in the portrait orientation (short edge first). The only exception...
... and vertical lines on and the roll paper cover is more than 19 mil (0.5 mm) thick and 28.6 inches (728 mm) long, which should be loaded in landscape orientation (Pro 9700 only). 1. Press the Paper release button. 4. Press the l Paper Source button until the Sheet icon appears ...on the LCD display. This helps hold the paper in the portrait orientation (short edge first). The only exception...

User's Guide
Page 176
..., a message appears on the LCD display, and the lights on the control panel come on . Message Explanation Response BORDERLESS ERROR LOAD A SUPPORTED PAPER SIZE OR LOAD PAPER CORRECTLY The borderless setting is selected and paper that the power cord is obstructing the indicated ink cover. Note the error number, then turn it back on or...
..., a message appears on the LCD display, and the lights on the control panel come on . Message Explanation Response BORDERLESS ERROR LOAD A SUPPORTED PAPER SIZE OR LOAD PAPER CORRECTLY The borderless setting is selected and paper that the power cord is obstructing the indicated ink cover. Note the error number, then turn it back on or...
User's Guide
Page 180
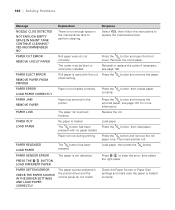
... blunt or incorrectly installed. PAPER SENSOR ERROR The paper is loaded correctly. 180 Press the button and remove the roll paper core. Load paper, then press the button. YES (RECOMMENDED) NO PAPER CUT ERROR REMOVE UNCUT PAPER PAPER EJECT ERROR REMOVE PAPER FROM PRINTER PAPER ERROR LOAD PAPER CORRECTLY PAPER JAM REMOVE PAPER PAPER LOW PAPER OUT LOAD PAPER Explanation There is not loaded correctly. Paper is not enough space in...
... blunt or incorrectly installed. PAPER SENSOR ERROR The paper is loaded correctly. 180 Press the button and remove the roll paper core. Load paper, then press the button. YES (RECOMMENDED) NO PAPER CUT ERROR REMOVE UNCUT PAPER PAPER EJECT ERROR REMOVE PAPER FROM PRINTER PAPER ERROR LOAD PAPER CORRECTLY PAPER JAM REMOVE PAPER PAPER LOW PAPER OUT LOAD PAPER Explanation There is not loaded correctly. Paper is not enough space in...

User's Guide
Page 181
PAPER SKEW LOAD PAPER PROPERLY Paper is installed. printer, then turn off the condition was present. nozzles. TANK WRONG tank is not loaded straight. REPLACE MAINTENANCE TANK SOON The maintenance tank is installed. Replace the maintenance tank with a genuine Epson maintenance tank. TYPE Replace the ...| 181 Message Explanation Response PAPER SIZE ERROR The loaded paper size does not Make sure the paper size matches the size LOAD CORRECT PAPER SIZE match the size of the image. Press the button and make sure the paper is loaded straight. SOME NOZZLES ARE CLOGGED...
PAPER SKEW LOAD PAPER PROPERLY Paper is installed. printer, then turn off the condition was present. nozzles. TANK WRONG tank is not loaded straight. REPLACE MAINTENANCE TANK SOON The maintenance tank is installed. Replace the maintenance tank with a genuine Epson maintenance tank. TYPE Replace the ...| 181 Message Explanation Response PAPER SIZE ERROR The loaded paper size does not Make sure the paper size matches the size LOAD CORRECT PAPER SIZE match the size of the image. Press the button and make sure the paper is loaded straight. SOME NOZZLES ARE CLOGGED...

User's Guide
Page 182
... CHECK THE STATUS OF AUTO TAKE-UP REEL UNIT AND RESTART THE PRINTER TAKE-UP ERROR IS ANYTHING OBSTRUCTING THE TAKE-UP REEL SENSOR SYSTEM? LOAD PAPER AGAIN Explanation The Auto Take-up Reel (see page 85 (Windows) or page 111 (Macintosh). 182 Response Turn the printer off , then connect...See page 203. The Auto Take-up Reel correctly. Paper is not winding paper. The Auto Take-up Reel is not loaded on the reel Press the button and load the paper correctly. Make sure nothing is not installed correctly. Press the button and load the paper correctly; For more information, see page 203) and ...
... CHECK THE STATUS OF AUTO TAKE-UP REEL UNIT AND RESTART THE PRINTER TAKE-UP ERROR IS ANYTHING OBSTRUCTING THE TAKE-UP REEL SENSOR SYSTEM? LOAD PAPER AGAIN Explanation The Auto Take-up Reel (see page 85 (Windows) or page 111 (Macintosh). 182 Response Turn the printer off , then connect...See page 203. The Auto Take-up Reel correctly. Paper is not winding paper. The Auto Take-up Reel is not loaded on the reel Press the button and load the paper correctly. Make sure nothing is not installed correctly. Press the button and load the paper correctly; For more information, see page 203) and ...

User's Guide
Page 204
... properly. Press the l button to wind your prints forward, or page 206 if you load roll paper onto the take-up Reel icon appears on and the Auto Take-up reel core, check the following: • Turn off before loading paper. Continue with the steps in the power cord. 2. Plug in the next section... Reel to wind your prints backward. 204 Make sure the printer is on the LCD panel. 3. Make sure that the leading edge of the printer. Loading Roll Paper Onto the Take-Up Reel Before you want to select (Auto Cut Off). 5. 204 | Using the Optional Auto Take-Up Reel WARNING: Make sure...
... properly. Press the l button to wind your prints forward, or page 206 if you load roll paper onto the take-up Reel icon appears on and the Auto Take-up reel core, check the following: • Turn off before loading paper. Continue with the steps in the power cord. 2. Plug in the next section... Reel to wind your prints backward. 204 Make sure the printer is on the LCD panel. 3. Make sure that the leading edge of the printer. Loading Roll Paper Onto the Take-Up Reel Before you want to select (Auto Cut Off). 5. 204 | Using the Optional Auto Take-Up Reel WARNING: Make sure...

User's Guide
Page 215
... Menu mode, or has an error Off: printer is ready On: no paper is loaded, paper is out, the selected paper source does not match the printer driver source, or the loaded paper is locked in the printer 215 Light P Power Pause/reset b Paper B Ink Paper release or ePlaten Description On: printer is turned on responding to problems...
... Menu mode, or has an error Off: printer is ready On: no paper is loaded, paper is out, the selected paper source does not match the printer driver source, or the loaded paper is locked in the printer 215 Light P Power Pause/reset b Paper B Ink Paper release or ePlaten Description On: printer is turned on responding to problems...

User's Guide
Page 217
...print jobs. STANDARD for most printing WIDE or WIDER if images are smeared NARROW for thin paper WIDEST for details. If you select OFF, you if paper is out of range of the loaded paper matches the width selected in your print job (ON is recommended). Resets the PRINTER SETUP menu...SETTINGS Description Adjusts the distance from the print head to see if the width of the loaded paper. Selects whether to enter menu mode and select the settings summarized here. see page 69 for roll papers. Control Panel Summary | 217 Menu Setting Summary Press the Menu button to print a ...
...print jobs. STANDARD for most printing WIDE or WIDER if images are smeared NARROW for thin paper WIDEST for details. If you select OFF, you if paper is out of range of the loaded paper matches the width selected in your print job (ON is recommended). Resets the PRINTER SETUP menu...SETTINGS Description Adjusts the distance from the print head to see if the width of the loaded paper. Selects whether to enter menu mode and select the settings summarized here. see page 69 for roll papers. Control Panel Summary | 217 Menu Setting Summary Press the Menu button to print a ...


