Product Brochure
Page 4
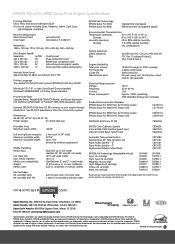
..., pump unit, flushing box, head cleaner, cap assembly Electrical Requirements Voltage: Frequency: Current: Power consumption: 120 V 50 to 60 Hz 1.0A Approx. 100W (operating) 30W (Standby) Energy Star compliant Product/Accessories Part Numbers EPSON Stylus Pro 9000 Fiery X2 Printing System EPSON Stylus Pro 9000 Print Engine only C277011S C277011B EPSON Stylus Pro 9500 Fiery X2 Printing System EPSON Stylus Pro 9500 Print Engine only C381011S C381011B EPSON RS-5100 Fiery X2...
..., pump unit, flushing box, head cleaner, cap assembly Electrical Requirements Voltage: Frequency: Current: Power consumption: 120 V 50 to 60 Hz 1.0A Approx. 100W (operating) 30W (Standby) Energy Star compliant Product/Accessories Part Numbers EPSON Stylus Pro 9000 Fiery X2 Printing System EPSON Stylus Pro 9000 Print Engine only C277011S C277011B EPSON Stylus Pro 9500 Fiery X2 Printing System EPSON Stylus Pro 9500 Print Engine only C381011S C381011B EPSON RS-5100 Fiery X2...
Product Information Guide
Page 1
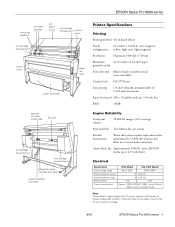
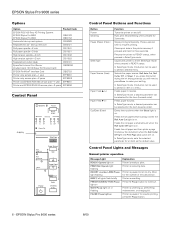
...printer's voltage. 8/00 EPSON Stylus Pro 9000 series - 1 EPSON Stylus Pro 9000 series - mounting brackets roll paper spindles roll paper cover ink cartridge compartment control panel ink cartridge compartment lower cover paper set lever paper hammock Printer Specifications Printing Printing method On-demand ink jet...serial interface connector parallel interface connector Engine Reliability Total print volume 18,000 B1 images, 30% coverage Print head life Two billion dots per nozzle Periodic maintenance Waste ink system requires replacement after approximately 12,000 sheets ...
...printer's voltage. 8/00 EPSON Stylus Pro 9000 series - 1 EPSON Stylus Pro 9000 series - mounting brackets roll paper spindles roll paper cover ink cartridge compartment control panel ink cartridge compartment lower cover paper set lever paper hammock Printer Specifications Printing Printing method On-demand ink jet...serial interface connector parallel interface connector Engine Reliability Total print volume 18,000 B1 images, 30% coverage Print head life Two billion dots per nozzle Periodic maintenance Waste ink system requires replacement after approximately 12,000 sheets ...
Product Information Guide
Page 6
...print head cleaning when pressed for the number of minutes shown. If you press this button during the ink drying process, you will need to press Enter to continue. Ejects the cut sheet when the Sheet light is paused. Press the Pause button to make your setting. Printer is on. To resume printing... paused to READY status, when pressed in READY status. EPSON Stylus Pro 9000 series Options Option EPSON RS-5100 Fiery X2 Printing System: EPSON Stylus Pro 9000 EPSON Stylus Pro 9500 Automatic take-up reel system Replacement 44" take-up , performing maintenance, or charging ink....
...print head cleaning when pressed for the number of minutes shown. If you press this button during the ink drying process, you will need to press Enter to continue. Ejects the cut sheet when the Sheet light is paused. Press the Pause button to make your setting. Printer is on. To resume printing... paused to READY status, when pressed in READY status. EPSON Stylus Pro 9000 series Options Option EPSON RS-5100 Fiery X2 Printing System: EPSON Stylus Pro 9000 EPSON Stylus Pro 9500 Automatic take-up reel system Replacement 44" take-up , performing maintenance, or charging ink....
Product Information Guide
Page 7
... jam. Turn the printer off the printer and remove the card. Install the correct ink cartridge(s). 8/00 EPSON Stylus Pro 9000 series - 7 Ink cartridge(s) are replacing the ink cartridge(s) and the ink compartment cover is different from the beginning for print head cleaning. See page 9. Pull the paper set lever down after you load the paper. Contact...
... jam. Turn the printer off the printer and remove the card. Install the correct ink cartridge(s). 8/00 EPSON Stylus Pro 9000 series - 7 Ink cartridge(s) are replacing the ink cartridge(s) and the ink compartment cover is different from the beginning for print head cleaning. See page 9. Pull the paper set lever down after you load the paper. Contact...
Product Information Guide
Page 8
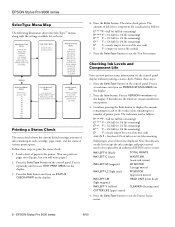
...PRINTS WASTE INK CR MOTOR PF MOTOR HEAD UNIT CLEANER HEAD ALIGNMENT MENU: PAPER THICK. DRYING TIME SUCTION Printing a Status Check The status check shows the current default settings, amount of ink remaining in the printer. (You can view printer status information on the control panel. EPSON Stylus Pro 9000 series 8/00 EPSON Stylus Pro 9000... parts. Checking Ink Levels and Component Life You can print test pages on roll paper, but you see STATUS CHECK=PRINT on the display. 3. REPLACE OPEN LOWER COVER REPLACE CUTTER CLOSE LOWER COVER PAPER CONFIG. The amount of ...
...PRINTS WASTE INK CR MOTOR PF MOTOR HEAD UNIT CLEANER HEAD ALIGNMENT MENU: PAPER THICK. DRYING TIME SUCTION Printing a Status Check The status check shows the current default settings, amount of ink remaining in the printer. (You can view printer status information on the control panel. EPSON Stylus Pro 9000 series 8/00 EPSON Stylus Pro 9000... parts. Checking Ink Levels and Component Life You can print test pages on roll paper, but you see STATUS CHECK=PRINT on the display. 3. REPLACE OPEN LOWER COVER REPLACE CUTTER CLOSE LOWER COVER PAPER CONFIG. The amount of ...
Product Information Guide
Page 10
...several times to get a clean nozzle check pattern. EPSON Stylus Pro 9000 series 8/00 Press the SelecType button on the control panel repeatedly until you see TEST PRINT MENU on the control panel to align the print head. See the following section for three seconds. Running...Print Head If banding appears on or flashing. (If so, you need to replace the indicated ink cartridge before you can run a test print or nozzle check between cleaning cycles. For the EPSON Stylus Pro 9500, you determine which numbered row of patterns (EPSON Stylus Pro 9000) or numbered line or box (EPSON Stylus Pro...
...several times to get a clean nozzle check pattern. EPSON Stylus Pro 9000 series 8/00 Press the SelecType button on the control panel repeatedly until you see TEST PRINT MENU on the control panel to align the print head. See the following section for three seconds. Running...Print Head If banding appears on or flashing. (If so, you need to replace the indicated ink cartridge before you can run a test print or nozzle check between cleaning cycles. For the EPSON Stylus Pro 9500, you determine which numbered row of patterns (EPSON Stylus Pro 9000) or numbered line or box (EPSON Stylus Pro...
User Manual
Page 5
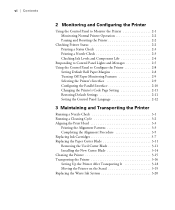
...Monitor the Printer 2-1 Monitoring Normal Printer Operation 2-2 Pausing and Resetting the Printer 2-2 Checking Printer Status 2-2 Printing a Status Check 2-3 Printing a Nozzle Check 2-3 Checking Ink Levels and Component Life 2-4 Responding to Control Panel Lights and Messages ...Transporting the Printer Running a Nozzle Check 3-1 Running a Cleaning Cycle 3-2 Aligning the Print Head 3-3 Printing the Alignment Patterns 3-3 Completing the Alignment Procedure 3-5 Replacing Ink Cartridges 3-7 Replacing the Paper Cutter Blade 3-11 Removing the Used Cutter Blade 3-11 Installing the New...
...Monitor the Printer 2-1 Monitoring Normal Printer Operation 2-2 Pausing and Resetting the Printer 2-2 Checking Printer Status 2-2 Printing a Status Check 2-3 Printing a Nozzle Check 2-3 Checking Ink Levels and Component Life 2-4 Responding to Control Panel Lights and Messages ...Transporting the Printer Running a Nozzle Check 3-1 Running a Cleaning Cycle 3-2 Aligning the Print Head 3-3 Printing the Alignment Patterns 3-3 Completing the Alignment Procedure 3-5 Replacing Ink Cartridges 3-7 Replacing the Paper Cutter Blade 3-11 Removing the Used Cutter Blade 3-11 Installing the New...
User Manual
Page 11
... and assemble the printer, install ink cartridges and paper, and prepare for printing. • The EPSON Stylus Pro 9000 Series Quick Reference Guide provides a handy summary of the procedures for daily use and printer maintenance-loading paper, replacing ink cartridges, running cleaning cycles, aligning the print head, and preparing the printer for transportation. It also includes practical color...
... and assemble the printer, install ink cartridges and paper, and prepare for printing. • The EPSON Stylus Pro 9000 Series Quick Reference Guide provides a handy summary of the procedures for daily use and printer maintenance-loading paper, replacing ink cartridges, running cleaning cycles, aligning the print head, and preparing the printer for transportation. It also includes practical color...
User Manual
Page 12
Chapter 3 gives instructions for installing an optional Ethernet interface card. Appendix A gives instructions for cleaning and aligning the print head, replacing ink cartridges and the cutter blade, and cleaning and transporting the printer. Appendix C covers the installation and use ...the following information: Chapter 1 gives instructions for loading roll paper and cut sheets, printing on your printer, paper requirements, and ink cartridges. Appendix B covers the installation and use of EPSON printer drivers and utilities for Macintosh computers. An Index is included at the end...
Chapter 3 gives instructions for installing an optional Ethernet interface card. Appendix A gives instructions for cleaning and aligning the print head, replacing ink cartridges and the cutter blade, and cleaning and transporting the printer. Appendix C covers the installation and use ...the following information: Chapter 1 gives instructions for loading roll paper and cut sheets, printing on your printer, paper requirements, and ink cartridges. Appendix B covers the installation and use of EPSON printer drivers and utilities for Macintosh computers. An Index is included at the end...

User Manual
Page 48
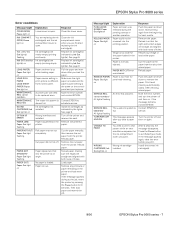
... ink system) CR MOTOR (carriage motor) PF MOTOR (paper feed motor) HEAD UNIT (print head) CLEANER (cleaning unit) 4. Paper Out light on Lower cover is up while loading paper. 2-5 Response Close the lower cover. Note that all three magnetic tabs are replacing the ink cartridge(s) and the ink compartment cover is a list of the... paper set lever is open . The lights on the control panel come on the list (except the ink cartridges and paper cutter) need to be replaced by authorized EPSON service centers. Ink Out light(s) Ink cartridge(s) are finished...
... ink system) CR MOTOR (carriage motor) PF MOTOR (paper feed motor) HEAD UNIT (print head) CLEANER (cleaning unit) 4. Paper Out light on Lower cover is up while loading paper. 2-5 Response Close the lower cover. Note that all three magnetic tabs are replacing the ink cartridge(s) and the ink compartment cover is a list of the... paper set lever is open . The lights on the control panel come on the list (except the ink cartridges and paper cutter) need to be replaced by authorized EPSON service centers. Ink Out light(s) Ink cartridge(s) are finished...
User Manual
Page 50
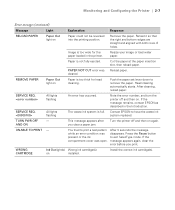
cleared. SERVICE REQ. If the message remains, contact EPSON as described in the printer. Contact EPSON to exit SelecType mode. AND ON This message appears after you print. UNABLE TO PRINT - PAPER NOT CUT error was open. Note the error number, and turn the printer off and... Pause button present or the ink to have the waste ink system replaced. Install the correct ink cartridge(s). 2-7 Paper is full. Head cleaning automatically starts. SERVICE REQ. Push the paper set lever down to print a test pattern After 3 seconds the message while an error condition ...
cleared. SERVICE REQ. If the message remains, contact EPSON as described in the printer. Contact EPSON to exit SelecType mode. AND ON This message appears after you print. UNABLE TO PRINT - PAPER NOT CUT error was open. Note the error number, and turn the printer off and... Pause button present or the ink to have the waste ink system replaced. Install the correct ink cartridge(s). 2-7 Paper is full. Head cleaning automatically starts. SERVICE REQ. Push the paper set lever down to print a test pattern After 3 seconds the message while an error condition ...

User Manual
Page 51
ROLL MARG=3MM appears on the display. 2-8 | Monitoring and Configuring the Printer Note Print quality may be affected near the cut edges if you can use the SelecType menus to configure printer settings and perform maintenance ...levels and component life page 2-4 Paper Register paper thickness and drying time, page 1-25 Configuration and select registered configurations Cutter Replace the paper cutter blade Replacement page 3-11 Head Alignment Align the print head page 3-3 Setting Default Roll Paper Margins The default margins for roll paper are .12 inches or 3 mm (left ...
ROLL MARG=3MM appears on the display. 2-8 | Monitoring and Configuring the Printer Note Print quality may be affected near the cut edges if you can use the SelecType menus to configure printer settings and perform maintenance ...levels and component life page 2-4 Paper Register paper thickness and drying time, page 1-25 Configuration and select registered configurations Cutter Replace the paper cutter blade Replacement page 3-11 Head Alignment Align the print head page 3-3 Setting Default Roll Paper Margins The default margins for roll paper are .12 inches or 3 mm (left ...
User Manual
Page 56
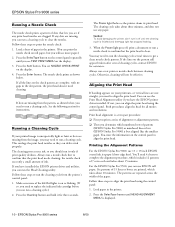
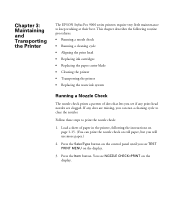
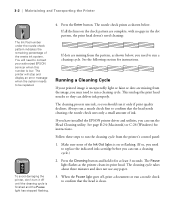
...; Replacing the waste ink system Running a Nozzle Check The nozzle check prints a pattern of dots that lets you can print the nozzle check on roll paper, but you see NOZZLE CHECK=PRINT on the control panel until you will use more paper.) 2. Press the Item button. Chapter 3: Maintaining and Transporting the Printer The EPSON Stylus Pro 9000 series...
...; Replacing the waste ink system Running a Nozzle Check The nozzle check prints a pattern of dots that lets you can print the nozzle check on roll paper, but you see NOZZLE CHECK=PRINT on the control panel until you will use more paper.) 2. Press the Item button. Chapter 3: Maintaining and Transporting the Printer The EPSON Stylus Pro 9000 series...
User Manual
Page 57
...If dots are missing from the printer's control panel: 1. If all the lines on or flashing. (If so, you need to be replaced. This unclogs the print head nozzles so they can run a cleaning cycle. See page B-24 (Macintosh) or C-26 (Windows) for instructions. The Pause light flashes...3. the nozzle check uses only a small amount of ink. Press the Cleaning button and hold it off , print a document or run a cleaning cycle. Running a Cleaning Cycle If your authorized EPSON servicer when this number is clean. 3-2 Caution To avoid damaging the printer, don't turn it for at least ...
...If dots are missing from the printer's control panel: 1. If all the lines on or flashing. (If so, you need to be replaced. This unclogs the print head nozzles so they can run a cleaning cycle. See page B-24 (Macintosh) or C-26 (Windows) for instructions. The Pause light flashes...3. the nozzle check uses only a small amount of ink. Press the Cleaning button and hold it off , print a document or run a cleaning cycle. Running a Cleaning Cycle If your authorized EPSON servicer when this number is clean. 3-2 Caution To avoid damaging the printer, don't turn it for at least ...

User Manual
Page 75
... panel when the waste ink system is almost full: MAINTENANCE REQ. 0100 You should call to the print head and maintain print quality. 3-20 | Maintaining and Transporting the Printer Replacing the Waste Ink System Approximately every two years (or after 12,000 B1-size prints), you must have your authorized EPSON servicer replace the waste ink system.
... panel when the waste ink system is almost full: MAINTENANCE REQ. 0100 You should call to the print head and maintain print quality. 3-20 | Maintaining and Transporting the Printer Replacing the Waste Ink System Approximately every two years (or after 12,000 B1-size prints), you must have your authorized EPSON servicer replace the waste ink system.
User Manual
Page 78
... in your print options. Print options are set incorrectly for the media you 're using a cut sheet, make sure the of alignment. You're printing on the wrong side If you're using . Check the Ink Out lights and replace ink cartridges if necessary, as described on . The print head is too ...old. Colors are incorrect or Print options are set incorrectly missing. If you 're using a cut sheet, make sure it's correctly attached to eliminate ...
... in your print options. Print options are set incorrectly for the media you 're using a cut sheet, make sure the of alignment. You're printing on the wrong side If you're using . Check the Ink Out lights and replace ink cartridges if necessary, as described on . The print head is too ...old. Colors are incorrect or Print options are set incorrectly missing. If you 're using a cut sheet, make sure it's correctly attached to eliminate ...
User Manual
Page 79
... The platen gap setting is too wide. Check the Ink Out lights and replace ink cartridges if necessary, as described on the wrong side of the printer with a soft, clean cloth. page 1-25 for non-EPSON media). Your print appears blurry or smeared. See page 1-25 for instructions. Ink has leaked...set a dry time between passes in seconds. The paper configuration setting is too old. Print head nozzles are clogged. See too thick. Make sure the Print Mode or Media Type setting is face up. You're printing on page 3-7. Wipe the paper path area of the paper or other media. See...
... The platen gap setting is too wide. Check the Ink Out lights and replace ink cartridges if necessary, as described on the wrong side of the printer with a soft, clean cloth. page 1-25 for non-EPSON media). Your print appears blurry or smeared. See page 1-25 for instructions. Ink has leaked...set a dry time between passes in seconds. The paper configuration setting is too old. Print head nozzles are clogged. See too thick. Make sure the Print Mode or Media Type setting is face up. You're printing on page 3-7. Wipe the paper path area of the paper or other media. See...

User Manual
Page 90
... Nozzle configuration Printable columns Character mode Raster graphics mode Maximum printable width Maximum resolution Engine reliability Total print volume Print head life Periodic maintenance Cutter blade life Print direction Control code Line spacing Paper feed speed RAM Character sets On-demand ink jet Black...B1 images, 30% coverage Two billion dots per nozzle Waste ink system requires replacement after approximately 12,000 sheets (parts and labor not covered under warranty) Approximately 2,000 B1 sheets (EPSON media up to 4.33 mil thick) Bidirectional or unidirectional (user-selectable) ...
... Nozzle configuration Printable columns Character mode Raster graphics mode Maximum printable width Maximum resolution Engine reliability Total print volume Print head life Periodic maintenance Cutter blade life Print direction Control code Line spacing Paper feed speed RAM Character sets On-demand ink jet Black...B1 images, 30% coverage Two billion dots per nozzle Waste ink system requires replacement after approximately 12,000 sheets (parts and labor not covered under warranty) Approximately 2,000 B1 sheets (EPSON media up to 4.33 mil thick) Bidirectional or unidirectional (user-selectable) ...

User Manual
Page 158
... C-21 Canvas, cutting, 1-14 Cartridges, see Ink cartridges Casters, 3-19 Chooser, selecting printer, B-5 Cleaner (cleaning unit), 2-5 Cleaning paper hammock, 3-15 print head, 3-2, B-24, C-26 to C-27 printer, 3-15 Cleaning button, 2-4, 3-2 -1 Cleaning cycle, running control panel, 3-2 Macintosh, B-24 Windows, C-26...to 1-18 printable area, 5-3 Cut/Eject button, 1-13 Cutter Replace menu, 3-11 Cutter, replacing blade, 3-11 to 3-14 Cutter, utility, 1-14 D Data transfer, optimizing, C-29 to C-30 Default settings, 2-8 to 2-12 Deleting print jobs Macintosh, B-19, B-21 Windows, C-21 Diagnosing problems,...
... C-21 Canvas, cutting, 1-14 Cartridges, see Ink cartridges Casters, 3-19 Chooser, selecting printer, B-5 Cleaner (cleaning unit), 2-5 Cleaning paper hammock, 3-15 print head, 3-2, B-24, C-26 to C-27 printer, 3-15 Cleaning button, 2-4, 3-2 -1 Cleaning cycle, running control panel, 3-2 Macintosh, B-24 Windows, C-26...to 1-18 printable area, 5-3 Cut/Eject button, 1-13 Cutter Replace menu, 3-11 Cutter, replacing blade, 3-11 to 3-14 Cutter, utility, 1-14 D Data transfer, optimizing, C-29 to C-30 Default settings, 2-8 to 2-12 Deleting print jobs Macintosh, B-19, B-21 Windows, C-21 Diagnosing problems,...
User Manual
Page 159
... Print head, aligning Head unit (print head), 2-5 Height of printer, 5-3 Help, EPSON, 4 to 5 Hex dump mode, 4-2 High Speed copies, B-23, C-30 High Speed setting, B-15, C-18 High tension spindles, 1-1 Humidity requirements, 5-3 I Initialization, 5-4 Ink monitoring level, 2-4 to 2-5, B-21 to B-22, C-20 to C-25 valve locks, 3-17, 4-5 waste ink system, 2-5, 3-20, 5-1 Ink cartridges ordering, 3-7 removing for transportation, 3-16 replacing...
... Print head, aligning Head unit (print head), 2-5 Height of printer, 5-3 Help, EPSON, 4 to 5 Hex dump mode, 4-2 High Speed copies, B-23, C-30 High Speed setting, B-15, C-18 High tension spindles, 1-1 Humidity requirements, 5-3 I Initialization, 5-4 Ink monitoring level, 2-4 to 2-5, B-21 to B-22, C-20 to C-25 valve locks, 3-17, 4-5 waste ink system, 2-5, 3-20, 5-1 Ink cartridges ordering, 3-7 removing for transportation, 3-16 replacing...


