
Quick Reference Guide
Page 2
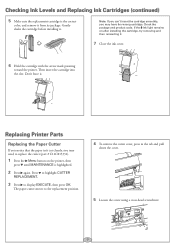
Printer Parts Front Roll paper holder Front cover Ink bay Paper basket Back Interface connector for optional equipment USB interface Roll paper cover Control panel Ink bay Casters Network interface AC inlet Maintenance tank (Pro 9890 includes two tanks, one on each side of printer) 1
Printer Parts Front Roll paper holder Front cover Ink bay Paper basket Back Interface connector for optional equipment USB interface Roll paper cover Control panel Ink bay Casters Network interface AC inlet Maintenance tank (Pro 9890 includes two tanks, one on each side of printer) 1
Quick Reference Guide
Page 3
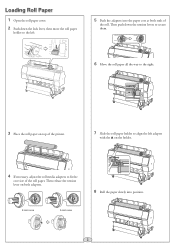
... on the holder. 4 If necessary, adjust the roll media adapters to fit the core size of the roll. Loading Roll Paper 1 Open the roll paper cover. 2 Push down the tension levers to secure them. 6 Move the roll paper all the way to the right. 3 Place the roll paper on top of... the printer. 7 Slide the roll paper holder to align the left . 5 Push the adapters into the paper core at both adapters. 2-inch core 3-inch core 8 Roll the...
... on the holder. 4 If necessary, adjust the roll media adapters to fit the core size of the roll. Loading Roll Paper 1 Open the roll paper cover. 2 Push down the tension levers to secure them. 6 Move the roll paper all the way to the right. 3 Place the roll paper on top of... the printer. 7 Slide the roll paper holder to align the left . 5 Push the adapters into the paper core at both adapters. 2-inch core 3-inch core 8 Roll the...
Quick Reference Guide
Page 4
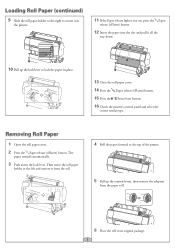
...(continued) 9 Slide the roll paper holder to the right to secure it in the printer. 11 If the Paper release light is not on, press the Paper release (ePlaten).... 6 Place the roll in place. 13 Close the roll paper cover. 14 Press the Paper release (ePlaten) button. 15 Press the Pause/reset button. 16 Check the printer's control panel and select the correct media type. The paper rewinds ...the tension levers, then remove the adapters from the roll. 4 Roll the paper forward to the top of the printer. 5 Pull up the lock lever to the left and remove it all the way down the lock lever. Then...
...(continued) 9 Slide the roll paper holder to the right to secure it in the printer. 11 If the Paper release light is not on, press the Paper release (ePlaten).... 6 Place the roll in place. 13 Close the roll paper cover. 14 Press the Paper release (ePlaten) button. 15 Press the Pause/reset button. 16 Check the printer's control panel and select the correct media type. The paper rewinds ...the tension levers, then remove the adapters from the roll. 4 Roll the paper forward to the top of the printer. 5 Pull up the lock lever to the left and remove it all the way down the lock lever. Then...
Quick Reference Guide
Page 5
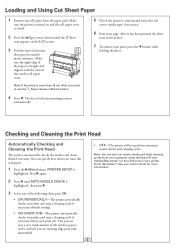
... any roll paper from your computer using the Epson Printer Utility4 (Macintosh®) or the Utility tab in the printer. 7 To remove your printer driver (Windows®). The sheet feeds into the paper slot until the Sheet icon appears on the roll paper cover. Note: If the sheet is more information....jobs unattended. 4 You can also run nozzle checks and head cleaning cycles from the paper path. Make sure the printer is turned on and the roll paper cover is straight and aligned with the vertical line on the LCD screen. 3 Feed the sheet down into printing position ...
... any roll paper from your computer using the Epson Printer Utility4 (Macintosh®) or the Utility tab in the printer. 7 To remove your printer driver (Windows®). The sheet feeds into the paper slot until the Sheet icon appears on the roll paper cover. Note: If the sheet is more information....jobs unattended. 4 You can also run nozzle checks and head cleaning cycles from the paper path. Make sure the printer is turned on and the roll paper cover is straight and aligned with the vertical line on the LCD screen. 3 Feed the sheet down into printing position ...

Quick Reference Guide
Page 6
... the cleaning cycle. POWER CLEANING-Press OK to align the print head. 1 Make sure the printer is turned on. Caution: Make sure you loaded. Load Epson Enhanced Matte paper. (You can also use Epson Doubleweight Matte or Ultra Premium Photo Paper Luster.) 2 Press the Menu button. 3 Press the... cleaning process is not sufficient to clear the nozzles. 5 When cleaning is the type of paper you don't open the front cover or turn off the printer during the alignment process. 9 When the uni-directional alignment is finished, press the Menu button, select HEAD ALIGNMENT, then select ALIGNMENT...
... the cleaning cycle. POWER CLEANING-Press OK to align the print head. 1 Make sure the printer is turned on. Caution: Make sure you loaded. Load Epson Enhanced Matte paper. (You can also use Epson Doubleweight Matte or Ultra Premium Photo Paper Luster.) 2 Press the Menu button. 3 Press the... cleaning process is not sufficient to clear the nozzles. 5 When cleaning is the type of paper you don't open the front cover or turn off the printer during the alignment process. 9 When the uni-directional alignment is finished, press the Menu button, select HEAD ALIGNMENT, then select ALIGNMENT...
Quick Reference Guide
Page 7
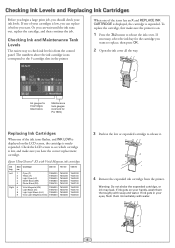
If necessary, select the ink bay for Pro 7890) Replacing Ink Cartridges When one tank for the cartridge you want to release ...and make sure the printer is low, you can wait until the ink runs out, replace the cartridge, and then continue the job. The numbers above the ink cartridge icons correspond to release the ink cover. Epson UltraChrome® K3 with... in the low or expended cartridge to replace, then press OK. 2 Open the ink cover all the way. If ink gets in the printer. Checking Ink and Maintenance Tank Levels The easiest way to see which cartridge is nearly expended...
If necessary, select the ink bay for Pro 7890) Replacing Ink Cartridges When one tank for the cartridge you want to release ...and make sure the printer is low, you can wait until the ink runs out, replace the cartridge, and then continue the job. The numbers above the ink cartridge icons correspond to release the ink cover. Epson UltraChrome® K3 with... in the low or expended cartridge to replace, then press OK. 2 Open the ink cover all the way. If ink gets in the printer. Checking Ink and Maintenance Tank Levels The easiest way to see which cartridge is nearly expended...
Quick Reference Guide
Page 8
... after installing the cartridge, try removing and then reinserting it . Don't force it . 7 Close the ink cover. 6 Hold the cartridge with the arrow mark pointing toward the printer. If the Ink light remains on the printer, then press until MAINTENANCE is the correct color, and remove it . Note: If you can't insert the...
... after installing the cartridge, try removing and then reinserting it . Don't force it . 7 Close the ink cover. 6 Hold the cartridge with the arrow mark pointing toward the printer. If the Ink light remains on the printer, then press until MAINTENANCE is the correct color, and remove it . Note: If you can't insert the...
Quick Reference Guide
Page 9
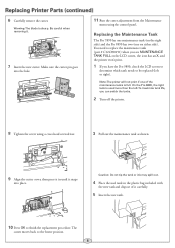
Replacing Printer Parts (continued) 6 Carefully remove the cutter. Warning: The blade is used tank in until it carefully. 5 Insert the new tank. 10 Press OK to replace the maintenance tank (part # C12C890191) when you see MAINTENANCE TANK FULL on either side). Replacing the Maintenance Tank The Pro 7890 has ...tank (on the right side) and the Pro 9890 has two (one of it snaps into the hole. 11 Run the cutter adjustment from the Maintenance menu using a cross-head screwdriver. 3 Pull out the maintenance tank as shown. 9 Align the cutter cover, then press it . 7 Insert the new...
Replacing Printer Parts (continued) 6 Carefully remove the cutter. Warning: The blade is used tank in until it carefully. 5 Insert the new tank. 10 Press OK to replace the maintenance tank (part # C12C890191) when you see MAINTENANCE TANK FULL on either side). Replacing the Maintenance Tank The Pro 7890 has ...tank (on the right side) and the Pro 9890 has two (one of it snaps into the hole. 11 Run the cutter adjustment from the Maintenance menu using a cross-head screwdriver. 3 Pull out the maintenance tank as shown. 9 Align the cutter cover, then press it . 7 Insert the new...
User's Guide
Page 16
... the wall outlet's ampere rating. • Do not block or cover the openings in the far right (home) position. the printer does not operate normally or exhibits a distinct change in performance. • Before transporting the printer, make sure the total ampere rating of all devices plugged into the...following conditions: The power cord or plug is in the printer's case. • Do not put your hand inside the printer during printing. • Do not move the print head by hand unless instructed to do so by an Epson service technician; When you press this product contain Perchlorate ...
... the wall outlet's ampere rating. • Do not block or cover the openings in the far right (home) position. the printer does not operate normally or exhibits a distinct change in performance. • Before transporting the printer, make sure the total ampere rating of all devices plugged into the...following conditions: The power cord or plug is in the printer's case. • Do not put your hand inside the printer during printing. • Do not move the print head by hand unless instructed to do so by an Epson service technician; When you press this product contain Perchlorate ...
User's Guide
Page 17
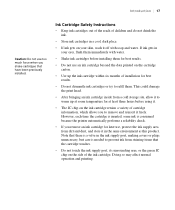
... shake cartridges that there is a valve in your skin, wash it freely. If ink gets in the ink supply port, making covers or plugs unnecessary, but care is consumed because the printer automatically performs a reliability check. • If you to warm up the ink cartridge within six months of the ink cartridge...
... shake cartridges that there is a valve in your skin, wash it freely. If ink gets in the ink supply port, making covers or plugs unnecessary, but care is consumed because the printer automatically performs a reliability check. • If you to warm up the ink cartridge within six months of the ink cartridge...

User's Guide
Page 18
18 | Introduction Printer Parts These illustrations show the Epson Stylus Pro 9890, but the parts are the same for computer Ink bay Casters Network interface Maintenance tank (Pro 9890 includes two tanks, one on each side of printer) 18 AC inlet Front Roll paper holder Roll paper cover Front cover Control panel Ink bay Paper basket Back Interface connector for optional equipment USB interface for the Pro 7890 unless otherwise noted.
18 | Introduction Printer Parts These illustrations show the Epson Stylus Pro 9890, but the parts are the same for computer Ink bay Casters Network interface Maintenance tank (Pro 9890 includes two tanks, one on each side of printer) 18 AC inlet Front Roll paper holder Roll paper cover Front cover Control panel Ink bay Paper basket Back Interface connector for optional equipment USB interface for the Pro 7890 unless otherwise noted.

User's Guide
Page 43
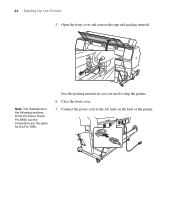
Check these areas: • the front cover • the ink compartment covers • the maintenance tank(s) 4. Open the roll paper cover and remove the tape and packing material. 43 Remove any packing tape and plastic film. Setting Up the Printer | 43 3.
Check these areas: • the front cover • the ink compartment covers • the maintenance tank(s) 4. Open the roll paper cover and remove the tape and packing material. 43 Remove any packing tape and plastic film. Setting Up the Printer | 43 3.
User's Guide
Page 44
44 | Setting Up the Printer 5. Open the front cover and remove the tape and packing material. Note: The illustrations in case you need to the AC inlet on the back of the printer. 44 Close the front cover. 7. Save the packing material in the following sections show the Epson Stylus Pro 9890, but the instructions are the same for the Pro 7890. Connect the power cord to ship the printer. 6.
44 | Setting Up the Printer 5. Open the front cover and remove the tape and packing material. Note: The illustrations in case you need to the AC inlet on the back of the printer. 44 Close the front cover. 7. Save the packing material in the following sections show the Epson Stylus Pro 9890, but the instructions are the same for the Pro 7890. Connect the power cord to ship the printer. 6.
User's Guide
Page 46
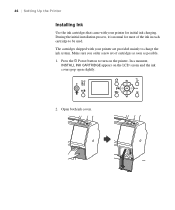
The cartridges shipped with your printer are provided mainly to charge the ink system. In a moment, INSTALL INK CARTRIDGE appears on the printer. During the initial installation process, it is normal for initial ink charging. Open both ink covers. 46 Press the P Power button to be used. 46 | Setting Up the Printer Installing Ink Use the ink cartridges that came with your printer for most of cartridges as soon as possible. 1. Make sure you order a new set of the ink in each cartridge to turn on the LCD screen and the ink covers pop open slightly. 2.
The cartridges shipped with your printer are provided mainly to charge the ink system. In a moment, INSTALL INK CARTRIDGE appears on the printer. During the initial installation process, it is normal for initial ink charging. Open both ink covers. 46 Press the P Power button to be used. 46 | Setting Up the Printer Installing Ink Use the ink cartridges that came with your printer for most of cartridges as soon as possible. 1. Make sure you order a new set of the ink in each cartridge to turn on the LCD screen and the ink covers pop open slightly. 2.

User's Guide
Page 48
...Your System You can use USB and/or Ethernet network connections. Make sure that both the printer and the computer are turned off the printer, remove the maintenance tank, or open the front cover or ink covers while the P Power light is completed, you need a standard RJ-45 CAT-5 network ...cable. The printer begins charging the ink delivery system and the P Power light flashes. Never turn off . 48...
...Your System You can use USB and/or Ethernet network connections. Make sure that both the printer and the computer are turned off the printer, remove the maintenance tank, or open the front cover or ink covers while the P Power light is completed, you need a standard RJ-45 CAT-5 network ...cable. The printer begins charging the ink delivery system and the P Power light flashes. Never turn off . 48...
User's Guide
Page 61
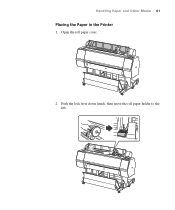
Open the roll paper cover. 2. Handling Paper and Other Media | 61 Placing the Paper in the Printer 1. Push the lock lever down firmly, then move the roll paper holder to the left. 61
Open the roll paper cover. 2. Handling Paper and Other Media | 61 Placing the Paper in the Printer 1. Push the lock lever down firmly, then move the roll paper holder to the left. 61

User's Guide
Page 69
Handling Paper and Other Media | 69 Removing Paper from the Printer 1. Open the roll paper cover. 2. Press the button to release the paper. • If automatic media tracking is on, the barcode and paper information is printed. • If you are not using the Auto Take-Up Reel, the paper is rewound automatically. 69
Handling Paper and Other Media | 69 Removing Paper from the Printer 1. Open the roll paper cover. 2. Press the button to release the paper. • If automatic media tracking is on, the barcode and paper information is printed. • If you are not using the Auto Take-Up Reel, the paper is rewound automatically. 69
User's Guide
Page 72
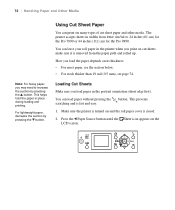
... load the paper depends on the LCD screen. 72 This prevents 1. How you may need to 24 inches (61 cm) for the Pro 7890 or 44 inches (112 cm) for the Pro 9890. Press the l Paper Source button until the Sheet icon appears on its thickness: • For most paper, see the section... pressing the u button. button. You can leave your roll paper in widths from the paper path and rolled up. Make sure the printer is turned on and the roll paper cover is closed. 2. 72 | Handling Paper and Other Media Using Cut Sheet Paper You can print on many types of cut sheets;
... load the paper depends on the LCD screen. 72 This prevents 1. How you may need to 24 inches (61 cm) for the Pro 7890 or 44 inches (112 cm) for the Pro 9890. Press the l Paper Source button until the Sheet icon appears on its thickness: • For most paper, see the section... pressing the u button. button. You can leave your roll paper in widths from the paper path and rolled up. Make sure the printer is turned on and the roll paper cover is closed. 2. 72 | Handling Paper and Other Media Using Cut Sheet Paper You can print on many types of cut sheets;

User's Guide
Page 73
Make sure the right edge of the paper is finished, the sheet stays in the printer. 8. Press d. Print your print, press the d button while holding the sheet. 73 The sheet feeds into the paper slot until it is straight and aligned .... 7. To remove your page. Handling Paper and Other Media | 73 3. Feed the sheet into printing position automatically. 5. If you see a question on the roll paper cover. 4.
Make sure the right edge of the paper is finished, the sheet stays in the printer. 8. Press d. Print your print, press the d button while holding the sheet. 73 The sheet feeds into the paper slot until it is straight and aligned .... 7. To remove your page. Handling Paper and Other Media | 73 3. Feed the sheet into printing position automatically. 5. If you see a question on the roll paper cover. 4.

Warranty Statement
Page 6
... from the date of original purchase (proof of purchase. Epson also warrants that the Epson Stylus Pro ink jet printer covered by the serial number. An Epson service technician will perform to 6:00 PM Pacific Time, Monday through Friday). What Epson Will Do To Correct Problems: Should your printer needs repair, diagnose the issue and determine what parts may...
... from the date of original purchase (proof of purchase. Epson also warrants that the Epson Stylus Pro ink jet printer covered by the serial number. An Epson service technician will perform to 6:00 PM Pacific Time, Monday through Friday). What Epson Will Do To Correct Problems: Should your printer needs repair, diagnose the issue and determine what parts may...


