
User Manual (P.I.M Plug-in)
Page 2
... Epson Stylus® Photo R200 ■ Epson Stylus Photo R300/R300M ■ Epson Stylus Photo R320 ■ Epson Stylus Photo R800 ■ Epson Stylus Photo RX500 ■ Epson Stylus Photo RX600 ■ Epson Stylus Photo 780 ■ Epson Stylus Photo 785EPX ■ Epson Stylus Photo 820 ■ Epson Stylus Photo 825 ■ Epson Stylus Photo 890 ■ Epson Stylus Photo 900 ■ Epson Stylus Photo 925 ■ Epson Stylus Photo 960 ■ Epson Stylus Photo 1280 ■ Epson Stylus Photo 2000P* ■ Epson Stylus Photo 2200 ■ PictureMate™ by Epson * This printer...
... Epson Stylus® Photo R200 ■ Epson Stylus Photo R300/R300M ■ Epson Stylus Photo R320 ■ Epson Stylus Photo R800 ■ Epson Stylus Photo RX500 ■ Epson Stylus Photo RX600 ■ Epson Stylus Photo 780 ■ Epson Stylus Photo 785EPX ■ Epson Stylus Photo 820 ■ Epson Stylus Photo 825 ■ Epson Stylus Photo 890 ■ Epson Stylus Photo 900 ■ Epson Stylus Photo 925 ■ Epson Stylus Photo 960 ■ Epson Stylus Photo 1280 ■ Epson Stylus Photo 2000P* ■ Epson Stylus Photo 2200 ■ PictureMate™ by Epson * This printer...
Start Here Card
Page 6
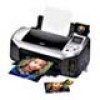
...Stylus Photo R300 printer name and then click the Add or Add Printer button. You see the Printer List again with the printer features available. 5 Close Print Center. Then go to print! See section 6, "Print." 6 Print Now you don't see another window listing your printer is a service mark of Epson America, Inc. EPSON...on and connected. You're ready to step 2. EPSON and EPSON Stylus are for identification purposes only and may be trademarks of their respective owners. You see it, make sure your printer. If the Stylus Photo R300 appears in XXXXXX XX-XX.XX Mac OS X ...
...Stylus Photo R300 printer name and then click the Add or Add Printer button. You see the Printer List again with the printer features available. 5 Close Print Center. Then go to print! See section 6, "Print." 6 Print Now you don't see another window listing your printer is a service mark of Epson America, Inc. EPSON...on and connected. You're ready to step 2. EPSON and EPSON Stylus are for identification purposes only and may be trademarks of their respective owners. You see it, make sure your printer. If the Stylus Photo R300 appears in XXXXXX XX-XX.XX Mac OS X ...
User Manual
Page 7
...and placement of ink droplets on ink jet-printable CDs and DVDs, with or without a computer. (The port in a variety of the printer's outstanding features: ■ EPSON's exclusive 6-color ink technology lets you select photos for printing. ■ Your printer also supports ...printer to your computer.) ■ If you have the EPSON Stylus Photo R300M, your printer has a preview monitor to your Windows® or Macintosh® computer and print from your Bluetooth-enabled phones, PDAs, etc. 7 Your EPSON Stylus® Photo R300 Series printer can create true BorderFree™ photos...
...and placement of ink droplets on ink jet-printable CDs and DVDs, with or without a computer. (The port in a variety of the printer's outstanding features: ■ EPSON's exclusive 6-color ink technology lets you select photos for printing. ■ Your printer also supports ...printer to your computer.) ■ If you have the EPSON Stylus Photo R300M, your printer has a preview monitor to your Windows® or Macintosh® computer and print from your Bluetooth-enabled phones, PDAs, etc. 7 Your EPSON Stylus® Photo R300 Series printer can create true BorderFree™ photos...

User Manual
Page 50
... Windows XP, click Safely Remove USB Mass Storage Device. In Windows 2000, click Stop USB Mass Storage Device. 2. Caution: Do not eject a card while the processing light is selected. 50 Printing From Your Computer Make sure EPSON Stylus Photo R300 ...Series is flashing, or without performing the steps described below to remove it straight out of the following: ■ On a Macintosh, drag the memory card icon from your desktop to remove any cards before unplugging the USB cable. 1. Removing a Memory Card Once you're finished copying photos from your printer...
... Windows XP, click Safely Remove USB Mass Storage Device. In Windows 2000, click Stop USB Mass Storage Device. 2. Caution: Do not eject a card while the processing light is selected. 50 Printing From Your Computer Make sure EPSON Stylus Photo R300 ...Series is flashing, or without performing the steps described below to remove it straight out of the following: ■ On a Macintosh, drag the memory card icon from your desktop to remove any cards before unplugging the USB cable. 1. Removing a Memory Card Once you're finished copying photos from your printer...

User Manual
Page 54
Open the Printer menu and select Stylus Photo R300. 8. Select Print from the pop-up menu. 9. Select the following Print Settings as necessary: Select your paper type (see a screen like this: Select the same printer feature you chose in the Format for faster printing) Tip: For more information about printer settings, click Help. 54 Printing From Your...
Open the Printer menu and select Stylus Photo R300. 8. Select Print from the pop-up menu. 9. Select the following Print Settings as necessary: Select your paper type (see a screen like this: Select the same printer feature you chose in the Format for faster printing) Tip: For more information about printer settings, click Help. 54 Printing From Your...
User Manual
Page 65
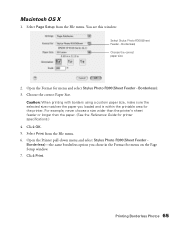
... Guide for menu and select Stylus Photo R300(Sheet Feeder - Select Page Setup from the File menu. 6. Borderless): 3. Choose the correct Paper Size. Open the Format for printer specifications.) 4. Select Print from the File menu. Macintosh OS X 1. You see this window: Select Stylus Photo R300(Sheet Feeder - Open the Printer pull-down menu and select Stylus Photo R300(Sheet Feeder - Click Print...
... Guide for menu and select Stylus Photo R300(Sheet Feeder - Select Page Setup from the File menu. 6. Borderless): 3. Choose the correct Paper Size. Open the Format for printer specifications.) 4. Select Print from the File menu. Macintosh OS X 1. You see this window: Select Stylus Photo R300(Sheet Feeder - Open the Printer pull-down menu and select Stylus Photo R300(Sheet Feeder - Click Print...
User Manual
Page 72
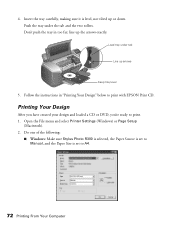
... print with EPSON Print CD. line up or down. Push the tray under tab Line up arrows Keep tray level 5. Follow the instructions in too far; Don't push the tray in "Printing Your Design" below to print. 1. Open the File menu and select Printer Settings (Windows) or Page... Setup (Macintosh). 2. Insert the tray carefully, making sure it is set to Manual, and the Paper Size is level, not tilted up the arrows exactly. Do one of the following: ■ Windows: Make sure Stylus Photo R300 is selected, the Paper Source...
... print with EPSON Print CD. line up or down. Push the tray under tab Line up arrows Keep tray level 5. Follow the instructions in too far; Don't push the tray in "Printing Your Design" below to print. 1. Open the File menu and select Printer Settings (Windows) or Page... Setup (Macintosh). 2. Insert the tray carefully, making sure it is set to Manual, and the Paper Size is level, not tilted up the arrows exactly. Do one of the following: ■ Windows: Make sure Stylus Photo R300 is selected, the Paper Source...
User Manual
Page 73
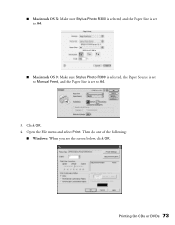
Open the File menu and select Print. Printing On CDs or DVDs 73 Then do one of the following: ■ Windows: When you see the screen below, click OK. Click OK. 4. ■ Macintosh OS X: Make sure Stylus Photo R300 is selected and the Paper Size is set to A4. ■ Macintosh OS 9: Make sure Stylus Photo R300 is selected, the Paper Source is set to Manual Feed, and the Paper Size is set to A4. 3.
Open the File menu and select Print. Printing On CDs or DVDs 73 Then do one of the following: ■ Windows: When you see the screen below, click OK. Click OK. 4. ■ Macintosh OS X: Make sure Stylus Photo R300 is selected and the Paper Size is set to A4. ■ Macintosh OS 9: Make sure Stylus Photo R300 is selected, the Paper Source is set to Manual Feed, and the Paper Size is set to A4. 3.

User Manual
Page 75
... on a CD or DVD: 1. In Windows or Mac OS 9, select Print Position Confirmation (or Check) Pattern. In Mac OS X, choose EPSON Print CD from the File menu. 5. Use the blank cardboard position check disk included with your EPSON Stylus Photo R300 Series printer is selected, and the Paper Source is set... to Manual or Manual Feed. 4. Start EPSON Print CD. 3. Adjusting the Print Position If your printed images and text are not...
... on a CD or DVD: 1. In Windows or Mac OS 9, select Print Position Confirmation (or Check) Pattern. In Mac OS X, choose EPSON Print CD from the File menu. 5. Use the blank cardboard position check disk included with your EPSON Stylus Photo R300 Series printer is selected, and the Paper Source is set... to Manual or Manual Feed. 4. Start EPSON Print CD. 3. Adjusting the Print Position If your printed images and text are not...

User Manual
Page 77
...the second pattern. You can also use the Brightness and Contrast settings in EPSON Print CD to try a third Color Correction setting, you may absorb ink differently, so you want to adjust color saturation. In Windows or Mac OS 9, select Print Density Confirmation (or Check) Pattern. Click...Color Correction) setting lighter or darker as necessary. 1. Printing On CDs or DVDs 77 Adjusting the Print Density If ink smears on your EPSON Stylus Photo R300 Series printer is selected, the Paper Size is set to A4, and the Paper Source is set to Manual (Windows) or Manual Feed (Mac OS 9). 4.
...the second pattern. You can also use the Brightness and Contrast settings in EPSON Print CD to try a third Color Correction setting, you may absorb ink differently, so you want to adjust color saturation. In Windows or Mac OS 9, select Print Density Confirmation (or Check) Pattern. Click...Color Correction) setting lighter or darker as necessary. 1. Printing On CDs or DVDs 77 Adjusting the Print Density If ink smears on your EPSON Stylus Photo R300 Series printer is selected, the Paper Size is set to A4, and the Paper Source is set to Manual (Windows) or Manual Feed (Mac OS 9). 4.

User Manual
Page 84
...converted into the EPSON RGB 2001 color space. Open the File menu, then: Photoshop 7.0 or Elements: Select Print Preview > Print Options, or Print with the ICC profile embedded. You see the printer settings window. In the Print Space box, select the Stylus Photo R300 profile for the... file; Instead use the Photoshop Save command. Photoshop 6.0: In Windows, click Setup, then select your printer and paper 2. image. header information intact for your printer and click Properties or Preferences. Image P.I .M. You see a window like this: Select the profile for use in the next section...
...converted into the EPSON RGB 2001 color space. Open the File menu, then: Photoshop 7.0 or Elements: Select Print Preview > Print Options, or Print with the ICC profile embedded. You see the printer settings window. In the Print Space box, select the Stylus Photo R300 profile for the... file; Instead use the Photoshop Save command. Photoshop 6.0: In Windows, click Setup, then select your printer and paper 2. image. header information intact for your printer and click Properties or Preferences. Image P.I .M. You see a window like this: Select the profile for use in the next section...
User Manual
Page 109
... uninstall and then reinstall your EPSON Stylus Photo R300 Series printer icon is selected and click OK. You don't need to reinstall your printer's Start Here sheet. Click EPSON Printer Software in the program list and click the Add/Remove button (Change/Remove button on -screen instructions. 8. In Windows 98 or Me, click EPSON USB Printer Devices in the program list...
... uninstall and then reinstall your EPSON Stylus Photo R300 Series printer icon is selected and click OK. You don't need to reinstall your printer's Start Here sheet. Click EPSON Printer Software in the program list and click the Add/Remove button (Change/Remove button on -screen instructions. 8. In Windows 98 or Me, click EPSON USB Printer Devices in the program list...
User Manual
Page 110
... agreement, click Accept. 110 Problem Solving Select EPSON Stylus Photo R300(Sheet Feeder - When you 're done. 7. In the EPSON window, scroll down and double-click the Drivers folder. 4. Double-click the Print Center icon. 5. Select EPSON Stylus Photo R300 and then click Delete. 6. Follow the on your printer driver: 1. Drag the EPSON Card Monitor and EPSON PhotoStarter3 for X folders to reinstall the...
... agreement, click Accept. 110 Problem Solving Select EPSON Stylus Photo R300(Sheet Feeder - When you 're done. 7. In the EPSON window, scroll down and double-click the Drivers folder. 4. Double-click the Print Center icon. 5. Select EPSON Stylus Photo R300 and then click Delete. 6. Follow the on your printer driver: 1. Drag the EPSON Card Monitor and EPSON PhotoStarter3 for X folders to reinstall the...


