User Manual (P.I.M Plug-in)
Page 1
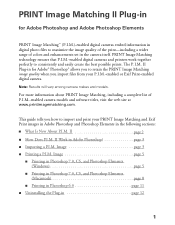
... and Adobe Photoshop Elements PRINT Image Matching™ (P.I.M.)-enabled digital cameras embed information in digital photo files to maximize the image quality of the print-including a wider range of P.I .M. II...Adobe Photoshop page 3 ■ Importing a P.I .M. Image page 5 ■ Printing in Photoshop 7.0, CS, and Photoshop Elements (Windows page 5 ■ Printing in Photoshop 7.0, CS, and Photoshop Elements (Macintosh page 8 ■ Printing in Photoshop 6.0 page ... cameras and printers work together perfectly to consistently and easily create the best possible prints.
... and Adobe Photoshop Elements PRINT Image Matching™ (P.I.M.)-enabled digital cameras embed information in digital photo files to maximize the image quality of the print-including a wider range of P.I .M. II...Adobe Photoshop page 3 ■ Importing a P.I .M. Image page 5 ■ Printing in Photoshop 7.0, CS, and Photoshop Elements (Windows page 5 ■ Printing in Photoshop 7.0, CS, and Photoshop Elements (Macintosh page 8 ■ Printing in Photoshop 6.0 page ... cameras and printers work together perfectly to consistently and easily create the best possible prints.

User Manual (P.I.M Plug-in)
Page 2
... Epson Stylus® Photo R200 ■ Epson Stylus Photo R300/R300M ■ Epson Stylus Photo R320 ■ Epson Stylus Photo R800 ■ Epson Stylus Photo RX500 ■ Epson Stylus Photo RX600 ■ Epson Stylus Photo 780 ■ Epson Stylus Photo 785EPX ■ Epson Stylus Photo 820 ■ Epson Stylus Photo 825 ■ Epson Stylus Photo 890 ■ Epson Stylus Photo 900 ■ Epson Stylus Photo 925 ■ Epson Stylus Photo 960 ■ Epson Stylus Photo 1280 ■ Epson Stylus Photo 2000P* ■ Epson Stylus Photo 2200 ■ PictureMate™ by Epson * This printer...
... Epson Stylus® Photo R200 ■ Epson Stylus Photo R300/R300M ■ Epson Stylus Photo R320 ■ Epson Stylus Photo R800 ■ Epson Stylus Photo RX500 ■ Epson Stylus Photo RX600 ■ Epson Stylus Photo 780 ■ Epson Stylus Photo 785EPX ■ Epson Stylus Photo 820 ■ Epson Stylus Photo 825 ■ Epson Stylus Photo 890 ■ Epson Stylus Photo 900 ■ Epson Stylus Photo 925 ■ Epson Stylus Photo 960 ■ Epson Stylus Photo 1280 ■ Epson Stylus Photo 2000P* ■ Epson Stylus Photo 2200 ■ PictureMate™ by Epson * This printer...
User Manual (P.I.M Plug-in)
Page 3
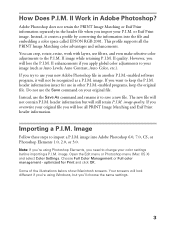
or Exif Print image. However, you will not contain P.I .M. If you 're using Windows, but will not be recognized as Auto Levels, Auto Contrast, Auto Color, etc.). image. The new file will lose the P.I .M. image quality....creates a profile by converting the information into Adobe Photoshop 6.0, 7.0, CS, or Photoshop Elements 1.0, 2.0, or 3.0. image into the file and embedding a color space called EPSON RGB 2001. Choose Full Color Management or Full color management - Your screens will lose all the PRINT Image Matching color advantages and enhancements. header information...
or Exif Print image. However, you will not contain P.I .M. If you 're using Windows, but will not be recognized as Auto Levels, Auto Contrast, Auto Color, etc.). image. The new file will lose the P.I .M. image quality....creates a profile by converting the information into Adobe Photoshop 6.0, 7.0, CS, or Photoshop Elements 1.0, 2.0, or 3.0. image into the file and embedding a color space called EPSON RGB 2001. Choose Full Color Management or Full color management - Your screens will lose all the PRINT Image Matching color advantages and enhancements. header information...
User Manual (P.I.M Plug-in)
Page 4
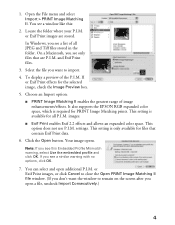
... Open button. Note: If you see only files that contain Exif Print data. 6. or Exif Print images are P.I .M. It also supports the EPSON RGB expanded color space, which is required for all JPEG and Tiff files stored in the folder. images. ■ Exif Print enables Exif 2.2 ...effects and allows an expanded color space. This setting is available for PRINT Image Matching prints. On a Macintosh, you see a window like this Embedded Profile Mismatch warning, select Use the embedded profile and click OK. Choose an Import option: ■ PRINT Image Matching II enables...
... Open button. Note: If you see only files that contain Exif Print data. 6. or Exif Print images are P.I .M. It also supports the EPSON RGB expanded color space, which is required for all JPEG and Tiff files stored in the folder. images. ■ Exif Print enables Exif 2.2 ...effects and allows an expanded color space. This setting is available for PRINT Image Matching prints. On a Macintosh, you see a window like this Embedded Profile Mismatch warning, select Use the embedded profile and click OK. Choose an Import option: ■ PRINT Image Matching II enables...
User Manual (P.I.M Plug-in)
Page 5
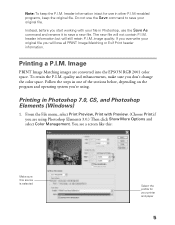
... file will lose all PRINT Image Matching or Exif Print header information. If you overwrite your file in Photoshop 7.0, CS, and Photoshop Elements (Windows) 1. quality and enhancements, make sure you 're using Photoshop Elements 3.0.) Then click Show More Options and select Color Management. Printing in Photoshop... is selected Select the profile for use the Save command to save your printer and paper 5 From the File menu, select Print Preview, Print with your original file you are converted into the EPSON RGB 2001 color space. Note: To keep the P.I .M.-enabled programs, keep...
... file will lose all PRINT Image Matching or Exif Print header information. If you overwrite your file in Photoshop 7.0, CS, and Photoshop Elements (Windows) 1. quality and enhancements, make sure you 're using Photoshop Elements 3.0.) Then click Show More Options and select Color Management. Printing in Photoshop... is selected Select the profile for use the Save command to save your printer and paper 5 From the File menu, select Print Preview, Print with your original file you are converted into the EPSON RGB 2001 color space. Note: To keep the P.I .M.-enabled programs, keep...

User Manual (P.I.M Plug-in)
Page 6
... paper Click Advanced Click Custom, then Advanced 6. Click Setup, then select your printer Properties or Preferences window: . Click the Advanced button. (If you don't see your printer and click the Properties or Preferences button. Click Print. 5. Select your paper Select your printer and the paper you 're printing on. 7. 2. In the Source Space box...
... paper Click Advanced Click Custom, then Advanced 6. Click Setup, then select your printer Properties or Preferences window: . Click the Advanced button. (If you don't see your printer and click the Properties or Preferences button. Click Print. 5. Select your paper Select your printer and the paper you 're printing on. 7. 2. In the Source Space box...
User Manual (P.I.M Plug-in)
Page 8
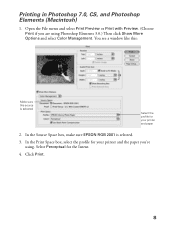
Printing in Photoshop 7.0, CS, and Photoshop Elements (Macintosh) 1. You see a window like this: Make sure this source is selected. 3. Click Print. 8 Select Perceptual for your printer and paper 2. Open the File menu and select Print Preview or Print with Preview. (Choose Print if you 're using Photoshop Elements 3.0.) Then click Show More Options and select Color Management. In the Source Space box, make sure EPSON RGB 2001 is selected Select the profile for your printer and the paper you are using . In the Print Space box, select the profile for the Intent. 4.
Printing in Photoshop 7.0, CS, and Photoshop Elements (Macintosh) 1. You see a window like this: Make sure this source is selected. 3. Click Print. 8 Select Perceptual for your printer and paper 2. Open the File menu and select Print Preview or Print with Preview. (Choose Print if you 're using Photoshop Elements 3.0.) Then click Show More Options and select Color Management. In the Source Space box, make sure EPSON RGB 2001 is selected Select the profile for your printer and the paper you are using . In the Print Space box, select the profile for the Intent. 4.
User Manual (P.I.M Plug-in)
Page 9
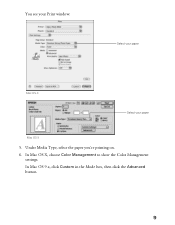
Select your paper Mac OS X Select your Print window: . You see your paper Mac OS 9 5. Under Media Type, select the paper you're printing on. 6. In Mac OS 9.x, click Custom in the Mode box, then click the Advanced button. 9 In Mac OS X, choose Color Management to show the Color Management settings.
Select your paper Mac OS X Select your Print window: . You see your paper Mac OS 9 5. Under Media Type, select the paper you're printing on. 6. In Mac OS 9.x, click Custom in the Mode box, then click the Advanced button. 9 In Mac OS X, choose Color Management to show the Color Management settings.
User Manual (P.I.M Plug-in)
Page 11
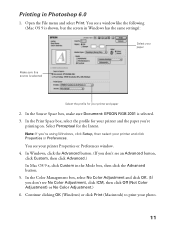
... 6.0 1. Continue clicking OK (Windows) or click Print (Macintosh) to print your printer Properties or Preferences window. 4. Open the File menu and select Print. In the Source Space box, make sure Document: EPSON RGB 2001 is selected. 3. Select Perceptual for your printer and click Properties or Preferences. ...re using Windows, click Setup, then select your printer and the paper you don't see No Color Adjustment, click ICM, then click Off (Not Color Adjustment) or No Color Adjustment.) 6. In Windows, click the Advanced button. (If you 're printing on. You see your photo. 11 In...
... 6.0 1. Continue clicking OK (Windows) or click Print (Macintosh) to print your printer Properties or Preferences window. 4. Open the File menu and select Print. In the Source Space box, make sure Document: EPSON RGB 2001 is selected. 3. Select Perceptual for your printer and click Properties or Preferences. ...re using Windows, click Setup, then select your printer and the paper you don't see No Color Adjustment, click ICM, then click Off (Not Color Adjustment) or No Color Adjustment.) 6. In Windows, click the Advanced button. (If you 're printing on. You see your photo. 11 In...
User Manual (P.I.M Plug-in)
Page 12
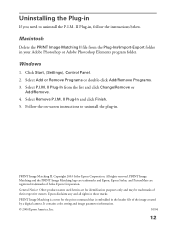
...P.I.M. PRINT Image Matching II. It contains color setting and image parameter information. © 2004 Epson America, Inc. 10/04 12 Select P.I .M. Windows 1. All rights reserved. Epson disclaims any and all rights in . Macintosh Delete the PRINT Image Matching II file from the... Photoshop or Adobe Photoshop Elements program folder. Select Remove P.I .M. Copyright 2003 Seiko Epson Corporation. PRINT Image Matching and the PRINT Image Matching logo are trademarks and Epson, Epson Stylus, and PictureMate are for the print command that is a term for identification purposes ...
...P.I.M. PRINT Image Matching II. It contains color setting and image parameter information. © 2004 Epson America, Inc. 10/04 12 Select P.I .M. Windows 1. All rights reserved. Epson disclaims any and all rights in . Macintosh Delete the PRINT Image Matching II file from the... Photoshop or Adobe Photoshop Elements program folder. Select Remove P.I .M. Copyright 2003 Seiko Epson Corporation. PRINT Image Matching and the PRINT Image Matching logo are trademarks and Epson, Epson Stylus, and PictureMate are for the print command that is a term for identification purposes ...
Product Brochure
Page 2
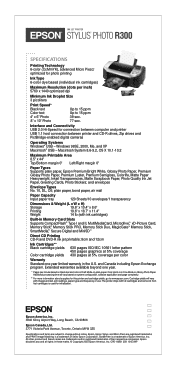
... No. 10, DL, C6; INK JET PRINTER EPSON® STYLUS® PHOTOR300 SPECIFICATIONS Printing Technology 6-color (CcMmYK), advanced Micro Piezo,® optimized for photo printing Ink Type 6-color dye based (individual ink cartridges) FPO Maximum Resolution (dots per inch) 5760 x 1440 optimized dpi Minimum Ink Droplet Size 3 picoliters Print Speed* Black text Color text 4" x 6" Photo 8" x 10" Photo Up to 15 ppm...
... No. 10, DL, C6; INK JET PRINTER EPSON® STYLUS® PHOTOR300 SPECIFICATIONS Printing Technology 6-color (CcMmYK), advanced Micro Piezo,® optimized for photo printing Ink Type 6-color dye based (individual ink cartridges) FPO Maximum Resolution (dots per inch) 5760 x 1440 optimized dpi Minimum Ink Droplet Size 3 picoliters Print Speed* Black text Color text 4" x 6" Photo 8" x 10" Photo Up to 15 ppm...
Product Brochure - Bluetooth Photo Print Adapter
Page 1
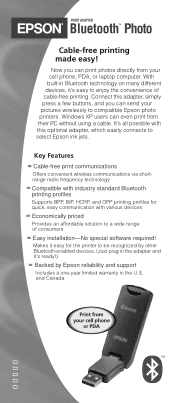
... ADAPTER Bluetooth™ Photo Cable-free printing made easy! Windows XP users can print photos directly from your cell phone or PDA ™ and Canada Print from their PC without using a cable. With built-in the U.S. Makes it 's easy to select Epson ink jets. Now you can send your pictures wirelessly to compatible Epson photo printers. Connect this optional...
... ADAPTER Bluetooth™ Photo Cable-free printing made easy! Windows XP users can print photos directly from your cell phone or PDA ™ and Canada Print from their PC without using a cable. With built-in the U.S. Makes it 's easy to select Epson ink jets. Now you can send your pictures wirelessly to compatible Epson photo printers. Connect this optional...
Start Here Card
Page 4
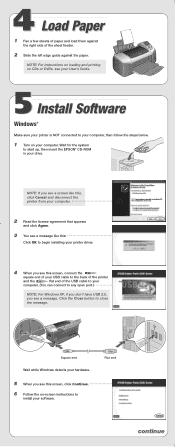
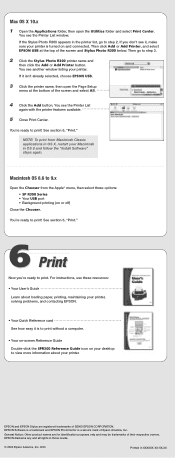
... the paper. Click the Close button to start up, then insert the EPSON® CD-ROM in your software. NOTE: For instructions on loading and printing on CDs or DVDs, see your User's Guide. 5 Install Software Windows® Make sure your printer is NOT connected to your computer, then follow the steps below.... 3 You see a message like this: Click OK to any open port.) NOTE: For Windows XP, if you don't have USB 2.0, you see this screen, connect the square end of your USB cable to the back of the printer and the flat end of the sheet feeder. 2 Slide the left edge guide against...
... the paper. Click the Close button to start up, then insert the EPSON® CD-ROM in your software. NOTE: For instructions on loading and printing on CDs or DVDs, see your User's Guide. 5 Install Software Windows® Make sure your printer is NOT connected to your computer, then follow the steps below.... 3 You see a message like this: Click OK to any open port.) NOTE: For Windows XP, if you don't have USB 2.0, you see this screen, connect the square end of your USB cable to the back of the printer and the flat end of the sheet feeder. 2 Slide the left edge guide against...
Start Here Card
Page 6
... Now you don't see another window listing your printer. You see the Printer List window. Macintosh OS 8.6 to step 3. 2 Click the Stylus Photo R300 printer name and then click the Add or Add Printer button. General Notice: Other product names are registered trademarks of Epson America, Inc. Then click Add or Add Printer, and select EPSON USB at the bottom of...
... Now you don't see another window listing your printer. You see the Printer List window. Macintosh OS 8.6 to step 3. 2 Click the Stylus Photo R300 printer name and then click the Add or Add Printer button. General Notice: Other product names are registered trademarks of Epson America, Inc. Then click Add or Add Printer, and select EPSON USB at the bottom of...
User Manual
Page 4
...Your Image Files to a CD or Zip Disk 39 Using a Bluetooth Device With Your Printer 41 Connecting the Bluetooth Photo Print Adapter 41 Disconnecting the Bluetooth Photo Print Adapter 42 Printing With Bluetooth 43 Choosing Bluetooth Settings 44 Resetting Default Settings 46 ...Printing From Your Computer 47 Copying Photos to Your Computer 48 Configuring PhotoStarter 49 Removing a Memory Card 50 Basic Printing in Windows 50 Selecting Default Settings 52 Basic Printing on a Macintosh 53 Printing in OS...
...Your Image Files to a CD or Zip Disk 39 Using a Bluetooth Device With Your Printer 41 Connecting the Bluetooth Photo Print Adapter 41 Disconnecting the Bluetooth Photo Print Adapter 42 Printing With Bluetooth 43 Choosing Bluetooth Settings 44 Resetting Default Settings 46 ...Printing From Your Computer 47 Copying Photos to Your Computer 48 Configuring PhotoStarter 49 Removing a Memory Card 50 Basic Printing in Windows 50 Selecting Default Settings 52 Basic Printing on a Macintosh 53 Printing in OS...
User Manual
Page 5
...Nozzle Check Pattern Replacing an Ink Cartridge Removing and Installing Ink Cartridges Aligning the Print Head Cleaning the Printer Transporting the Printer Problem Solving Diagnosing Problems Control Panel Messages Running a Printer Check Setup or Software Installation Problems Printer Problems Print Quality Problems ...Problems With Paper Feeding CD/DVD Printing Problems Miscellaneous Printout Problems 62 63 65 66 67 67 68 70 72 75 77 78 78 82 87 88 89 89 90 93 94 95 97 97 98 100 101 102 103 106 107 107 Contents 5 Printing Borderless Photos Windows...
...Nozzle Check Pattern Replacing an Ink Cartridge Removing and Installing Ink Cartridges Aligning the Print Head Cleaning the Printer Transporting the Printer Problem Solving Diagnosing Problems Control Panel Messages Running a Printer Check Setup or Software Installation Problems Printer Problems Print Quality Problems ...Problems With Paper Feeding CD/DVD Printing Problems Miscellaneous Printout Problems 62 63 65 66 67 67 68 70 72 75 77 78 78 82 87 88 89 89 90 93 94 95 97 97 98 100 101 102 103 106 107 107 Contents 5 Printing Borderless Photos Windows...
User Manual
Page 6
Uninstalling Printer Software 109 Windows 109 Macintosh OS X 110 Macintosh OS 8.6 to 9x 110 Where To Get Help 111 Notices 113 Windows System Requirements 113 Macintosh System Requirements 113 Important Safety Instructions 114 Ink Cartridge Safety Instructions 115 Energy Star Compliance 116 FCC Compliance Statement 116 Declaration of Conformity 117 Epson America, Inc., Limited Warranty 118 Index 121 6 Contents
Uninstalling Printer Software 109 Windows 109 Macintosh OS X 110 Macintosh OS 8.6 to 9x 110 Where To Get Help 111 Notices 113 Windows System Requirements 113 Macintosh System Requirements 113 Important Safety Instructions 114 Ink Cartridge Safety Instructions 115 Energy Star Compliance 116 FCC Compliance Statement 116 Declaration of Conformity 117 Epson America, Inc., Limited Warranty 118 Index 121 6 Contents
User Manual
Page 7
...This lets you save your PC. You can print pictures directly from your printer in the back of sizes perfect for connecting the printer to your Windows® or Macintosh® computer and print from your digital camera's memory ...a variety of the printer's outstanding features: ■ EPSON's exclusive 6-color ink technology lets you can transfer them immediately to your computer.) ■ If you have the EPSON Stylus Photo R300M, your digital camera. Your EPSON Stylus® Photo R300 Series printer can create true BorderFree™ photos directly from your Bluetooth...
...This lets you save your PC. You can print pictures directly from your printer in the back of sizes perfect for connecting the printer to your Windows® or Macintosh® computer and print from your digital camera's memory ...a variety of the printer's outstanding features: ■ EPSON's exclusive 6-color ink technology lets you can transfer them immediately to your computer.) ■ If you have the EPSON Stylus Photo R300M, your digital camera. Your EPSON Stylus® Photo R300 Series printer can create true BorderFree™ photos directly from your Bluetooth...
User Manual
Page 10
... a different browser, the pages may not display correctly. (A browser is not included on the printer software CD-ROM.) You can also click Start, Programs (or All Programs in Windows XP), EPSON, SPR300 Reference Guide, then click Reference Guide. ■ Macintosh: Double-click the SPR300 Reference ...-screen Reference Guide ■ Printing all types of the following: ■ Windows: Double-click the SPR300 Reference Guide icon on your desktop. You can view the Reference Guide by doing one of photos without a computer, see the Quick Reference card. Notes contain important information about...
... a different browser, the pages may not display correctly. (A browser is not included on the printer software CD-ROM.) You can also click Start, Programs (or All Programs in Windows XP), EPSON, SPR300 Reference Guide, then click Reference Guide. ■ Macintosh: Double-click the SPR300 Reference ...-screen Reference Guide ■ Printing all types of the following: ■ Windows: Double-click the SPR300 Reference Guide icon on your desktop. You can view the Reference Guide by doing one of photos without a computer, see the Quick Reference card. Notes contain important information about...

User Manual
Page 15
...load one envelope at a time: 1. Load with the printable side facing you, flap-edge to the left edge guide against the right edge of your printer software: ■ For the paper Type/Media Type, select Plain Paper ■ For the Size/Paper Size, select the size of the sheet feeder.... the envelopes. Select these settings in your envelopes ■ For the Orientation, select Landscape (in Macintosh OS X, click the icon) See page 50 (Windows), page 53 (Macintosh OS X), or page 56 (Macintosh OS 8.6 to 10 envelopes at a time. Loading Envelopes 15 Loading Envelopes You can load up 2.
...load one envelope at a time: 1. Load with the printable side facing you, flap-edge to the left edge guide against the right edge of your printer software: ■ For the paper Type/Media Type, select Plain Paper ■ For the Size/Paper Size, select the size of the sheet feeder.... the envelopes. Select these settings in your envelopes ■ For the Orientation, select Landscape (in Macintosh OS X, click the icon) See page 50 (Windows), page 53 (Macintosh OS X), or page 56 (Macintosh OS 8.6 to 10 envelopes at a time. Loading Envelopes 15 Loading Envelopes You can load up 2.

