
Basics
Page 4
Solving Problems 57 Checking for Software Updates 57 Problems and Solutions 57 Where to Get Help 61 Notices 62 4 Contents
Solving Problems 57 Checking for Software Updates 57 Problems and Solutions 57 Where to Get Help 61 Notices 62 4 Contents

Basics
Page 20
... See "Checking for instructions. Printing From Start to your Epson Stylus Photo R3000 Series software. Tip: It's a good idea to check for details. You can also print label designs directly onto ink jet-printable CDs or DVDs. Select your product, then click the Preferences or Properties button. Note: If you see a Setup, Printer, or Options button, click it.
... See "Checking for instructions. Printing From Start to your Epson Stylus Photo R3000 Series software. Tip: It's a good idea to check for details. You can also print label designs directly onto ink jet-printable CDs or DVDs. Select your product, then click the Preferences or Properties button. Note: If you see a Setup, Printer, or Options button, click it.

Basics
Page 23
...; Front - If you 're printing borderless photos, select Borderless, if available. Click Save, ...Click OK or Print to feed small amounts of roll paper between each photo. ■ Roll Paper (Banner): for details.) 11. If desired,...Note: For roll paper, make sure the maximum width of your photo is 8.3 or 13 inches to fit in the width of ...in the CD/DVD tray (see your online User's Guide for photos or banners over 27 inches (68.6 cm) long. Fine Art...Paper Height enter the desired length up to save your application software). 9. To reduce or enlarge your printout or print double...
...; Front - If you 're printing borderless photos, select Borderless, if available. Click Save, ...Click OK or Print to feed small amounts of roll paper between each photo. ■ Roll Paper (Banner): for details.) 11. If desired,...Note: For roll paper, make sure the maximum width of your photo is 8.3 or 13 inches to fit in the width of ...in the CD/DVD tray (see your online User's Guide for photos or banners over 27 inches (68.6 cm) long. Fine Art...Paper Height enter the desired length up to save your application software). 9. To reduce or enlarge your printout or print double...
Basics
Page 25
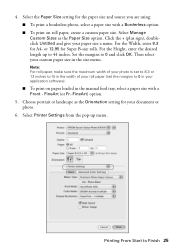
or 12.95 for A4- Select Printer Settings from the pop-up to 0 and click OK. Select Manage Custom Sizes as the Orientation setting for the paper size and source you are using: ■ To print a borderless photo, select a paper size with a Borderless option. ■ To print on...landscape as the Paper Size option. For the Height, enter the desired length up menu. FineArt (or Fr.-FineArt) option. 5. Then select your application software). ■ To print on roll paper, create a custom paper size. Select the Paper Size setting for your paper size a name. Note: For...
or 12.95 for A4- Select Printer Settings from the pop-up to 0 and click OK. Select Manage Custom Sizes as the Orientation setting for the paper size and source you are using: ■ To print a borderless photo, select a paper size with a Borderless option. ■ To print on...landscape as the Paper Size option. For the Height, enter the desired length up menu. FineArt (or Fr.-FineArt) option. 5. Then select your application software). ■ To print on roll paper, create a custom paper size. Select the Paper Size setting for your paper size a name. Note: For...
Basics
Page 28
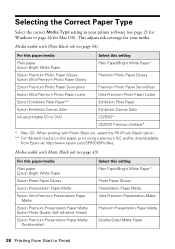
... this paper/media Plain paper Epson Bright White Paper Epson Premium Photo Paper Glossy Epson Ultra Premium Photo Paper Glossy Epson Premium Photo Paper Semi-gloss Epson Ultra Premium Photo Paper Luster Epson Exhibition Fiber Paper** Epson Exhibition Canvas Satin Ink jet-printable CD or DVD Select this setting Plain Paper/Bright White Paper* Premium Photo Paper Glossy Premium Photo Paper Semi-Gloss Ultra Premium...
... this paper/media Plain paper Epson Bright White Paper Epson Premium Photo Paper Glossy Epson Ultra Premium Photo Paper Glossy Epson Premium Photo Paper Semi-gloss Epson Ultra Premium Photo Paper Luster Epson Exhibition Fiber Paper** Epson Exhibition Canvas Satin Ink jet-printable CD or DVD Select this setting Plain Paper/Bright White Paper* Premium Photo Paper Glossy Premium Photo Paper Semi-Gloss Ultra Premium...

Basics
Page 30
Close the rear support if it to print label designs directly onto ink jet-printable CDs or DVDs. To prevent errors, you should burn files, music, or video onto your R3000 Series and the Epson Print CD software that came with it 's open. 30 Printing on CDs and DVDs Follow the steps in the sheet feeder...: ■ "Loading a CD or DVD" on page 30 ■ "Printing on a CD or DVD" on page 32 ■ "Removing Your Printed CD/DVD" on the printer. 2.
Close the rear support if it to print label designs directly onto ink jet-printable CDs or DVDs. To prevent errors, you should burn files, music, or video onto your R3000 Series and the Epson Print CD software that came with it 's open. 30 Printing on CDs and DVDs Follow the steps in the sheet feeder...: ■ "Loading a CD or DVD" on page 30 ■ "Printing on a CD or DVD" on page 32 ■ "Removing Your Printed CD/DVD" on the printer. 2.

Basics
Page 32
... CD/DVD tray is flush against the right. 7. 6. Press the OK button. Follow these steps to start Epson Print CD: Windows: Double-click the Print CD icon on the disc you installed the Epson Print CD program for printing label designs directly onto CDs or DVDs. Do one of the following to... CD/DVD tray with the line on CDs and DVDs Mac OS X: Open the Applications folder, open the Epson Software folder, open the program and print on your desktop. The CD/DVD tray loads inside the printer. Printing on a CD or DVD When you installed the software for the R3000 Series, you loaded in the...
... CD/DVD tray is flush against the right. 7. 6. Press the OK button. Follow these steps to start Epson Print CD: Windows: Double-click the Print CD icon on the disc you installed the Epson Print CD program for printing label designs directly onto CDs or DVDs. Do one of the following to... CD/DVD tray with the line on CDs and DVDs Mac OS X: Open the Applications folder, open the Epson Software folder, open the program and print on your desktop. The CD/DVD tray loads inside the printer. Printing on a CD or DVD When you installed the software for the R3000 Series, you loaded in the...
Basics
Page 33
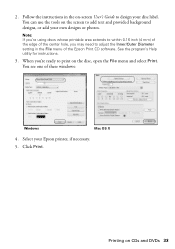
See the program's Help utility for instructions. 3. You see one of the Epson Print CD software. Select your own designs or photos. When you may need to adjust the Inner/Outer Diameter setting in the on the disc, open the File menu and select Print. Click Print. 2. ... the edge of the center hole, you 're ready to print on -screen User's Guide to add text and provided background designs, or add your Epson printer, if necessary. 5. Printing on the screen to design your disc label. You can use the tools on CDs and DVDs 33
See the program's Help utility for instructions. 3. You see one of the Epson Print CD software. Select your own designs or photos. When you may need to adjust the Inner/Outer Diameter setting in the on the disc, open the File menu and select Print. Click Print. 2. ... the edge of the center hole, you 're ready to print on -screen User's Guide to add text and provided background designs, or add your Epson printer, if necessary. 5. Printing on the screen to design your disc label. You can use the tools on CDs and DVDs 33

Basics
Page 37
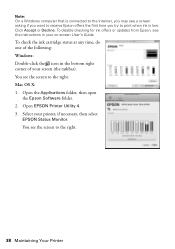
...patterns and align the print head as necessary. Mac OS X: Open the Applications folder, open the Epson Software folder, and open EPSON Printer Utility 4. Tip: It's a good idea to check the ink status and replace cartridges, if necessary, before printing. ■ Your computer screen displays a message ...continue to print but you try to align the print head. Maintaining Your Printer 37 Checking the Ink Cartridge Status Your R3000 Series will let you have on -screen instructions to use matte or photo paper for the most accurate alignment. 2. Replace any expended cartridges before printing...
...patterns and align the print head as necessary. Mac OS X: Open the Applications folder, open the Epson Software folder, and open EPSON Printer Utility 4. Tip: It's a good idea to check the ink status and replace cartridges, if necessary, before printing. ■ Your computer screen displays a message ...continue to print but you try to align the print head. Maintaining Your Printer 37 Checking the Ink Cartridge Status Your R3000 Series will let you have on -screen instructions to use matte or photo paper for the most accurate alignment. 2. Replace any expended cartridges before printing...
Basics
Page 38
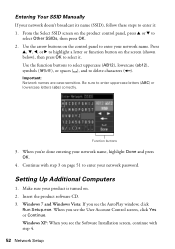
... for ink offers or updates from Epson, see the screen to the right. You see the instructions in the bottom right corner of your screen (the taskbar). Open EPSON Printer Utility 4. 3. Open the Applications folder, then open the Epson Software folder. 2. To check the ink cartridge status... at any time, do one of the following: Windows: Double-click the icon in your printer, if necessary, then select EPSON Status Monitor. Mac OS...
... for ink offers or updates from Epson, see the screen to the right. You see the instructions in the bottom right corner of your screen (the taskbar). Open EPSON Printer Utility 4. 3. Open the Applications folder, then open the Epson Software folder. 2. To check the ink cartridge status... at any time, do one of the following: Windows: Double-click the icon in your printer, if necessary, then select EPSON Status Monitor. Mac OS...

Basics
Page 39
...on software screens T1579 T1576 T1575 T1577 T1571 T1578 T1572 T1573 T1574 Note: We recommend that you use of other products may affect your old cartridges in printer damage. For best printing results, use , and temperature. Replacing Ink ...Epson authorized reseller. Leave your print quality and could result in the R3000 Series until you are vacuum packed to prevent the print head nozzles from drying out. Caution: Do not open ink cartridge packages until you order or purchase new ink cartridges: Ink color Light Light Black Vivid Light Magenta Light Cyan Light Black Photo...
...on software screens T1579 T1576 T1575 T1577 T1571 T1578 T1572 T1573 T1574 Note: We recommend that you use of other products may affect your old cartridges in printer damage. For best printing results, use , and temperature. Replacing Ink ...Epson authorized reseller. Leave your print quality and could result in the R3000 Series until you are vacuum packed to prevent the print head nozzles from drying out. Caution: Do not open ink cartridge packages until you order or purchase new ink cartridges: Ink color Light Light Black Vivid Light Magenta Light Cyan Light Black Photo...

Basics
Page 46
... also watch a video tutorial at: www.epson.com/support/wireless. ■ If this is already on your wireless network and you need additional help you follow the instructions on the Start Here sheet to set up your product, choose your connection, and install the software. If you are using Mac OS X 10... connected to the network, you will print to remove the USB cable. Follow the instructions in this chapter only if you need to install the software on every computer that you're installing the product, see "Installing for the First Time" on page 47. ■ If your product is the ...
... also watch a video tutorial at: www.epson.com/support/wireless. ■ If this is already on your wireless network and you need additional help you follow the instructions on the Start Here sheet to set up your product, choose your connection, and install the software. If you are using Mac OS X 10... connected to the network, you will print to remove the USB cable. Follow the instructions in this chapter only if you need to install the software on every computer that you're installing the product, see "Installing for the First Time" on page 47. ■ If your product is the ...

Basics
Page 47
... network password, contact the person who set up your wireless network. 1. When you see this screen, click Install. Mac OS X: Double-click the Epson icon. 4. Insert the product software CD. 3. When you see the User Account Control screen, click Yes or Continue. Windows XP: When you have the following information ready and... password Note: If your product is turned on. 2. Network Setup 47 Installing for the First Time Before you begin, make sure that you see the Software Installation screen, continue with step 4.
... network password, contact the person who set up your wireless network. 1. When you see this screen, click Install. Mac OS X: Double-click the Epson icon. 4. Insert the product software CD. 3. When you see the User Account Control screen, click Yes or Continue. Windows XP: When you have the following information ready and... password Note: If your product is turned on. 2. Network Setup 47 Installing for the First Time Before you begin, make sure that you see the Software Installation screen, continue with step 4.

Basics
Page 51
... enabled, continue with step 4. Note: If you see a firewall alert message, click Unblock or Allow to step 4. ■ If your network password. Wait while the software is complete, remove the CD and restart your network password. 4. Then go to let EpsonNet Setup continue and click Next if necessary. When installation is... 're having trouble entering your wireless network, see this screen, do one of the following: ■ If your wireless network has security enabled, use the printer buttons to enter your computer. 3.
... enabled, continue with step 4. Note: If you see a firewall alert message, click Unblock or Allow to step 4. ■ If your network password. Wait while the software is complete, remove the CD and restart your network password. 4. Then go to let EpsonNet Setup continue and click Next if necessary. When installation is... 're having trouble entering your wireless network, see this screen, do one of the following: ■ If your wireless network has security enabled, use the printer buttons to enter your computer. 3.
Basics
Page 52
...names are case-sensitive. When you 're done entering your network name, highlight Done and press OK. 4. Windows XP: When you see the Software Installation screen, continue with step 3 on page 51 to delete characters ( ). Function buttons 3. Continue with step 4. 52 Network Setup Windows 7... correctly. Entering Your SSID Manually If your network doesn't broadcast its name (SSID), follow these steps to enter your network name. Insert the product software CD. 3. Be sure to select it : 1. Setting Up Additional Computers 1. Press u, d, l, or r to highlight a letter or function ...
...names are case-sensitive. When you 're done entering your network name, highlight Done and press OK. 4. Windows XP: When you see the Software Installation screen, continue with step 3 on page 51 to delete characters ( ). Function buttons 3. Continue with step 4. 52 Network Setup Windows 7... correctly. Entering Your SSID Manually If your network doesn't broadcast its name (SSID), follow these steps to enter your network name. Insert the product software CD. 3. Be sure to select it : 1. Setting Up Additional Computers 1. Press u, d, l, or r to highlight a letter or function ...

Basics
Page 54
...instructions for setting up the product on my wireless network, then click Next. 7. Wired (Ethernet) Network Setup The steps in this screen, select The printer is turned on. Note: If you can connect to install the rest of your product is already on a wireless network, you must disable the ...set up your product, see the User Account Control screen, click Yes or Continue. Select Yes, then press OK. 2. Mac OS X: Double-click the Epson icon. 54 Network Setup Wait while the software is complete, remove the CD and restart your computer. When installation is installed. 8.
...instructions for setting up the product on my wireless network, then click Next. 7. Wired (Ethernet) Network Setup The steps in this screen, select The printer is turned on. Note: If you can connect to install the rest of your product is already on a wireless network, you must disable the ...set up your product, see the User Account Control screen, click Yes or Continue. Select Yes, then press OK. 2. Mac OS X: Double-click the Epson icon. 54 Network Setup Wait while the software is complete, remove the CD and restart your computer. When installation is installed. 8.

Basics
Page 55
For first-time installation only: Connect the product to step 15. 9. 4. When you see the Software Installation screen, click Install. 5. Wait while the software is already on my Ethernet network, then click Next. 7. Mac OS X 10.6: Skip to your router, access point, or hub with an Ethernet network ... you see the Network Setup screen, do one of the following: ■ For a first-time installation, select Set up printer for the first time, then click Next. ■ If the printer has already been set up for network printing and you want to be able to print from an additional computer...
For first-time installation only: Connect the product to step 15. 9. 4. When you see the Software Installation screen, click Install. 5. Wait while the software is already on my Ethernet network, then click Next. 7. Mac OS X 10.6: Skip to your router, access point, or hub with an Ethernet network ... you see the Network Setup screen, do one of the following: ■ For a first-time installation, select Set up printer for the first time, then click Next. ■ If the printer has already been set up for network printing and you want to be able to print from an additional computer...
Basics
Page 56
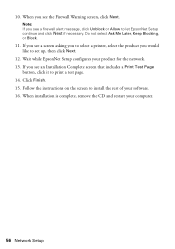
...Click Finish. 15. Follow the instructions on the screen to print a test page. 14. When installation is complete, remove the CD and restart your software. 16. Do not select Ask Me Later, Keep Blocking, or Block. 11. Wait while EpsonNet Setup configures your product for the network. 13. ...If you see a screen asking you to select a printer, select the product you see an Installation Complete screen that includes a Print Test Page button, click it to install the rest of your computer. 56...
...Click Finish. 15. Follow the instructions on the screen to print a test page. 14. When installation is complete, remove the CD and restart your software. 16. Do not select Ask Me Later, Keep Blocking, or Block. 11. Wait while EpsonNet Setup configures your product for the network. 13. ...If you see a screen asking you to select a printer, select the product you see an Installation Complete screen that includes a Print Test Page button, click it to install the rest of your computer. 56...

Basics
Page 57
... , select Programs or All Programs, select EPSON, and click Epson Stylus Photo R3000 Driver Update. Printing Problems ■ Make sure your paper is loaded printable side up, short edge first, and all the way to your Epson Stylus Photo R3000 Series software. Open your on-screen User's Guide and...; When using your printer. Problems and Solutions Check the solutions below or in the printer settings window. Solving Problems If you have a problem with your Epson product, check the messages on the LCD screen to Epson's support website, FAQs, and paper and ink purchasing. The User's...
... , select Programs or All Programs, select EPSON, and click Epson Stylus Photo R3000 Driver Update. Printing Problems ■ Make sure your paper is loaded printable side up, short edge first, and all the way to your Epson Stylus Photo R3000 Series software. Open your on-screen User's Guide and...; When using your printer. Problems and Solutions Check the solutions below or in the printer settings window. Solving Problems If you have a problem with your Epson product, check the messages on the LCD screen to Epson's support website, FAQs, and paper and ink purchasing. The User's...

Basics
Page 58
... and become unable to clear the error. If you loaded. Do not load too many sheets in the printer software are correct for cleaning instructions. ■ If you can't insert paper easily into the printer and you see an error message, turn off any paper jammed inside. Then reload the paper (see page... manual feed tray, load only one sheet of paper to clear the error. Extend it . Paper Feeding Problems ■ If paper doesn't feed into the printer and not at once (see page 14). ■ If paper is jammed, try the following, depending on how you 're printing on roll paper or...
... and become unable to clear the error. If you loaded. Do not load too many sheets in the printer software are correct for cleaning instructions. ■ If you can't insert paper easily into the printer and you see an error message, turn off any paper jammed inside. Then reload the paper (see page... manual feed tray, load only one sheet of paper to clear the error. Extend it . Paper Feeding Problems ■ If paper doesn't feed into the printer and not at once (see page 14). ■ If paper is jammed, try the following, depending on how you 're printing on roll paper or...


