Quick Guide
Page 2
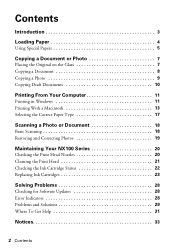
... 5 Copying a Document or Photo 7 Placing the Original on the Glass 7 Copying a Document 8 Copying a Photo 9 Copying Draft Documents 10 Printing From Your Computer 11 Printing in Windows 11 Printing With a Macintosh 13 Selecting the Correct Paper Type 17 Scanning a Photo or Document 18 Basic Scanning 18 Restoring and Correcting Photos 19 Maintaining...
... 5 Copying a Document or Photo 7 Placing the Original on the Glass 7 Copying a Document 8 Copying a Photo 9 Copying Draft Documents 10 Printing From Your Computer 11 Printing in Windows 11 Printing With a Macintosh 13 Selecting the Correct Paper Type 17 Scanning a Photo or Document 18 Basic Scanning 18 Restoring and Correcting Photos 19 Maintaining...

Quick Guide
Page 3
...things without ever turning on your equipment. Note: Notes contain important information about your desktop. Introduction After you have set up your Epson Stylus® NX100 Series as you read your NX100 Series instructions: Warning: Warnings must be followed carefully to your computer! Introduction 3... correct the color, if necessary ■ Perform routine maintenance ■ Solve simple problems This book tells you how to your Windows® or Macintosh® computer. Caution: Cautions must be observed to avoid damage to avoid bodily injury. For additional instructions,...
...things without ever turning on your equipment. Note: Notes contain important information about your desktop. Introduction After you have set up your Epson Stylus® NX100 Series as you read your NX100 Series instructions: Warning: Warnings must be followed carefully to your computer! Introduction 3... correct the color, if necessary ■ Perform routine maintenance ■ Solve simple problems This book tells you how to your Windows® or Macintosh® computer. Caution: Cautions must be observed to avoid damage to avoid bodily injury. For additional instructions,...
Quick Guide
Page 11
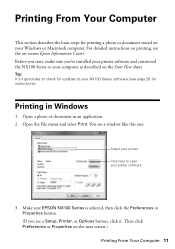
...stored on -screen Epson Information Center. You see the on your Windows or Macintosh computer. Open the File menu and select Print. Printing From Your Computer This section describes the basic steps for updates to your NX100 Series software (see a Setup, Printer, or Options ... for instructions). Open a photo or document in Windows 1. For detailed instructions on the next screen.) Printing From Your Computer 11 Then click Preferences or Properties on printing, see a window like this one: Select your printer Click here to your printer software 3. Printing in an application. 2.
...stored on -screen Epson Information Center. You see the on your Windows or Macintosh computer. Open the File menu and select Print. Printing From Your Computer This section describes the basic steps for updates to your NX100 Series software (see a Setup, Printer, or Options ... for instructions). Open a photo or document in Windows 1. For detailed instructions on the next screen.) Printing From Your Computer 11 Then click Preferences or Properties on printing, see a window like this one: Select your printer Click here to your printer software 3. Printing in an application. 2.
Quick Guide
Page 12
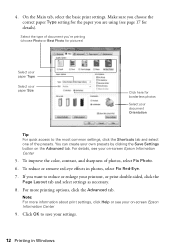
... common settings, click the Shortcuts tab and select one of the presets. Make sure you choose the correct paper Type setting for the paper you 're printing (choose Photo or Best Photo for pictures) Select your paper Type Select your on-screen Epson Information Center 9. Select the type of photos,... Advanced tab. For details, see your settings. 12 Printing in photos, select Fix Red-Eye. 7. 4. To reduce or remove red-eye effects in Windows Click OK to save your on the Advanced tab. On the Main tab, select the basic print settings. For more information about print settings, click...
... common settings, click the Shortcuts tab and select one of the presets. Make sure you choose the correct paper Type setting for the paper you 're printing (choose Photo or Best Photo for pictures) Select your paper Type Select your on-screen Epson Information Center 9. Select the type of photos,... Advanced tab. For details, see your settings. 12 Printing in photos, select Fix Red-Eye. 7. 4. To reduce or remove red-eye effects in Windows Click OK to save your on the Advanced tab. On the Main tab, select the basic print settings. For more information about print settings, click...
Quick Guide
Page 13
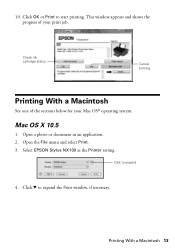
Select EPSON Stylus NX100 as the Printer setting. Click to expand the Print window, if necessary. Mac OS X 10.5 1. Open the File menu and select Print. 3. Printing With a Macintosh 13 Click d to expand 4. Click OK or Print to start printing. Open a photo or document in an application. 2. Check ink cartridge status Cancel printing Printing With a Macintosh See one of your Mac OS® operating system. This window appears and shows the progress of the sections below for your print job. 10.
Select EPSON Stylus NX100 as the Printer setting. Click to expand the Print window, if necessary. Mac OS X 10.5 1. Open the File menu and select Print. 3. Printing With a Macintosh 13 Click d to expand 4. Click OK or Print to start printing. Open a photo or document in an application. 2. Check ink cartridge status Cancel printing Printing With a Macintosh See one of your Mac OS® operating system. This window appears and shows the progress of the sections below for your print job. 10.
Quick Guide
Page 15
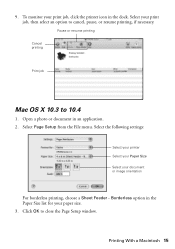
... your Paper Size Select your print job, click the printer icon in the dock. Select your paper size. 3. Click OK to cancel, pause, or resume printing, if necessary. Printing With a Macintosh 15 Select Page Setup ... in an application. 2. Open a photo or document in the Paper Size list for your print job, then select an option to close the Page Setup window. 9.
... your Paper Size Select your print job, click the printer icon in the dock. Select your paper size. 3. Click OK to cancel, pause, or resume printing, if necessary. Printing With a Macintosh 15 Select Page Setup ... in an application. 2. Open a photo or document in the Paper Size list for your print job, then select an option to close the Page Setup window. 9.
Quick Guide
Page 16
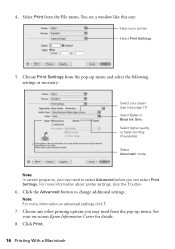
... Epson Information Center for details. 8. See your printer Select Print Settings 5. Choose any other printing options you may need from the pop-up menu. Click Print. 16 Printing With a Macintosh Choose Print Settings from the pop-up menu and select the following settings as necessary: Select your paper type (see a window like this one...
... Epson Information Center for details. 8. See your printer Select Print Settings 5. Choose any other printing options you may need from the pop-up menu. Click Print. 16 Printing With a Macintosh Choose Print Settings from the pop-up menu and select the following settings as necessary: Select your paper type (see a window like this one...
Quick Guide
Page 18
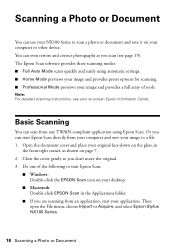
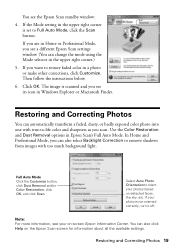
...can use your NX100 Series to scan a photo or document and save your image to start Epson Scan: ■ Windows: Double-click the EPSON Scan icon on your desktop. ■ Macintosh: Double-click EPSON Scan in the front right corner, as you don't move the original. 3. Basic Scanning You... even restore and correct photographs as shown on -screen Epson Information Center. Open the document cover and place your computer or other device. Do one of tools. Then open the File menu, choose Import or Acquire, and select Epson Stylus NX100 Series. 18 Scanning a Photo or Document Close the...
...can use your NX100 Series to scan a photo or document and save your image to start Epson Scan: ■ Windows: Double-click the EPSON Scan icon on your desktop. ■ Macintosh: Double-click EPSON Scan in the front right corner, as you don't move the original. 3. Basic Scanning You... even restore and correct photographs as shown on -screen Epson Information Center. Open the document cover and place your computer or other device. Do one of tools. Then open the File menu, choose Import or Acquire, and select Epson Stylus NX100 Series. 18 Scanning a Photo or Document Close the...
Quick Guide
Page 19
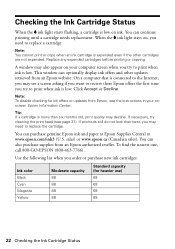
... and/or Color Restoration, click OK, and click Scan. Then follow the instructions below. 6. Note: For more information, see a different Epson Scan settings window. (You can also click Help on detected faces, the sky, etc. Restoring and Correcting Photos 19 The image is not oriented correctly, ... remove shadows from images with true-to orient your photos based on the Epson Scan screen for information about all the available settings. In Home and Professional Mode, you can automatically transform a faded, dusty, or badly exposed color photo into one with too much background light.
... and/or Color Restoration, click OK, and click Scan. Then follow the instructions below. 6. Note: For more information, see a different Epson Scan settings window. (You can also click Help on detected faces, the sky, etc. Restoring and Correcting Photos 19 The image is not oriented correctly, ... remove shadows from images with true-to orient your photos based on the Epson Scan screen for information about all the available settings. In Home and Professional Mode, you can automatically transform a faded, dusty, or badly exposed color photo into one with too much background light.
Quick Guide
Page 22
... may see a screen asking if you want to receive these Epson offers the first time you order or purchase new ink cartridges...or updates from Epson, see page 21). Tip: If a cartridge is expended even if the other updates retrieved from an Epson authorized reseller. If...may decline. This window can also purchase supplies from an Epson website. You can purchase genuine Epson ink and paper at Epson Supplies Central at www.epson.com/ink3 (U.S....sales) or www.epson.ca (Canadian sales). When the B ink light stays on, you may also appear on ink. A window may need to print...
... may see a screen asking if you want to receive these Epson offers the first time you order or purchase new ink cartridges...or updates from Epson, see page 21). Tip: If a cartridge is expended even if the other updates retrieved from an Epson authorized reseller. If...may decline. This window can also purchase supplies from an Epson website. You can purchase genuine Epson ink and paper at Epson Supplies Central at www.epson.com/ink3 (U.S....sales) or www.epson.ca (Canadian sales). When the B ink light stays on, you may also appear on ink. A window may need to print...
Quick Guide
Page 28
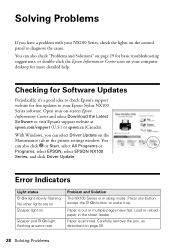
... mode. Paper is out or multiple pages have a problem with your Epson Stylus NX100 Series software. Carefully remove the jam, as described on b paper and P On light flashing at epson.com/support (U.S.) or epson.ca (Canada). Open your computer desktop for free updates to your NX100...can also click or Start, select All Programs or Programs, select EPSON, select EPSON NX100 Series, and click Driver Update. Load or reload paper in the printer settings window. Checking for Software Updates Periodically, it up. With Windows, you have fed. Press any button except the P On button...
... mode. Paper is out or multiple pages have a problem with your Epson Stylus NX100 Series software. Carefully remove the jam, as described on b paper and P On light flashing at epson.com/support (U.S.) or epson.ca (Canada). Open your computer desktop for free updates to your NX100...can also click or Start, select All Programs or Programs, select EPSON, select EPSON NX100 Series, and click Driver Update. Load or reload paper in the printer settings window. Checking for Software Updates Periodically, it up. With Windows, you have fed. Press any button except the P On button...
Start Here
Page 5
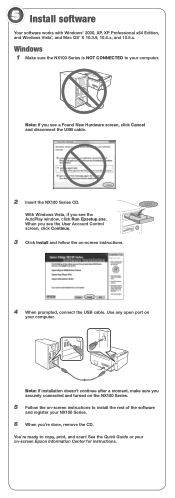
... the rest of the software and register your computer. 5 Install software Your software works with Windows® 2000, XP, XP Professional x64 Edition, and Windows Vista®, and Mac OS® X 10.3.9, 10.4.x, and 10.5.x. With Windows Vista, if you see the User Account Control screen, click Continue. 3 Click Install and ...When prompted, connect the USB cable. When you see a Found New Hardware screen, click Cancel and disconnect the USB cable. 2 Insert the NX100 Series CD. Windows 1 Make sure the NX100 Series is NOT CONNECTED to your on your NX100 Series. 6 When you see the AutoPlay...
... the rest of the software and register your computer. 5 Install software Your software works with Windows® 2000, XP, XP Professional x64 Edition, and Windows Vista®, and Mac OS® X 10.3.9, 10.4.x, and 10.5.x. With Windows Vista, if you see the User Account Control screen, click Continue. 3 Click Install and ...When prompted, connect the USB cable. When you see a Found New Hardware screen, click Cancel and disconnect the USB cable. 2 Insert the NX100 Series CD. Windows 1 Make sure the NX100 Series is NOT CONNECTED to your on your NX100 Series. 6 When you see the AutoPlay...
Product Brochure
Page 2
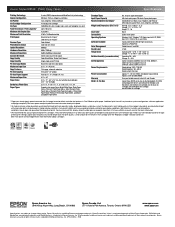
... use genuine Epson ink cartridges. CPD-26438oss 9/08 See www.epson.com/printspeed for Windows and Macintosh, one 88 Black ink cartridge, one 88 Cyan ink cartridge, one 88 Magenta ink cartridge, one 88 Yellow ink... Weight: 11.1 lb Black USB 2.0 full speed Windows Vista®, Windows® XP Professional x64, XP, 2000 Mac OS® X 10.3.9, 10.4.x and 10.5.x Epson printer driver, Web to Page, Epson Scan, Epson Easy Photo Print PhotoEnhance™ and ICM 47 dB.... and Canada Epson Stylus NX105 all -in Draft Mode on specialty media, displayed indoors, under glass or properly store ...
... use genuine Epson ink cartridges. CPD-26438oss 9/08 See www.epson.com/printspeed for Windows and Macintosh, one 88 Black ink cartridge, one 88 Cyan ink cartridge, one 88 Magenta ink cartridge, one 88 Yellow ink... Weight: 11.1 lb Black USB 2.0 full speed Windows Vista®, Windows® XP Professional x64, XP, 2000 Mac OS® X 10.3.9, 10.4.x and 10.5.x Epson printer driver, Web to Page, Epson Scan, Epson Easy Photo Print PhotoEnhance™ and ICM 47 dB.... and Canada Epson Stylus NX105 all -in Draft Mode on specialty media, displayed indoors, under glass or properly store ...

