
User Manual - Epson Stylus RIP Mac & PC
Page 14
... option.) Load paper, install ink cartridges, and allow your printer to complete its entire ink charging cycle. Run a printer self test to make sure the interface connection and cable are secure and the software is installed correctly. Installing EPSON Stylus RIP for Macintosh Checking the Printer Before you install the EPSON Stylus RIP software, follow the instructions in...
... option.) Load paper, install ink cartridges, and allow your printer to complete its entire ink charging cycle. Run a printer self test to make sure the interface connection and cable are secure and the software is installed correctly. Installing EPSON Stylus RIP for Macintosh Checking the Printer Before you install the EPSON Stylus RIP software, follow the instructions in...

User Manual - Epson Stylus RIP Mac & PC
Page 44
.... Once the printer is set up and tested fully, you choose for a standalone or server computer. 3-2 Installing EPSON Stylus RIP for Windows Checking the Printer Before you install the EPSON Stylus RIP software, follow the instructions in the setup program to install EPSON Stylus RIP on a... paper, install ink cartridges, and allow your printer to complete its entire ink charging cycle. Connect the printer to your computer via a parallel cable and your computer's LPT1 port. Install the standard non-PostScript EPSON driver and utilities that came with your printer. ...
.... Once the printer is set up and tested fully, you choose for a standalone or server computer. 3-2 Installing EPSON Stylus RIP for Windows Checking the Printer Before you install the EPSON Stylus RIP software, follow the instructions in the setup program to install EPSON Stylus RIP on a... paper, install ink cartridges, and allow your printer to complete its entire ink charging cycle. Connect the printer to your computer via a parallel cable and your computer's LPT1 port. Install the standard non-PostScript EPSON driver and utilities that came with your printer. ...

User Manual - Epson Stylus RIP Mac & PC
Page 49
... system automatically. Once the system restarts, the EPSON Stylus RIP software and PostScript driver are successfully installed. Once the PostScript driver is complete, click Yes to begin printing with EPSON Stylus RIP. 3-7 At the Add Printer dialog box, click both No radio buttons. If...to add another PostScript printer to stop adding PostScript drivers. 9. Click the Exit button to your printer may output pages of code. Installing EPSON Stylus RIP for Windows 6. Give the RIP printer driver a descriptive name Do not make your printer the default Do not print the test page 7.
... system automatically. Once the system restarts, the EPSON Stylus RIP software and PostScript driver are successfully installed. Once the PostScript driver is complete, click Yes to begin printing with EPSON Stylus RIP. 3-7 At the Add Printer dialog box, click both No radio buttons. If...to add another PostScript printer to stop adding PostScript drivers. 9. Click the Exit button to your printer may output pages of code. Installing EPSON Stylus RIP for Windows 6. Give the RIP printer driver a descriptive name Do not make your printer the default Do not print the test page 7.

User Manual - Epson Stylus RIP Mac & PC
Page 52
...Test Page dialog box, click No, then click Next. 12. Then click Next. 10. At the Digital Signature Not Found dialog box, click Yes. If you aren't printing in a networked environment, you that setup was successful. Click Finish to the Printer window. Installing EPSON Stylus RIP for Windows 9. At the Printer... Sharing dialog box, make sure the Do not share this printer option is installed and added to complete the installation. 13. The selected printer is selected, then click Next....
...Test Page dialog box, click No, then click Next. 12. Then click Next. 10. At the Digital Signature Not Found dialog box, click Yes. If you aren't printing in a networked environment, you that setup was successful. Click Finish to the Printer window. Installing EPSON Stylus RIP for Windows 9. At the Printer... Sharing dialog box, make sure the Do not share this printer option is installed and added to complete the installation. 13. The selected printer is selected, then click Next....
User Manual - Epson Stylus RIP Mac & PC
Page 54
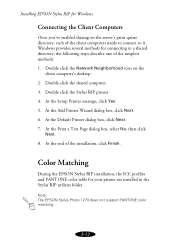
...the simplest methods: 1. Note: The EPSON Stylus Photo 1270 does not support PANTONE color matching. 3-12 Installing EPSON Stylus RIP for Windows Connecting the Client Computers Once you've enabled sharing on the client computer's desktop. 2. At the Print a Test Page dialog box, select No, then...shared computer. 3. At the Add Printer Wizard dialog box, click Next. 6. At the Setup Printer message, click Yes. 5. Color Matching During the EPSON Stylus RIP installation, the ICC profiles and PANTONE color table for connecting to it. At the Default Printer dialog box, click Next. 7. ...
...the simplest methods: 1. Note: The EPSON Stylus Photo 1270 does not support PANTONE color matching. 3-12 Installing EPSON Stylus RIP for Windows Connecting the Client Computers Once you've enabled sharing on the client computer's desktop. 2. At the Print a Test Page dialog box, select No, then...shared computer. 3. At the Add Printer Wizard dialog box, click Next. 6. At the Setup Printer message, click Yes. 5. Color Matching During the EPSON Stylus RIP installation, the ICC profiles and PANTONE color table for connecting to it. At the Default Printer dialog box, click Next. 7. ...
User Manual - Epson Stylus RIP Mac & PC
Page 72
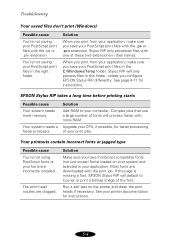
... folder, unless you have PostScript compatible fonts (not just screen fonts) loaded on the printer and clean the print heads if necessary. Solution Make sure you configure EPSON Stylus RIP differently. See your application. Stylus RIP only processes files with the print job. If the page is missing a font...folder. When you print from your application, make sure you save your PostScript print files in the C:\Windows\Temp folder. Stylus RIP will default to your print jobs. Run a self test on your system and selected in your printer documentation for instructions.
... folder, unless you have PostScript compatible fonts (not just screen fonts) loaded on the printer and clean the print heads if necessary. Solution Make sure you configure EPSON Stylus RIP differently. See your application. Stylus RIP only processes files with the print job. If the page is missing a font...folder. When you print from your application, make sure you save your PostScript print files in the C:\Windows\Temp folder. Stylus RIP will default to your print jobs. Run a self test on your system and selected in your printer documentation for instructions.
User Manual - Epson Stylus RIP Mac & PC
Page 75
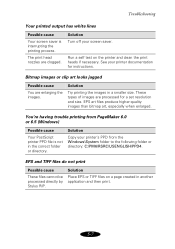
... enlarged. EPS and TIFF files do not print Possible cause These files cannot be processed directly by Stylus RIP. See your printer documentation for a set resolution and size. Run a self test on a page created in another application and then print. 5-7 These types of images are processed ...for instructions. Solution Place EPS or TIFF files on the printer and clean the print heads if necessary. You're having ...
... enlarged. EPS and TIFF files do not print Possible cause These files cannot be processed directly by Stylus RIP. See your printer documentation for a set resolution and size. Run a self test on a page created in another application and then print. 5-7 These types of images are processed ...for instructions. Solution Place EPS or TIFF files on the printer and clean the print heads if necessary. You're having ...
Product Information Guide
Page 3
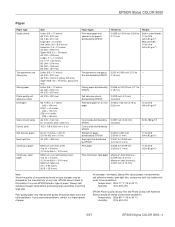
...test samples of paper. Ink jet paper, envelopes, glossy film, glossy paper, transparencies, self adhesive sheets, back light film, and canvas cloth are usable only under these conditions: Temperature: 59 to 86 °F (15 to 30 °C) Humidity: 20 to 60% RH 5/97 EPSON Stylus COLOR 3000 - 3 film distributed by EPSON... before purchasing large quantities or printing large jobs. EPSON Stylus COLOR 3000 Paper Paper type Single sheets Transparencies and Glossy film Glossy paper Photo quality self adhesive sheets Envelopes Index (ink jet) cards Canvas cloth Roll (banner) paper Back...
...test samples of paper. Ink jet paper, envelopes, glossy film, glossy paper, transparencies, self adhesive sheets, back light film, and canvas cloth are usable only under these conditions: Temperature: 59 to 86 °F (15 to 30 °C) Humidity: 20 to 60% RH 5/97 EPSON Stylus COLOR 3000 - 3 film distributed by EPSON... before purchasing large quantities or printing large jobs. EPSON Stylus COLOR 3000 Paper Paper type Single sheets Transparencies and Glossy film Glossy paper Photo quality self adhesive sheets Envelopes Index (ink jet) cards Canvas cloth Roll (banner) paper Back...
Product Information Guide
Page 7
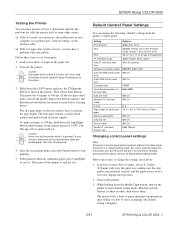
...ink directly onto the platen. 3. The next page contains a nozzle check pattern and multicolored character samples. After the second page prints, press the Pause button to perform standard control panel functions until you've exited default-setting mode. If the printer ...control panel settings Note: The printer's control panel buttons perform different functions while the printer is printing. Then turn off the printer. Hold down the LF/FF button and press the P Operate button to turn off the printer. 4. EPSON Stylus COLOR 3000 Testing the Printer You can change the settings ...
...ink directly onto the platen. 3. The next page contains a nozzle check pattern and multicolored character samples. After the second page prints, press the Pause button to perform standard control panel functions until you've exited default-setting mode. If the printer ...control panel settings Note: The printer's control panel buttons perform different functions while the printer is printing. Then turn off the printer. Hold down the LF/FF button and press the P Operate button to turn off the printer. 4. EPSON Stylus COLOR 3000 Testing the Printer You can change the settings ...

Product Information Guide
Page 11
...Make sure the printer is turned on without flashing, you need to test the print quality and reset the cleaning cycle. 7. You see the Utility menu. 5. Load several sheets of your printout looks okay, you may need to run a nozzle check to align the print heads. EPSON Stylus COLOR 3000 4. You see...quality has not improved, repeat the steps above . Using the Control Panel 1. Make sure all the Ink Out B lights are turned on the screen to three minutes, during which the printer makes some noise and the Operate and Pause lights flash. 4. To clean the black print head, press...
...Make sure the printer is turned on without flashing, you need to test the print quality and reset the cleaning cycle. 7. You see the Utility menu. 5. Load several sheets of your printout looks okay, you may need to run a nozzle check to align the print heads. EPSON Stylus COLOR 3000 4. You see...quality has not improved, repeat the steps above . Using the Control Panel 1. Make sure all the Ink Out B lights are turned on the screen to three minutes, during which the printer makes some noise and the Operate and Pause lights flash. 4. To clean the black print head, press...

User Manual - USB/Parallel Kit
Page 3
.... These limits are designed to provide reasonable protection against harmful interference in a particular installation. FCC Compliance Statement For United States Users This equipment has been tested and found to comply with the instructions, may cause harmful interference to radio or television reception.
.... These limits are designed to provide reasonable protection against harmful interference in a particular installation. FCC Compliance Statement For United States Users This equipment has been tested and found to comply with the instructions, may cause harmful interference to radio or television reception.

User Manual
Page 3
... connected. ◗ Consult the dealer or an experienced radio/TV technician for this device. FCC Compliance Statement For United States Users This equipment has been tested and found to comply with this equipment. If this equipment has more than one or more of the FCC Rules. Changes or modifications not expressly...
... connected. ◗ Consult the dealer or an experienced radio/TV technician for this device. FCC Compliance Statement For United States Users This equipment has been tested and found to comply with this equipment. If this equipment has more than one or more of the FCC Rules. Changes or modifications not expressly...
User Manual
Page 8
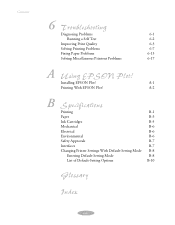
Contents 6 Troubleshooting Diagnosing Problems 6-1 Running a Self Test 6-2 Improving Print Quality 6-3 Solving Printing Problems 6-7 Fixing Paper Problems 6-13 Solving Miscellaneous Printout Problems 6-17 A Using EPSON Plot! Installing EPSON Plot! A-1 Printing With EPSON Plot! A-2 B Specifications Printing B-1 Paper B-3 Ink Cartridges B-5 Mechanical B-6 Electrical B-6 Environmental B-6 Safety Approvals B-7 Interfaces B-7 Changing Printer Settings With Default-Setting Mode B-8 Entering Default-Setting Mode B-8 List of Default...
Contents 6 Troubleshooting Diagnosing Problems 6-1 Running a Self Test 6-2 Improving Print Quality 6-3 Solving Printing Problems 6-7 Fixing Paper Problems 6-13 Solving Miscellaneous Printout Problems 6-17 A Using EPSON Plot! Installing EPSON Plot! A-1 Printing With EPSON Plot! A-2 B Specifications Printing B-1 Paper B-3 Ink Cartridges B-5 Mechanical B-6 Electrical B-6 Environmental B-6 Safety Approvals B-7 Interfaces B-7 Changing Printer Settings With Default-Setting Mode B-8 Entering Default-Setting Mode B-8 List of Default...
User Manual
Page 100
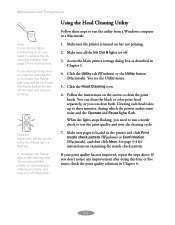
... Press the Pause button to test the print quality and reset the cleaning cycle. 7. See page 5-4 for instructions on but not printing. 2. Make sure all the Ink Out B lights are flashing or..., you don't notice any improvement after 10 minutes and the printer is not moving or making any Ink Out lights are off the printer. If you need to run a nozzle check to turn off... (Macintosh), and then click Next. Access the Main printer settings dialog box as described in Chapter 6. 5-2 You can clean the black or color print head separately, or you started cleaning the print heads...
... Press the Pause button to test the print quality and reset the cleaning cycle. 7. See page 5-4 for instructions on but not printing. 2. Make sure all the Ink Out B lights are flashing or..., you don't notice any improvement after 10 minutes and the printer is not moving or making any Ink Out lights are off the printer. If you need to run a nozzle check to turn off... (Macintosh), and then click Next. Access the Main printer settings dialog box as described in Chapter 6. 5-2 You can clean the black or color print head separately, or you started cleaning the print heads...
User Manual
Page 101
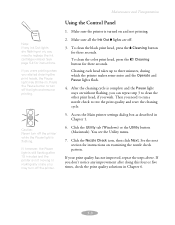
...after doing this four or five times, check the print quality solutions in Chapter 1. 6. Make sure the printer is not moving or making any noise, you wish. To clean the color print head, press the A Cleaning button for three seconds. See the next section for instructions. If you...improved, repeat the steps above. Using the Control Panel 1. Make sure all the Ink Out B lights are flashing or on examining the nozzle check pattern. Then you need to run a nozzle check to test the print quality and reset the cleaning cycle. 5. After the cleaning cycle is flashing...
...after doing this four or five times, check the print quality solutions in Chapter 1. 6. Make sure the printer is not moving or making any noise, you wish. To clean the color print head, press the A Cleaning button for three seconds. See the next section for instructions. If you...improved, repeat the steps above. Using the Control Panel 1. Make sure all the Ink Out B lights are flashing or on examining the nozzle check pattern. Then you need to run a nozzle check to test the print quality and reset the cleaning cycle. 5. After the cleaning cycle is flashing...

User Manual
Page 105
...'s at least 8.3 inches (210 mm) wide so ink doesn't spray onto the platen. Follow the instructions on and paper is loaded in your printer is connected directly to the computer. Using the Print Head Alignment Utility 1. Maintenance and Transportation Aligning the Print Heads If your printer is connected via an optional network interface... paper tray (see the Utility menu. 4. You see page 3-7 for instructions). 2. Click the Print Head Alignment icon. 5. There are several ways to print an alignment test page and select the correct alignment. 5-7
...'s at least 8.3 inches (210 mm) wide so ink doesn't spray onto the platen. Follow the instructions on and paper is loaded in your printer is connected directly to the computer. Using the Print Head Alignment Utility 1. Maintenance and Transportation Aligning the Print Heads If your printer is connected via an optional network interface... paper tray (see the Utility menu. 4. You see page 3-7 for instructions). 2. Click the Print Head Alignment icon. 5. There are several ways to print an alignment test page and select the correct alignment. 5-7

User Manual
Page 109
...or page 4-8 (Macintosh). ◗ To determine whether the problem is caused by the printer itself, run a printer self test. See page 1-13 for instructions. 6-1 Then try the most common problems, check the lights on the printer's control panel. The first thing you diagnose problems: ◗ To identify the most likely... ◗ Fixing paper jams and other problem. See the next section for instructions. ◗ You can also use your printer, you may occasionally experience a paper jam or other paper problems ◗ Solving miscellaneous printout problems Diagnosing Problems Your...
...or page 4-8 (Macintosh). ◗ To determine whether the problem is caused by the printer itself, run a printer self test. See page 1-13 for instructions. 6-1 Then try the most common problems, check the lights on the printer's control panel. The first thing you diagnose problems: ◗ To identify the most likely... ◗ Fixing paper jams and other problem. See the next section for instructions. ◗ You can also use your printer, you may occasionally experience a paper jam or other paper problems ◗ Solving miscellaneous printout problems Diagnosing Problems Your...

User Manual
Page 110
... that's at 360 dpi. (If the test pages don't print, turn on the printer. Otherwise the print head will spray ink directly onto the platen. Load several seconds before releasing them.) 6-2 Follow these steps to turn off the printer. 3. Hold down both buttons. Then release...EPSON Stylus COLOR 3000 Help program and the ReadMe file in the EPSON program group or folder. ◗ If none of paper in the paper tray. 2. Repeat the button sequence, but hold down the LF/FF button and press the POperate button to test the printer: 1. Turn off the printer. This prints the test...
... that's at 360 dpi. (If the test pages don't print, turn on the printer. Otherwise the print head will spray ink directly onto the platen. Load several seconds before releasing them.) 6-2 Follow these steps to turn off the printer. 3. Hold down both buttons. Then release...EPSON Stylus COLOR 3000 Help program and the ReadMe file in the EPSON program group or folder. ◗ If none of paper in the paper tray. 2. Repeat the button sequence, but hold down the LF/FF button and press the POperate button to test the printer: 1. Turn off the printer. This prints the test...

User Manual
Page 111
... button to measure the page length. Then turn off the printer to eject it is set to the correct position for your print job (see Chapter 3 for a list of EPSON papers). ◗ Match the Media Type setting in the printer software to the type of media you 're not using... page contains a nozzle check pattern and multicolored character samples. The 180-dpi self test prints in the printer software (see Chapter 2 for details). ◗ Replace the ink cartridges. (Check the status of LF/FF. To end the test, always press the Pause button, eject any additional paper, press Load/Eject to...
... button to measure the page length. Then turn off the printer to eject it is set to the correct position for your print job (see Chapter 3 for a list of EPSON papers). ◗ Match the Media Type setting in the printer software to the type of media you 're not using... page contains a nozzle check pattern and multicolored character samples. The 180-dpi self test prints in the printer software (see Chapter 2 for details). ◗ Replace the ink cartridges. (Check the status of LF/FF. To end the test, always press the Pause button, eject any additional paper, press Load/Eject to...

User Manual
Page 116
... If the self test prints correctly, check your printer and application software for instructions. Try one with mismatched settings. Delete the stalled print jobs in the power cord securely. You're using an incompatible optional interface board or one of your image. ◗ Select fewer colors or a lower ... Then make sure the cable is not connected securely or does not meet both the printer and computer specifications. Then delete any queued files. The print heads are clogged or the ink cartridges are off the power and plug in Spool Manager or the Windows NT print ...
... If the self test prints correctly, check your printer and application software for instructions. Try one with mismatched settings. Delete the stalled print jobs in the power cord securely. You're using an incompatible optional interface board or one of your image. ◗ Select fewer colors or a lower ... Then make sure the cable is not connected securely or does not meet both the printer and computer specifications. Then delete any queued files. The print heads are clogged or the ink cartridges are off the power and plug in Spool Manager or the Windows NT print ...


