User Manual
Page 8
...-in Ethernet interface and can connect anywhere on your network using the network interface on a network. O This guide is called the network interface in this manual, automatically selects the correct standard when it automatically selects appropriate network protocols. Note: O To read the guide, you can use the printer on your network...
...-in Ethernet interface and can connect anywhere on your network using the network interface on a network. O This guide is called the network interface in this manual, automatically selects the correct standard when it automatically selects appropriate network protocols. Note: O To read the guide, you can use the printer on your network...
User Manual
Page 9
...following environments. Introduction 9 O The term "network administrator" refers to the built-in Ethernet interface of the Network Interface O Connects your Epson printer using a built-in Ethernet interface, which is synonymous with "Supervisor" in this guide. O The term "network interface" refers to... network. This difference does not alter the instructions. See your printer's User's Guide for HTTPS protocols. O Some screen shots in this manual, to your printer. OS Windows 10 Windows 8.x Windows 7 Windows Vista Windows Server 2012 Windows Server 2008 Windows XP (Home, Professional)...
...following environments. Introduction 9 O The term "network administrator" refers to the built-in Ethernet interface of the Network Interface O Connects your Epson printer using a built-in Ethernet interface, which is synonymous with "Supervisor" in this guide. O The term "network interface" refers to... network. This difference does not alter the instructions. See your printer's User's Guide for HTTPS protocols. O Some screen shots in this manual, to your printer. OS Windows 10 Windows 8.x Windows 7 Windows Vista Windows Server 2012 Windows Server 2008 Windows XP (Home, Professional)...
User Manual
Page 21
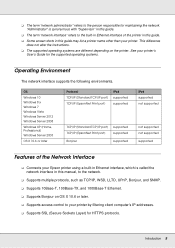
... start the Add Printer wizard. Select the desired printer model that is different. TCP/IP printing Note: If you need to install the printer driver manually. Note: If your operating system. Click the + button to add a new printer. 4. Now you prefer. Open Print & Fax. 3. See the section in this chapter appropriate...
... start the Add Printer wizard. Select the desired printer model that is different. TCP/IP printing Note: If you need to install the printer driver manually. Note: If your operating system. Click the + button to add a new printer. 4. Now you prefer. Open Print & Fax. 3. See the section in this chapter appropriate...
User Manual
Page 30
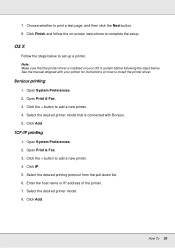
Choose whether to add a new printer. 4. See the manual shipped with Bonjour. 5. Click the + button to print a test page, and then click the Next button. 8. Open Print & Fax. 3. Select the desired printing protocol from ...
Choose whether to add a new printer. 4. See the manual shipped with Bonjour. 5. Click the + button to print a test page, and then click the Next button. 8. Open Print & Fax. 3. Select the desired printing protocol from ...

User Manual
Page 34
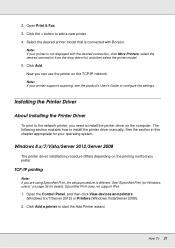
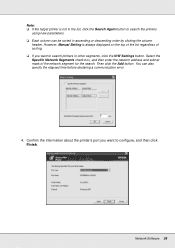
... Auto, the IP address of the network interface, use the DHCP server, make sure it is not supported, we recommend that you select Manual and then enter an IP address. If you select Auto, DHCP becomes available and assigns an IP address automatically. Note: ❏ The... network administrator must check any changes made to set the IP address manually, select Manual. Select the printer you want to change the printer port setting accordingly. https://IP address of network interface/ Example: https://192.168.100...
... Auto, the IP address of the network interface, use the DHCP server, make sure it is not supported, we recommend that you select Manual and then enter an IP address. If you select Auto, DHCP becomes available and assigns an IP address automatically. Note: ❏ The... network administrator must check any changes made to set the IP address manually, select Manual. Select the printer you want to change the printer port setting accordingly. https://IP address of network interface/ Example: https://192.168.100...

User Manual
Page 35
... sure the IP address does not conflict with EpsonNet Config; Note: ❏ Since the new IP address becomes available after you want to specify manually, enter the host name and the domain name in the text boxes. 10. this prevents any other devices on -screen instructions to DNS Server.... DNS server. 9. Select Enable for Set Using PING. For OS X users: Select Enable or Disable for the gateway address. 5. To assign an IP address manually, enter the IP address, the subnet mask, and the default gateway. Note: If there is a server or a router functioning as a gateway, enter the...
... sure the IP address does not conflict with EpsonNet Config; Note: ❏ Since the new IP address becomes available after you want to specify manually, enter the host name and the domain name in the text boxes. 10. this prevents any other devices on -screen instructions to DNS Server.... DNS server. 9. Select Enable for Set Using PING. For OS X users: Select Enable or Disable for the gateway address. 5. To assign an IP address manually, enter the IP address, the subnet mask, and the default gateway. Note: If there is a server or a router functioning as a gateway, enter the...
User Manual
Page 37
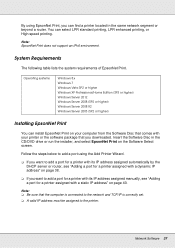
... on the Software Select screen. Follow the steps below to the printer. O If you want to add a port for a printer with its IP address assigned manually, see "Adding a port for a printer assigned with a static IP address" on page 38. Network Software 37 Note: EpsonNet Print does not support an IPv6 environment...
... on the Software Select screen. Follow the steps below to the printer. O If you want to add a port for a printer with its IP address assigned manually, see "Adding a port for a printer assigned with a static IP address" on page 38. Network Software 37 Note: EpsonNet Print does not support an IPv6 environment...
User Manual
Page 39
... Finish. Note: ❏ If the target printer is always displayed on the top of the list regardless of the network segment for the search. However, Manual Setting is not in the list, click the Search Again button to search the printers using new parameters. ❏ Each column can also specify the...
... Finish. Note: ❏ If the target printer is always displayed on the top of the list regardless of the network segment for the search. However, Manual Setting is not in the list, click the Search Again button to search the printers using new parameters. ❏ Each column can also specify the...
User Manual
Page 40
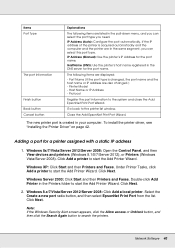
... name. Windows Server 2003: Click Start and then Printers and Faxes. Windows 8.x/7/Vista/Server 2012/Server 2008: Click Add a local printer. Click Next. IP Address (Manual): Use the printer's IP Address for a printer assigned with a static IP address 1. Click Next. 2. If the IP address of the printer is created in your...
... name. Windows Server 2003: Click Start and then Printers and Faxes. Windows 8.x/7/Vista/Server 2012/Server 2008: Click Add a local printer. Click Next. IP Address (Manual): Use the printer's IP Address for a printer assigned with a static IP address 1. Click Next. 2. If the IP address of the printer is created in your...
User Manual
Page 41
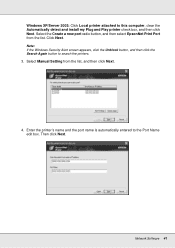
Windows XP/Server 2003: Click Local printer attached to search the printers. 3. Select Manual Setting from the list. Then click Next. Note: If the Windows Security Alert screen appears, click the Unblock button, and then click the Search Again ...
Windows XP/Server 2003: Click Local printer attached to search the printers. 3. Select Manual Setting from the list. Then click Next. Note: If the Windows Security Alert screen appears, click the Unblock button, and then click the Search Again ...

User Manual
Page 45
.... Cause You have assigned an IP address to the printer by Automatic Private IP Addressing (APIPA). If you assigned the IP address to the computer manually, but you can print a status sheet, as the computer.
.... Cause You have assigned an IP address to the printer by Automatic Private IP Addressing (APIPA). If you assigned the IP address to the computer manually, but you can print a status sheet, as the computer.
User Manual
Page 49
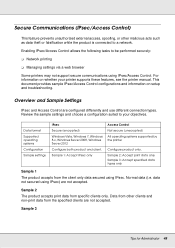
.... Data from other malicious acts such as data theft or falsification while the product is connected to your printer supports these features, see the printer manual. Sample 1: Accept IPsec only Access Control Not secure (unecrypted) All operating systems supported by the printer Configure product only. Enabling IPsec/Access Control allows the...
.... Data from other malicious acts such as data theft or falsification while the product is connected to your printer supports these features, see the printer manual. Sample 1: Accept IPsec only Access Control Not secure (unecrypted) All operating systems supported by the printer Configure product only. Enabling IPsec/Access Control allows the...
User Manual
Page 2
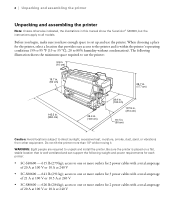
... and is well ventilated and can support the following illustration shows the minimum space required to one or more outlets for each printer: • SC-S40600 - 615 lb (279 kg); 2 | Unpacking and assembling the printer Unpacking and assembling the printer Note: Unless otherwise indicated, the illustrations in . (50 cm) Caution: Avoid.... (50 cm) 145.5 in. (362 cm) 39.4 in. (100 cm) 69.7 in. (177 cm) 39.4 in. (100 cm) 107.9 in. (274 cm) 19.7 in this manual show the SureColor® S40600, but the instructions apply to unpack and install the printer.
... and is well ventilated and can support the following illustration shows the minimum space required to one or more outlets for each printer: • SC-S40600 - 615 lb (279 kg); 2 | Unpacking and assembling the printer Unpacking and assembling the printer Note: Unless otherwise indicated, the illustrations in . (50 cm) Caution: Avoid.... (50 cm) 145.5 in. (362 cm) 39.4 in. (100 cm) 69.7 in. (177 cm) 39.4 in. (100 cm) 107.9 in. (274 cm) 19.7 in this manual show the SureColor® S40600, but the instructions apply to unpack and install the printer.
User Manual
Page 25
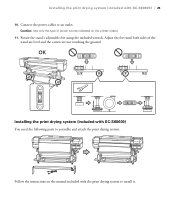
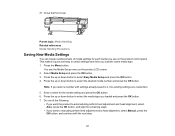
Connect the power cables to install it. Adjust the feet until both sides of power source indicated on the printer's label. 11. Installing the print drying system (included with the print drying system to an outlet. Rotate the stand's adjustable feet using the included wrench. Installing the print drying system (included with SC-S60600) You need the following parts to assemble and attach the print drying system: Follow the instructions in the manual included with SC-S60600) | 25 10. Caution: Use only the type of the stand are level and the casters are not touching the ground.
Connect the power cables to install it. Adjust the feet until both sides of power source indicated on the printer's label. 11. Installing the print drying system (included with the print drying system to an outlet. Rotate the stand's adjustable feet using the included wrench. Installing the print drying system (included with SC-S60600) You need the following parts to assemble and attach the print drying system: Follow the instructions in the manual included with SC-S60600) | 25 10. Caution: Use only the type of the stand are level and the casters are not touching the ground.
User Manual
Page 8
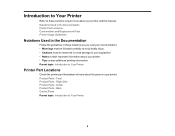
Front Product Parts - Inside Product Parts - Product Parts - Back Control Panel Parent topic: Introduction to learn more about your printer and this manual. Parent topic: Introduction to Your Printer Printer Part Locations Check the printer part illustrations to Your Printer 8 Notations Used in the Documentation Printer Part Locations ...
Front Product Parts - Inside Product Parts - Product Parts - Back Control Panel Parent topic: Introduction to learn more about your printer and this manual. Parent topic: Introduction to Your Printer Printer Part Locations Check the printer part illustrations to Your Printer 8 Notations Used in the Documentation Printer Part Locations ...

User Manual
Page 9
Front 1 Left maintenance cover 2 Print drying system (included with SC-S60600 and optional for SC-S40600) 3 After heater 4 Tension bar 5 Takeup reel roll core holder 6 Takeup roll support 7 Auto switch 8 Manual switch 9 Ink cartridges (one set for SC-S40600) 10 ink cartridge lock levers 11 Cartridge check light 12 Right maintenance cover 13 Media loading lever 14 Alert light 9 Product Parts -
Front 1 Left maintenance cover 2 Print drying system (included with SC-S60600 and optional for SC-S40600) 3 After heater 4 Tension bar 5 Takeup reel roll core holder 6 Takeup roll support 7 Auto switch 8 Manual switch 9 Ink cartridges (one set for SC-S40600) 10 ink cartridge lock levers 11 Cartridge check light 12 Right maintenance cover 13 Media loading lever 14 Alert light 9 Product Parts -

User Manual
Page 28
Firmly insert the roll media onto the left roll holder. On the right side of the roll media is less than 5.5 inches (140 mm), you need to lift the media into position. 28 Note: If the outer diameter of the product, raise the lift lever to manually lift the roll media onto the roll holder. 10. 9.
Firmly insert the roll media onto the left roll holder. On the right side of the roll media is less than 5.5 inches (140 mm), you need to lift the media into position. 28 Note: If the outer diameter of the product, raise the lift lever to manually lift the roll media onto the roll holder. 10. 9.
User Manual
Page 37
... Related references Media Handling Precautions Saving New Media Settings You can create numbered sets of the following: • If you want to manually perform feed adjustment and head alignment, select Manual, press the OK button, and continue with settings already saved to select the desired media number and press the OK button.
... Related references Media Handling Precautions Saving New Media Settings You can create numbered sets of the following: • If you want to manually perform feed adjustment and head alignment, select Manual, press the OK button, and continue with settings already saved to select the desired media number and press the OK button.
User Manual
Page 47
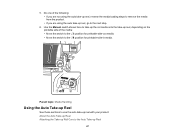
... media. • Move the switch to remove the media from the product. • If you are using the auto take -up Reel 47 Use the Manual switch shown here to take up the cut media onto the take-up reel, depending on the printable side of the following: • If you...
... media. • Move the switch to remove the media from the product. • If you are using the auto take -up Reel 47 Use the Manual switch shown here to take up the cut media onto the take-up reel, depending on the printable side of the following: • If you...
User Manual
Page 62
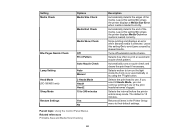
... End Check Media Skew Check Btw Pages Nozzle Check Lamp Setting Head Mode (SC-S60600 only) Sleep Mode Off Print Pattern Auto Nozzle Check Auto Manual 2 Heads Mode Head1 Head2 15 to turn on the light inside the front cover automatically or by skewed media. Selects the interval before the printer...
... End Check Media Skew Check Btw Pages Nozzle Check Lamp Setting Head Mode (SC-S60600 only) Sleep Mode Off Print Pattern Auto Nozzle Check Auto Manual 2 Heads Mode Head1 Head2 15 to turn on the light inside the front cover automatically or by skewed media. Selects the interval before the printer...


