
Creating a Photo Book
Page 3
Contents Welcome 6 System Requirements 6 Your StoryTeller Kit 7 Installing the Software 8 Start Your Book 10 Starting StoryTeller Publisher 10 Selecting Your Photos 11 Fixing Your Photos 16 Saving Your Photo Changes 17 Create Your Photo Book Pages 18 Adding Photos to Your Page Layouts 18 Making Changes to Your Page Layouts 22 Replacing One Photo with Another 22 Resizing, Repositioning, or Rotating a Photo 23 Adding, Deleting, and Locking Pages 24 Adding Captions to Your Page Layouts 25 Saving Your Photo Book to Your Computer 26 3
Contents Welcome 6 System Requirements 6 Your StoryTeller Kit 7 Installing the Software 8 Start Your Book 10 Starting StoryTeller Publisher 10 Selecting Your Photos 11 Fixing Your Photos 16 Saving Your Photo Changes 17 Create Your Photo Book Pages 18 Adding Photos to Your Page Layouts 18 Making Changes to Your Page Layouts 22 Replacing One Photo with Another 22 Resizing, Repositioning, or Rotating a Photo 23 Adding, Deleting, and Locking Pages 24 Adding Captions to Your Page Layouts 25 Saving Your Photo Book to Your Computer 26 3

Creating a Photo Book
Page 4
...Photo Book Pages 27 Printing a Draft of Your Photo Book 27 Printing Your Final Photo Book Pages 28 Epson Printers: Printing Your Final Pages 29 HP Printers: Printing Your Final Pages 33 Canon, Lexmark, or Other Printers: Printing Your Final Pages 36 Create Your Cover 41 Adding Photos to the Front and Back Covers 41 Adding Photos and Text... Size Color Draft of Your Cover 48 Printing Your Final Cover Page 50 Epson Printers: Printing the Final Cover Page 50 HP Printers: Printing Your Final Cover Page 59 Canon, Lexmark, and Other Printers: Printing Your Final Cover Page 69 4 Contents
...Photo Book Pages 27 Printing a Draft of Your Photo Book 27 Printing Your Final Photo Book Pages 28 Epson Printers: Printing Your Final Pages 29 HP Printers: Printing Your Final Pages 33 Canon, Lexmark, or Other Printers: Printing Your Final Pages 36 Create Your Cover 41 Adding Photos to the Front and Back Covers 41 Adding Photos and Text... Size Color Draft of Your Cover 48 Printing Your Final Cover Page 50 Epson Printers: Printing the Final Cover Page 50 HP Printers: Printing Your Final Cover Page 59 Canon, Lexmark, and Other Printers: Printing Your Final Cover Page 69 4 Contents
Creating a Photo Book
Page 6
... layouts that captures the family vacation, graduation day, or a child's birthday. You can create a personalized photo book that make a great gift for everyone, for your cover, and easy-to put your photos a breeze. The Epson StoryTeller™ kit includes everything you how to -use the StoryTeller Publisher software, your photo book, and creating and printing a cover page. This guide walks you can choose from six different book styles...
... layouts that captures the family vacation, graduation day, or a child's birthday. You can create a personalized photo book that make a great gift for everyone, for your cover, and easy-to put your photos a breeze. The Epson StoryTeller™ kit includes everything you how to -use the StoryTeller Publisher software, your photo book, and creating and printing a cover page. This guide walks you can choose from six different book styles...
Creating a Photo Book
Page 10
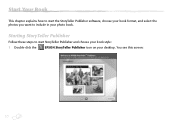
You see this screen: 10 Start Your Book This chapter explains how to start the StoryTeller Publisher software, choose your book format, and select the photos you want to start StoryTeller Publisher and choose your book style: 1 Double-click the EPSON StoryTeller Publisher icon on your photo book. Starting StoryTeller Publisher Follow these steps to include in your desktop.
You see this screen: 10 Start Your Book This chapter explains how to start the StoryTeller Publisher software, choose your book format, and select the photos you want to start StoryTeller Publisher and choose your book style: 1 Double-click the EPSON StoryTeller Publisher icon on your photo book. Starting StoryTeller Publisher Follow these steps to include in your desktop.
Creating a Photo Book
Page 11
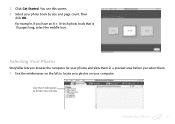
Then click OK. You see this screen: 3 Select your photos and view them in a preview area before you have an 8 × 10-inch photo book that is 10 pages long, select the middle icon. For example, if you select them. 1 Use the minibrowser on the left to locate your photos on your computer: Use the minibrowser to locate your photos Selecting Your Photos 11 Selecting Your Photos StoryTeller lets you browse the computer for your photo book by size and page count. 2 Click Get Started.
Then click OK. You see this screen: 3 Select your photos and view them in a preview area before you have an 8 × 10-inch photo book that is 10 pages long, select the middle icon. For example, if you select them. 1 Use the minibrowser on the left to locate your photos on your computer: Use the minibrowser to locate your photos Selecting Your Photos 11 Selecting Your Photos StoryTeller lets you browse the computer for your photo book by size and page count. 2 Click Get Started.
Creating a Photo Book
Page 16
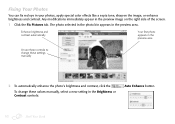
... and contrast. The photo selected in the photo bin appears in the Brightness or Contrast controls: Auto Enhance button. 16 Start Your Book Enhance brightness and contrast automatically Your first photo appears in the preview area Or use these controls to change these settings manually 2 To automatically enhance the photo's brightness and contrast, click the To change these values manually, select a new setting in the preview area...
... and contrast. The photo selected in the photo bin appears in the Brightness or Contrast controls: Auto Enhance button. 16 Start Your Book Enhance brightness and contrast automatically Your first photo appears in the preview area Or use these controls to change these settings manually 2 To automatically enhance the photo's brightness and contrast, click the To change these values manually, select a new setting in the preview area...

Creating a Photo Book
Page 17
... of the screen. Then select a new setting in "Create Your Photo Book Pages" on page 18, or go to the next section to your photo changes. Saving Your Photo Changes Once you've fixed a photo, you want to save it to save your computer or a disk and use it and click Save. Saving Your Photo Changes 17 Just ...re ready to add photos to the location where you can save it at a later date. Then select one of the color effects settings. 6 To rotate the image 90° to the right or left, click one of the rotation icons at the top of the screen. 7 If you change your mind about...
... of the screen. Then select a new setting in "Create Your Photo Book Pages" on page 18, or go to the next section to your photo changes. Saving Your Photo Changes Once you've fixed a photo, you want to save it to save your computer or a disk and use it and click Save. Saving Your Photo Changes 17 Just ...re ready to add photos to the location where you can save it at a later date. Then select one of the color effects settings. 6 To rotate the image 90° to the right or left, click one of the rotation icons at the top of the screen. 7 If you change your mind about...
Creating a Photo Book
Page 18
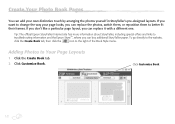
... Epson StoryTeller Internet site has more information about StoryTeller, including special offers and links to Your Page Layouts 1 Click the Create Book tab. 2 Click Customize Book. Create Your Photo Book Pages You can add your page looks, you can replace the photos, switch them, or reposition them to better fit their frames. Adding Photos to troubleshooting information and the Epson StoreSM, where you can replace it with a different one. Click Customize Book...
... Epson StoryTeller Internet site has more information about StoryTeller, including special offers and links to Your Page Layouts 1 Click the Create Book tab. 2 Click Customize Book. Create Your Photo Book Pages You can add your page looks, you can replace the photos, switch them, or reposition them to better fit their frames. Adding Photos to troubleshooting information and the Epson StoreSM, where you can replace it with a different one. Click Customize Book...
Creating a Photo Book
Page 28
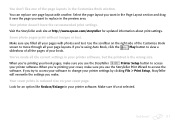
... Your Final Pages" on page 29 ● "HP Printers: Printing Your Final Pages" on page 33 ● "Canon, Lexmark, or Other Printers: Printing Your Final Pages" on page 36 28 Print Your Photo Book Pages 2 Click Draft Color. 3 If you don't want to make the settings yourself in your printer is selected in the Layout menu. 4 Click the window: Printer Setup button...
... Your Final Pages" on page 29 ● "HP Printers: Printing Your Final Pages" on page 33 ● "Canon, Lexmark, or Other Printers: Printing Your Final Pages" on page 36 28 Print Your Photo Book Pages 2 Click Draft Color. 3 If you don't want to make the settings yourself in your printer is selected in the Layout menu. 4 Click the window: Printer Setup button...
Creating a Photo Book
Page 30
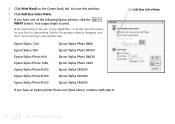
... Epson Stylus Photo R200 Epson Stylus Photo R300 Epson Stylus Photo R320 Epson Stylus Photo R800 Epson Stylus Photo RX500 Epson Stylus Photo RX620 Epson Stylus Photo 2200 Epson Stylus CX4600 Epson Stylus CX6400 Epson Stylus CX6600 If you have an Epson printer that is not listed above, continue with step 8. 5 Click Print Book on the size of the following Epson printers, click the PRINT button. You see this window: 6 Click Full Size Color...
... Epson Stylus Photo R200 Epson Stylus Photo R300 Epson Stylus Photo R320 Epson Stylus Photo R800 Epson Stylus Photo RX500 Epson Stylus Photo RX620 Epson Stylus Photo 2200 Epson Stylus CX4600 Epson Stylus CX6400 Epson Stylus CX6600 If you have an Epson printer that is not listed above, continue with step 8. 5 Click Print Book on the size of the following Epson printers, click the PRINT button. You see this window: 6 Click Full Size Color...
Creating a Photo Book
Page 32
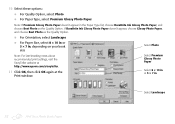
... on your book size Select Photo Note: For late-breaking news about recommended print settings, visit the StoryTeller website at http://www.epson.com/storyteller. 11 Click OK, then click OK again at the Print window. 10 Select these options: ● For Quality Option, select Photo ● For Paper Type, select Premium Glossy Photo Paper Note: If Premium Glossy Photo Paper doesn't appear in the Paper Type list, choose...
... on your book size Select Photo Note: For late-breaking news about recommended print settings, visit the StoryTeller website at http://www.epson.com/storyteller. 11 Click OK, then click OK again at the Print window. 10 Select these options: ● For Quality Option, select Photo ● For Paper Type, select Premium Glossy Photo Paper Note: If Premium Glossy Photo Paper doesn't appear in the Paper Type list, choose...
Creating a Photo Book
Page 35
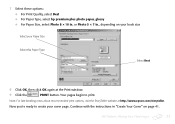
... recommended print options, visit the StoryTeller website at the Print window. 9 Click the PRINT button. or Photo 5 × 7 in., depending on page 41. Continue with the instructions in . 7 Select these options: ● For Print Quality, select Best ● For Paper Type, select hp premium plus photo paper, glossy ● For Paper Size, select Photo 8 × 10 in "Create Your Cover" on your book size Select your cover...
... recommended print options, visit the StoryTeller website at the Print window. 9 Click the PRINT button. or Photo 5 × 7 in., depending on page 41. Continue with the instructions in . 7 Select these options: ● For Print Quality, select Best ● For Paper Type, select hp premium plus photo paper, glossy ● For Paper Size, select Photo 8 × 10 in "Create Your Cover" on your book size Select your cover...
Creating a Photo Book
Page 36
... 8 × 10-inch or 5 × 7-inch glossy photo paper from the top, like Epson printers. your printer has them. 36 Print Your Photo Book Pages Note: Avoid touching the glossy surface of your printer's feeder. 3 Lower the output tray and pull out the output tray extensions, if your printer screens may look different and may include different options.
... 8 × 10-inch or 5 × 7-inch glossy photo paper from the top, like Epson printers. your printer has them. 36 Print Your Photo Book Pages Note: Avoid touching the glossy surface of your printer's feeder. 3 Lower the output tray and pull out the output tray extensions, if your printer screens may look different and may include different options.
Creating a Photo Book
Page 57
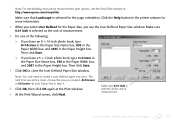
... the User Defined Paper Size window. Make sure 0.01 inch is selected for the Paper Size, you have an 8 × 10-inch photo book, type 8×10cover in the Paper Size Name box, 850 in the Paper Width box, and 2873 in the Paper Height box. Click the Help button in step 4. ....epson.com/storyteller. Then click Save. ● If you see the User Defined Paper Size window. Note: For late-breaking news about recommended print options, visit the StoryTeller website at the Print window. 9 At the Print Wizard screen, click Next. The next time you print a cover, choose the size you created-...
... the User Defined Paper Size window. Make sure 0.01 inch is selected for the Paper Size, you have an 8 × 10-inch photo book, type 8×10cover in the Paper Size Name box, 850 in the Paper Width box, and 2873 in the Paper Height box. Click the Help button in step 4. ....epson.com/storyteller. Then click Save. ● If you see the User Defined Paper Size window. Note: For late-breaking news about recommended print options, visit the StoryTeller website at the Print window. 9 At the Print Wizard screen, click Next. The next time you print a cover, choose the size you created-...
Creating a Photo Book
Page 64
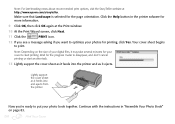
... your photo book together. Make sure that Landscape is selected for more information. 9 Click OK, then click OK again at http://www.epson.com/storyteller. Click the Help button in "Assemble Your Photo Book" on the size of your digital files, it ejects. Wait for printing, click Yes. Lightly support the ... recommended print options, visit the StoryTeller website at the Print window. 10 At the Print Wizard screen, click Next. 11 Click the PRINT icon. 12 If you see a message asking if you want to optimize your cover to start another task. 13 Lightly support the cover sheet...
... your photo book together. Make sure that Landscape is selected for more information. 9 Click OK, then click OK again at http://www.epson.com/storyteller. Click the Help button in "Assemble Your Photo Book" on the size of your digital files, it ejects. Wait for printing, click Yes. Lightly support the ... recommended print options, visit the StoryTeller website at the Print window. 10 At the Print Wizard screen, click Next. 11 Click the PRINT icon. 12 If you see a message asking if you want to optimize your cover to start another task. 13 Lightly support the cover sheet...

Creating a Photo Book
Page 76
...start printing. Continue with the instructions in "Assemble Your Photo Book" on the size of your digital files, it may look different. Note: Depending on page 83. Your printer may not load from the front like an HP printer, load the paper glossy side down. 2 Slide the left edge guide... printer software may take several minutes for the progress meter to start another task. Your cover sheet begins to optimize your photos for detailed paper loading and printing instructions. 14 If you see a message asking if you 're ready to avoid fingerprints. 1 Load two StoryTeller sheets glossy...
...start printing. Continue with the instructions in "Assemble Your Photo Book" on the size of your digital files, it may look different. Note: Depending on page 83. Your printer may not load from the front like an HP printer, load the paper glossy side down. 2 Slide the left edge guide... printer software may take several minutes for the progress meter to start another task. Your cover sheet begins to optimize your photos for detailed paper loading and printing instructions. 14 If you see a message asking if you 're ready to avoid fingerprints. 1 Load two StoryTeller sheets glossy...
Creating a Photo Book
Page 91
... correct settings in your cover, make . Problems? 91 You don't like Reduce/Enlarge in your page layouts. Visit the StoryTeller web site at http://www.epson.com/storyteller for an option like one page layout with photos and text. Make sure you 're using Auto Book, click the Play button to view a slideshow of the Customize Book screen to access your cover page. If you filled all your printer software...
... correct settings in your cover, make . Problems? 91 You don't like Reduce/Enlarge in your page layouts. Visit the StoryTeller web site at http://www.epson.com/storyteller for an option like one page layout with photos and text. Make sure you 're using Auto Book, click the Play button to view a slideshow of the Customize Book screen to access your cover page. If you filled all your printer software...
Creating a Photo Book
Page 92
... StoryTeller and view special offers. Where To Get Help If you're having trouble with your non-Epson printer, see the documentation or contact information for reseller referral. 92 Problems? Uninstalling the StoryTeller Software 1 Do one of the following: Windows XP: Select Start > Control Panel > Add or Remove Programs. Other Windows systems: Select Start > Settings > Control Panel. Then double-click the Change/Remove or Add/Remove icon. 2 Select Epson StoryTeller Publisher and click Change/Remove (or Add/Remove). 3 Follow the on the Create Book...
... StoryTeller and view special offers. Where To Get Help If you're having trouble with your non-Epson printer, see the documentation or contact information for reseller referral. 92 Problems? Uninstalling the StoryTeller Software 1 Do one of the following: Windows XP: Select Start > Control Panel > Add or Remove Programs. Other Windows systems: Select Start > Settings > Control Panel. Then double-click the Change/Remove or Add/Remove icon. 2 Select Epson StoryTeller Publisher and click Change/Remove (or Add/Remove). 3 Follow the on the Create Book...

Creating a Photo Book
Page 95
..., 39, 57, 63, 68, 75, 81 Pages adding photos, 21 adding text, 25 to 26 adding, deleting, and locking, 24 attaching to book, 83 to 86 problems editing, 90 viewing book pages, 21 Paper loading cover sheet, 50 to 51, 59 to 60, 70 loading glossy photo paper, 29, 33, 36, 65 Photo bin adding photos, 13 rearranging photos, 15 removing photos, 14 Photo book attaching cover(s), 86 to 89 attaching pages, 83...
..., 39, 57, 63, 68, 75, 81 Pages adding photos, 21 adding text, 25 to 26 adding, deleting, and locking, 24 attaching to book, 83 to 86 problems editing, 90 viewing book pages, 21 Paper loading cover sheet, 50 to 51, 59 to 60, 70 loading glossy photo paper, 29, 33, 36, 65 Photo bin adding photos, 13 rearranging photos, 15 removing photos, 14 Photo book attaching cover(s), 86 to 89 attaching pages, 83...
Creating a Photo Book
Page 97
... problems making print settings, 91 Sharpness, adjusting, 17 Slideshow, viewing, 91 Smears, 92 Software installing, 8 to 9 starting, 10 to 11 uninstalling, 92 Spine, adding text, 44 to 46 Starting software, 10 to 11 Support, 92 Switching photos, see Replacing photos System requirements, 6 T Technical support, 92 Text adding to cover, 43, 46 adding to page layouts, 25 to 26 editing, 26, 43 problems, 90 Thumbnails adding to photo bin, 13 rearranging in photo bin, 15 removing...
... problems making print settings, 91 Sharpness, adjusting, 17 Slideshow, viewing, 91 Smears, 92 Software installing, 8 to 9 starting, 10 to 11 uninstalling, 92 Spine, adding text, 44 to 46 Starting software, 10 to 11 Support, 92 Switching photos, see Replacing photos System requirements, 6 T Technical support, 92 Text adding to cover, 43, 46 adding to page layouts, 25 to 26 editing, 26, 43 problems, 90 Thumbnails adding to photo bin, 13 rearranging in photo bin, 15 removing...
