
Basics
Page 4
... 41 Cropping a Photo 42 Creating Photo Greeting Cards 43 Selecting a Photo and Printing a Template 44 Using the Template Selection Sheet 44 Printing on CDs and DVDs 47 Loading a Disk 48 Using EPSON Print CD 49 Designing CDs and DVDs 49 Printing Your Design 52 Adjusting the Print Position 52 Adjusting the Print Density 54 Printing a CD/DVD Without a Computer 55 Using a Printed Image 55 Printing From a Memory...
... 41 Cropping a Photo 42 Creating Photo Greeting Cards 43 Selecting a Photo and Printing a Template 44 Using the Template Selection Sheet 44 Printing on CDs and DVDs 47 Loading a Disk 48 Using EPSON Print CD 49 Designing CDs and DVDs 49 Printing Your Design 52 Adjusting the Print Position 52 Adjusting the Print Density 54 Printing a CD/DVD Without a Computer 55 Using a Printed Image 55 Printing From a Memory...

Basics
Page 7
... printing photos and colorful designs directly on your disks. ■ Dual paper paths that let you keep plain paper in the front tray for brilliantly clear previews of scanning and stand-alone copying with your RX700 and install its software, see the on CDs is also included. To use the RX700 with true photo print quality. The Epson Stylus® Photo RX700...
... printing photos and colorful designs directly on your disks. ■ Dual paper paths that let you keep plain paper in the front tray for brilliantly clear previews of scanning and stand-alone copying with your RX700 and install its software, see the on CDs is also included. To use the RX700 with true photo print quality. The Epson Stylus® Photo RX700...

Basics
Page 47
... ink jet-printable CDs or DVDs for printing. The EPSON Print CD software included with an ink-jet printable surface from your RX700. If you're not using a computer, you print customized text, graphics, and photos directly on page 55 47 See these sections: ■ "Loading a Disk" on page 48 ■ "Using EPSON Print CD" on page 49 ■ "Printing a CD/DVD Without...
... ink jet-printable CDs or DVDs for printing. The EPSON Print CD software included with an ink-jet printable surface from your RX700. If you're not using a computer, you print customized text, graphics, and photos directly on page 55 47 See these sections: ■ "Loading a Disk" on page 48 ■ "Using EPSON Print CD" on page 49 ■ "Printing a CD/DVD Without...

Basics
Page 48
...8-cm disks, place the included adapter on the tray first. 48 Printing on the RX700 and open tab. The CD/DVD guide slides out. 3. Caution: Use only CDs or DVDs designed for printing with the label surface up. Turn on CDs and DVDs Press 2. Place your disk on your ink-jet printable... CDs or DVDs before you print. Loading a Disk Make sure the data, music,...
...8-cm disks, place the included adapter on the tray first. 48 Printing on the RX700 and open tab. The CD/DVD guide slides out. 3. Caution: Use only CDs or DVDs designed for printing with the label surface up. Turn on CDs and DVDs Press 2. Place your disk on your ink-jet printable... CDs or DVDs before you print. Loading a Disk Make sure the data, music,...

Basics
Page 49
... EPSON Print CD folder and select EPSON Print CD. Align arrows Using EPSON Print CD If your RX700 is connected to your system, to build a printer information database. Note: When you can use the EPSON Print CD software to install the software. Designing CDs and DVDs 1. Start EPSON Print CD. ■ Windows: Click Start > Programs or All Programs > EPSON Print CD > EPSON Print CD. ■ Mac OS X: Open the Applications folder, then open EPSON Print CD...
... EPSON Print CD folder and select EPSON Print CD. Align arrows Using EPSON Print CD If your RX700 is connected to your system, to build a printer information database. Note: When you can use the EPSON Print CD software to install the software. Designing CDs and DVDs 1. Start EPSON Print CD. ■ Windows: Click Start > Programs or All Programs > EPSON Print CD > EPSON Print CD. ■ Mac OS X: Open the Applications folder, then open EPSON Print CD...

Basics
Page 50
... OK. ■ Macintosh: Click Select Background, locate the folder where your images are stored and click OK. Then click OK. 50 Printing on CDs and DVDs When you see thumbnail images of the available editing features. To select a background image, do one you want, and click Open.... You see a different screen. 2. You can adjust the brightness, contrast, and gamma, or apply mosaic, blur, or special color effects, as follows: ■...
... OK. ■ Macintosh: Click Select Background, locate the folder where your images are stored and click OK. Then click OK. 50 Printing on CDs and DVDs When you see thumbnail images of the available editing features. To select a background image, do one you want, and click Open.... You see a different screen. 2. You can adjust the brightness, contrast, and gamma, or apply mosaic, blur, or special color effects, as follows: ■...

Basics
Page 51
..., then drag the red "handle" up or down. In the Text Settings window, type your text, then use any block of the options in the Color Settings and Object Settings windows. When you're finished, choose Save as from the File menu to save your text, use options in the window... the text button. Enter your file. You can also use the tabs to format it using the other handles that appear. 7. 5. Then adjust it . Using EPSON Print CD 51 To curve a single line of the following: ■ Windows: Click the text button. Windows Macintosh 6.
..., then drag the red "handle" up or down. In the Text Settings window, type your text, then use any block of the options in the Color Settings and Object Settings windows. When you're finished, choose Save as from the File menu to save your text, use options in the window... the text button. Enter your file. You can also use the tabs to format it using the other handles that appear. 7. 5. Then adjust it . Using EPSON Print CD 51 To curve a single line of the following: ■ Windows: Click the text button. Windows Macintosh 6.
Basics
Page 52
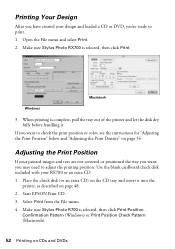
... DVD, you may need to adjust the printing position. When printing is selected, then click Print. Make sure Stylus Photo R700 is selected, then click Print Position Confirmation Pattern (Windows) or Print Position Check Pattern (Macintosh). 52 Printing on page 48. 2. Start EPSON Print CD. 3. Macintosh Windows 3. Select Print from the File menu. 4. Make sure Stylus Photo RX700 is complete, pull the tray out of...
... DVD, you may need to adjust the printing position. When printing is selected, then click Print. Make sure Stylus Photo R700 is selected, then click Print Position Confirmation Pattern (Windows) or Print Position Check Pattern (Macintosh). 52 Printing on page 48. 2. Start EPSON Print CD. 3. Macintosh Windows 3. Select Print from the File menu. 4. Make sure Stylus Photo RX700 is complete, pull the tray out of...

Basics
Page 53
... (Top) or Top Space box. Make sure Enter Values (Windows) or Value Entry (Macintosh) is printed on the position check disk or CD. 6. Using EPSON Print CD 53 Remove the position check disk or CD and measure the distance from the edge of the hole to save the measurements. Open the File menu... and select Adjust Print Position. The confirmation pattern is checked. You see a screen like this: Windows ...
... (Top) or Top Space box. Make sure Enter Values (Windows) or Value Entry (Macintosh) is printed on the position check disk or CD. 6. Using EPSON Print CD 53 Remove the position check disk or CD and measure the distance from the edge of the hole to save the measurements. Open the File menu... and select Adjust Print Position. The confirmation pattern is checked. You see a screen like this: Windows ...

Basics
Page 54
... necessary. 1. After the pattern is printed in EPSON Print CD to adjust the density for at least 24 hours. Each pattern is printed, examine the print and make adjustments as necessary. Select Print from different manufacturers may absorb ink differently, so you may need to adjust color saturation. Make sure Stylus Photo R700 is printed, adjust the setting, then repeat steps...
... necessary. 1. After the pattern is printed in EPSON Print CD to adjust the density for at least 24 hours. Each pattern is printed, examine the print and make adjustments as necessary. Select Print from different manufacturers may absorb ink differently, so you may need to adjust color saturation. Make sure Stylus Photo R700 is printed, adjust the setting, then repeat steps...

Basics
Page 55
... disk this way, but you may need to print a colorful design directly onto a CD or DVD without using your computer. Change the Copy Density as the Quality setting. 4. Select Text as needed, then press OK. You can't print text on the disk. 2. Place the design...such as the Copy Layout. 3. The image is printed. Disks from different manufacturers absorb ink differently, so you can either scan a design and copy it . Printing a CD/DVD Without a Computer 55 Printing a CD/DVD Without a Computer You can use your Stylus Photo RX700 to adjust the setting for each brand.
... disk this way, but you may need to print a colorful design directly onto a CD or DVD without using your computer. Change the Copy Density as the Quality setting. 4. Select Text as needed, then press OK. You can't print text on the disk. 2. Place the design...such as the Copy Layout. 3. The image is printed. Disks from different manufacturers absorb ink differently, so you can either scan a design and copy it . Printing a CD/DVD Without a Computer 55 Printing a CD/DVD Without a Computer You can use your Stylus Photo RX700 to adjust the setting for each brand.

Basics
Page 56
...may not produce satisfactory results with stronger colors, increase the Density setting. Disks from your family vacation photos) ■ 12-up to print with some brands. 5. Insert a memory card (see your memory card's first photo displayed on the screen: 56 Printing on your selections. Press the Memory... Card button, select Custom Print, and press OK. 3. You see page 28). 2. Press OK when done making your disk Note: If you wish to print twelve images on CDs and DVDs Select CD/DVD, then...
...may not produce satisfactory results with stronger colors, increase the Density setting. Disks from your family vacation photos) ■ 12-up to print with some brands. 5. Insert a memory card (see your memory card's first photo displayed on the screen: 56 Printing on your selections. Press the Memory... Card button, select Custom Print, and press OK. 3. You see page 28). 2. Press OK when done making your disk Note: If you wish to print twelve images on CDs and DVDs Select CD/DVD, then...

Basics
Page 57
... the tray out of it 's misaligned horizontally, select CD/DVD Position Left/Right. Printing a CD/DVD Without a Computer 57 At the preview screen, press the x Color button to print in grayscale. To cancel printing, press the y Stop button. 8. Select your RX700 or an extra CD. 2. Adjusting the Print Position If your photos. ■ While a photo is displayed, use the + and - 6. The...
... the tray out of it 's misaligned horizontally, select CD/DVD Position Left/Right. Printing a CD/DVD Without a Computer 57 At the preview screen, press the x Color button to print in grayscale. To cancel printing, press the y Stop button. 8. Select your RX700 or an extra CD. 2. Adjusting the Print Position If your photos. ■ While a photo is displayed, use the + and - 6. The...

Basics
Page 58
...one of these Layout options: ■ Jewel Case Upper 1/2 to print a single photo for the type of up to print a jewel case insert that matches your camera's memory card to 5 mm in either direction. Note: The RX700 remembers your insert 6. Select CD Jacket, then press OK. 4. Select the setting for the cover ...of your insert ■ Jewel Case Index to print a series of paper you do not need to 24 photos on your settings even after it has been ...
...one of these Layout options: ■ Jewel Case Upper 1/2 to print a single photo for the type of up to print a jewel case insert that matches your camera's memory card to 5 mm in either direction. Note: The RX700 remembers your insert 6. Select CD Jacket, then press OK. 4. Select the setting for the cover ...of your insert ■ Jewel Case Index to print a series of paper you do not need to 24 photos on your settings even after it has been ...
Basics
Page 94
... 15, 17 Epson help, 83 to 84 EPSON Print CD, 47 to 54 Exif Print, 36 F Factory settings, 37 Faded photos, 25 to 26 Faint prints, 79 FCC statement, 88 Feeding problems, 80 File types, memory card, 28 Film printing from, 19 to..., 31, 37, 43, 77 Flash memory card, 65 to 68 Fluorescent lamp, 20, 21 G Gaps in prints, 79 Grainy printouts, 79 Greeting cards, 43 to 46 H Help, 83 to 84 High Speed setting, 78 I ...Image quality problems, 81 to 82 Incorrect colors, 79 Index sheet, 38 to 40 Ink cartridges checking levels, 69 to 70 low or empty, 69 to...
... 15, 17 Epson help, 83 to 84 EPSON Print CD, 47 to 54 Exif Print, 36 F Factory settings, 37 Faded photos, 25 to 26 Faint prints, 79 FCC statement, 88 Feeding problems, 80 File types, memory card, 28 Film printing from, 19 to..., 31, 37, 43, 77 Flash memory card, 65 to 68 Fluorescent lamp, 20, 21 G Gaps in prints, 79 Grainy printouts, 79 Greeting cards, 43 to 46 H Help, 83 to 84 High Speed setting, 78 I ...Image quality problems, 81 to 82 Incorrect colors, 79 Index sheet, 38 to 40 Ink cartridges checking levels, 69 to 70 low or empty, 69 to...
Basics
Page 95
... Photos cropping, 24 to 25, 42 to 43 placing on glass, 14 position problems, 82 restoring color in, 25 to 26 scanning to memory card, 62 to 64 supported file types, 28 transferring to computer, 65 to 66 PictBridge, 41 Print CD software, EPSON, 47 to 54 Print head aligning, 74 cleaning, 73 PRINT Image Matching, 36 Print..., 76 to 77 image quality, 81 to 82 installing software, 75 to 76 paper feeding, 80 print quality, 78 to 79 printing, 72, 76 to 79 scan quality, 81 to 82 scanning, 81 to 82 screen, RX700, 82 setup, 75 to 76 solving, 75 to 84 Proof sheet, 38 to 40 Index 95
... Photos cropping, 24 to 25, 42 to 43 placing on glass, 14 position problems, 82 restoring color in, 25 to 26 scanning to memory card, 62 to 64 supported file types, 28 transferring to computer, 65 to 66 PictBridge, 41 Print CD software, EPSON, 47 to 54 Print head aligning, 74 cleaning, 73 PRINT Image Matching, 36 Print..., 76 to 77 image quality, 81 to 82 installing software, 75 to 76 paper feeding, 80 print quality, 78 to 79 printing, 72, 76 to 79 scan quality, 81 to 82 scanning, 81 to 82 screen, RX700, 82 setup, 75 to 76 solving, 75 to 84 Proof sheet, 38 to 40 Index 95

Basics
Page 96
... Replacing ink cartridges, 69 to 72 Resizing copies, 15, 17 Restoring color, 25 to 26 Restoring default settings, 37 S Safety instructions, 70, 85 to 87 Saturation, 36 Saving files from memory cards, 65 to 67 photos on computer, 65 to 66 Scanner lid, 14 noise, 75 Scanning ..., RX700 display problems, 82 safety instructions, 87 Setup problems, 75 to 76 Sharpness, 36 Sleep mode, 82 Slides printing from, 19 to 24 printing problems, 77 scanning problems, 81 scanning to memory card, 63 to 64 Slideshow, 34 Slow printing or copying, 77 Smears, 78 Software ArcSoft PhotoImpression, 84 EPSON Print CD, ...
... Replacing ink cartridges, 69 to 72 Resizing copies, 15, 17 Restoring color, 25 to 26 Restoring default settings, 37 S Safety instructions, 70, 85 to 87 Saturation, 36 Saving files from memory cards, 65 to 67 photos on computer, 65 to 66 Scanner lid, 14 noise, 75 Scanning ..., RX700 display problems, 82 safety instructions, 87 Setup problems, 75 to 76 Sharpness, 36 Sleep mode, 82 Slides printing from, 19 to 24 printing problems, 77 scanning problems, 81 scanning to memory card, 63 to 64 Slideshow, 34 Slow printing or copying, 77 Smears, 78 Software ArcSoft PhotoImpression, 84 EPSON Print CD, ...

Basics
Page 97
..., restore the color of old photos, and make reprints and enlargements-even without a computer! For instructions, see "Saving and Storing Photos"). Design and print your own CDs and DVDs After archiving your photos on CD, enhance your camera to the RX700. Turn your own photos and the included EPSON Print CD software. How to Copy, Print, and Scan Without a Computer Your Stylus Photo RX700 lets you...
..., restore the color of old photos, and make reprints and enlargements-even without a computer! For instructions, see "Saving and Storing Photos"). Design and print your own CDs and DVDs After archiving your photos on CD, enhance your camera to the RX700. Turn your own photos and the included EPSON Print CD software. How to Copy, Print, and Scan Without a Computer Your Stylus Photo RX700 lets you...

Product Information Guide
Page 11
...EPSON Print CD software, you loaded, turn Restoration ON, and then press OK. Select the Paper Size of the paper you can import your photos, add text, and modify your designs with the label surface up to print directly onto a CD or DVD without using your color-restored photos... CD Copy as the Quality setting. 5/05 Epson Stylus Photo RX700 - 11 Place your photos. Align arrows Printing a CD/DVD Without a Computer Follow these steps to select how many copies of Epson Premium Glossy Photo Paper. 5. Printing on a CD/DVD You can either scan a photo (or other printed image...
...EPSON Print CD software, you loaded, turn Restoration ON, and then press OK. Select the Paper Size of the paper you can import your photos, add text, and modify your designs with the label surface up to print directly onto a CD or DVD without using your color-restored photos... CD Copy as the Quality setting. 5/05 Epson Stylus Photo RX700 - 11 Place your photos. Align arrows Printing a CD/DVD Without a Computer Follow these steps to select how many copies of Epson Premium Glossy Photo Paper. 5. Printing on a CD/DVD You can either scan a photo (or other printed image...
Start Here Card
Page 7
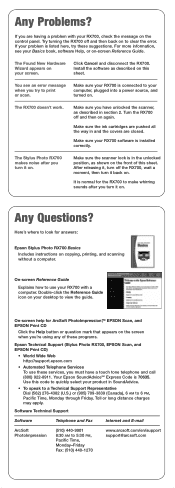
... you must have unlocked the scanner, as shown on . Make sure you try these programs. Epson Technical Support (Stylus Photo RX700, EPSON Scan, and EPSON Print CD) • World Wide Web http://support.epson.com • Automated Telephone Services To use your RX700 with your RX700 software is 70635. For more information, see an error message when you have a touch tone...
... you must have unlocked the scanner, as shown on . Make sure you try these programs. Epson Technical Support (Stylus Photo RX700, EPSON Scan, and EPSON Print CD) • World Wide Web http://support.epson.com • Automated Telephone Services To use your RX700 with your RX700 software is 70635. For more information, see an error message when you have a touch tone...


