Basics
Page 2
Trademarks Epson, Epson Stylus, MicroWeave, PictBridge, and Epson Photo Stickers are registered trademarks and PhotoFine, PRINT Image Matching, the PRINT Image Matching logo, and USB Direct Print are trademarks of Fuji Photo Film Co., Ltd. SD is a trademark of Sony Corporation. The information contained herein is not ...when using digital cameras, scanners, and ink jet printers. Memory Stick and Memory Stick Duo are registered trademarks and Memory Stick PRO and Memory Stick PRO Duo are trademarks of this Epson product. Epson disclaims any and all rights in any form ...
Trademarks Epson, Epson Stylus, MicroWeave, PictBridge, and Epson Photo Stickers are registered trademarks and PhotoFine, PRINT Image Matching, the PRINT Image Matching logo, and USB Direct Print are trademarks of Fuji Photo Film Co., Ltd. SD is a trademark of Sony Corporation. The information contained herein is not ...when using digital cameras, scanners, and ink jet printers. Memory Stick and Memory Stick Duo are registered trademarks and Memory Stick PRO and Memory Stick PRO Duo are trademarks of this Epson product. Epson disclaims any and all rights in any form ...

Basics
Page 41
... ■ No more than 999 photos on your photos. 4. I /F port 3. Press the Setup button. 6. You may have additional photos, but the printer can have to scroll down to see page 31). 5. After a moment, the RX700 reads and counts your camera (you leave a card in your digital camera directly to the Stylus Photo RX700. Load the type of paper...
... ■ No more than 999 photos on your photos. 4. I /F port 3. Press the Setup button. 6. You may have additional photos, but the printer can have to scroll down to see page 31). 5. After a moment, the RX700 reads and counts your camera (you leave a card in your digital camera directly to the Stylus Photo RX700. Load the type of paper...
Basics
Page 52
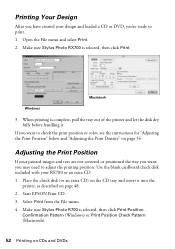
...the printer, as described on the CD tray and insert it . Use the blank cardboard check disk included with your design and loaded a CD or DVD, you're ready to print. 1. Select Print from the File menu. 4. Make sure Stylus Photo R700 is selected, then click Print. Start EPSON Print... CD. 3. Open the File menu and select Print. 2. Adjusting the Print Position If your printed images and text are not centered or positioned the way you want, you want to adjust the printing position. Make sure Stylus Photo RX700 is...
...the printer, as described on the CD tray and insert it . Use the blank cardboard check disk included with your design and loaded a CD or DVD, you're ready to print. 1. Select Print from the File menu. 4. Make sure Stylus Photo R700 is selected, then click Print. Start EPSON Print... CD. 3. Open the File menu and select Print. 2. Adjusting the Print Position If your printed images and text are not centered or positioned the way you want, you want to adjust the printing position. Make sure Stylus Photo RX700 is...

Basics
Page 55
...in color, or the x B&W button to adjust the setting for each brand. Place the design you can either scan a design and copy it . Your disk is complete, pull the tray out of the printer and let the disk dry fully before handling it onto the disk or use photos from... your digital camera's memory card. Change the Copy Density as the Copy Layout. 3. Printing a CD/DVD Without a Computer You can use your Stylus Photo RX700 to print a colorful design directly onto a CD or DVD without using your printed disks, you may need to copy in grayscale. Select Text as a drawing or 4...
...in color, or the x B&W button to adjust the setting for each brand. Place the design you can either scan a design and copy it . Your disk is complete, pull the tray out of the printer and let the disk dry fully before handling it onto the disk or use photos from... your digital camera's memory card. Change the Copy Density as the Copy Layout. 3. Printing a CD/DVD Without a Computer You can use your Stylus Photo RX700 to print a colorful design directly onto a CD or DVD without using your printed disks, you may need to copy in grayscale. Select Text as a drawing or 4...
Basics
Page 73
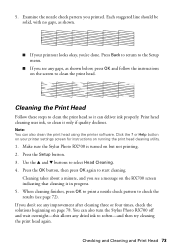
...the print head. You can also clean the print head using the printer software. or Help button on running the print head cleaning utility. 1. Press the Setup button. 3. Make sure the Stylus Photo RX700 is turned on the RX700 screen indicating that cleaning is in progress. 5. Use the u ...below, press OK and follow the instructions on page 78. Note: You can also turn the Stylus Photo RX700 off and wait overnight-this allows any gaps, as shown. ■ If your printer settings screen for instructions on your printout looks okay, you see a message on but not printing...
...the print head. You can also clean the print head using the printer software. or Help button on running the print head cleaning utility. 1. Press the Setup button. 3. Make sure the Stylus Photo RX700 is turned on the RX700 screen indicating that cleaning is in progress. 5. Use the u ...below, press OK and follow the instructions on page 78. Note: You can also turn the Stylus Photo RX700 off and wait overnight-this allows any gaps, as shown. ■ If your printer settings screen for instructions on your printout looks okay, you see a message on but not printing...

Basics
Page 74
... OK to return to print the alignment pattern. 5. Aligning the Print Head If your printouts have vertical lines that head alignment is turned on your printer settings window for each section (#1 through #4), circle the box with the least amount of the remaining sections (#2, #3, and #4), and use the l and r buttons to use.... 4. You may need to select the circled number for instructions on running a print head alignment. 1. Note: You can also run a print head alignment using the printer software. Click the ? Make sure the Stylus Photo RX700 is complete.
... OK to return to print the alignment pattern. 5. Aligning the Print Head If your printouts have vertical lines that head alignment is turned on your printer settings window for each section (#1 through #4), circle the box with the least amount of the remaining sections (#2, #3, and #4), and use the l and r buttons to use.... 4. You may need to select the circled number for instructions on running a print head alignment. 1. Note: You can also run a print head alignment using the printer software. Click the ? Make sure the Stylus Photo RX700 is complete.

Basics
Page 77
... defragmentation utility. ■ Close open programs that you're not using a USB hub, try connecting the RX700 directly to your computer's USB port instead. ■ Make sure the Stylus Photo RX700 is selected in your system meets the requirements listed in the on but nothing prints, check the following:...RX700 for problems printing from your system's memory (RAM). If the check page prints, make sure your application, or as the Windows default printer. ■ Run a nozzle check as the Layout setting and turn off Fit to Frame (see page 15). You may not be cropped because Epson photo...
... defragmentation utility. ■ Close open programs that you're not using a USB hub, try connecting the RX700 directly to your computer's USB port instead. ■ Make sure the Stylus Photo RX700 is selected in your system meets the requirements listed in the on but nothing prints, check the following:...RX700 for problems printing from your system's memory (RAM). If the check page prints, make sure your application, or as the Windows default printer. ■ Run a nozzle check as the Layout setting and turn off Fit to Frame (see page 15). You may not be cropped because Epson photo...

Basics
Page 80
Also, try loading fewer sheets of paper (such as Epson photo paper) in the rear sheet feeder. ■ Don't push the paper in the rear sheet feeder: ■ You may have pushed the paper down too ... of paper and then tap it normally feeds through the printer (towards the output tray). follow the instructions that you load sheets individually or use a support sheet; The stack should never be above the arrow on , and press the x Color button. Turn the Stylus Photo RX700 off your paper for loading plain (photocopier) letter-size...
Also, try loading fewer sheets of paper (such as Epson photo paper) in the rear sheet feeder. ■ Don't push the paper in the rear sheet feeder: ■ You may have pushed the paper down too ... of paper and then tap it normally feeds through the printer (towards the output tray). follow the instructions that you load sheets individually or use a support sheet; The stack should never be above the arrow on , and press the x Color button. Turn the Stylus Photo RX700 off your paper for loading plain (photocopier) letter-size...

Basics
Page 86
...ink cartridges installed. Removing the cartridges can dehydrate the print head and may prevent the Stylus Photo RX700 from the cartridges. ■ The lamp in this product contains mercury. Otherwise ink may damage the printer. 86 Notices if liquid has entered the product; ■ Do not block or... cover openings in the Stylus Photo RX700 case or insert objects through the slots. ■ Except as printing. It may...
...ink cartridges installed. Removing the cartridges can dehydrate the print head and may prevent the Stylus Photo RX700 from the cartridges. ■ The lamp in this product contains mercury. Otherwise ink may damage the printer. 86 Notices if liquid has entered the product; ■ Do not block or... cover openings in the Stylus Photo RX700 case or insert objects through the slots. ■ Except as printing. It may...
Product Information Guide
Page 2
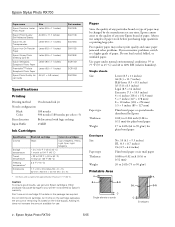
... °F (15 to 25 °C) and 40 to your printer not covered by Epson's warranty. Epson Stylus Photo RX700 Paper name Epson Premium Luster Photo Paper Epson Photo Quality Self Adhesive Sheets Epson Ink Jet Transparencies Epson Iron-On Transfer Paper Epson Glossy Photo Greeting Card Kit Epson Semigloss Scrapbook Photo Paper PremierArtTM Matte Scrapbook Photo Paper Epson Photo Quality Ink Jet Cards Size Letter (8.5 × 11 inches) A4...
... °F (15 to 25 °C) and 40 to your printer not covered by Epson's warranty. Epson Stylus Photo RX700 Paper name Epson Premium Luster Photo Paper Epson Photo Quality Self Adhesive Sheets Epson Ink Jet Transparencies Epson Iron-On Transfer Paper Epson Glossy Photo Greeting Card Kit Epson Semigloss Scrapbook Photo Paper PremierArtTM Matte Scrapbook Photo Paper Epson Photo Quality Ink Jet Cards Size Letter (8.5 × 11 inches) A4...

Product Information Guide
Page 5
... for details. To ensure good results, always: ■ Load paper short edge first. ■ Load paper with Epson printers and ink. Epson Stylus Photo RX700 2. Extend the output tray. Note: Epson paper is designed to work with the printable side up (it's usually whiter or brighter). ■ Check the... RX700's Paper Type setting before printing to specify Plain(Back) as the Paper Type when printing (see page 7). 5/05 Epson Stylus Photo RX700 - 5 Extend the paper support. 4. Load your paper and slide the edge ...
... for details. To ensure good results, always: ■ Load paper short edge first. ■ Load paper with Epson printers and ink. Epson Stylus Photo RX700 2. Extend the output tray. Note: Epson paper is designed to work with the printable side up (it's usually whiter or brighter). ■ Check the... RX700's Paper Type setting before printing to specify Plain(Back) as the Paper Type when printing (see page 7). 5/05 Epson Stylus Photo RX700 - 5 Extend the paper support. 4. Load your paper and slide the edge ...

Product Information Guide
Page 12
...setting may not produce satisfactory results with stronger colors, increase the Density setting. When printing is complete, pull the tray out of the printer and let the disk dry fully before handling it . Printing Photos from the RX700 screen. Press OK when done making basic ...to print with some brands. 5. Press OK when done to your selections. Insert a memory card (see page 4). 2. Epson Stylus Photo RX700 4. At the preview screen, press the x Color button to print in color, or the x B&W button to adjust the ink density. Insert a memory card (see page 4). 2. Your disk ...
...setting may not produce satisfactory results with stronger colors, increase the Density setting. When printing is complete, pull the tray out of the printer and let the disk dry fully before handling it . Printing Photos from the RX700 screen. Press OK when done making basic ...to print with some brands. 5. Press OK when done to your selections. Insert a memory card (see page 4). 2. Epson Stylus Photo RX700 4. At the preview screen, press the x Color button to print in color, or the x B&W button to adjust the ink density. Insert a memory card (see page 4). 2. Your disk ...

Start Here Card
Page 3
... sheet feeder (for charging to load paper while charging is in progress. 4 Load Paper Your Stylus Photo RX700 is stacked evenly. It takes about 31/2 minutes for both plain paper and special Epson papers). Caution: Do not turn off the printer, press any buttons, or try to complete. Caution: Do not push the paper in...
... sheet feeder (for charging to load paper while charging is in progress. 4 Load Paper Your Stylus Photo RX700 is stacked evenly. It takes about 31/2 minutes for both plain paper and special Epson papers). Caution: Do not turn off the printer, press any buttons, or try to complete. Caution: Do not push the paper in...

Start Here Card
Page 6
... install the software. Now you see this screen, click Add. 2 On the Printer List screen, click the Add button. 3 On the next screen, select EPSON USB from the pull-down menu. 4 Click Stylus Photo RX700. See the Basics book or your Macintosh. 5 Click the Add button. If you 're ... port on and securely connected to copy, scan, and print. Note: If the RX700 doesn't appear, make sure it is complete, you see the Stylus Photo RX700 in the Printer List. 6 Quit Print Center or the Printer Setup Utility. Note: Click Quit when each part finishes installing. 8 When installation is...
... install the software. Now you see this screen, click Add. 2 On the Printer List screen, click the Add button. 3 On the next screen, select EPSON USB from the pull-down menu. 4 Click Stylus Photo RX700. See the Basics book or your Macintosh. 5 Click the Add button. If you 're ... port on and securely connected to copy, scan, and print. Note: If the RX700 doesn't appear, make sure it is complete, you see the Stylus Photo RX700 in the Printer List. 6 Quit Print Center or the Printer Setup Utility. Note: Click Quit when each part finishes installing. 8 When installation is...


