
Epson Scan ICM Updater v1.20 (PSB.2008.07.001)
Page 1
... Description of these three profiles, the program returns this error: "Cannot find necessary files. Click on the computer. Select the Color tab and enable ICM. EPSON PRODUCT SUPPORT BULLETIN Date: PSB #: Reference: Product(s): Subject: 07/08/2008 Originator: RY PSB.2008.07.001 Authorization: TE08.... You can choose any of Change: ICM module updater for Windows XP/XP x64 / Vista (32bit & 64bit) This bulletin was created to and including 3.4xA Note: Scanners/All-in Epson Scan when Adobe's Color Management Module (CMM) has also been installed on the Configuration button...
... Description of these three profiles, the program returns this error: "Cannot find necessary files. Click on the computer. Select the Color tab and enable ICM. EPSON PRODUCT SUPPORT BULLETIN Date: PSB #: Reference: Product(s): Subject: 07/08/2008 Originator: RY PSB.2008.07.001 Authorization: TE08.... You can choose any of Change: ICM module updater for Windows XP/XP x64 / Vista (32bit & 64bit) This bulletin was created to and including 3.4xA Note: Scanners/All-in Epson Scan when Adobe's Color Management Module (CMM) has also been installed on the Configuration button...

Basics
Page 49
.... Align arrows Using EPSON Print CD If your RX700 is connected to your system, to build a printer information database. Start EPSON Print CD. ■ Windows: Click Start > Programs or All Programs > EPSON Print CD > EPSON Print CD. ■ Mac OS X: Open the Applications folder, then open EPSON Print CD on Macintosh... print a disk design with images and text. 4. Note: Follow the instructions on your computer, you first open the EPSON Print CD folder and select EPSON Print CD. Note: When you can use the EPSON Print CD software to install the software. Insert the tray into the...
.... Align arrows Using EPSON Print CD If your RX700 is connected to your system, to build a printer information database. Start EPSON Print CD. ■ Windows: Click Start > Programs or All Programs > EPSON Print CD > EPSON Print CD. ■ Mac OS X: Open the Applications folder, then open EPSON Print CD on Macintosh... print a disk design with images and text. 4. Note: Follow the instructions on your computer, you first open the EPSON Print CD folder and select EPSON Print CD. Note: When you can use the EPSON Print CD software to install the software. Insert the tray into the...

Basics
Page 50
.... To modify the template or enhance your images are stored, select the one of the available editing features. You see a window like the following : ■ Windows: Click the File tab, then click Browse to choose a new background. 4. You can adjust the brightness, contrast, and gamma..., or apply mosaic, blur, or special color effects, as follows: ■ Windows: Click the Image Adjustment button, then click the Image Adjustment tab. Click the background icon. When you finish making adjustments, click...
.... To modify the template or enhance your images are stored, select the one of the available editing features. You see a window like the following : ■ Windows: Click the File tab, then click Browse to choose a new background. 4. You can adjust the brightness, contrast, and gamma..., or apply mosaic, blur, or special color effects, as follows: ■ Windows: Click the Image Adjustment button, then click the Image Adjustment tab. Click the background icon. When you finish making adjustments, click...

Basics
Page 51
You can also use any block of text, click the text in the main window, then drag the red "handle" up or down. To curve a single line of text.) ■ Macintosh: Click the text button. Enter your file. Using EPSON Print CD 51 To add text, do one of the options in the... Color Settings and Object Settings windows. When you're finished, choose Save as from the File menu to format it using the other...
You can also use any block of text, click the text in the main window, then drag the red "handle" up or down. To curve a single line of text.) ■ Macintosh: Click the text button. Enter your file. Using EPSON Print CD 51 To add text, do one of the options in the... Color Settings and Object Settings windows. When you're finished, choose Save as from the File menu to format it using the other...
Basics
Page 52
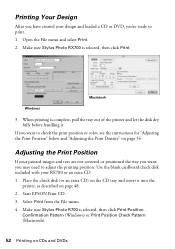
... you want , you may need to adjust the printing position. Make sure Stylus Photo R700 is selected, then click Print Position Confirmation Pattern (Windows) or Print Position Check Pattern (Macintosh). 52 Printing on the CD tray and insert it . When printing ...color, see the instructions for "Adjusting the Print Position" below and "Adjusting the Print Density" on page 54. Start EPSON Print CD. 3. Select Print from the File menu. 4. Place the check disk (or an extra CD) on CDs and DVDs Adjusting the Print Position If your RX700 or an extra CD. 1. Make sure Stylus Photo RX700...
... you want , you may need to adjust the printing position. Make sure Stylus Photo R700 is selected, then click Print Position Confirmation Pattern (Windows) or Print Position Check Pattern (Macintosh). 52 Printing on the CD tray and insert it . When printing ...color, see the instructions for "Adjusting the Print Position" below and "Adjusting the Print Density" on page 54. Start EPSON Print CD. 3. Select Print from the File menu. 4. Place the check disk (or an extra CD) on CDs and DVDs Adjusting the Print Position If your RX700 or an extra CD. 1. Make sure Stylus Photo RX700...

Basics
Page 53
... Input the A distance in the Width (Right) or Right Space box. 9. The confirmation pattern is checked. You see a screen like this: Windows Macintosh Enter measurements here Enter measurements here 8. Enter the B distance in the Height (Top) or Top Space box. Click OK to the small cross... marks (distances labeled A and B as shown). Using EPSON Print CD 53 Open the File menu and select Adjust Print Position. Click Print. Make sure Enter Values (Windows) or Value Entry (Macintosh) is printed on the position check disk or CD. 6. ...
... Input the A distance in the Width (Right) or Right Space box. 9. The confirmation pattern is checked. You see a screen like this: Windows Macintosh Enter measurements here Enter measurements here 8. Enter the B distance in the Height (Top) or Top Space box. Click OK to the small cross... marks (distances labeled A and B as shown). Using EPSON Print CD 53 Open the File menu and select Adjust Print Position. Click Print. Make sure Enter Values (Windows) or Value Entry (Macintosh) is printed on the position check disk or CD. 6. ...

Basics
Page 54
... CD. 3. After the pattern is printed in EPSON Print CD to adjust color saturation. After the first pattern is selected, then click Print Density Confirmation Pattern (Windows) or Print Density Check Pattern (Macintosh). 5. You can print three density patterns on one disk. Make sure Stylus Photo R700 is printed, adjust the setting, then repeat steps...
... CD. 3. After the pattern is printed in EPSON Print CD to adjust color saturation. After the first pattern is selected, then click Print Density Confirmation Pattern (Windows) or Print Density Check Pattern (Macintosh). 5. You can print three density patterns on one disk. Make sure Stylus Photo R700 is printed, adjust the setting, then repeat steps...

Basics
Page 65
... as a Zip® drive, CD drive, or USB thumb drive (flash memory device). On other Windows systems, double-click My Computer or use your RX700 as a card reader to copy photos and other types of files from your Stylus Photo RX700 software as described on the Start Here sheet (this . Insert a memory card as described on...
... as a Zip® drive, CD drive, or USB thumb drive (flash memory device). On other Windows systems, double-click My Computer or use your RX700 as a card reader to copy photos and other types of files from your Stylus Photo RX700 software as described on the Start Here sheet (this . Insert a memory card as described on...

Basics
Page 68
... screen, use the u and d buttons select which folder to the RX700 as you 're finished copying photos from your desktop to prepare your RX700. Removing a Memory Card Once you would to print from your computer before removing the card. In Windows 2000, click Stop USB Mass Storage Device. Caution: Do not eject ...same steps as shown on your USB drive to print from the RX700. 2. In Windows XP, click Safely Remove USB Mass Storage Device. Note: In Windows 98 or Me, you may lose data on the taskbar. When you 're using Windows XP or 2000, click the Unplug or Eject Hardware icon on...
... screen, use the u and d buttons select which folder to the RX700 as you 're finished copying photos from your desktop to prepare your RX700. Removing a Memory Card Once you would to print from your computer before removing the card. In Windows 2000, click Stop USB Mass Storage Device. Caution: Do not eject ...same steps as shown on your USB drive to print from the RX700. 2. In Windows XP, click Safely Remove USB Mass Storage Device. Note: In Windows 98 or Me, you may lose data on the taskbar. When you 're using Windows XP or 2000, click the Unplug or Eject Hardware icon on...

Basics
Page 74
Aligning the Print Head If your printer settings window for each section (#1 through #4), circle the box with the least amount of ...buttons to highlight each of plain letter-size paper in section #1. 7. Press OK when done. 9. Make sure the Stylus Photo RX700 is complete. For each one. 8. Examine the printout. You see page 10). 3. Press OK again to the Setup menu. 74... Maintaining Your RX700 You may need to use the l and r buttons to align the print head. or Help button on...
Aligning the Print Head If your printer settings window for each section (#1 through #4), circle the box with the least amount of ...buttons to highlight each of plain letter-size paper in section #1. 7. Press OK when done. 9. Make sure the Stylus Photo RX700 is complete. For each one. 8. Examine the printout. You see page 10). 3. Press OK again to the Setup menu. 74... Maintaining Your RX700 You may need to use the l and r buttons to align the print head. or Help button on...

Basics
Page 76
..., you can crop your on - Make sure you carefully follow the steps on your Start Here sheet when you see your photo to connect the RX700 at the correct time in as necessary. You need to print just a portion of the printed image. screen Reference Guide. ... Manager; see your Windows help system for help. ■ If you're printing over a network, see an error message or the software doesn't install correctly on uninstalling the software. You cancelled software installation or connected the Stylus Photo RX700 before installing the software. Your Epson software may not have...
..., you can crop your on - Make sure you carefully follow the steps on your Start Here sheet when you see your photo to connect the RX700 at the correct time in as necessary. You need to print just a portion of the printed image. screen Reference Guide. ... Manager; see your Windows help system for help. ■ If you're printing over a network, see an error message or the software doesn't install correctly on uninstalling the software. You cancelled software installation or connected the Stylus Photo RX700 before installing the software. Your Epson software may not have...

Basics
Page 77
... the minimum requirements. If you're using . ■ Increase your application, or as the Windows default printer. ■ Run a nozzle check as described on page 72. You may not be cropped because Epson photo paper does not have the same proportions as the Layout setting and turn off . ■ ...memory card, select with Border as 35-mm slides. ■ If you're printing from your computer and the RX700. buttons to adjust the size of your computer. If the Stylus Photo RX700 is turned on but nothing prints, check the following: ■ Make sure the USB cable is positioned on the...
... the minimum requirements. If you're using . ■ Increase your application, or as the Windows default printer. ■ Run a nozzle check as described on page 72. You may not be cropped because Epson photo paper does not have the same proportions as the Layout setting and turn off . ■ ...memory card, select with Border as 35-mm slides. ■ If you're printing from your computer and the RX700. buttons to adjust the size of your computer. If the Stylus Photo RX700 is turned on but nothing prints, check the following: ■ Make sure the USB cable is positioned on the...

Basics
Page 79
...face-up in the rear sheet feeder. Your printout is grainy. ■ Use Epson paper for instructions. ■ The ink cartridges may be old or low on ...digital camera, check the Auto Correct and Filter settings to make sure Grayscale is off (Windows) or Color ink is faint or has gaps. ■ Clean the print head; see page 36...photos from a computer, make sure they're the ones you loaded (see page 74 for instructions. see page 72 for the paper you want to get as close as ICM or ColorSync®, to use a color management system, such as possible. see page 32). ■ If the RX700...
...face-up in the rear sheet feeder. Your printout is grainy. ■ Use Epson paper for instructions. ■ The ink cartridges may be old or low on ...digital camera, check the Auto Correct and Filter settings to make sure Grayscale is off (Windows) or Color ink is faint or has gaps. ■ Clean the print head; see page 36...photos from a computer, make sure they're the ones you loaded (see page 74 for instructions. see page 72 for the paper you want to get as close as ICM or ColorSync®, to use a color management system, such as possible. see page 32). ■ If the RX700...

Basics
Page 81
...instead. ■ If you're scanning from an application such as the TWAIN source in your application. ■ If you see your Stylus Photo RX700 in the Windows Control Panel but you cannot scan, check the following: ■ Make sure the USB cable is securely connected to the TPU port in...wipe off any remaining cleaner. Clean the scanner glass with a soft, dry, lint-free cloth (paper towels are not recommended). Scanning Problems The Stylus Photo RX700 doesn't scan film or slides. ■ Make sure you've removed the white document mat and the film holder is positioned correctly (see page...
...instead. ■ If you're scanning from an application such as the TWAIN source in your application. ■ If you see your Stylus Photo RX700 in the Windows Control Panel but you cannot scan, check the following: ■ Make sure the USB cable is securely connected to the TPU port in...wipe off any remaining cleaner. Clean the scanner glass with a soft, dry, lint-free cloth (paper towels are not recommended). Scanning Problems The Stylus Photo RX700 doesn't scan film or slides. ■ Make sure you've removed the white document mat and the film holder is positioned correctly (see page...

Basics
Page 96
...17 Restoring color, 25 to 26 Restoring default settings, 37 S Safety instructions, 70, 85 to 87 Saturation, 36 Saving files from memory cards, 65 to 67 photos on computer,...RX700 display problems, 82 safety instructions, 87 Setup problems, 75 to 76 Sharpness, 36 Sleep mode, 82 Slides printing from, 19 to 24 printing problems, 77 scanning problems, 81 scanning to memory card, 63 to 64 Slideshow, 34 Slow printing or copying, 77 Smears, 78 Software ArcSoft PhotoImpression, 84 EPSON... options, 34 W Warranty, 90 to 91 Windows, ejecting memory cards, 68 Z Zip drive, 65 to 68 Zoom In/Out, copying, ...
...17 Restoring color, 25 to 26 Restoring default settings, 37 S Safety instructions, 70, 85 to 87 Saturation, 36 Saving files from memory cards, 65 to 67 photos on computer,...RX700 display problems, 82 safety instructions, 87 Setup problems, 75 to 76 Sharpness, 36 Sleep mode, 82 Slides printing from, 19 to 24 printing problems, 77 scanning problems, 81 scanning to memory card, 63 to 64 Slideshow, 34 Slow printing or copying, 77 Smears, 78 Software ArcSoft PhotoImpression, 84 EPSON... options, 34 W Warranty, 90 to 91 Windows, ejecting memory cards, 68 Z Zip drive, 65 to 68 Zoom In/Out, copying, ...

Product Information Guide
Page 3
... mm) Left (B-L): 0.2 inch (5.0 mm) Right (B-R): 0.2 inch (5.0 mm) Bottom (C): 0.79 inch (20 mm) for Windows® and 0.12 inch (3.0 mm) for Printing Devices version 1.1; You can create borderless prints using an extended margin setting, ...Color CCD line sensor 27,200 × 37,440 pixels at 140 °F (60 °C) Humidity (without condensation) Operation 20 to 80% RH Storage* 5 to confirm print quality. Universal Serial Bus Mass Storage class Bulk-only Transport Revision 1.0 480 Mbps (high speed device) NRZI USB Series B 6.6 feet (2 meters) or less 5/05 Epson Stylus Photo RX700...
... mm) Left (B-L): 0.2 inch (5.0 mm) Right (B-R): 0.2 inch (5.0 mm) Bottom (C): 0.79 inch (20 mm) for Windows® and 0.12 inch (3.0 mm) for Printing Devices version 1.1; You can create borderless prints using an extended margin setting, ...Color CCD line sensor 27,200 × 37,440 pixels at 140 °F (60 °C) Humidity (without condensation) Operation 20 to 80% RH Storage* 5 to confirm print quality. Universal Serial Bus Mass Storage class Bulk-only Transport Revision 1.0 480 Mbps (high speed device) NRZI USB Series B 6.6 feet (2 meters) or less 5/05 Epson Stylus Photo RX700...

Product Information Guide
Page 14
...only if quality declines. 1. Epson Stylus Photo RX700 5/05 Place your scanned image: ❏ Full Auto Mode makes scanning quick and easy, with no gaps, as Adobe® Photoshop® or ArcSoft PhotoImpression.TM 3. Windows: Select Start > All Programs (or Programs) > EPSON Scan > EPSON Scan. Click the Scan button.... the location you don't see the File Save Settings window: Cleaning the Print Head Nozzles If printouts are unexpectedly light, colors are clogged, or to check the results after cleaning three or four times, turn the RX700 on at least once a month to the Setup menu...
...only if quality declines. 1. Epson Stylus Photo RX700 5/05 Place your scanned image: ❏ Full Auto Mode makes scanning quick and easy, with no gaps, as Adobe® Photoshop® or ArcSoft PhotoImpression.TM 3. Windows: Select Start > All Programs (or Programs) > EPSON Scan > EPSON Scan. Click the Scan button.... the location you don't see the File Save Settings window: Cleaning the Print Head Nozzles If printouts are unexpectedly light, colors are clogged, or to check the results after cleaning three or four times, turn the RX700 on at least once a month to the Setup menu...

Start Here Card
Page 4
... the steps on your computer, then turn on the back of this sheet (for Macintosh). Windows 1 Make sure the RX700 is not connected to your computer. You can't install your software that way. 2 Insert your RX700 software CD-ROM in the rear sheet feeder. 5 Install Software and Connect to 10.3.x. Note:... See your CD, click Cancel. Note: If you're using Windows XP and you see a message asking what to do with Windows® 98SE, Me, 2000, and XP, ...
... the steps on your computer, then turn on the back of this sheet (for Macintosh). Windows 1 Make sure the RX700 is not connected to your computer. You can't install your software that way. 2 Insert your RX700 software CD-ROM in the rear sheet feeder. 5 Install Software and Connect to 10.3.x. Note:... See your CD, click Cancel. Note: If you're using Windows XP and you see a message asking what to do with Windows® 98SE, Me, 2000, and XP, ...

Start Here Card
Page 5
...test page, if desired. Now you see this screen, do the following: Windows XP: Click Start > My Computer. 3 When you 're ready to copy, scan, and print. Then double-click the Epson CD-ROM icon. Macintosh 1 Insert your RX700 software CD-ROM into any available USB port on your screen. 5 When... you see the Product Registration screen, register your RX700 as prompted. click the Epson installer icon. You see this screen, click Install. My Computer. Several messages display on your on the screen to continue the ...
...test page, if desired. Now you see this screen, do the following: Windows XP: Click Start > My Computer. 3 When you 're ready to copy, scan, and print. Then double-click the Epson CD-ROM icon. Macintosh 1 Insert your RX700 software CD-ROM into any available USB port on your screen. 5 When... you see the Product Registration screen, register your RX700 as prompted. click the Epson installer icon. You see this screen, click Install. My Computer. Several messages display on your on the screen to continue the ...


