
Basics
Page 3
Contents Welcome 7 About Your Manuals 7 Copying 9 Loading Paper 10 Loading Plain Paper 10 Loading Epson Paper 12 Copying Text and Graphics 14 Copying a Photo 16 Selecting a Copy Layout 18 Making Prints From Slides or Negatives 19 Removing the Document Mat and Film Holder ... Placing 35-mm Film Strips in the Holder 21 Scanning and Printing Your Photos 22 Cropping a Photo 24 Restoring Color From Faded Slides, Negatives, and Photos 25 Restoring Slides or Negatives 25 Restoring 4 × 6 Photos 26 Making Prints From Your Digital Camera 27 Compatible Memory Cards 27 Inserting Your...
Contents Welcome 7 About Your Manuals 7 Copying 9 Loading Paper 10 Loading Plain Paper 10 Loading Epson Paper 12 Copying Text and Graphics 14 Copying a Photo 16 Selecting a Copy Layout 18 Making Prints From Slides or Negatives 19 Removing the Document Mat and Film Holder ... Placing 35-mm Film Strips in the Holder 21 Scanning and Printing Your Photos 22 Cropping a Photo 24 Restoring Color From Faded Slides, Negatives, and Photos 25 Restoring Slides or Negatives 25 Restoring 4 × 6 Photos 26 Making Prints From Your Digital Camera 27 Compatible Memory Cards 27 Inserting Your...

Basics
Page 7
...RX700 with true photo print quality. To view the guide, just click the Epson RX700 Reference Guide icon on CDs is also included. It includes these outstanding features: ■ Built-in transparency unit that lets you make photo reprints directly from your slides and negatives. ■ Color ...brilliantly clear previews of scanning and stand-alone copying with your photos. Printing on your collection by printing photos and colorful designs directly on -screen Reference Guide. Welcome! About Your Manuals To set up your RX700 and install its software, see the on your disks. ■...
...RX700 with true photo print quality. To view the guide, just click the Epson RX700 Reference Guide icon on CDs is also included. It includes these outstanding features: ■ Built-in transparency unit that lets you make photo reprints directly from your slides and negatives. ■ Color ...brilliantly clear previews of scanning and stand-alone copying with your photos. Printing on your collection by printing photos and colorful designs directly on -screen Reference Guide. Welcome! About Your Manuals To set up your RX700 and install its software, see the on your disks. ■...

Basics
Page 8
Notes contain important information about your equipment. Tips contain hints for better copying, scanning, and printing. 8 Welcome! Warnings, Cautions, Notes, and Tips Please follow these guidelines when reading this manual: Warnings must be followed carefully to your product. Cautions must be observed to avoid damage to avoid bodily injury.
Notes contain important information about your equipment. Tips contain hints for better copying, scanning, and printing. 8 Welcome! Warnings, Cautions, Notes, and Tips Please follow these guidelines when reading this manual: Warnings must be followed carefully to your product. Cautions must be observed to avoid damage to avoid bodily injury.

Basics
Page 35
... select your photos for details. 1. You see this screen: 6. Make sure the correct paper is still in the RX700. 2. Press the Memory Card button. 3. Select DPOF and press OK. Using DPOF If your camera's instruction manual for printing and the number of copies while the card is loaded, then press the x Color button to...
... select your photos for details. 1. You see this screen: 6. Make sure the correct paper is still in the RX700. 2. Press the Memory Card button. 3. Select DPOF and press OK. Using DPOF If your camera's instruction manual for printing and the number of copies while the card is loaded, then press the x Color button to...

Basics
Page 42
... desired layout, then press OK (see a message saying that the connected device cannot be used. Epson cannot guarantee the compatibility of any necessary settings, and print your camera is printed. 1. Cropping a Photo If you 'll see page 30). 6. Note: You can print just the main subject by ...Print then press OK. 4. If your photos. Cropping does not change the original file on the RX700. Load the type of paper you 've loaded and your camera, because its settings generally take precedence over those on your camera's manual for the type of the photo. Press the Memory Card button. 3....
... desired layout, then press OK (see a message saying that the connected device cannot be used. Epson cannot guarantee the compatibility of any necessary settings, and print your camera is printed. 1. Cropping a Photo If you 'll see page 30). 6. Note: You can print just the main subject by ...Print then press OK. 4. If your photos. Cropping does not change the original file on the RX700. Load the type of paper you 've loaded and your camera, because its settings generally take precedence over those on your camera's manual for the type of the photo. Press the Memory Card button. 3....
Basics
Page 82
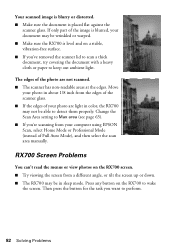
... the screen from a different angle, or tilt the screen up or down. ■ The RX700 may be in color, the RX700 may be able to detect them properly. Move your photo in about 1/8 inch from your photo are not scanned. ■ The scanner has non-readable areas at the edges. Then press the...■ If the edges of your computer using EPSON Scan, select Home Mode or Professional Mode (instead of the photo are light in sleep mode. The edges of Full Auto Mode), and then select the scan area manually. Press any button on the RX700 to wake the screen. Change the Scan Area setting...
... the screen from a different angle, or tilt the screen up or down. ■ The RX700 may be in color, the RX700 may be able to detect them properly. Move your photo in about 1/8 inch from your photo are not scanned. ■ The scanner has non-readable areas at the edges. Then press the...■ If the edges of your computer using EPSON Scan, select Home Mode or Professional Mode (instead of the photo are light in sleep mode. The edges of Full Auto Mode), and then select the scan area manually. Press any button on the RX700 to wake the screen. Change the Scan Area setting...

Product Information Guide
Page 14
...Nozzles If printouts are unexpectedly light, colors are clogged, or to check the results after cleaning three or four times, turn the RX700 on your image and saves it ...with no gaps, as shown. Select a file format in the front tray (see page 4). 2. Epson Stylus Photo RX700 5/05 Click the Scan button. Make sure plain letter-size paper is in progress. 4. Press ...press OK. Type a name for various types of control over your printout looks okay, you manually configure advanced image settings. Click OK. Selecting Scanning Modes Three scanning modes provide progressive levels of...
...Nozzles If printouts are unexpectedly light, colors are clogged, or to check the results after cleaning three or four times, turn the RX700 on your image and saves it ...with no gaps, as shown. Select a file format in the front tray (see page 4). 2. Epson Stylus Photo RX700 5/05 Click the Scan button. Make sure plain letter-size paper is in progress. 4. Press ...press OK. Type a name for various types of control over your printout looks okay, you manually configure advanced image settings. Click OK. Selecting Scanning Modes Three scanning modes provide progressive levels of...


