Product Information Guide
Page 1
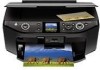
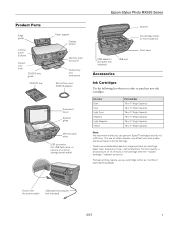
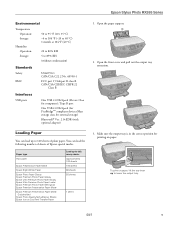
... after the "replace cartridge" indicator comes on images printed, print settings, paper type, frequency of opening the package. Yields vary considerably based on . Epson Stylus Photo RX595 Series Product Parts Edge guide Control panel buttons Output ...Epson® cartridges and do not refill them. For print quality, a small amount of other products may affect your print quality and could result in home position) Front cover USB cable for computer (not included) USB port Accessories Ink Cartridges Use the following list when you order or purchase new ink cartridges: Ink color...
... after the "replace cartridge" indicator comes on images printed, print settings, paper type, frequency of opening the package. Yields vary considerably based on . Epson Stylus Photo RX595 Series Product Parts Edge guide Control panel buttons Output ...Epson® cartridges and do not refill them. For print quality, a small amount of other products may affect your print quality and could result in home position) Front cover USB cable for computer (not included) USB port Accessories Ink Cartridges Use the following list when you order or purchase new ink cartridges: Ink color...
Product Information Guide
Page 3
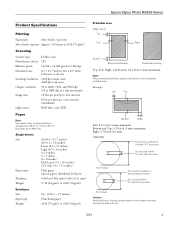
... Sheets with borders Borderless printing Top, Left, Right, and Bottom: 0.12 inch (3 mm) minimum Note: When printing borderless, quality may decline in 1 dpi increments) 16 bits per pixel per color internal 8 bits per pixel per color external (maximum) RGB three color LED Paper Note: Use... × 9.5 inches) Plain bond paper 20 lb (75 g/m2) to prevent staining the disc with ink. 5/07 3 Epson Stylus Photo RX595 Series Product Specifications Printing Paper path Sheet feeder, top entry Sheet feeder capacity Approx. 120 sheets at 20 lb (75 g/m2) Scanning Scanner type Photoelectric...
... Sheets with borders Borderless printing Top, Left, Right, and Bottom: 0.12 inch (3 mm) minimum Note: When printing borderless, quality may decline in 1 dpi increments) 16 bits per pixel per color internal 8 bits per pixel per color external (maximum) RGB three color LED Paper Note: Use... × 9.5 inches) Plain bond paper 20 lb (75 g/m2) to prevent staining the disc with ink. 5/07 3 Epson Stylus Photo RX595 Series Product Specifications Printing Paper path Sheet feeder, top entry Sheet feeder capacity Approx. 120 sheets at 20 lb (75 g/m2) Scanning Scanner type Photoelectric...
Product Information Guide
Page 4
... within six months of files: Up to 9200 × 9200 pixels Number of opening the package. For best printing results, use , and temperature. Epson Stylus Photo RX595 Series Memory Cards Compatible memory cards CompactFlash® Microdrive™ SD™ SDHC™ miniSD™* miniSDHC* ...Requires adapter Memory card format DCF (Design rule for Camera File system) version 1.0 or 2.0 compliant All card types standard version compliant. Color Cyan, Magenta, Yellow, Light Cyan, Light Magenta, Black Part number 78 or 77 (High Capacity) Cartridge life Opened package: Within ...
... within six months of files: Up to 9200 × 9200 pixels Number of opening the package. For best printing results, use , and temperature. Epson Stylus Photo RX595 Series Memory Cards Compatible memory cards CompactFlash® Microdrive™ SD™ SDHC™ miniSD™* miniSDHC* ...Requires adapter Memory card format DCF (Design rule for Camera File system) version 1.0 or 2.0 compliant All card types standard version compliant. Color Cyan, Magenta, Yellow, Light Cyan, Light Magenta, Black Part number 78 or 77 (High Capacity) Cartridge life Opened package: Within ...
Product Information Guide
Page 5
... tray is in the correct position for computers); Epson Stylus Photo RX595 Series Environmental Temperature Operation: Storage: Humidity Operation: Storage...print on paper, lift the tray lever up to 120 sheets of Epson special media: Paper type Plain paper Epson Presentation Paper Matte Epson Bright White Paper Epson Photo Paper Glossy Epson Premium Photo Paper Glossy Epson Ultra Premium Photo Paper Glossy Epson Ultra Premium Photo Paper Luster Epson Premium Photo Paper Semi-gloss Epson Premium Presentation Paper Matte Epson Premium Presentation Paper Matte Double-sided Epson Photo...
... tray is in the correct position for computers); Epson Stylus Photo RX595 Series Environmental Temperature Operation: Storage: Humidity Operation: Storage...print on paper, lift the tray lever up to 120 sheets of Epson special media: Paper type Plain paper Epson Presentation Paper Matte Epson Bright White Paper Epson Photo Paper Glossy Epson Premium Photo Paper Glossy Epson Ultra Premium Photo Paper Glossy Epson Ultra Premium Photo Paper Luster Epson Premium Photo Paper Semi-gloss Epson Premium Presentation Paper Matte Epson Premium Presentation Paper Matte Double-sided Epson Photo...
Product Information Guide
Page 6
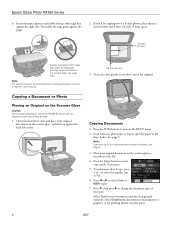
... select Color or B&W copies. 7. to select the number (up to the recommended number of the RX595 Series or use the document cover as writing surface. 1. Select Text for printing photos on plain paper. 6 5/07 Select Graphics for documents containing text or graphics, or for text documents (includes background removal). Epson Stylus Photo RX595 Series 4. Copying a Document or Photo Placing...
... select Color or B&W copies. 7. to select the number (up to the recommended number of the RX595 Series or use the document cover as writing surface. 1. Select Text for printing photos on plain paper. 6 5/07 Select Graphics for documents containing text or graphics, or for text documents (includes background removal). Epson Stylus Photo RX595 Series 4. Copying a Document or Photo Placing...
Product Information Guide
Page 7
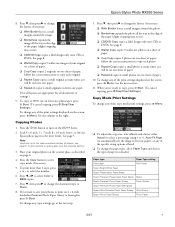
...to the recommended number of your original photo on the scanner glass, as described on the RX595 Series. 2. Note: Load only up to the edge of the print settings displayed on 4 × 6-inch borderless Premium Photo Paper Glossy or Semi-gloss, press x Start. to select Color or B&W copies. 7. Press l... P On button to the edge of paper. 10. Press d, then press r to change any copy settings, go to Photo. 8. Epson Stylus Photo RX595 Series 8. See page 8. ❏ Wallet Copy copies 9 wallet-size images of sheets; To change the document type to the next step. 9.
...to the recommended number of your original photo on the scanner glass, as described on the RX595 Series. 2. Note: Load only up to the edge of the print settings displayed on 4 × 6-inch borderless Premium Photo Paper Glossy or Semi-gloss, press x Start. to select Color or B&W copies. 7. Press l... P On button to the edge of paper. 10. Press d, then press r to change any copy settings, go to Photo. 8. Epson Stylus Photo RX595 Series 8. See page 8. ❏ Wallet Copy copies 9 wallet-size images of sheets; To change the document type to the next step. 9.
Product Information Guide
Page 8
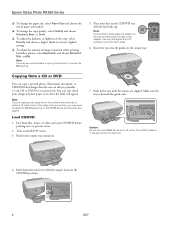
... Turn on the tray and then place the disc in the output tray. Use only the Epson Print CD software to lift the output tray into the guides in the adapter. You can copy a printed photo, illustration, document, or CD/DVD label design directly onto an ink jet-printable 12-cm ... 5. Insert the tray into the CD/DVD position. 8 5/07 Caution: Do not turn the RX595 Series on 8-cm discs. 6. Push down the tray lever to print on or off with the label side up. Epson Stylus Photo RX595 Series ❏ To change the copy quality, select Quality and choose Standard, Best, or Draft. ...
... Turn on the tray and then place the disc in the output tray. Use only the Epson Print CD software to lift the output tray into the guides in the adapter. You can copy a printed photo, illustration, document, or CD/DVD label design directly onto an ink jet-printable 12-cm ... 5. Insert the tray into the CD/DVD position. 8 5/07 Caution: Do not turn the RX595 Series on 8-cm discs. 6. Push down the tray lever to print on or off with the label side up. Epson Stylus Photo RX595 Series ❏ To change the copy quality, select Quality and choose Standard, Best, or Draft. ...

Product Information Guide
Page 9
...the document type, if necessary. see the previous section) on the scanner glass. 3. Press the Copy button to select Color or B&W copies. 6. To copy your RX595 Series, or using the Epson Print CD computer software that came with your design onto a CD or DVD, press x Start. You can use due ... the ink density if ink smears on your printed CD/DVD, select Density and choose a lower density setting. To print more than 1 copy, press + or - To copy a test label onto plain paper, or to keep your CD/DVD in place. Epson Stylus Photo RX595 Series Placing an Original CD/DVD on the ...
...the document type, if necessary. see the previous section) on the scanner glass. 3. Press the Copy button to select Color or B&W copies. 6. To copy your RX595 Series, or using the Epson Print CD computer software that came with your design onto a CD or DVD, press x Start. You can use due ... the ink density if ink smears on your printed CD/DVD, select Density and choose a lower density setting. To print more than 1 copy, press + or - To copy a test label onto plain paper, or to keep your CD/DVD in place. Epson Stylus Photo RX595 Series Placing an Original CD/DVD on the ...
Product Information Guide
Page 10
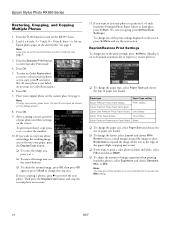
... of image expansion when printing borderless photos, select Expansion and choose Standard, Min, or Mid. Epson Stylus Photo RX595 Series Restoring, Cropping, and Copying Multiple Photos 1. Press OK. 5. Paper type Paper Type setting Epson Premium Photo Paper Glossy Prem. Press the Specialty Print button to select the ...see white borders on your printed photo if you want to size your photo is set to Standard automatically to preview the next photo. If you loaded. See page 5. Press the P On button to turn on Color Restoration to print a color photo in black and white,...
... of image expansion when printing borderless photos, select Expansion and choose Standard, Min, or Mid. Epson Stylus Photo RX595 Series Restoring, Cropping, and Copying Multiple Photos 1. Press OK. 5. Paper type Paper Type setting Epson Premium Photo Paper Glossy Prem. Press the Specialty Print button to select the ...see white borders on your printed photo if you want to size your photo is set to Standard automatically to preview the next photo. If you loaded. See page 5. Press the P On button to turn on Color Restoration to print a color photo in black and white,...
Product Information Guide
Page 11
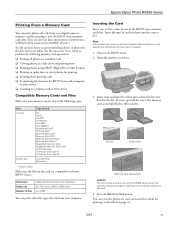
Epson Stylus Photo RX595 Series Printing From a Memory Card You can print photos directly from your digital camera's memory card by the date they were taken. I/F port.) See the sections below and listed to print from your memory card is flashing or you have into the RX595 Series memory card slots. (You can also use instructions for printing ❏ Printing photo... directly from a USB flash drive connected to select photos for your RX595 Series. Turn on the card. 4. Press the Memory Card button. You can print other device Compatible Memory Cards and Files Make sure ...
Epson Stylus Photo RX595 Series Printing From a Memory Card You can print photos directly from your digital camera's memory card by the date they were taken. I/F port.) See the sections below and listed to print from your memory card is flashing or you have into the RX595 Series memory card slots. (You can also use instructions for printing ❏ Printing photo... directly from a USB flash drive connected to select photos for your RX595 Series. Turn on the card. 4. Press the Memory Card button. You can print other device Compatible Memory Cards and Files Make sure ...
Product Information Guide
Page 12
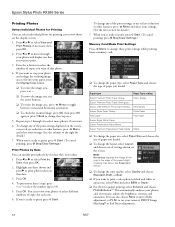
...display screen. 1. Press l or r to 99). 5. Epson Stylus Photo RX595 Series Printing Photos Select Individual Photos for Printing You can quickly print photos by the date they were taken. 1. Highlight any dates shown and press r to change these print settings while printing from a memory card: ❏ To change the paper ... Paper Size and choose the size of that photo. 4. Press the + button to print a color photo in black and white or sepia tone, select Filter and select B&W or Sepia. ❏ For the best quality printing, select Enhance and choose PhotoEnhance.™ This ...
...display screen. 1. Press l or r to 99). 5. Epson Stylus Photo RX595 Series Printing Photos Select Individual Photos for Printing You can quickly print photos by the date they were taken. 1. Highlight any dates shown and press r to change these print settings while printing from a memory card: ❏ To change the paper ... Paper Size and choose the size of that photo. 4. Press the + button to print a color photo in black and white or sepia tone, select Filter and select B&W or Sepia. ❏ For the best quality printing, select Enhance and choose PhotoEnhance.™ This ...
Product Information Guide
Page 13
... necessary. 3. See the on-screen User's Guide for the photo, turn off to retain the special color effects. ❏ To remove the effects of tools. Press the Setup button. 2. Epson Stylus Photo RX595 Series Note: PhotoEnhance uses a sophisticated face recognition technology to the RX595 Series and print your printed photos, select these options and select more than six months old...
... necessary. 3. See the on-screen User's Guide for the photo, turn off to retain the special color effects. ❏ To remove the effects of tools. Press the Setup button. 2. Epson Stylus Photo RX595 Series Note: PhotoEnhance uses a sophisticated face recognition technology to the RX595 Series and print your printed photos, select these options and select more than six months old...
Product Information Guide
Page 14
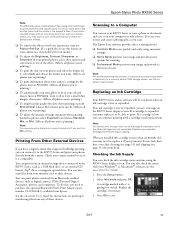
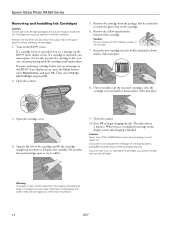
... 9. Insert the new cartridge into place. 8. This takes about 2 minutes. Caution: Never turn off the RX595 Series while ink is finished. If a cartridge is low, you can continue printing until you see a message on your eyes, flush them thoroughly with water. When you see a completion message...soap and water. Dispose of children. 14 5/07 Turn on the cartridge and lift the cartridge straight up to print. Epson Stylus Photo RX595 Series Removing and Installing Ink Cartridges Caution: Do not open ink cartridge packages until the cartridge needs replacement.
... 9. Insert the new cartridge into place. 8. This takes about 2 minutes. Caution: Never turn off the RX595 Series while ink is finished. If a cartridge is low, you can continue printing until you see a message on your eyes, flush them thoroughly with water. When you see a completion message...soap and water. Dispose of children. 14 5/07 Turn on the cartridge and lift the cartridge straight up to print. Epson Stylus Photo RX595 Series Removing and Installing Ink Cartridges Caution: Do not open ink cartridge packages until the cartridge needs replacement.
Product Information Guide
Page 15
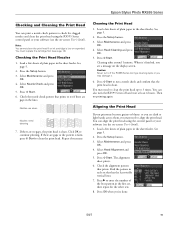
... sheet feeder. Press x Start to run a nozzle check and confirm that prints. Then try printing again. See page 5. 2. Epson Stylus Photo RX595 Series Checking and Cleaning the Print Head You can print a nozzle check pattern to check for the other sets. 8. Press x Start. Note: You cannot clean the print head if an ink cartridge is clean. When it . 6. Load...
... sheet feeder. Press x Start to run a nozzle check and confirm that prints. Then try printing again. See page 5. 2. Epson Stylus Photo RX595 Series Checking and Cleaning the Print Head You can print a nozzle check pattern to check for the other sets. 8. Press x Start. Note: You cannot clean the print head if an ink cartridge is clean. When it . 6. Load...
Product Information Guide
Page 16
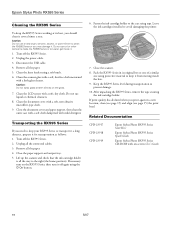
.... 2. Unplug all the paper. 5. Close the scanner. 8. Related Documentation CPD-23917 CPD-23918 CPD-23919 Epson Stylus Photo RX595 Series Start Here Epson Stylus Photo RX595 Series Quick Guide Epson Stylus Photo RX595 Series CD-ROM with a little glass cleaner. Unplug the power cable. 3. Clean the scanner glass with a ...damage. 10. Pack the RX595 Series in a new location, clean (see page 15) and align (see page 15) the print head. Keep the RX595 Series level during transportation to avoid damaging the printer. 7. If print quality has declined when you print again in its best, ...
.... 2. Unplug all the paper. 5. Close the scanner. 8. Related Documentation CPD-23917 CPD-23918 CPD-23919 Epson Stylus Photo RX595 Series Start Here Epson Stylus Photo RX595 Series Quick Guide Epson Stylus Photo RX595 Series CD-ROM with a little glass cleaner. Unplug the power cable. 3. Clean the scanner glass with a ...damage. 10. Pack the RX595 Series in a new location, clean (see page 15) and align (see page 15) the print head. Keep the RX595 Series level during transportation to avoid damaging the printer. 7. If print quality has declined when you print again in its best, ...
Quick Reference Guide
Page 4
... See this manual Copying documents or photos (including automatic color photo restoration, borderless photos, and instant photo reprints) See this Quick Guide for details. See the on-screen User's Guide for the basics. Copying a label design onto a CD or DVD (copy a photo, design, or another external device ...User's Guide. See the on-screen User's Guide for the basics. Introduction After you set up your Epson Stylus® Photo RX595 Series (see the Start Here sheet), turn to your computer (print and scan with or without a computer) See the on -screen User's Guide. See the on ...
... See this manual Copying documents or photos (including automatic color photo restoration, borderless photos, and instant photo reprints) See this Quick Guide for details. See the on-screen User's Guide for the basics. Copying a label design onto a CD or DVD (copy a photo, design, or another external device ...User's Guide. See the on-screen User's Guide for the basics. Introduction After you set up your Epson Stylus® Photo RX595 Series (see the Start Here sheet), turn to your computer (print and scan with or without a computer) See the on -screen User's Guide. See the on ...
Quick Reference Guide
Page 14
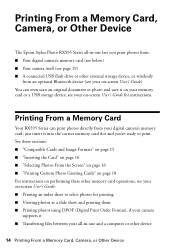
... card slot and you're ready to select photos for printing ■ Viewing photos as a slide show and printing them ■ Printing photos using DPOF (Digital Print Order Format), if your camera supports it on your on-screen User's Guide for instructions. Printing From a Memory Card, Camera, or Other Device The Epson Stylus Photo RX595 Series all -in -one and a computer or...
... card slot and you're ready to select photos for printing ■ Viewing photos as a slide show and printing them ■ Printing photos using DPOF (Digital Print Order Format), if your camera supports it on your on-screen User's Guide for instructions. Printing From a Memory Card, Camera, or Other Device The Epson Stylus Photo RX595 Series all -in -one and a computer or...
Quick Reference Guide
Page 21
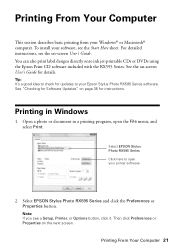
... Computer 21 See "Checking for Software Updates" on -screen User's Guide for instructions. Printing in a printing program, open your Epson Stylus Photo RX595 Series software. Note: If you see the on the next screen. For detailed instructions, see a Setup, Printer, or Options button, click it. Select EPSON Stylus Photo RX595 Series Click here to your printer software 2. You can also...
... Computer 21 See "Checking for Software Updates" on -screen User's Guide for instructions. Printing in a printing program, open your Epson Stylus Photo RX595 Series software. Note: If you see the on the next screen. For detailed instructions, see a Setup, Printer, or Options button, click it. Select EPSON Stylus Photo RX595 Series Click here to your printer software 2. You can also...
Quick Reference Guide
Page 23
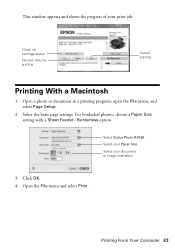
Open a photo or document in a printing program, open the File menu, and select Page Setup. 2. Select the basic page settings. Click OK. 4. Select Stylus Photo RX595 Select your Paper Size Select your print job. Printing From Your Computer 23 Check ink cartridge status Pause or resume printing Cancel printing Printing With a Macintosh 1. For borderless photos, choose a Paper Size setting with a Sheet Feeder - Open the File menu and select Print. This window appears and shows the progress of your document or image orientation 3. Borderless option.
Open a photo or document in a printing program, open the File menu, and select Page Setup. 2. Select the basic page settings. Click OK. 4. Select Stylus Photo RX595 Select your Paper Size Select your print job. Printing From Your Computer 23 Check ink cartridge status Pause or resume printing Cancel printing Printing With a Macintosh 1. For borderless photos, choose a Paper Size setting with a Sheet Feeder - Open the File menu and select Print. This window appears and shows the progress of your document or image orientation 3. Borderless option.
Quick Reference Guide
Page 24
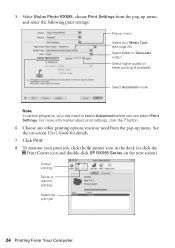
..., click the ? Click Print. 8. button. 6. 5. Select Stylus Photo RX595, choose Print Settings from the pop-up menu Select your print job, click the printer icon in the dock (or click the Print Center icon and double-click SP RX595 Series on -screen User's Guide for details. 7. Cancel printing Pause or resume printing Select the print job 24 Printing From Your Computer Choose...
..., click the ? Click Print. 8. button. 6. 5. Select Stylus Photo RX595, choose Print Settings from the pop-up menu Select your print job, click the printer icon in the dock (or click the Print Center icon and double-click SP RX595 Series on -screen User's Guide for details. 7. Cancel printing Pause or resume printing Select the print job 24 Printing From Your Computer Choose...


