
Technical Brief (Ink Jet Printers)
Page 1
... shadows, with smooth transitions and true photographic image quality Epson's core printing technologies work together to produce greater detail in photos and sharper text and line art High Quality Halftoning Generates fast, color-accurate results with higher optical density and contrast Better &#... on the core technologies used in Epson printers and all ink solution. Print Quality-Core Printing Technologies The core technologies used in Epson ink jet printers work together to produce brilliant Photo Quality color, sharp text, and incredible print speeds Small Ink Droplet Size Small ink...
... shadows, with smooth transitions and true photographic image quality Epson's core printing technologies work together to produce greater detail in photos and sharper text and line art High Quality Halftoning Generates fast, color-accurate results with higher optical density and contrast Better &#... on the core technologies used in Epson printers and all ink solution. Print Quality-Core Printing Technologies The core technologies used in Epson ink jet printers work together to produce brilliant Photo Quality color, sharp text, and incredible print speeds Small Ink Droplet Size Small ink...

Technical Brief (Ink Jet Printers)
Page 2
... to have fast print speeds without having to improve color ranges and accuracy because Epson printers can produce high print quality without sacrificing print speed and without increasing the number of a photograph. Here's how it compares to thermal ink jet technology, used in photos and laser sharp text. Epson MicroPiezo Technology: Epson Micro Piezo print heads use...
... to have fast print speeds without having to improve color ranges and accuracy because Epson printers can produce high print quality without sacrificing print speed and without increasing the number of a photograph. Here's how it compares to thermal ink jet technology, used in photos and laser sharp text. Epson MicroPiezo Technology: Epson Micro Piezo print heads use...

Technical Brief (Ink Jet Printers)
Page 3
... as halftoning, that produces fast, high-quality, color-accurate output. High Quality Halftoning: Every ink jet printer uses a method referred to get sharp black text, superb photo quality photos, or both on the Epson ink sets in those marks. Other product names used , the best possibly print quality is a professional photographer staking his reputation on...
... as halftoning, that produces fast, high-quality, color-accurate output. High Quality Halftoning: Every ink jet printer uses a method referred to get sharp black text, superb photo quality photos, or both on the Epson ink sets in those marks. Other product names used , the best possibly print quality is a professional photographer staking his reputation on...
Basics Guide
Page 2
...Epson, Epson Stylus, PRINT Image Matching, and the PRINT Image Matching logo are registered trademarks and Claria, Exceed Your Vision, USB DIRECT-PRINT, and the USB DIRECTPRINT logo are trademarks of copyrighted material in certain circumstances, those marks. © 2006 Epson America, Inc. 7/06 2 Epson disclaims any Epson product. Epson...identification purposes only and may not be trademarks of this Epson product. xD-Picture Card is a trademark. RPM is a registered trademark, Photo Enhance is a trademark, and Epson Connection is not responsible for any damages or problems ...
...Epson, Epson Stylus, PRINT Image Matching, and the PRINT Image Matching logo are registered trademarks and Claria, Exceed Your Vision, USB DIRECT-PRINT, and the USB DIRECTPRINT logo are trademarks of copyrighted material in certain circumstances, those marks. © 2006 Epson America, Inc. 7/06 2 Epson disclaims any Epson product. Epson...identification purposes only and may not be trademarks of this Epson product. xD-Picture Card is a trademark. RPM is a registered trademark, Photo Enhance is a trademark, and Epson Connection is not responsible for any damages or problems ...
Basics Guide
Page 3
... 5 Using the RX580 Control Panel 6 Loading Paper 7 Using Special Papers 10 Copying a Photo or Document 12 Placing the Original on the Glass 12 Copying Documents 14 Copying Photos 15 Selecting Copy Settings 16 Reprinting Photos and Restoring Color 18 Printing From a Memory Card 20 Compatible Cards and Image Formats 21 Inserting the Card 22 Printing From a USB...
... 5 Using the RX580 Control Panel 6 Loading Paper 7 Using Special Papers 10 Copying a Photo or Document 12 Placing the Original on the Glass 12 Copying Documents 14 Copying Photos 15 Selecting Copy Settings 16 Reprinting Photos and Restoring Color 18 Printing From a Memory Card 20 Compatible Cards and Image Formats 21 Inserting the Card 22 Printing From a USB...

Basics Guide
Page 4
... Document 63 Scanning to Your Computer 63 Scanning to a Memory Card 66 Backing Up Your Photos 67 Maintaining Your RX580 69 Checking the Print Head Nozzles 69 Cleaning the Print Head 70 Replacing Ink Cartridges 71 Aligning the Print Head 77 Solving Problems 78 Error Messages 78 Problems and Solutions 79 Where To Get Help...
... Document 63 Scanning to Your Computer 63 Scanning to a Memory Card 66 Backing Up Your Photos 67 Maintaining Your RX580 69 Checking the Print Head Nozzles 69 Cleaning the Print Head 70 Replacing Ink Cartridges 71 Aligning the Print Head 77 Solving Problems 78 Error Messages 78 Problems and Solutions 79 Where To Get Help...
Basics Guide
Page 5
... a quick copy of a document or photo ■ Restore color in faded photos ■ Print photos stored on a memory card ■ Print photos directly from your camera, mobile phone, or PDA ■ Print on CDs or DVDs ■ Print a basic document or photo from your computer ■ Scan a document or photo ■ Back up your Epson Stylus® Photo RX580 all-in-one as you connect...
... a quick copy of a document or photo ■ Restore color in faded photos ■ Print photos stored on a memory card ■ Print photos directly from your camera, mobile phone, or PDA ■ Print on CDs or DVDs ■ Print a basic document or photo from your computer ■ Scan a document or photo ■ Back up your Epson Stylus® Photo RX580 all-in-one as you connect...

Basics Guide
Page 6
... also see a green light rotate around the Mode buttons. Using the RX580 Control Panel Copy a photo or document View and print photos on CD/DVDs; backup photos; crop or zoom a photo Print on card; make PictBridge® or Bluetooth® settings Stop printing or copying; reprint or restore photos; print photo greeting cards Check ink status; scan to card Display 1 or...
... also see a green light rotate around the Mode buttons. Using the RX580 Control Panel Copy a photo or document View and print photos on CD/DVDs; backup photos; crop or zoom a photo Print on card; make PictBridge® or Bluetooth® settings Stop printing or copying; reprint or restore photos; print photo greeting cards Check ink status; scan to card Display 1 or...

Basics Guide
Page 7
Open the paper support, then pull up the extension. 2. Loading Paper 7 For example, photos look , so make sure you are just making a copy or printing a rough draft, plain paper is fine. Loading Paper The type of Epson papers and ordering information. 1. See page 10 for your printer. Open the front cover. However, for the best results, use one of Epson's special ink jet papers designed for a list of paper you choose affects the way your job. If you select the correct paper for your printouts look great printed on Epson® Ultra Premium Photo Paper Glossy.
Open the paper support, then pull up the extension. 2. Loading Paper 7 For example, photos look , so make sure you are just making a copy or printing a rough draft, plain paper is fine. Loading Paper The type of Epson papers and ordering information. 1. See page 10 for your printer. Open the front cover. However, for the best results, use one of Epson's special ink jet papers designed for a list of paper you choose affects the way your job. If you select the correct paper for your printouts look great printed on Epson® Ultra Premium Photo Paper Glossy.

Basics Guide
Page 9
... against the right edge. The printable side is often whiter or brighter than the other side. Always load paper short edge first, even for landscape printing. Loading Paper 9 Make sure the paper lies beneath the tabs. 4 × 6-inch, 5 × 7-inch Letter-size, 8 × 10-inch You can load up to 20... information and instructions on loading envelopes, see your onscreen User's Guide. 5. Make sure the paper stack fits under the arrow inside the left edge of photo paper. Insert the paper, printable side up to 120 sheets of plain paper or up , against the left edge guide. 6.
... against the right edge. The printable side is often whiter or brighter than the other side. Always load paper short edge first, even for landscape printing. Loading Paper 9 Make sure the paper lies beneath the tabs. 4 × 6-inch, 5 × 7-inch Letter-size, 8 × 10-inch You can load up to 20... information and instructions on loading envelopes, see your onscreen User's Guide. 5. Make sure the paper stack fits under the arrow inside the left edge of photo paper. Insert the paper, printable side up to 120 sheets of plain paper or up , against the left edge guide. 6.

Basics Guide
Page 11
... inches) * The availability of ozone. ■ As with Epson papers for prints that will minimize color changes and lengthen display life: ■ Frame prints under glass or a protective plastic sleeve to protect them from your RX580 will last for your printer provide the ultimate combination of photo quality and longevity when used with all photographs, keep...
... inches) * The availability of ozone. ■ As with Epson papers for prints that will minimize color changes and lengthen display life: ■ Frame prints under glass or a protective plastic sleeve to protect them from your RX580 will last for your printer provide the ultimate combination of photo quality and longevity when used with all photographs, keep...
Basics Guide
Page 14
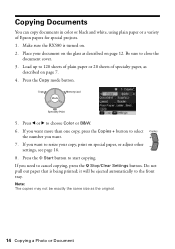
Make sure the RX580 is being printed; Be sure to choose Color or B&W. 6. Press l or r to close the document cover. 3. If you want more than one copy, press the Copies + button to resize your document on the glass as the original. 14 Copying a Photo or Document Do not pull out paper that is... copies may not be ejected automatically to 120 sheets of plain paper or 20 sheets of Epson papers for special projects. 1. If you need to start copying. Press the Copy mode button. 5. Place your copy, print on page 12. Load up to the front tray. Press the x Start button to...
Make sure the RX580 is being printed; Be sure to choose Color or B&W. 6. Press l or r to close the document cover. 3. If you want more than one copy, press the Copies + button to resize your document on the glass as the original. 14 Copying a Photo or Document Do not pull out paper that is... copies may not be ejected automatically to 120 sheets of plain paper or 20 sheets of Epson papers for special projects. 1. If you need to start copying. Press the Copy mode button. 5. Place your copy, print on page 12. Load up to the front tray. Press the x Start button to...

Basics Guide
Page 15
...settings are automatically selected when you copy photos: Borderless prints, automatically sized to fit on 4 × 6-inch Premium Photo Paper Glossy. ■ If you want to copy using 4 × 6 Epson Premium Photo Paper Glossy. See page 17 for more information. ■ The RX580 remembers your settings, even after you... You can copy a photograph on page 12. Load your photo paper, as described on 4 × 6, 5 × 7, 8 × 10, or 8.5 × 11-inch paper. Press l or r to use. If you want to restore the color in faded photos, see page 18. If you want more information. ■...
...settings are automatically selected when you copy photos: Borderless prints, automatically sized to fit on 4 × 6-inch Premium Photo Paper Glossy. ■ If you want to copy using 4 × 6 Epson Premium Photo Paper Glossy. See page 17 for more information. ■ The RX580 remembers your settings, even after you... You can copy a photograph on page 12. Load your photo paper, as described on 4 × 6, 5 × 7, 8 × 10, or 8.5 × 11-inch paper. Press l or r to use. If you want to restore the color in faded photos, see page 18. If you want more information. ■...
Basics Guide
Page 17
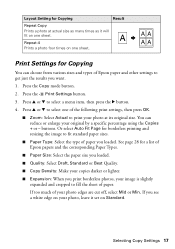
...of Epson papers and the corresponding Paper Types. ■ Paper Size: Select the paper size you loaded. ■ Quality: Select Draft, Standard or Best Quality. ■ Copy Density: Make your photo at actual size as many times as it set on one of paper you print borderless photos, your photo, leave... types of Epson paper and other settings to get just the results you see a white edge on your image is slightly expanded and cropped to select a menu item, then press the r button. 4. Layout Setting for Copying Result Repeat Copy Prints a photo at its original size. Print Settings for...
...of Epson papers and the corresponding Paper Types. ■ Paper Size: Select the paper size you loaded. ■ Quality: Select Draft, Standard or Best Quality. ■ Copy Density: Make your photo at actual size as many times as it set on one of paper you print borderless photos, your photo, leave... types of Epson paper and other settings to get just the results you see a white edge on your image is slightly expanded and cropped to select a menu item, then press the r button. 4. Layout Setting for Copying Result Repeat Copy Prints a photo at its original size. Print Settings for...

Basics Guide
Page 18
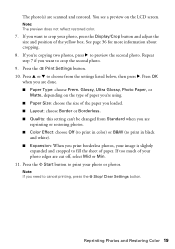
... are at least 1/4 inch apart and 1/4 inch from the edges of your photos, press OK. 18 Copying a Photo or Document For photos that don't need color restoration, choose Off. 6. Press the Specialty Print button. 4. Press l or r to highlight Reprint/Restore Photos, then press OK. 5. When you can follow the same steps to crop and resize your...
... are at least 1/4 inch apart and 1/4 inch from the edges of your photos, press OK. 18 Copying a Photo or Document For photos that don't need color restoration, choose Off. 6. Press the Specialty Print button. 4. Press l or r to highlight Reprint/Restore Photos, then press OK. 5. When you can follow the same steps to crop and resize your...
Basics Guide
Page 19
... 36 for more information about cropping. 8. Press u or d to cancel printing, press the y Stop/ Clear Settings button. Glossy, Ultra Glossy, Photo Paper, or Matte, depending on the LCD screen. Reprinting Photos and Restoring Color 19 Press OK when you print borderless photos, your photo or photos. The photo(s) are done. ■ Paper Type: choose Prem. If too much of...
... 36 for more information about cropping. 8. Press u or d to cancel printing, press the y Stop/ Clear Settings button. Glossy, Ultra Glossy, Photo Paper, or Matte, depending on the LCD screen. Reprinting Photos and Restoring Color 19 Press OK when you print borderless photos, your photo or photos. The photo(s) are done. ■ Paper Type: choose Prem. If too much of...
Basics Guide
Page 20
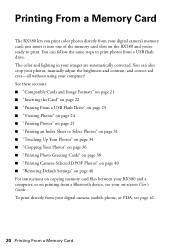
...RX580 and you print color photos directly from your digital camera's memory card; See these sections: ■ "Compatible Cards and Image Formats" on page 21 ■ "Inserting the Card" on page 22 ■ "Printing From a USB Flash Drive" on page 23 ■ "Viewing Photos" on page 24 ■ "Printing Photos" on page 25 ■ "Printing... can follow the same steps to print. The color and lighting in your on printing from a Bluetooth device, see page 41. 20 Printing From a Memory Card Printing From a Memory Card The RX580 lets you 're ready to print photos from a USB flash drive.
...RX580 and you print color photos directly from your digital camera's memory card; See these sections: ■ "Compatible Cards and Image Formats" on page 21 ■ "Inserting the Card" on page 22 ■ "Printing From a USB Flash Drive" on page 23 ■ "Viewing Photos" on page 24 ■ "Printing Photos" on page 25 ■ "Printing... can follow the same steps to print. The color and lighting in your on printing from a Bluetooth device, see page 41. 20 Printing From a Memory Card Printing From a Memory Card The RX580 lets you 're ready to print photos from a USB flash drive.

Basics Guide
Page 22
Close the memory card slot cover. Make sure the RX580 is off and that no cards are in any of the slots, then insert your card requires an adapter, make sure you insert it into ... slot. Do not insert more than one card at a time, and do not force the card into the correct slot. See page 21 for printing instructions. 22 Printing From a Memory Card See page 25 for details. Memory card access light 4. Inserting the Card 1. Otherwise, the card may get stuck in the slot...
Close the memory card slot cover. Make sure the RX580 is off and that no cards are in any of the slots, then insert your card requires an adapter, make sure you insert it into ... slot. Do not insert more than one card at a time, and do not force the card into the correct slot. See page 21 for printing instructions. 22 Printing From a Memory Card See page 25 for details. Memory card access light 4. Inserting the Card 1. Otherwise, the card may get stuck in the slot...
Basics Guide
Page 23
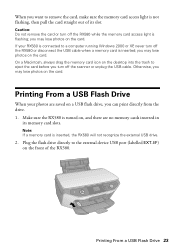
...no memory cards inserted in its slot. Printing From a USB Flash Drive When your RX580 is flashing; Note: If a memory card is turned on, and there are saved on the card. you may lose photos on a USB flash drive, you can print directly from the drive. 1. Printing From a USB Flash Drive 23 you ...may lose photos on the card. On a Macintosh, ...
...no memory cards inserted in its slot. Printing From a USB Flash Drive When your RX580 is flashing; Note: If a memory card is turned on, and there are saved on the card. you may lose photos on a USB flash drive, you can print directly from the drive. 1. Printing From a USB Flash Drive 23 you ...may lose photos on the card. On a Macintosh, ...

Basics Guide
Page 24
...You see this screen, press u or d to select the folder to select View and Print, then press OK. First, insert your photos, or display nine photos at a time, press the Display/Crop button again. 24 Printing From a Memory Card Press the Memory Card mode button. 2. You can view each... as shown: ■ To view the photo only, without the information, press the Display/Crop button twice. ■ To view nine photos at once. If you see your photos the same as from , then press OK. 4. Viewing Photos You can select and print your first photo, with information as described above. 1. ...
...You see this screen, press u or d to select the folder to select View and Print, then press OK. First, insert your photos, or display nine photos at a time, press the Display/Crop button again. 24 Printing From a Memory Card Press the Memory Card mode button. 2. You can view each... as shown: ■ To view the photo only, without the information, press the Display/Crop button twice. ■ To view nine photos at once. If you see your photos the same as from , then press OK. 4. Viewing Photos You can select and print your first photo, with information as described above. 1. ...


