
Basics Guide
Page 4
... Front Tray to the Paper Position 54 Printing a CD/DVD Jewel Case Insert 55 Printing From Your Computer 56 Printing With Windows 56 Printing From a Macintosh 59 Selecting the Correct Paper Type 62 Scanning a Photo or Document 63 Scanning to Your Computer 63 Scanning to a Memory Card 66 Backing Up Your Photos 67 Maintaining Your RX580...
... Front Tray to the Paper Position 54 Printing a CD/DVD Jewel Case Insert 55 Printing From Your Computer 56 Printing With Windows 56 Printing From a Macintosh 59 Selecting the Correct Paper Type 62 Scanning a Photo or Document 63 Scanning to Your Computer 63 Scanning to a Memory Card 66 Backing Up Your Photos 67 Maintaining Your RX580...
Basics Guide
Page 45
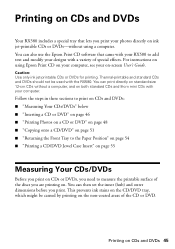
... standard CDs and 8-cm mini CDs with your photos directly on ink jet-printable CDs or DVDs-without using Epson Print CD on your computer, see your designs with a variety of special effects. This prevents ink stains on the CD/DVD tray, which might be used with the RX580. For instructions on using a computer. You can also use the Epson Print CD software...
... standard CDs and 8-cm mini CDs with your photos directly on ink jet-printable CDs or DVDs-without using Epson Print CD on your computer, see your designs with a variety of special effects. This prevents ink stains on the CD/DVD tray, which might be used with the RX580. For instructions on using a computer. You can also use the Epson Print CD software...

Basics Guide
Page 46
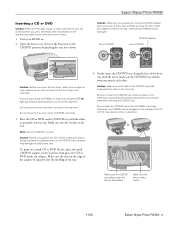
..., dirt or scratches on the surface may damage the RX580 or tray. 1. Inserting a CD or DVD Make sure the data, music, or video is burned on your ink jet-printable CDs or DVDs before you plan to print large numbers of CDs or DVDs, it's a good idea to print a small sample and check the...instructions on and not printing or performing any maintenance routines. 2. Turn on CDs and DVDs Caution: Make sure you insert the tray correctly, or you may cause errors when you burn the data. Only insert a CD or DVD when the RX580 is turned on adjusting the dimensions. Use a millimeter ruler to make sure...
..., dirt or scratches on the surface may damage the RX580 or tray. 1. Inserting a CD or DVD Make sure the data, music, or video is burned on your ink jet-printable CDs or DVDs before you plan to print large numbers of CDs or DVDs, it's a good idea to print a small sample and check the...instructions on and not printing or performing any maintenance routines. 2. Turn on CDs and DVDs Caution: Make sure you insert the tray correctly, or you may cause errors when you burn the data. Only insert a CD or DVD when the RX580 is turned on adjusting the dimensions. Use a millimeter ruler to make sure...

Basics Guide
Page 47
Place the CD or DVD on the tray. 5. Inserting a CD or DVD 47 Make sure the disc lies flat on the CD tray with the white or printable side faceup. 3. Push down the lever. 4. Insert the CD tray carefully between the guides on the front tray. Caution: Do not move the tray lever when the RX580 is operating, and do not touch the tray when pushing down the lever to raise the tray to the CD/DVD position.
Place the CD or DVD on the tray. 5. Inserting a CD or DVD 47 Make sure the disc lies flat on the CD tray with the white or printable side faceup. 3. Push down the lever. 4. Insert the CD tray carefully between the guides on the front tray. Caution: Do not move the tray lever when the RX580 is operating, and do not touch the tray when pushing down the lever to raise the tray to the CD/DVD position.

Basics Guide
Page 48
Slide the CD tray in the next section to print photos on your CD or DVD from your memory card or USB flash drive. line up the arrows exactly. 7. Press the Specialty Print mode button. 3. Follow the instructions in until the arrows on CDs and DVDs Press l or r to add text and modify...Print on CD/DVD, then press OK. 48 Printing on the trays are aligned. Don't push in the tray too far; Note: If you can use the Epson Print CD software on your on-screen User's Guide for printing, as described on a CD or DVD 1. Printing Photos on page 46. 2. Insert a CD or DVD for instructions...
Slide the CD tray in the next section to print photos on your CD or DVD from your memory card or USB flash drive. line up the arrows exactly. 7. Press the Specialty Print mode button. 3. Follow the instructions in until the arrows on CDs and DVDs Press l or r to add text and modify...Print on CD/DVD, then press OK. 48 Printing on the trays are aligned. Don't push in the tray too far; Note: If you can use the Epson Print CD software on your on-screen User's Guide for printing, as described on a CD or DVD 1. Printing Photos on page 46. 2. Insert a CD or DVD for instructions...

Basics Guide
Page 49
...as described on your CD will have blank spaces. 7. To return the font tray to add. Four photos are printed on the CD/DVD, arranged in a drive. When you need to wait up pictures of faces, because of the hole in each photo you have chosen, your CD or DVD. Note: If ... printing, remove the CD/DVD tray from moisture and direct sunlight. Press l or r to cancel printing, press the y Stop/Clear Settings button. 8. To allow the ink to dry fully, you may need to choose a photo, then press the Copies + button. Keep printed discs away from the RX580. 4. For more information...
...as described on your CD will have blank spaces. 7. To return the font tray to add. Four photos are printed on the CD/DVD, arranged in a drive. When you need to wait up pictures of faces, because of the hole in each photo you have chosen, your CD or DVD. Note: If ... printing, remove the CD/DVD tray from moisture and direct sunlight. Press l or r to cancel printing, press the y Stop/Clear Settings button. 8. To allow the ink to dry fully, you may need to choose a photo, then press the Copies + button. Keep printed discs away from the RX580. 4. For more information...

Basics Guide
Page 50
... press the x Print Settings button. 3. If the printable area of the CD or DVD. 1. Make sure you have measured your discs, following the instructions on the RX580. This prevents ink stains on the CD/DVD tray, which might be caused by printing on the noncoated areas of your changes and... return to select CD Inner-Outer, then press r. 4. Press d, u, l, or r to adjust the ...
... press the x Print Settings button. 3. If the printable area of the CD or DVD. 1. Make sure you have measured your discs, following the instructions on the RX580. This prevents ink stains on the CD/DVD tray, which might be caused by printing on the noncoated areas of your changes and... return to select CD Inner-Outer, then press r. 4. Press d, u, l, or r to adjust the ...

Basics Guide
Page 55
... printing, press the y Stop/Clear Settings button. Printing a CD/DVD Jewel Case Insert 55 If you select more than 24 photos, multiple inserts will be printed. Press the x Print Settings button. Note: If you load letter-size paper, remove the CD/DVD tray, and return the front tray to the paper position as necessary, then press OK...
... printing, press the y Stop/Clear Settings button. Printing a CD/DVD Jewel Case Insert 55 If you select more than 24 photos, multiple inserts will be printed. Press the x Print Settings button. Note: If you load letter-size paper, remove the CD/DVD tray, and return the front tray to the paper position as necessary, then press OK...

Basics Guide
Page 73
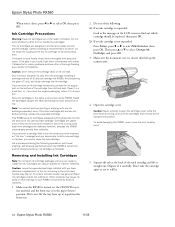
... paper (lower) position. 2. Make sure the RX580 is turned on, the CD/DVD tray is not inserted, and the front tray is closed, then lift up the scanner unit. Press OK. Press Setup, press l or r to select Change Ink Cartridge, then press OK. 3. To ensure good results, use genuine Epson ink cartridges and do not refill...
... paper (lower) position. 2. Make sure the RX580 is turned on, the CD/DVD tray is not inserted, and the front tray is closed, then lift up the scanner unit. Press OK. Press Setup, press l or r to select Change Ink Cartridge, then press OK. 3. To ensure good results, use genuine Epson ink cartridges and do not refill...

Basics Guide
Page 77
... are printed. 7. Press d to select the number for that square. 9. Note: Make sure the front tray is in the paper (lower) position and the CD/DVD tray is most even, with no streaks or lines. Make sure the RX580 is turned on the nozzle check pattern, you may have to align the print head. Aligning...
... are printed. 7. Press d to select the number for that square. 9. Note: Make sure the front tray is in the paper (lower) position and the CD/DVD tray is most even, with no streaks or lines. Make sure the RX580 is turned on the nozzle check pattern, you may have to align the print head. Aligning...

Basics Guide
Page 81
... settings are not recommended), or use Epson special paper (see page 62) and genuine Epson ink cartridges (see page 72). ■ Set the tray lever to clean the print head. Remove sheets from the output tray as they can deliver ink properly. If you are printing on CDs or DVDs, push in the extensions, then set... selecting Best as the Quality setting. ■ If you are copying, make sure the document is placed flat against the document table glass and the RX580 is cut off, try turning off the Fit Frame setting. Problems and Solutions 81 See page 37 for paper, then pull out the front...
... settings are not recommended), or use Epson special paper (see page 62) and genuine Epson ink cartridges (see page 72). ■ Set the tray lever to clean the print head. Remove sheets from the output tray as they can deliver ink properly. If you are printing on CDs or DVDs, push in the extensions, then set... selecting Best as the Quality setting. ■ If you are copying, make sure the document is placed flat against the document table glass and the RX580 is cut off, try turning off the Fit Frame setting. Problems and Solutions 81 See page 37 for paper, then pull out the front...
Basics Guide
Page 90
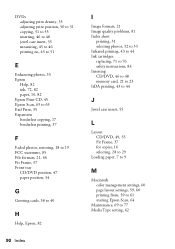
... Print, 35 Expansion borderless copying, 17 borderless printing, 37 F Faded photos, restoring, 18 to 19 FCC statement, 85 File formats, 21, 66 Fit Frame, 37 Front tray CD/DVD position, 47 paper position, 54 G Greeting cards, 38 to 40 H Help, Epson, 82 90 Index I Image formats, 21 Image quality problems, 81 ...43 to 44 J Jewel case insert, 55 L Layout CD/DVD, 49, 55 Fit Frame, 37 for copies, 16 selecting, 28 to 29 Loading paper, 7 to 9 M Macintosh color management settings, 60 page layout settings, 59, 60 printing from, 59 to 61 starting Epson Scan, 64 Maintenance, 69 to 77 Media Type setting, ...
... Print, 35 Expansion borderless copying, 17 borderless printing, 37 F Faded photos, restoring, 18 to 19 FCC statement, 85 File formats, 21, 66 Fit Frame, 37 Front tray CD/DVD position, 47 paper position, 54 G Greeting cards, 38 to 40 H Help, Epson, 82 90 Index I Image formats, 21 Image quality problems, 81 ...43 to 44 J Jewel case insert, 55 L Layout CD/DVD, 49, 55 Fit Frame, 37 for copies, 16 selecting, 28 to 29 Loading paper, 7 to 9 M Macintosh color management settings, 60 page layout settings, 59, 60 printing from, 59 to 61 starting Epson Scan, 64 Maintenance, 69 to 77 Media Type setting, ...

Product Information Guide
Page 1
... Check ink status; print photo greeting cards 11/06 Epson Stylus Photo RX580 - 1 play a slide show of photos on CD/DVDs; maintain the RX580; restore default settings; scan to card; print from an index sheet; backup photos; I/F USB port (for PictBridge® or Infrared port USB storage devices) Memory card slots Scanner unit Cartridge cover CD/DVD tray Copy a photo or document View and...
... Check ink status; print photo greeting cards 11/06 Epson Stylus Photo RX580 - 1 play a slide show of photos on CD/DVDs; maintain the RX580; restore default settings; scan to card; print from an index sheet; backup photos; I/F USB port (for PictBridge® or Infrared port USB storage devices) Memory card slots Scanner unit Cartridge cover CD/DVD tray Copy a photo or document View and...

Product Information Guide
Page 3
...RX580 for its voltage. Epson Stylus Photo RX580 Product Specifications Printing Printing method On-demand ink jet Ink Configuration Six individual ink cartridges in black, cyan, magenta, yellow, light cyan, and light magenta Mechanical Paper feed Paper path Sheet feeder capacity Dimensions Storage Printing Weight Friction Sheet feeder, top entry CD/DVD tray... msec per line 1200 dpi Color: Approximately 28 msec per line Image data 16 bits per pixel per color internal 8 bits per pixel per color external (maximum) Light source RGB three color LED Electrical Rated Voltage Input ...
...RX580 for its voltage. Epson Stylus Photo RX580 Product Specifications Printing Printing method On-demand ink jet Ink Configuration Six individual ink cartridges in black, cyan, magenta, yellow, light cyan, and light magenta Mechanical Paper feed Paper path Sheet feeder capacity Dimensions Storage Printing Weight Friction Sheet feeder, top entry CD/DVD tray... msec per line 1200 dpi Color: Approximately 28 msec per line Image data 16 bits per pixel per color internal 8 bits per pixel per color external (maximum) Light source RGB three color LED Electrical Rated Voltage Input ...

Product Information Guide
Page 6
... a standard 3-mm margin. CD/DVD Copy Copies onto a CD or DVD. Then both originals are automatically selected when you copy photos: Borderless prints, automatically sized to fit on 4 × 6-inch Premium Photo Paper Glossy. ❏ If you want to copy photos (using default settings) is using a special layout, such as described on page 7. Epson Stylus Photo RX580 Copying Documents You can...
... a standard 3-mm margin. CD/DVD Copy Copies onto a CD or DVD. Then both originals are automatically selected when you copy photos: Borderless prints, automatically sized to fit on 4 × 6-inch Premium Photo Paper Glossy. ❏ If you want to copy photos (using default settings) is using a special layout, such as described on page 7. Epson Stylus Photo RX580 Copying Documents You can...
Product Information Guide
Page 9
... sides) Make sure the arrow marks match 11/06 Epson Stylus Photo RX580 - 9 Make sure the CD/DVD tray slides under the tab (on both sides of the tray. 4. otherwise the RX580 may become dirty or scratched. CD/DVD adapter 12-cm CD/DVD 8-cm CD/DVD Caution: Before you print. Caution: Before you position the CD or DVD, make sure the green P On light has stopped...
... sides) Make sure the arrow marks match 11/06 Epson Stylus Photo RX580 - 9 Make sure the CD/DVD tray slides under the tab (on both sides of the tray. 4. otherwise the RX580 may become dirty or scratched. CD/DVD adapter 12-cm CD/DVD 8-cm CD/DVD Caution: Before you print. Caution: Before you position the CD or DVD, make sure the green P On light has stopped...

Product Information Guide
Page 10
...See your memory card as described on . 4. Make sure the RX580 is flashing; you print color photos directly from Your Camera's Memory Card The RX580 lets you may lose photos on . 2. Insert your printed Basics Guide for each additional photo you insert it into one copy, press the Copies + button again...printed Basics Guide for more than one of the memory card slots on a CD/DVD, remove the CD/DVD tray and set the front tray to display the list of layouts. Epson Stylus Photo RX580 After you turn off the RX580 or unplug the USB cable. You can use the cards and image file ...
...See your memory card as described on . 4. Make sure the RX580 is flashing; you print color photos directly from Your Camera's Memory Card The RX580 lets you may lose photos on . 2. Insert your printed Basics Guide for each additional photo you insert it into one copy, press the Copies + button again...printed Basics Guide for more than one of the memory card slots on a CD/DVD, remove the CD/DVD tray and set the front tray to display the list of layouts. Epson Stylus Photo RX580 After you turn off the RX580 or unplug the USB cable. You can use the cards and image file ...
Product Information Guide
Page 12
... may dry out. Epson Stylus Photo RX580 When you're done, press l or r to your RX580 not covered by Epson's warranty. 1. If it carefully. Then press u or d to reposition the front tray. 2. If ink gets on the bottom of the ink cartridge or its own box. the label identifying the color should be on , the CD/DVD tray is not inserted...
... may dry out. Epson Stylus Photo RX580 When you're done, press l or r to your RX580 not covered by Epson's warranty. 1. If it carefully. Then press u or d to reposition the front tray. 2. If ink gets on the bottom of the ink cartridge or its own box. the label identifying the color should be on , the CD/DVD tray is not inserted...

Product Information Guide
Page 14
... Epson Stylus Photo RX580 12. The RX580 begins charging the ink delivery system and the message "Charging Ink. After about one minute, the message "Ink cartridge replacement is complete. Caution: Do not turn off the RX580 during copying, the documents or photos on the LCD screen. Do not insert the CD/DVD tray ...Head If your printouts are faint, follow the steps in the RX580. 3. This unclogs the nozzles so they can deliver ink properly. Before you may have moved slightly when you don't use your printout or colors are displayed on the LCD screen. (If error messages indicating...
... Epson Stylus Photo RX580 12. The RX580 begins charging the ink delivery system and the message "Charging Ink. After about one minute, the message "Ink cartridge replacement is complete. Caution: Do not turn off the RX580 during copying, the documents or photos on the LCD screen. Do not insert the CD/DVD tray ...Head If your printouts are faint, follow the steps in the RX580. 3. This unclogs the nozzles so they can deliver ink properly. Before you may have moved slightly when you don't use your printout or colors are displayed on the LCD screen. (If error messages indicating...

Product Information Guide
Page 15
...ink may prevent the RX580 from printing. 1. The nozzle check pattern prints. 7. Your RX580 prints an alignment sheet like this one is loaded in the memory card slots. 11/06 Epson Stylus Photo RX580 - 15 If you align the print head, make sure the CD/DVD tray is not inserted in the RX580, and make sure... paper is not, lift the tray lever up vertically, or turn the RX580 off . 3. This allows any dried ink to ...
...ink may prevent the RX580 from printing. 1. The nozzle check pattern prints. 7. Your RX580 prints an alignment sheet like this one is loaded in the memory card slots. 11/06 Epson Stylus Photo RX580 - 15 If you align the print head, make sure the CD/DVD tray is not inserted in the RX580, and make sure... paper is not, lift the tray lever up vertically, or turn the RX580 off . 3. This allows any dried ink to ...


