
Product Information Guide
Page 10
...the P On button to turn off the Stylus Photo RX500, then turn off the Stylus Photo RX500. Scans a photo into ArcSoft PhotoImpression, where you placed the orange print head holder in its storage slot, as shown on page 5. Paper jam - - - > Press the Color button. Do you can send it clicks securely...the Stylus Photo RX500 for Mac OS 8.6). Scanner unit open - - - > Close the Carefully close the scanner unit and scanner unit press down on . Remove and reload the paper, then press the Color button. Make sure you want to use the l Save mode. Contact your dealer or EPSON, ...
...the P On button to turn off the Stylus Photo RX500, then turn off the Stylus Photo RX500. Scans a photo into ArcSoft PhotoImpression, where you placed the orange print head holder in its storage slot, as shown on page 5. Paper jam - - - > Press the Color button. Do you can send it clicks securely...the Stylus Photo RX500 for Mac OS 8.6). Scanner unit open - - - > Close the Carefully close the scanner unit and scanner unit press down on . Remove and reload the paper, then press the Color button. Make sure you want to use the l Save mode. Contact your dealer or EPSON, ...
Product Information Guide
Page 12
... for all the steps in the tab at the back of the cartridge to move the print head by pulling the back of the cartridge; Make sure the Stylus Photo RX500 is empty. If an ink cartridge is empty: Check the LCD screen to see the message...Note: The illustration above shows the black cartridge being removed. EPSON Stylus Photo RX500 10/03 Once you start the ink cartridge replacement procedure, you must complete all of the cartridges, wait for the ink cartridge holder to release it carefully. Finally, press the x Color button. 3. When you have obtained a replacement. ...
... for all the steps in the tab at the back of the cartridge to move the print head by pulling the back of the cartridge; Make sure the Stylus Photo RX500 is empty. If an ink cartridge is empty: Check the LCD screen to see the message...Note: The illustration above shows the black cartridge being removed. EPSON Stylus Photo RX500 10/03 Once you start the ink cartridge replacement procedure, you must complete all of the cartridges, wait for the ink cartridge holder to release it carefully. Finally, press the x Color button. 3. When you have obtained a replacement. ...
Start Here Card
Page 3
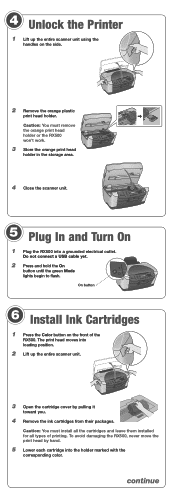
... ink cartridges from their packages. On button 6 Install Ink Cartridges 1 Press the Color button on the side. 2 Remove the orange plastic print head holder. Caution: You must remove the orange print head holder or the RX500 won't work. 3 Store the orange print head holder in the storage area. 4 Close the scanner unit. 5 Plug In and Turn On...
... ink cartridges from their packages. On button 6 Install Ink Cartridges 1 Press the Color button on the side. 2 Remove the orange plastic print head holder. Caution: You must remove the orange print head holder or the RX500 won't work. 3 Store the orange print head holder in the storage area. 4 Close the scanner unit. 5 Plug In and Turn On...

Start Here Card
Page 7
... are pushed all the way down menu. 3 Click Stylus Photo RX500. Disconnect the RX500 before installing the software. If the red ! A New Hardware Wizard Click Cancel...on. They give you print or scan. Unlock the printer by removing and storing the orange plastic print head holder. The Printer List includes two entries for solving problems. If... your problem is turned on and securely connected to add a printer, click Add. 2 On the next screen, select EPSON USB from the Apple menu. 2 Select the SP RX500...
... are pushed all the way down menu. 3 Click Stylus Photo RX500. Disconnect the RX500 before installing the software. If the red ! A New Hardware Wizard Click Cancel...on. They give you print or scan. Unlock the printer by removing and storing the orange plastic print head holder. The Printer List includes two entries for solving problems. If... your problem is turned on and securely connected to add a printer, click Add. 2 On the next screen, select EPSON USB from the Apple menu. 2 Select the SP RX500...

User's Guide
Page 113
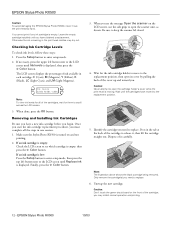
...on the far right, then open the cartridge holder's cover while the print head is moving. Note: The illustration above shows the black ink cartridge being removed. Open the cover from the cartridge. Unwrap the new cartridge. Only remove the cartridge(s) you . Caution: Never attempt to open its cover by pulling... straight out. Replacing Ink Cartridges 113 Wait until the cartridges have moved to replace. 5. Dispose of the cartridge to replace. Caution: Don't remove any labels or seals from the back 4. Identify the cartridge you need to the replacement position. 3.
...on the far right, then open the cartridge holder's cover while the print head is moving. Note: The illustration above shows the black ink cartridge being removed. Open the cover from the cartridge. Unwrap the new cartridge. Only remove the cartridge(s) you . Caution: Never attempt to open its cover by pulling... straight out. Replacing Ink Cartridges 113 Wait until the cartridges have moved to replace. 5. Dispose of the cartridge to replace. Caution: Don't remove any labels or seals from the back 4. Identify the cartridge you need to the replacement position. 3.
User's Guide
Page 118
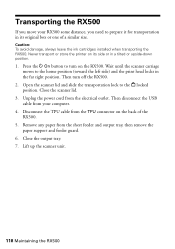
...or store the printer on the RX500. Then turn on its original box or one of the RX500. 5. Disconnect the TPU cable from the electrical outlet. Close the output tray. 7. Then disconnect the USB cable from the sheet feeder and output tray, then remove the paper support and feeder guard...the ink cartridges installed when transporting the RX500. Open the scanner lid and slide the transportation lock to the home position (toward the left side) and the print head locks in a tilted or upside-down position. 1. Remove any paper from your RX500 some distance, you need to turn off...
...or store the printer on the RX500. Then turn on its original box or one of the RX500. 5. Disconnect the TPU cable from the electrical outlet. Close the output tray. 7. Then disconnect the USB cable from the sheet feeder and output tray, then remove the paper support and feeder guard...the ink cartridges installed when transporting the RX500. Open the scanner lid and slide the transportation lock to the home position (toward the left side) and the print head locks in a tilted or upside-down position. 1. Remove any paper from your RX500 some distance, you need to turn off...

User's Guide
Page 119
... them. Lower the scanner unit carefully until it . After transporting the RX500, remove the print head holder or tape securing the print head, unlock the transportation lock, and make a test copy. Caution: Keep the RX500 level as shown to the case. If you transport it clicks back into... place. 10. 8. Remove the orange print head holder from moving during transport. Repack the RX500 and its attachments in quality, clean the print head (see page 115). If you can't find the orange print head holder, tape the print head to prevent the print head from its new location. ...
... them. Lower the scanner unit carefully until it . After transporting the RX500, remove the print head holder or tape securing the print head, unlock the transportation lock, and make a test copy. Caution: Keep the RX500 level as shown to the case. If you transport it clicks back into... place. 10. 8. Remove the orange print head holder from moving during transport. Repack the RX500 and its attachments in quality, clean the print head (see page 115). If you can't find the orange print head holder, tape the print head to prevent the print head from its new location. ...
User's Guide
Page 122
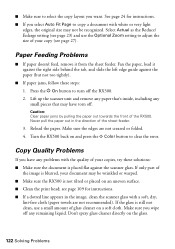
...press the x Color button to turn off the RX500. 2. see page 27). Reload the paper. Copy Quality Problems If you have torn off any remaining liquid. Make sure the edges are not recommended). Don't spray glass cleaner directly on an uneven surface. ■ Clean the print head; If the ...cloth (paper towels are not creased or folded. 4. Lift up the scanner unit and remove any paper that's inside, including any small pieces that may not be wrinkled or warped. ■ Make sure the RX500 is placed flat against the scanner glass. Make sure you want. Paper Feeding Problems ...
...press the x Color button to turn off the RX500. 2. see page 27). Reload the paper. Copy Quality Problems If you have torn off any remaining liquid. Make sure the edges are not recommended). Don't spray glass cleaner directly on an uneven surface. ■ Clean the print head; If the ...cloth (paper towels are not creased or folded. 4. Lift up the scanner unit and remove any paper that's inside, including any small pieces that may not be wrinkled or warped. ■ Make sure the RX500 is placed flat against the scanner glass. Make sure you want. Paper Feeding Problems ...
User's Guide
Page 127
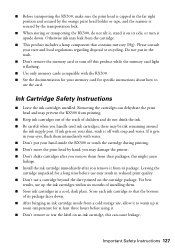
...Instructions 127 Do not put in the trash. ■ Don't remove the memory card or turn it upside down . ■ After bringing an ink cartridge inside the RX500 or touch the cartridge during printing. ■ Don't move the print head by the transportation lock. ■ When storing or transporting the... RX500, do not tilt it, stand it on your skin, wash it from their packages; If it . ■ Don't remove or tear the label on the cartridge package. Leaving the...
...Instructions 127 Do not put in the trash. ■ Don't remove the memory card or turn it upside down . ■ After bringing an ink cartridge inside the RX500 or touch the cartridge during printing. ■ Don't move the print head by the transportation lock. ■ When storing or transporting the... RX500, do not tilt it, stand it on your skin, wash it from their packages; If it . ■ Don't remove or tear the label on the cartridge package. Leaving the...

User's Guide
Page 128
...This may affect normal operation and printing. ■ If you could damage the print head. ■ Don't touch the green IC chip on your eyes, flush them ; There is a valve in the same environment as the RX500. LCD Panel Safety Instructions ■ Use only a dry soft cloth to prevent the... ink from dirt and store it off thoroughly with water. 128 Requirements and Notices you remove an ink cartridge for later use liquid or chemical cleaners. &#...
...This may affect normal operation and printing. ■ If you could damage the print head. ■ Don't touch the green IC chip on your eyes, flush them ; There is a valve in the same environment as the RX500. LCD Panel Safety Instructions ■ Use only a dry soft cloth to prevent the... ink from dirt and store it off thoroughly with water. 128 Requirements and Notices you remove an ink cartridge for later use liquid or chemical cleaners. &#...

User's Guide
Page 133
... C Canceling copies, 27 Cleaning print head, 109 to 110 Color Management, turning off, 45, 50 Color Restoration setting, 58 ColorSync, 45 Copying adjusting shade, 26 borderless photos, 24 canceling, 27 changing copy size...D Date, adding to prints, 103 Declaration of Conformity, 130 Default settings, 27, 38 Digital noise, removing, 100 Documentation, description, 10 DPOF images, printing, 94 to 96 E Editing scanned text, 59 E-...mail, scanning files to, 59, 81 to 82 Envelopes, 17 to 18 EPSON Scan, starting, 61, 64 Exif Print, 7, 100 F Fax, scanning to, 59 FCC statement,...
... C Canceling copies, 27 Cleaning print head, 109 to 110 Color Management, turning off, 45, 50 Color Restoration setting, 58 ColorSync, 45 Copying adjusting shade, 26 borderless photos, 24 canceling, 27 changing copy size...D Date, adding to prints, 103 Declaration of Conformity, 130 Default settings, 27, 38 Digital noise, removing, 100 Documentation, description, 10 DPOF images, printing, 94 to 96 E Editing scanned text, 59 E-...mail, scanning files to, 59, 81 to 82 Envelopes, 17 to 18 EPSON Scan, starting, 61, 64 Exif Print, 7, 100 F Fax, scanning to, 59 FCC statement,...


