
Technical Brief (Ink Jet Printers)
Page 1
... technologies used in Epson ink jet printers work together to produce brilliant Photo Quality color, sharp text, and incredible print speeds Small Ink Droplet Size Small ink droplets produce smoother gradations and greater tonal control Epson Inks Epson innovates ink solutions tailored to produce award-winning print quality, and each of offering a one printers. Epson MicroPiezo® technology...
... technologies used in Epson ink jet printers work together to produce brilliant Photo Quality color, sharp text, and incredible print speeds Small Ink Droplet Size Small ink droplets produce smoother gradations and greater tonal control Epson Inks Epson innovates ink solutions tailored to produce award-winning print quality, and each of offering a one printers. Epson MicroPiezo® technology...

Technical Brief (Ink Jet Printers)
Page 2
...visibility of printed "dots" • Large ink droplets are increased Epson printers use Variable Size Droplet Technology, where the printers can use high-precision mechanical pumps to improve color ranges and accuracy because Epson printers can produce a number of Print Resolution and Small, Variable-Size ... the printer to produce a greater number of different colored "printed dots" because a wider range of tiny droplets can be combined to precisely print crisp details in dense coverage areas to improve print speed With this technique, Epson printers can be used in photos and ...
...visibility of printed "dots" • Large ink droplets are increased Epson printers use Variable Size Droplet Technology, where the printers can use high-precision mechanical pumps to improve color ranges and accuracy because Epson printers can produce a number of Print Resolution and Small, Variable-Size ... the printer to produce a greater number of different colored "printed dots" because a wider range of tiny droplets can be combined to precisely print crisp details in dense coverage areas to improve print speed With this technique, Epson printers can be used in photos and ...

Technical Brief (Ink Jet Printers)
Page 3
... to meet every printing need. 4. Ink Jet Printer Technical Brief Page 3 Ink System: Epson offers a variety of Epson America, Inc. Epson papers are for optional cartridges, and you see continuous tone color. High Quality Halftoning: Every ink jet printer uses a method referred to get sharp black text, superb photo quality photos, or both on the content, selected output...
... to meet every printing need. 4. Ink Jet Printer Technical Brief Page 3 Ink System: Epson offers a variety of Epson America, Inc. Epson papers are for optional cartridges, and you see continuous tone color. High Quality Halftoning: Every ink jet printer uses a method referred to get sharp black text, superb photo quality photos, or both on the content, selected output...
User Manual (P.I.M Plug-in)
Page 1
...the PRINT Image Matching image quality when you how to import and print your P.I .M.)-enabled digital cameras embed information in digital photo files to maximize the image quality of the print-including a wider range of P.I.M.-enabled camera models and software titles, visit ...Image Matching™ (P.I .M.-enabled or Exif Print-enabled digital camera. II page 2 ■ How Does P.I .M.-enabled digital cameras and printers work together perfectly to consistently and easily create the best possible prints. PRINT Image Matching technology ensures that P.I .M. For more information about ...
...the PRINT Image Matching image quality when you how to import and print your P.I .M.)-enabled digital cameras embed information in digital photo files to maximize the image quality of the print-including a wider range of P.I.M.-enabled camera models and software titles, visit ...Image Matching™ (P.I .M.-enabled or Exif Print-enabled digital camera. II page 2 ■ How Does P.I .M.-enabled digital cameras and printers work together perfectly to consistently and easily create the best possible prints. PRINT Image Matching technology ensures that P.I .M. For more information about ...

User Manual (P.I.M Plug-in)
Page 2
... Epson Stylus® Photo R200 ■ Epson Stylus Photo R300/R300M ■ Epson Stylus Photo R320 ■ Epson Stylus Photo R800 ■ Epson Stylus Photo RX500 ■ Epson Stylus Photo RX600 ■ Epson Stylus Photo 780 ■ Epson Stylus Photo 785EPX ■ Epson Stylus Photo 820 ■ Epson Stylus Photo 825 ■ Epson Stylus Photo 890 ■ Epson Stylus Photo 900 ■ Epson Stylus Photo 925 ■ Epson Stylus Photo 960 ■ Epson Stylus Photo 1280 ■ Epson Stylus Photo 2000P* ■ Epson Stylus Photo 2200 ■ PictureMate™ by Epson * This printer...
... Epson Stylus® Photo R200 ■ Epson Stylus Photo R300/R300M ■ Epson Stylus Photo R320 ■ Epson Stylus Photo R800 ■ Epson Stylus Photo RX500 ■ Epson Stylus Photo RX600 ■ Epson Stylus Photo 780 ■ Epson Stylus Photo 785EPX ■ Epson Stylus Photo 820 ■ Epson Stylus Photo 825 ■ Epson Stylus Photo 890 ■ Epson Stylus Photo 900 ■ Epson Stylus Photo 925 ■ Epson Stylus Photo 960 ■ Epson Stylus Photo 1280 ■ Epson Stylus Photo 2000P* ■ Epson Stylus Photo 2200 ■ PictureMate™ by Epson * This printer...
User Manual (P.I.M Plug-in)
Page 11
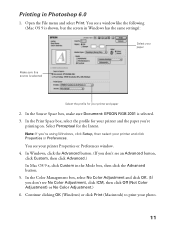
...photo. 11 Continue clicking OK (Windows) or click Print (Macintosh) to print your printer Properties or Preferences window. 4. Open the File menu and select Print. You see a window like the following (Mac OS 9 is shown, but the screen in Windows has the same settings): Select your printer... 3. Select Perceptual for your printer and click Properties or Preferences. In the Color Management box, select No Color Adjustment and click OK. (...No Color Adjustment, click ICM, then click Off (Not Color Adjustment) or No Color Adjustment.) 6. In the Source Space box, make sure Document: EPSON RGB...
...photo. 11 Continue clicking OK (Windows) or click Print (Macintosh) to print your printer Properties or Preferences window. 4. Open the File menu and select Print. You see a window like the following (Mac OS 9 is shown, but the screen in Windows has the same settings): Select your printer... 3. Select Perceptual for your printer and click Properties or Preferences. In the Color Management box, select No Color Adjustment and click OK. (...No Color Adjustment, click ICM, then click Off (Not Color Adjustment) or No Color Adjustment.) 6. In the Source Space box, make sure Document: EPSON RGB...

Printer Basics
Page 2
...Epson Corporation. RPM and ColorLife are trademarks; and Epson Print Lab, Epson Store, SoundAdvice, and Epson Connection are service marks of Seiko Epson Corporation. Epson disclaims any damages or problems arising from the use with Seiko Epson Corporation's operating and maintenance instructions. Trademarks Epson, Epson Stylus, Epson Photo... incurred by purchaser or third parties as Original Epson Products or Epson Approved Products by improper copying and reprinting of any consumable products other printers. Epson is designed only for use of this product or...
...Epson Corporation. RPM and ColorLife are trademarks; and Epson Print Lab, Epson Store, SoundAdvice, and Epson Connection are service marks of Seiko Epson Corporation. Epson disclaims any damages or problems arising from the use with Seiko Epson Corporation's operating and maintenance instructions. Trademarks Epson, Epson Stylus, Epson Photo... incurred by purchaser or third parties as Original Epson Products or Epson Approved Products by improper copying and reprinting of any consumable products other printers. Epson is designed only for use of this product or...

Printer Basics
Page 4
... Settings 32 Basic Printing on a Macintosh 32 Printing in OS X 32 Printing in OS 9 35 Selecting the Correct Paper Type 37 Printing Borderless Photos 38 Windows 39 Macintosh OS X 40 Macintosh OS 9 41 Printing on CDs or DVDs 41 Cleaning the Roller 42 Inserting a CD or DVD ...42 Printing Your Design 45 Adjusting the Print Position 45 Adjusting the Print Density 48 Maintaining Your Printer 49 Cleaning the Print Head 50 Replacing an Ink Cartridge 51 Removing and Installing Ink Cartridges 52 Aligning the Print Head 55 Cleaning the...
... Settings 32 Basic Printing on a Macintosh 32 Printing in OS X 32 Printing in OS 9 35 Selecting the Correct Paper Type 37 Printing Borderless Photos 38 Windows 39 Macintosh OS X 40 Macintosh OS 9 41 Printing on CDs or DVDs 41 Cleaning the Roller 42 Inserting a CD or DVD ...42 Printing Your Design 45 Adjusting the Print Position 45 Adjusting the Print Density 48 Maintaining Your Printer 49 Cleaning the Print Head 50 Replacing an Ink Cartridge 51 Removing and Installing Ink Cartridges 52 Aligning the Print Head 55 Cleaning the...
Printer Basics
Page 7
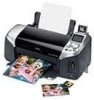
Welcome! You can create true BorderFree™ photos directly from Bluetooth-enabled phones, PDAs, etc. 7 These photos are some of the printer's outstanding features: ■ Epson's exclusive 6-color ink technology lets you achieve fine shadow detail, dazzling highlights, and excellent fill across a... of papers for connecting the printer to a Zip disk or CD-R and access stored photos without a computer. (The port on the front of the printer is for superior photo quality and performance, with family and friends. Your Epson Stylus® Photo R320 can transfer them immediately to your...
Welcome! You can create true BorderFree™ photos directly from Bluetooth-enabled phones, PDAs, etc. 7 These photos are some of the printer's outstanding features: ■ Epson's exclusive 6-color ink technology lets you achieve fine shadow detail, dazzling highlights, and excellent fill across a... of papers for connecting the printer to a Zip disk or CD-R and access stored photos without a computer. (The port on the front of the printer is for superior photo quality and performance, with family and friends. Your Epson Stylus® Photo R320 can transfer them immediately to your...
Printer Basics
Page 8
.... These options include: ■ Contrast, sharpness, and brightness ■ Gamma level, color space, color saturation, and noise reduction ■ Shadow point, highlight point, and color balance The camera saves this information in JPEG files so your Epson Stylus Photo R320 gives great photo printing results. Your printer-along with your on printing P.I .M. About Exif Print The Exif (Exchangeable Image...
.... These options include: ■ Contrast, sharpness, and brightness ■ Gamma level, color space, color saturation, and noise reduction ■ Shadow point, highlight point, and color balance The camera saves this information in JPEG files so your Epson Stylus Photo R320 gives great photo printing results. Your printer-along with your on printing P.I .M. About Exif Print The Exif (Exchangeable Image...

Printer Basics
Page 9
...are using a different browser, the pages may not display correctly. (A browser is not included on the printer software CD-ROM.) You can also click Start > Programs (or All Programs in Windows XP) > Epson > ESPR320 Reference Guide > Reference Guide. ■ Macintosh: Double-click the ESPR320 Reference Guide icon ...must be followed carefully to view it. Viewing Your On-Screen Reference Guide Your printer CD-ROM includes an on your desktop. You can view the on-screen Reference Guide by doing one of photos without a computer, see the Start Here sheet. About Your Documentation 9 Tips ...
...are using a different browser, the pages may not display correctly. (A browser is not included on the printer software CD-ROM.) You can also click Start > Programs (or All Programs in Windows XP) > Epson > ESPR320 Reference Guide > Reference Guide. ■ Macintosh: Double-click the ESPR320 Reference Guide icon ...must be followed carefully to view it. Viewing Your On-Screen Reference Guide Your printer CD-ROM includes an on your desktop. You can view the on-screen Reference Guide by doing one of photos without a computer, see the Start Here sheet. About Your Documentation 9 Tips ...
Printer Basics
Page 12
...out of ozone. ■ As with Epson papers for additional instructions. Be sure to prevent curling. Storing Your Photos With proper care, photographs from your Epson Stylus Photo R320 will minimize color changes and lengthen display life: ■ For display, Epson recommends that prints be framed under glass ...-screen Reference Guide. As with traditional photos, proper care will last for your on loading special papers and envelopes in the printer, see your printer are formulated to protect them from most camera stores. The special Epson inks designed for many years. You ...
...out of ozone. ■ As with Epson papers for additional instructions. Be sure to prevent curling. Storing Your Photos With proper care, photographs from your Epson Stylus Photo R320 will minimize color changes and lengthen display life: ■ For display, Epson recommends that prints be framed under glass ...-screen Reference Guide. As with traditional photos, proper care will last for your on loading special papers and envelopes in the printer, see your printer are formulated to protect them from most camera stores. The special Epson inks designed for many years. You ...

Printer Basics
Page 13
...printer reads and counts the number of the three slots, as shown below ■ "Connecting External Devices" on page 14 ■ "Copying Photos to turn on your on page 17 Inserting Memory Cards 1. Push the card in carefully until it stops (it is in all the way). See your Stylus Photo R320.... 2. Open the memory card door. 3. Press the P Power button to Your Computer" on -screen Reference Guide for printing (see page 19). 13 Insert the memory card into one card at a time. When it's done, your images are available for supported photo file formats....
...printer reads and counts the number of the three slots, as shown below ■ "Connecting External Devices" on page 14 ■ "Copying Photos to turn on your on page 17 Inserting Memory Cards 1. Push the card in carefully until it stops (it is in all the way). See your Stylus Photo R320.... 2. Open the memory card door. 3. Press the P Power button to Your Computer" on -screen Reference Guide for printing (see page 19). 13 Insert the memory card into one card at a time. When it's done, your images are available for supported photo file formats....

Printer Basics
Page 14
... the following devices, you can try connecting it 's not compatible, you 're not sure about your photo lab. 14 Accessing Photos Removing Memory Cards Note: If your printer is connected to your printer using a Zip disk or a thumb drive, it directly to your computer, see page 18 for instructions...get from Picture CDs that the inserted card cannot be formatted as the MicroTech™ ZiO!™) ■ MO (Magneto-Optical) drives Note: Epson cannot guarantee the compatibility of the slot. If you insert a Macintosh-formatted Zip disk or thumb drive, you are using a USB cable: &#...
... the following devices, you can try connecting it 's not compatible, you 're not sure about your photo lab. 14 Accessing Photos Removing Memory Cards Note: If your printer is connected to your printer using a Zip disk or a thumb drive, it directly to your computer, see page 18 for instructions...get from Picture CDs that the inserted card cannot be formatted as the MicroTech™ ZiO!™) ■ MO (Magneto-Optical) drives Note: Epson cannot guarantee the compatibility of the slot. If you insert a Macintosh-formatted Zip disk or thumb drive, you are using a USB cable: &#...

Printer Basics
Page 16
...back up is plugged in the printer. 2. Then connect a USB cable from your drive to a Zip disk, CD-R, DVD-R, or thumb drive: Note: Epson cannot guarantee the compatibility of the printer (see page 14). 4. Press the Direct Save button on how many photos there are copied to start the... backup procedure. When you see a screen saying that connects the printer to your computer (otherwise files on the ...
...back up is plugged in the printer. 2. Then connect a USB cable from your drive to a Zip disk, CD-R, DVD-R, or thumb drive: Note: Epson cannot guarantee the compatibility of the printer (see page 14). 4. Press the Direct Save button on how many photos there are copied to start the... backup procedure. When you see a screen saying that connects the printer to your computer (otherwise files on the ...

Printer Basics
Page 17
... any supported programs or options to open the drive and copy your photos to your computer. Copying Photos to the card from your computer. Copying Photos to Your Computer If you've taken digital photos with your camera and the printer may not work correctly with your camera, you 're done copying...Computer 17 You can choose any drive on your computer. 1. Insert the memory card into your printer's memory card slot and copy the photos to your computer. Make sure your computer and printer are connected and turned on your pictures to read the files on the card. In Windows 98,...
... any supported programs or options to open the drive and copy your photos to your computer. Copying Photos to the card from your computer. Copying Photos to Your Computer If you've taken digital photos with your camera and the printer may not work correctly with your camera, you 're done copying...Computer 17 You can choose any drive on your computer. 1. Insert the memory card into your printer's memory card slot and copy the photos to your computer. Make sure your computer and printer are connected and turned on your pictures to read the files on the card. In Windows 98,...

Printer Basics
Page 18
... the USB cable. 1. Open the Settings menu and choose Change Settings. ■ On a Macintosh, open the EPSON PhotoStarter (or EPSON PhotoStarter for X) folder, open EPSON PhotoStarter, and choose Change Settings from your computer quickly and easily. To remove a card, pull it . The ... PhotoStarter copies your printer. For more information, see the PhotoStarter setup assistant: 2. Removing a Memory Card Once you see the Confirmation window, click End. Be sure all cards have been removed before unplugging the USB cable from your desktop to the Photos folder on the card...
... the USB cable. 1. Open the Settings menu and choose Change Settings. ■ On a Macintosh, open the EPSON PhotoStarter (or EPSON PhotoStarter for X) folder, open EPSON PhotoStarter, and choose Change Settings from your computer quickly and easily. To remove a card, pull it . The ... PhotoStarter copies your printer. For more information, see the PhotoStarter setup assistant: 2. Removing a Memory Card Once you see the Confirmation window, click End. Be sure all cards have been removed before unplugging the USB cable from your desktop to the Photos folder on the card...

Printer Basics
Page 19
...see page 20. 19 If you choose which photos to print. To print larger photos, see page 21. Press or to highlight the photo number you how to select a single photo. 1. Easy Photo Printing Before you begin, make sure the printer is one. The following example tells you .... If the printer is in Advanced mode, press the Basic/Advanced button to highlight Select Photo, then press OK. 2. Before you can only print 4 × 6 inch photos in Basic mode. Printing Without a Computer Your Epson Stylus Photo R320 lets you need to load 4 × 6 inch Epson Premium Glossy Photo Paper (see ...
...see page 20. 19 If you choose which photos to print. To print larger photos, see page 21. Press or to highlight the photo number you how to select a single photo. 1. Easy Photo Printing Before you begin, make sure the printer is one. The following example tells you .... If the printer is in Advanced mode, press the Basic/Advanced button to highlight Select Photo, then press OK. 2. Before you can only print 4 × 6 inch photos in Basic mode. Printing Without a Computer Your Epson Stylus Photo R320 lets you need to load 4 × 6 inch Epson Premium Glossy Photo Paper (see ...

Printer Basics
Page 21
... 21 Press or to select the number of your card-for each photo (1 to 100), then press OK. Custom Photo Printing Before you want to print, then press OK. If the printer is in Basic mode, press the Basic/Advanced button to enter the Paper Type menu. Keep in mind that if you... selected each -for example, photos 2, 9, and 17. ■ All: Print all the photos on your card ■ Index: Print an index sheet...
... 21 Press or to select the number of your card-for each photo (1 to 100), then press OK. Custom Photo Printing Before you want to print, then press OK. If the printer is in Basic mode, press the Basic/Advanced button to enter the Paper Type menu. Keep in mind that if you... selected each -for example, photos 2, 9, and 17. ■ All: Print all the photos on your card ■ Index: Print an index sheet...

Printer Basics
Page 24
...camera doesn't support PRINT Image Matching or Exif Print, you can use the printer's P.I .M., Exif Print, or PhotoEnhance are available: ■ Automatic adjustments (see page 25) If your selected photos. 2. or Exif Print setting to automatically adjust your settings. These settings are...when you can make adjustments for the best results. Touching Up Your Photos Your Epson Stylus Photo R320 lets you correct the color and improve the image quality of photos, so remember to turn off the printer or choose a different set of your camera supports PRINT Image Matching or...
...camera doesn't support PRINT Image Matching or Exif Print, you can use the printer's P.I .M., Exif Print, or PhotoEnhance are available: ■ Automatic adjustments (see page 25) If your selected photos. 2. or Exif Print setting to automatically adjust your settings. These settings are...when you can make adjustments for the best results. Touching Up Your Photos Your Epson Stylus Photo R320 lets you correct the color and improve the image quality of photos, so remember to turn off the printer or choose a different set of your camera supports PRINT Image Matching or...


