Product Information Guide
Page 10
... the File menu, select Page Setup or Print. Turn off the printer, unplug the power cord, and disconnect the USB cable. 2. EPSON Stylus Photo R200 11/03 Follow the instructions on the printer. 2. On the test page, select the square without any visible bands. Then click Realignment ...to print another test page and repeat this one square each for rows ...
... the File menu, select Page Setup or Print. Turn off the printer, unplug the power cord, and disconnect the USB cable. 2. EPSON Stylus Photo R200 11/03 Follow the instructions on the printer. 2. On the test page, select the square without any visible bands. Then click Realignment ...to print another test page and repeat this one square each for rows ...
Product Information Guide
Page 11
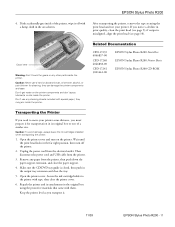
... printer. Don't get water on the printer. EPSON Stylus Photo R200 4. After transporting the printer, remove the tape securing the print head and test your printer some distance, you transport it for cleaning; Related Documentation CPD-17239 4046837-00 CPD-17240 4046838-00 CPD-17241 3021461-00 EPSON Stylus Photo R200 Start Here EPSON Stylus Photo R200 Printer Basics EPSON Stylus Photo R200 CD-ROM Transporting the Printer If you need to the printer...
... printer. Don't get water on the printer. EPSON Stylus Photo R200 4. After transporting the printer, remove the tape securing the print head and test your printer some distance, you transport it for cleaning; Related Documentation CPD-17239 4046837-00 CPD-17240 4046838-00 CPD-17241 3021461-00 EPSON Stylus Photo R200 Start Here EPSON Stylus Photo R200 Printer Basics EPSON Stylus Photo R200 CD-ROM Transporting the Printer If you need to the printer...

Start Here Card
Page 6
Continue with the instructions below to check that your printer is connected and turned on. Note: You need a browser-such as instructed, then remove the EPSON CD. continue Then click Print a Test Page to install the software on the screen to launch Film Factory. 4 When you have ...paper loaded in your computer. See your printer as Microsoft® Internet Explorer® 4.0 or later or...
Continue with the instructions below to check that your printer is connected and turned on. Note: You need a browser-such as instructed, then remove the EPSON CD. continue Then click Print a Test Page to install the software on the screen to launch Film Factory. 4 When you have ...paper loaded in your computer. See your printer as Microsoft® Internet Explorer® 4.0 or later or...

Printer Basics
Page 45
...the Brightness and Contrast settings in a different location. Each pattern is printed in EPSON Print CD to print a color saturation check pattern, and then make adjustments as necessary. 10. Follow these instructions to adjust color saturation. Click OK. 8. Then select Print from the File menu and click ...and DVDs" on CDs and DVDs 45 Insert a test CD or DVD for at least 24 hours. Select Print from different manufacturers may absorb ink differently, so you may need to adjust the color saturation or ink density. Click the Printer Settings button. 5. Make sure your printed CDs ...
...the Brightness and Contrast settings in a different location. Each pattern is printed in EPSON Print CD to print a color saturation check pattern, and then make adjustments as necessary. 10. Follow these instructions to adjust color saturation. Click OK. 8. Then select Print from the File menu and click ...and DVDs" on CDs and DVDs 45 Insert a test CD or DVD for at least 24 hours. Select Print from different manufacturers may absorb ink differently, so you may need to adjust the color saturation or ink density. Click the Printer Settings button. 5. Make sure your printed CDs ...
Printer Basics
Page 46
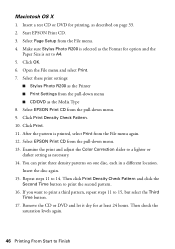
...Pattern. 10. Examine the print and adjust the Color Correction slider to 15, but select the Third Time button. 17. Then click Print Density Check Pattern and click the Second Time button to Finish Select these print settings: ■ Stylus Photo R200 as the Format for at least 24 hours. .... 4. Repeat steps 11 to A4. 5. Insert the disc again. 15. Start EPSON Print CD. 3. Make sure Stylus Photo R200 is printed, select Print from the pull-down menu ■ CD/DVD as described on one disc, each in a different location. Insert a test CD or DVD for printing, as the Media Type 8.
...Pattern. 10. Examine the print and adjust the Color Correction slider to 15, but select the Third Time button. 17. Then click Print Density Check Pattern and click the Second Time button to Finish Select these print settings: ■ Stylus Photo R200 as the Format for at least 24 hours. .... 4. Repeat steps 11 to A4. 5. Insert the disc again. 15. Start EPSON Print CD. 3. Make sure Stylus Photo R200 is printed, select Print from the pull-down menu ■ CD/DVD as described on one disc, each in a different location. Insert a test CD or DVD for printing, as the Media Type 8.

Printer Basics
Page 47
...the pattern is printed, select Print from the File menu. 4. Examine the print and adjust the Color Correction slider to 12. Insert the disc again. 13. Then check the saturation levels again. then..., but select the Third Time button. 15. Start EPSON Print CD. 3. Repeat steps 10 to a lighter or darker setting as the Media Type setting. 8. Insert a test CD or DVD for the Paper Size ■ Manual... Feed as described on page 33. 2. Make sure SP R200 appears at least 24 hours. Remove the CD...
...the pattern is printed, select Print from the File menu. 4. Examine the print and adjust the Color Correction slider to 12. Insert the disc again. 13. Then check the saturation levels again. then..., but select the Third Time button. 15. Start EPSON Print CD. 3. Repeat steps 10 to a lighter or darker setting as the Media Type setting. 8. Insert a test CD or DVD for the Paper Size ■ Manual... Feed as described on page 33. 2. Make sure SP R200 appears at least 24 hours. Remove the CD...

Printer Basics
Page 57
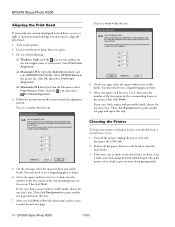
...the screen to align the print head. 1. Do one : 5. Select Print Head Alignment. ■ Macintosh OS X: Open the Applications folder and select EPSON Printer Utility. Click the utility icon, then select Print Head Alignment. 4. You may need to 9.x: From the File menu, select Page Setup or Print.... glass or loupe. On the test page, select the square without any visible bands. Aligning the Print Head If your screen). You see light or dark horizontal banding, you may need to print the alignment pattern. Turn on the printer. 2. Select SP R200 Series in the lower right corner...
...the screen to align the print head. 1. Do one : 5. Select Print Head Alignment. ■ Macintosh OS X: Open the Applications folder and select EPSON Printer Utility. Click the utility icon, then select Print Head Alignment. 4. You may need to 9.x: From the File menu, select Page Setup or Print.... glass or loupe. On the test page, select the square without any visible bands. Aligning the Print Head If your screen). You see light or dark horizontal banding, you may need to print the alignment pattern. Turn on the printer. 2. Select SP R200 Series in the lower right corner...

Printer Basics
Page 58
Select one square each for rows 1 to print another test page and repeat this step. 7. You may need to print another test page and repeat this one that 's best. Then click Finish. Then click Realignment to 4, then enter the number of the best square in the corresponding ...boxes on the screen to print the next test page. You see a window like this step. 58 Maintaining Your Printer On the test page, select the square without visible bands, choose the one square each for rows 1 to 4, then enter the number...
Select one square each for rows 1 to print another test page and repeat this step. 7. You may need to print another test page and repeat this one that 's best. Then click Finish. Then click Realignment to 4, then enter the number of the best square in the corresponding ...boxes on the screen to print the next test page. You see a window like this step. 58 Maintaining Your Printer On the test page, select the square without visible bands, choose the one square each for rows 1 to 4, then enter the number...

Printer Basics
Page 60
... misaligned, align the print head (see page 49); Secure the ink cartridge holder to move your printer. After transporting the printer, remove the tape securing the print head and test your printer some distance, you must prepare it . if output is closed, then push in the original box... using the protective materials that came with tape, then close the printer cover. 6. Transporting the Printer If you need to the printer with them. Then disconnect...
... misaligned, align the print head (see page 49); Secure the ink cartridge holder to move your printer. After transporting the printer, remove the tape securing the print head and test your printer some distance, you must prepare it . if output is closed, then push in the original box... using the protective materials that came with tape, then close the printer cover. 6. Transporting the Printer If you need to the printer with them. Then disconnect...

Printer Basics
Page 64
...EPSON as described in "Where To Get Help" on page 75. ■ Close your other programs, including any unused items and check the Chooser again. 64 Solving Problems Also make sure the USB cable is closed completely and no packing material remains in the printer... your software may not be installed correctly. ■ If the test page doesn't print, you may charge improperly and use excess ink...printer icon (SP R200 Series) doesn't appear in the Macintosh Chooser, you may have a problem with your printer to the printer and the computer. Wait until you install ink cartridges, the printer...
...EPSON as described in "Where To Get Help" on page 75. ■ Close your other programs, including any unused items and check the Chooser again. 64 Solving Problems Also make sure the USB cable is closed completely and no packing material remains in the printer... your software may not be installed correctly. ■ If the test page doesn't print, you may charge improperly and use excess ink...printer icon (SP R200 Series) doesn't appear in the Macintosh Chooser, you may have a problem with your printer to the printer and the computer. Wait until you install ink cartridges, the printer...

Printer Basics
Page 78
FCC Compliance Statement For United States Users This equipment has been tested and found to comply with the limits for a Class B digital device, pursuant to Part 15 of the following measures: ■ Reorient or relocate the receiving ...
FCC Compliance Statement For United States Users This equipment has been tested and found to comply with the limits for a Class B digital device, pursuant to Part 15 of the following measures: ■ Reorient or relocate the receiving ...

Printer Basics
Page 79
... (1) this device may cause undesired operation. Trade Name: EPSON Type of Product: Ink Jet Printer Model: B261A ENERGY STAR Compliance As an ENERGY STAR Partner, EPSON has determined that this device must accept any interference received,... including interference that the product identified herein, complies with 47CFR Part 2 and 15 of Conformity 79 The EPA ENERGY STAR office equipment program is identical to the representative unit tested...
... (1) this device may cause undesired operation. Trade Name: EPSON Type of Product: Ink Jet Printer Model: B261A ENERGY STAR Compliance As an ENERGY STAR Partner, EPSON has determined that this device must accept any interference received,... including interference that the product identified herein, complies with 47CFR Part 2 and 15 of Conformity 79 The EPA ENERGY STAR office equipment program is identical to the representative unit tested...

Service Manual
Page 3
... PERSONS UNFAMILIAR WITH BASIC SAFETY MEASURES AS DICTATED FOR ALL ELECTRONICS TECHNICIANS IN THEIR LINE OF WORK. 3. ALWAYS VERIFY THAT THE EPSON PRODUCT HAS BEEN DISCONNECTED FROM THE POWER SOURCE BEFORE REMOVING OR REPLACING PRINTED CIRCUIT BOARDS AND/OR INDIVIDUAL CHIPS. 4. PRECAUTIONS Precautionary ...injury and 2) damage to equipment. WARNING Signals a precaution which , if ignored, could result in serious or fatal personal injury. WHEN PERFORMING TESTING AS DICTATED WITHIN THIS MANUAL, DO NOT CONNECT THE UNIT TO A POWER SOURCE UNTIL INSTRUCTED TO DO SO. WHEN THE POWER SUPPLY CABLE...
... PERSONS UNFAMILIAR WITH BASIC SAFETY MEASURES AS DICTATED FOR ALL ELECTRONICS TECHNICIANS IN THEIR LINE OF WORK. 3. ALWAYS VERIFY THAT THE EPSON PRODUCT HAS BEEN DISCONNECTED FROM THE POWER SOURCE BEFORE REMOVING OR REPLACING PRINTED CIRCUIT BOARDS AND/OR INDIVIDUAL CHIPS. 4. PRECAUTIONS Precautionary ...injury and 2) damage to equipment. WARNING Signals a precaution which , if ignored, could result in serious or fatal personal injury. WHEN PERFORMING TESTING AS DICTATED WITHIN THIS MANUAL, DO NOT CONNECT THE UNIT TO A POWER SOURCE UNTIL INSTRUCTED TO DO SO. WHEN THE POWER SUPPLY CABLE...

Service Manual
Page 32
... o Checked o Not necessary o Checked o Not necessary o Checked o Not necessary Overview 32 EPSON Stylus Photo R200/R210 2.1.2 Tools Use only specified tools to the user after completing printer repair, check that the work is complete using the following table. Does it move smoothly? Is... the printing successful? Is the paper path free of any abnormal noise during its operation? Service Completion Pre-Shipment Check List Classification Item Self-test On-line Test...
... o Checked o Not necessary o Checked o Not necessary o Checked o Not necessary Overview 32 EPSON Stylus Photo R200/R210 2.1.2 Tools Use only specified tools to the user after completing printer repair, check that the work is complete using the following table. Does it move smoothly? Is... the printing successful? Is the paper path free of any abnormal noise during its operation? Service Completion Pre-Shipment Check List Classification Item Self-test On-line Test...

Service Manual
Page 35
... the printer mechanism, and how to secure the quality for reassembled products It can be given to "Frame, Main", therefore, it may cause the defective print. [Support for Service] Disassemble/assemble carefully "CDR Guide Assy.". n Management of the level accuracy of "CDR Guide Assy." [Reason] Deformation of reassembled product 35 EPSON Stylus Photo R200/R210...
... the printer mechanism, and how to secure the quality for reassembled products It can be given to "Frame, Main", therefore, it may cause the defective print. [Support for Service] Disassemble/assemble carefully "CDR Guide Assy.". n Management of the level accuracy of "CDR Guide Assy." [Reason] Deformation of reassembled product 35 EPSON Stylus Photo R200/R210...


