

Technical Brief (Ink Jet Printers)
Page 3
... FAQs on the same page. Epson Papers: In general, Epson printers will deliver their best output quality when used herein are designed to get sharp black text, superb photo quality photos, or both on the Epson ink sets in various patterns so you never have to swap an ink cartridge to produce their respective owners. Epson, Exceed Your Vision, MicroPiezo...
... FAQs on the same page. Epson Papers: In general, Epson printers will deliver their best output quality when used herein are designed to get sharp black text, superb photo quality photos, or both on the Epson ink sets in various patterns so you never have to swap an ink cartridge to produce their respective owners. Epson, Exceed Your Vision, MicroPiezo...
Product Information Guide
Page 1
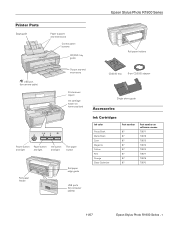
Epson Stylus Photo R1900 Series Printer Parts Edge guide Paper support and extensions Control panel buttons CD/DVD tray guide Roll paper holders USB port (for camera cable) Output tray and extensions Printer cover (open) Ink cartridge holder (in home position) Power button Paper button Ink button and light and light and light Roll paper button Roll paper feeder Roll...
Epson Stylus Photo R1900 Series Printer Parts Edge guide Paper support and extensions Control panel buttons CD/DVD tray guide Roll paper holders USB port (for camera cable) Output tray and extensions Printer cover (open) Ink cartridge holder (in home position) Power button Paper button Ink button and light and light and light Roll paper button Roll paper feeder Roll...
Product Information Guide
Page 5
... devices) 11/07 Epson Stylus Photo R1900 Series - 5 Color Cartridge life Temperature Photo Black, Matte Black, Cyan, Magenta, Yellow, Red, Orange, Gloss Optimizer (see page 1 for part numbers) Opened package: within six months of use, and temperature. For print quality, a small amount of ink remains in printer damage. The use of cartridges is usable after the "replace cartridge" indicator comes on...
... devices) 11/07 Epson Stylus Photo R1900 Series - 5 Color Cartridge life Temperature Photo Black, Matte Black, Cyan, Magenta, Yellow, Red, Orange, Gloss Optimizer (see page 1 for part numbers) Opened package: within six months of use, and temperature. For print quality, a small amount of ink remains in printer damage. The use of cartridges is usable after the "replace cartridge" indicator comes on...
Product Information Guide
Page 6
... Load paper and press the I CD/DVD tray and press the paper button. Insert the I paper button. Replace or reinstall the cartridge. Ink in the sheet feeder (except roll paper; Remove the loaded paper to print on a CD/DVD or close the CD/DVD tray ... Epson for the type of their service life or an unknown error has occurred. Running a Printer Check A printer check will help . Disconnect any obstructions, and turn on paper. Your problem may be out. You can continue printing, or check which cartridge is closed. Check the list on . Epson Stylus Photo R1900 Series...
... Load paper and press the I CD/DVD tray and press the paper button. Insert the I paper button. Replace or reinstall the cartridge. Ink in the sheet feeder (except roll paper; Remove the loaded paper to print on a CD/DVD or close the CD/DVD tray ... Epson for the type of their service life or an unknown error has occurred. Running a Printer Check A printer check will help . Disconnect any obstructions, and turn on paper. Your problem may be out. You can continue printing, or check which cartridge is closed. Check the list on . Epson Stylus Photo R1900 Series...
Product Information Guide
Page 12
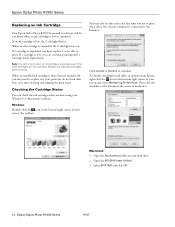
... in the bottom right corner of the screen to print. Open the EPSON Printer Utility2. 3. Macintosh 1. You may need to replace it to be able to uncheck it. Epson Stylus Photo R1900 Series 11/07 If a cartridge is low, you try to continue. When an installed ink cartridge is connected to the Internet): Click Accept or Decline to print...
... in the bottom right corner of the screen to print. Open the EPSON Printer Utility2. 3. Macintosh 1. You may need to replace it to be able to uncheck it. Epson Stylus Photo R1900 Series 11/07 If a cartridge is low, you try to continue. When an installed ink cartridge is connected to the Internet): Click Accept or Decline to print...

Product Information Guide
Page 13
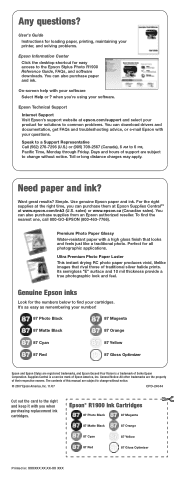
...Ink Cartridges Purchase these genuine Epson cartridges: Ink color Photo Black Matte Black Cyan Magenta Yellow Red Orange Gloss Optimizer Part number 87 87 87 87 87 87 87 87 Part number on the printer. 2. The printer ships with full cartridges and part of the ink from this first set of ink remains in the cold, allow them . Store ink cartridges in printer... on your old cartridges in the printer until you bring them inside from drying out. Dispose of children. 11/07 Epson Stylus Photo R1900 Series - 13 WARNING: If ink gets on the cartridge and lift the cartridge straight up to ...
...Ink Cartridges Purchase these genuine Epson cartridges: Ink color Photo Black Matte Black Cyan Magenta Yellow Red Orange Gloss Optimizer Part number 87 87 87 87 87 87 87 87 Part number on the printer. 2. The printer ships with full cartridges and part of the ink from this first set of ink remains in the cold, allow them . Store ink cartridges in printer... on your old cartridges in the printer until you bring them inside from drying out. Dispose of children. 11/07 Epson Stylus Photo R1900 Series - 13 WARNING: If ink gets on the cartridge and lift the cartridge straight up to ...
Product Information Guide
Page 14
... the bottom of the cartridge. 11. Press the H ink button to let the printer check and clean the nozzles, if necessary. If you remove a low or expended ink cartridge, you 'll waste ink. It's best to run the automatic nozzle check and cleaning utility first to begin charging the ink. Epson Stylus Photo R1900 Series 11/07 Epson Stylus Photo R1900 Series 6. Once you see...
... the bottom of the cartridge. 11. Press the H ink button to let the printer check and clean the nozzles, if necessary. If you remove a low or expended ink cartridge, you 'll waste ink. It's best to run the automatic nozzle check and cleaning utility first to begin charging the ink. Epson Stylus Photo R1900 Series 11/07 Epson Stylus Photo R1900 Series 6. Once you see...
Product Information Guide
Page 17
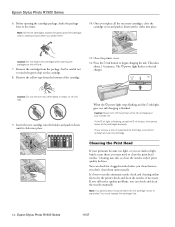
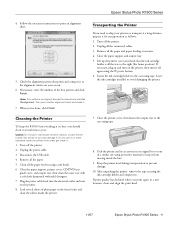
... . Leave the ink cartridges installed to the case using protective material to ship your screen. 6. Remove all the way to clean the printer or you 're done, click Finish. Close the printer cover, then fasten the output tray to prevent damage. 10. Keep the printer level during transportation to the case using a soft brush. 6. Epson Stylus Photo R1900 Series...
... . Leave the ink cartridges installed to the case using protective material to ship your screen. 6. Remove all the way to clean the printer or you 're done, click Finish. Close the printer cover, then fasten the output tray to prevent damage. 10. Keep the printer level during transportation to the case using a soft brush. 6. Epson Stylus Photo R1900 Series...
Start Here
Page 2
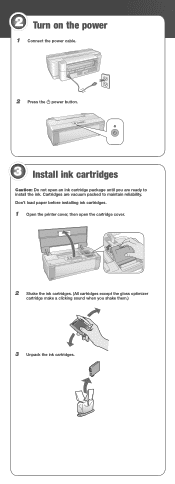
Cartridges are ready to maintain reliability. Don't load paper before installing ink cartridges. 1 Open the printer cover, then open an ink cartridge package until you shake them.) 3 Unpack the ink cartridges. 2 Turn on the power 1 Connect the power cable. 2 Press the power button. 3 Install ink cartridges Caution: Do not open the cartridge cover. 2 Shake the ink cartridges. (All cartridges except the gloss optimizer cartridge make a clicking sound when you are vacuum packed to install the ink.
Cartridges are ready to maintain reliability. Don't load paper before installing ink cartridges. 1 Open the printer cover, then open an ink cartridge package until you shake them.) 3 Unpack the ink cartridges. 2 Turn on the power 1 Connect the power cable. 2 Press the power button. 3 Install ink cartridges Caution: Do not open the cartridge cover. 2 Shake the ink cartridges. (All cartridges except the gloss optimizer cartridge make a clicking sound when you are vacuum packed to install the ink.
Start Here
Page 8
... 87 Red 87 Gloss Optimizer Epson and Epson Stylus are the property of support are subject to change without notice. © 2007 Epson America, Inc. 11/07 CPD-24044 Cut out the card to the Epson Stylus Photo R1900 Reference Guide, FAQs, and software...Epson authorized reseller. To find your printer, and solving problems. Epson Information Center Click the desktop shortcut for all photographic applications. For the right supplies at the right time, you 're using your product for the numbers below to change without notice. Epson® R1900 Ink Cartridges 87 Photo...
... 87 Red 87 Gloss Optimizer Epson and Epson Stylus are the property of support are subject to change without notice. © 2007 Epson America, Inc. 11/07 CPD-24044 Cut out the card to the Epson Stylus Photo R1900 Reference Guide, FAQs, and software...Epson authorized reseller. To find your printer, and solving problems. Epson Information Center Click the desktop shortcut for all photographic applications. For the right supplies at the right time, you 're using your product for the numbers below to change without notice. Epson® R1900 Ink Cartridges 87 Photo...
User's Guide - PDF
Page 3
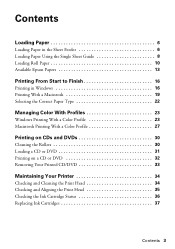
...Loading Roll Paper 10 Available Epson Papers 13 Printing From Start to Finish 16 Printing in Windows 16 Printing With a Macintosh 19 Selecting the Correct Paper Type 22 Managing Color With Profiles 23 Windows Printing With a Color Profile 23 Macintosh Printing With a Color Profile 27 Printing on ...CDs and DVDs 30 Cleaning the Rollers 30 Loading a CD or DVD 31 Printing on a CD or DVD 32 Removing Your Printed CD/DVD 33 Maintaining Your Printer 34 Checking and Cleaning the Print Head 34 Checking and Aligning the Print Head 35 Checking the Ink Cartridge...
...Loading Roll Paper 10 Available Epson Papers 13 Printing From Start to Finish 16 Printing in Windows 16 Printing With a Macintosh 19 Selecting the Correct Paper Type 22 Managing Color With Profiles 23 Windows Printing With a Color Profile 23 Macintosh Printing With a Color Profile 27 Printing on ...CDs and DVDs 30 Cleaning the Rollers 30 Loading a CD or DVD 31 Printing on a CD or DVD 32 Removing Your Printed CD/DVD 33 Maintaining Your Printer 34 Checking and Cleaning the Print Head 34 Checking and Aligning the Print Head 35 Checking the Ink Cartridge...
User's Guide - PDF
Page 5
... individual Epson UltraChrome Hi-Gloss® 2 ink cartridges, including red and orange inks for improved facial tones and increased vibrancy. ■ Improved gloss optimizer cartridge provides a smooth, uniform glossy coat on glossy papers for an unprecedented look and feel. ■ Enhanced media handling of sheets and rolls for precise color management. Introduction Your Epson Stylus® Photo R1900 Series printer gives...
... individual Epson UltraChrome Hi-Gloss® 2 ink cartridges, including red and orange inks for improved facial tones and increased vibrancy. ■ Improved gloss optimizer cartridge provides a smooth, uniform glossy coat on glossy papers for an unprecedented look and feel. ■ Enhanced media handling of sheets and rolls for precise color management. Introduction Your Epson Stylus® Photo R1900 Series printer gives...
User's Guide - PDF
Page 19
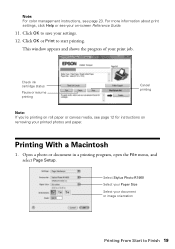
Check ink cartridge status Pause or resume printing Cancel printing Note: If you're printing on roll paper or canvas media, see your on removing your document or ... see page 12 for instructions on -screen Reference Guide. 11. Open a photo or document in a printing program, open the File menu, and select Page Setup. Click OK or Print to save your print job. Select Stylus Photo R1900 Select your Paper Size Select your printed photos and paper. Note: For color management instructions, see page 23.
Check ink cartridge status Pause or resume printing Cancel printing Note: If you're printing on roll paper or canvas media, see your on removing your document or ... see page 12 for instructions on -screen Reference Guide. 11. Open a photo or document in a printing program, open the File menu, and select Page Setup. Click OK or Print to save your print job. Select Stylus Photo R1900 Select your Paper Size Select your printed photos and paper. Note: For color management instructions, see page 23.

User's Guide - PDF
Page 34
... folder, open the EPSON Printer Utility2, select SP R1900, and click OK. If necessary, the printer cleans the print head, and may print and check the nozzle check pattern a few sheets of your screen (the taskbar) and select Auto Head Cleaning. Maintaining Your Printer Follow the steps in... keep the R1900 Series working at its best: ■ "Checking and Cleaning the Print Head" below ■ "Checking and Aligning the Print Head" on page 35 ■ "Checking the Ink Cartridge Status" on page 36 ■ "Replacing Ink Cartridges" on -screen instructions to allow the printer to print...
... folder, open the EPSON Printer Utility2, select SP R1900, and click OK. If necessary, the printer cleans the print head, and may print and check the nozzle check pattern a few sheets of your screen (the taskbar) and select Auto Head Cleaning. Maintaining Your Printer Follow the steps in... keep the R1900 Series working at its best: ■ "Checking and Cleaning the Print Head" below ■ "Checking and Aligning the Print Head" on page 35 ■ "Checking the Ink Cartridge Status" on page 36 ■ "Replacing Ink Cartridges" on -screen instructions to allow the printer to print...
User's Guide - PDF
Page 36
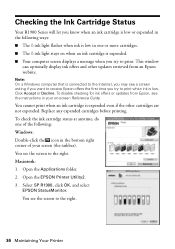
... low in one of your on when an ink cartridge is expended. ■ Your computer screen displays a message when you try to print. Open the EPSON Printer Utility2. 3. Open the Applications folder. 2. Select SP R1900, click OK, and select EPSON StatusMonitor. To disable checking for ink offers or updates from Epson, see the screen to the right. 36...
... low in one of your on when an ink cartridge is expended. ■ Your computer screen displays a message when you try to print. Open the EPSON Printer Utility2. 3. Open the Applications folder. 2. Select SP R1900, click OK, and select EPSON StatusMonitor. To disable checking for ink offers or updates from Epson, see the screen to the right. 36...
User's Guide - PDF
Page 37
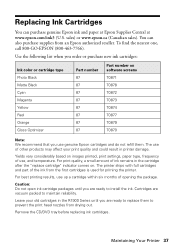
... quality, a small amount of use of the ink from the first cartridges is used for priming the printer. Yields vary considerably based on images printed, print settings, paper type, frequency of ink remains in printer damage. Use the following list when you order or purchase new ink cartridges: Ink color or cartridge type Photo Black Matte Black Cyan Magenta Yellow Red...
... quality, a small amount of use of the ink from the first cartridges is used for priming the printer. Yields vary considerably based on images printed, print settings, paper type, frequency of ink remains in printer damage. Use the following list when you order or purchase new ink cartridges: Ink color or cartridge type Photo Black Matte Black Cyan Magenta Yellow Red...
User's Guide - PDF
Page 38
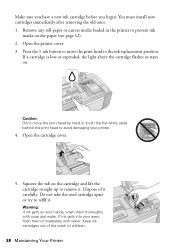
... any roll paper or canvas media loaded in the printer to prevent ink marks on . Press the H ink button to move the print head by hand or touch the flat white cable behind the print head to the ink replacement position. Keep ink cartridges out of the reach of it carefully. Dispose of... children. 38 Maintaining Your Printer Do not take the used cartridge apart or try to remove it . Caution: Don't move the print head...
... any roll paper or canvas media loaded in the printer to prevent ink marks on . Press the H ink button to move the print head by hand or touch the flat white cable behind the print head to the ink replacement position. Keep ink cartridges out of the reach of it carefully. Dispose of... children. 38 Maintaining Your Printer Do not take the used cartridge apart or try to remove it . Caution: Don't move the print head...

User's Guide - PDF
Page 40
... cannot reinstall and use the cartridge. 40 Maintaining Your Printer The P power light flashes as the ink charges. 10. Press the H ink button to begin charging the ink. Caution: Never turn off the R1900 Series while ink is finished. If you remove a low or expended ink cartridge, you replace all the necessary cartridges, close the cartridge cover and push it clicks...
... cannot reinstall and use the cartridge. 40 Maintaining Your Printer The P power light flashes as the ink charges. 10. Press the H ink button to begin charging the ink. Caution: Never turn off the R1900 Series while ink is finished. If you remove a low or expended ink cartridge, you replace all the necessary cartridges, close the cartridge cover and push it clicks...
User's Guide - PDF
Page 42
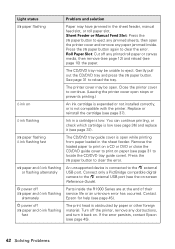
... or canvas media, then remove (see page 12) and reload (see page 45). Press the I paper button. Roll Paper Slot: Cut off the printer, remove any paper jammed inside the R1900 Series are at the end of their I paper button to print on . See page 31 to clear the error. Close the... eject any jammed sheets, then open the printer cover and remove any obstructions, and turn it (see page 37). The CD/DVD tray may be open. Remove the loaded paper to print on An ink cartridge is expended or not installed correctly, or is low. Contact alternately Epson for help (see page 10) the...
... or canvas media, then remove (see page 12) and reload (see page 45). Press the I paper button. Roll Paper Slot: Cut off the printer, remove any paper jammed inside the R1900 Series are at the end of their I paper button to print on . See page 31 to clear the error. Close the... eject any jammed sheets, then open the printer cover and remove any obstructions, and turn it (see page 37). The CD/DVD tray may be open. Remove the loaded paper to print on An ink cartridge is expended or not installed correctly, or is low. Contact alternately Epson for help (see page 10) the...
User's Guide - PDF
Page 44
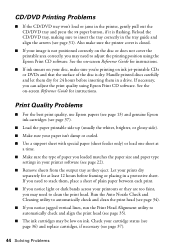
... automatically check and align the print head (see page 35). ■ The ink cartridges may need to stack them dry for instructions. Check your disc, make sure the printer cover is flashing. See the on ink jet-printable CDs or DVDs and that the surface of the disc is not... 24 hours before framing or placing in a protective sheet. Print Quality Problems ■ For the best print quality, use Epson papers (see page 13) and genuine Epson ink cartridges (see page 37). 44 Solving Problems Run the Auto Nozzle Check and Cleaning utility to automatically check and clean the print...
... automatically check and align the print head (see page 35). ■ The ink cartridges may need to stack them dry for instructions. Check your disc, make sure the printer cover is flashing. See the on ink jet-printable CDs or DVDs and that the surface of the disc is not... 24 hours before framing or placing in a protective sheet. Print Quality Problems ■ For the best print quality, use Epson papers (see page 13) and genuine Epson ink cartridges (see page 37). 44 Solving Problems Run the Auto Nozzle Check and Cleaning utility to automatically check and clean the print...


