

Installation Guide - ELPMBUNI Universal Mount Assembly
Page 2
... in the completion of Contents Warranty ...- 3 Contact Premier Mounts ...- 3 Warning Statements ...- 4 Parts List ...- 5 Installation Tools ...- 5 ELPMBUNI Universal Mount Assembly ...- 6 Projector Preparation ...- 7 Securing the Bracket to the Projector ...- 9 Leveling the Mounting bracket ...- 14 Securing the Upper Assembly Ceiling Plate...- 15 Low-Profile... Installation ...- 16 Securing the Projector to mounts, adapters, display equipment or personal injury. Premier Mounts is not liable for improper installation...
... in the completion of Contents Warranty ...- 3 Contact Premier Mounts ...- 3 Warning Statements ...- 4 Parts List ...- 5 Installation Tools ...- 5 ELPMBUNI Universal Mount Assembly ...- 6 Projector Preparation ...- 7 Securing the Bracket to the Projector ...- 9 Leveling the Mounting bracket ...- 14 Securing the Upper Assembly Ceiling Plate...- 15 Low-Profile... Installation ...- 16 Securing the Projector to mounts, adapters, display equipment or personal injury. Premier Mounts is not liable for improper installation...

Installation Guide - ELPMBUNI Universal Mount Assembly
Page 4
... x 12mm Security Head Screws (Qty 4) Portable Drill Pencil Level (Supplied) Stud Finder (Commercially Available) M5 Allen Wrench NOTE: Mounting screws will vary by projector. Lag Screws (#14 x 2") (Qty 3) M4 x 12 Security Head Screws (Qty 4) M3 x 16mm Phillips Head Screws (Qty 4) Installation Tools Phillips...: The following pages for the installation. Make sure that none of these parts are parts missing and/or damaged, please stop the installation and contact Premier Mounts (800-368-9700). ELPMBUNI Parts List NOTE: This mount is not required for model specific hardware: Pages 10...
... x 12mm Security Head Screws (Qty 4) Portable Drill Pencil Level (Supplied) Stud Finder (Commercially Available) M5 Allen Wrench NOTE: Mounting screws will vary by projector. Lag Screws (#14 x 2") (Qty 3) M4 x 12 Security Head Screws (Qty 4) M3 x 16mm Phillips Head Screws (Qty 4) Installation Tools Phillips...: The following pages for the installation. Make sure that none of these parts are parts missing and/or damaged, please stop the installation and contact Premier Mounts (800-368-9700). ELPMBUNI Parts List NOTE: This mount is not required for model specific hardware: Pages 10...

Installation Guide - ELPMBUNI Universal Mount Assembly
Page 7
Installation Manual Next loosen the safety screw knurl knob far enough to allow the two parts to create free play between the bracket tri-lock assembly and the upper section tri-lock assembly points. 5. Figure 2 Tri-Lock Opening Rotate 180° To Unlock Tension Knobs Upper Assembly Safety Knob Figure 3 Figure 4 Page - 8 - ELPMBUNI 4. Separate the upper assembly from the projector mounting bracket by slightly loosening the two tension knurl knobs to be rotated 180° apart and separate.
Installation Manual Next loosen the safety screw knurl knob far enough to allow the two parts to create free play between the bracket tri-lock assembly and the upper section tri-lock assembly points. 5. Figure 2 Tri-Lock Opening Rotate 180° To Unlock Tension Knobs Upper Assembly Safety Knob Figure 3 Figure 4 Page - 8 - ELPMBUNI 4. Separate the upper assembly from the projector mounting bracket by slightly loosening the two tension knurl knobs to be rotated 180° apart and separate.
Product Information Guide
Page 1
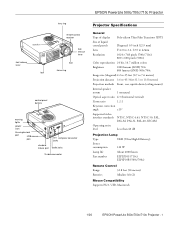
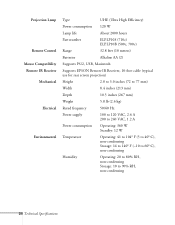
...-N, PAL-60, SECAM Operating noise level Less than 40 dB Projection Lamp Type UHE (Ultra High Efficiency) Power consumption 120 W Lamp life About 2000 hours Part number ELPLP10S (710c) ELPSP10B (500c/700c) Remote Control Range 32.8 feet (10 meters) Batteries Alkaline AA (2) Mouse Compatibility Supports PS/2, USB, Macintosh 1/00 EPSON PowerLite 500c/700c/710c Projector - 1
...-N, PAL-60, SECAM Operating noise level Less than 40 dB Projection Lamp Type UHE (Ultra High Efficiency) Power consumption 120 W Lamp life About 2000 hours Part number ELPLP10S (710c) ELPSP10B (500c/700c) Remote Control Range 32.8 feet (10 meters) Batteries Alkaline AA (2) Mouse Compatibility Supports PS/2, USB, Macintosh 1/00 EPSON PowerLite 500c/700c/710c Projector - 1
Product Information Guide
Page 2
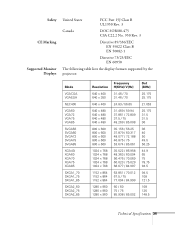
... 157.5 135 162 31.33 30.24 57.28 64 80 100 28.486 20.890 28.846 21.154 28.846 21.154 2 - EPSON PowerLite 500c/700c/710c Projector Mechanical Height Width Depth Weight 2.8 to 3.0 inches (72 to 77 mm) 8.4 inches (213 mm) 10.5 inches (267 mm) 5.8 lb. (2.6 kg) ... correctly. Note: The frequencies of some computers may not allow the image to 90% RH, non-condensing Safety United States Canada FCC Part 15J Class B UL1950 Rev. 3 DOC SOR/88-475 CSA C22.2 No. 950 Rev. 3 Supported Monitor Displays Following are not supported by the projector. EPSON PowerLite 500c/700c/710c Projector 1/00
... 157.5 135 162 31.33 30.24 57.28 64 80 100 28.486 20.890 28.846 21.154 28.846 21.154 2 - EPSON PowerLite 500c/700c/710c Projector Mechanical Height Width Depth Weight 2.8 to 3.0 inches (72 to 77 mm) 8.4 inches (213 mm) 10.5 inches (267 mm) 5.8 lb. (2.6 kg) ... correctly. Note: The frequencies of some computers may not allow the image to 90% RH, non-condensing Safety United States Canada FCC Part 15J Class B UL1950 Rev. 3 DOC SOR/88-475 CSA C22.2 No. 950 Rev. 3 Supported Monitor Displays Following are not supported by the projector. EPSON PowerLite 500c/700c/710c Projector 1/00
Product Information Guide
Page 5
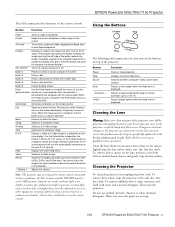
... lint-free cloth. A/V mute Turns off the projector and unplug the power cord. button 5 Erases drawing effects. Illumination Illuminates all other equipment emitting infrared energy is displayed. Volume + Adjusts the volume. Never open any part of an enlarged image which is too bright; ... Picture in Picture (P in a subscreen on top of the projector. - button 2 Draws a box. Resize Switches the display dot mode and resize mode for VGA, UXGA, SVGA, and SXGA input. EPSON PowerLite 500c/700c/710c Projector This table summarizes the functions on the screen. R/C ON/OFF...
... lint-free cloth. A/V mute Turns off the projector and unplug the power cord. button 5 Erases drawing effects. Illumination Illuminates all other equipment emitting infrared energy is displayed. Volume + Adjusts the volume. Never open any part of an enlarged image which is too bright; ... Picture in Picture (P in a subscreen on top of the projector. - button 2 Draws a box. Resize Switches the display dot mode and resize mode for VGA, UXGA, SVGA, and SXGA input. EPSON PowerLite 500c/700c/710c Projector This table summarizes the functions on the screen. R/C ON/OFF...
Product Information Guide
Page 6
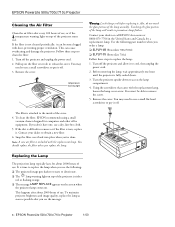
... hours of use. Snap the filter cover back into place when you see the following part number when you see the message. 6 - It is time to replace the lamp when you 're done. EPSON PowerLite 500c/700c/710c Projector 1/00 Contact your dealer to replace the lamp: 1. Turn off . 3. You won...the inside of the cover. 4. You should replace the filter when you don't have one hour until the projector is included with the replacement lamp. EPSON PowerLite 500c/700c/710c Projector Cleaning the Air Filter Clean the air filter after every 100 hours of use, or if the temperature warning ...
... hours of use. Snap the filter cover back into place when you see the following part number when you see the message. 6 - It is time to replace the lamp when you 're done. EPSON PowerLite 500c/700c/710c Projector 1/00 Contact your dealer to replace the lamp: 1. Turn off . 3. You won...the inside of the cover. 4. You should replace the filter when you don't have one hour until the projector is included with the replacement lamp. EPSON PowerLite 500c/700c/710c Projector Cleaning the Air Filter Clean the air filter after every 100 hours of use, or if the temperature warning ...

Product Information Guide
Page 7
...-9732 CPD-9733 CPD-9749 Service Manual Parts Price Lists EPSON PowerLite 500c/700c/710c User's Guide EPSON PowerLite 500c/700c/710c Quick Setup sheet EPSON PowerLite 500c/700c/710c Start Here folder SM-EMP500 PL-EMP500, PL-EMP700, PL-EMP710 1/00 EPSON PowerLite 500c/700c/710c Projector - 7 Then pull out the lamp using the handle. 6. EPSON PowerLite 500c/700c/710c Projector 7. Remove the two mounting screws on...
...-9732 CPD-9733 CPD-9749 Service Manual Parts Price Lists EPSON PowerLite 500c/700c/710c User's Guide EPSON PowerLite 500c/700c/710c Quick Setup sheet EPSON PowerLite 500c/700c/710c Start Here folder SM-EMP500 PL-EMP500, PL-EMP700, PL-EMP710 1/00 EPSON PowerLite 500c/700c/710c Projector - 7 Then pull out the lamp using the handle. 6. EPSON PowerLite 500c/700c/710c Projector 7. Remove the two mounting screws on...
User Manual
Page 2
... product or third parties for use with this EPSON printer. SEIKO EPSON CORPORATION shall not be liable to qualified service personnel. Copyright © 2000 by SEIKO EPSON CORPORATION. Important Safety Information WARNING: Never look into the projector lens when the lamp is on. Never let...Guide or this Supplement, do not attempt to service this information as applied to strictly comply with your eyes. No part of Epson America, Inc. PowerLite is a registered trademark of suffocation. the bright light can severely injure you replace the lamp, never touch the new...
... product or third parties for use with this EPSON printer. SEIKO EPSON CORPORATION shall not be liable to qualified service personnel. Copyright © 2000 by SEIKO EPSON CORPORATION. Important Safety Information WARNING: Never look into the projector lens when the lamp is on. Never let...Guide or this Supplement, do not attempt to service this information as applied to strictly comply with your eyes. No part of Epson America, Inc. PowerLite is a registered trademark of suffocation. the bright light can severely injure you replace the lamp, never touch the new...

User Manual
Page 18
To access the menu system, open the cover on the remote control to change a menu setting: 1. To change menu settings. Volume + You see the following: menus 18 Using the Projector Menus Video menu options Freeze A/V Mute E-Zoom Power R/C ON OFF 3 2 5 4 1 Enter Menu button Esc Menu Help Comp S-Video Video Auto Resize P in P - Changing Menu Settings You use the Menu, Enter and Esc buttons on the lower part of the remote control and press the Menu button.
To access the menu system, open the cover on the remote control to change a menu setting: 1. To change menu settings. Volume + You see the following: menus 18 Using the Projector Menus Video menu options Freeze A/V Mute E-Zoom Power R/C ON OFF 3 2 5 4 1 Enter Menu button Esc Menu Help Comp S-Video Video Auto Resize P in P - Changing Menu Settings You use the Menu, Enter and Esc buttons on the lower part of the remote control and press the Menu button.
User Manual
Page 34
... Mechanical Electrical Environmental Type UHE (Ultra High Efficiency) Power consumption 120 W Lamp life About 2000 hours Part number ELPLP10S (710c) ELPLP10B (500c, 700c) Range 32.8 feet (10 meters) Batteries Alkaline AA (2) Supports PS/2, USB, Macintosh Supports EPSON Remote IR Receiver, 10-foot cable (typical use for rear screen projection) Height 2.8 to 3.0 inches (72...
... Mechanical Electrical Environmental Type UHE (Ultra High Efficiency) Power consumption 120 W Lamp life About 2000 hours Part number ELPLP10S (710c) ELPLP10B (500c, 700c) Range 32.8 feet (10 meters) Batteries Alkaline AA (2) Supports PS/2, USB, Macintosh Supports EPSON Remote IR Receiver, 10-foot cable (typical use for rear screen projection) Height 2.8 to 3.0 inches (72...
User Manual
Page 35
... Supported Monitor Displays United States FCC Part 15J Class B UL1950 Rev. 3 Canada DOC SOR/88-475 CSA C22.2 No. 950 Rev. 3 Directive 89/336/EEC EN 55022 Class B EN 50082-1 Directive 73/23/EEC EN 60950 The following table lists the display formats supported by the projector: Mode VGACGA VGAEGA NEC400 VGA60...
... Supported Monitor Displays United States FCC Part 15J Class B UL1950 Rev. 3 Canada DOC SOR/88-475 CSA C22.2 No. 950 Rev. 3 Directive 89/336/EEC EN 55022 Class B EN 50082-1 Directive 73/23/EEC EN 60950 The following table lists the display formats supported by the projector: Mode VGACGA VGAEGA NEC400 VGA60...
User Manual
Page 41
... comply with your bare hands; No part of this publication may be liable to the purchaser of this information as Original EPSON Products or EPSON Approved Products by SEIKO EPSON CORPORATION. EPSON is a registered trademark of this product...projector and its affiliates shall be trademarks of suffocation. Neither SEIKO EPSON CORPORATION nor its accessories come packaged in those designated as applied to qualified service personnel. Never open any risk of their respective owners. General Notice: Other product names used herein are trademarks, and PowerLite...
... comply with your bare hands; No part of this publication may be liable to the purchaser of this information as Original EPSON Products or EPSON Approved Products by SEIKO EPSON CORPORATION. EPSON is a registered trademark of this product...projector and its affiliates shall be trademarks of suffocation. Neither SEIKO EPSON CORPORATION nor its accessories come packaged in those designated as applied to qualified service personnel. Never open any risk of their respective owners. General Notice: Other product names used herein are trademarks, and PowerLite...

User Manual
Page 51
... packaging (or the equivalent) when you are moving the projector by hand, use a carrying case (either a case available from EPSON or something similar, such as a laptop case). 8 Getting Started If you need to another location. Unpacking the Projector Make sure you have all the parts shown: Freeze A/V Mute E-Zoom Power R/C ON OFF 3 2 5 4 1 Enter Esc...
... packaging (or the equivalent) when you are moving the projector by hand, use a carrying case (either a case available from EPSON or something similar, such as a laptop case). 8 Getting Started If you need to another location. Unpacking the Projector Make sure you have all the parts shown: Freeze A/V Mute E-Zoom Power R/C ON OFF 3 2 5 4 1 Enter Esc...
User Manual
Page 71
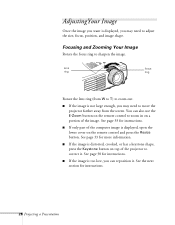
... ring (from the screen. s If the image is not large enough, you may need to move the projector farther away from W to T) to sharpen the image. You can reposition it . s If only part of the projector to correct it . Focusing and Zooming Your Image Rotate the focus ring to zoom out. See page...
... ring (from the screen. s If the image is not large enough, you may need to move the projector farther away from W to T) to sharpen the image. You can reposition it . s If only part of the projector to correct it . Focusing and Zooming Your Image Rotate the focus ring to zoom out. See page...

User Manual
Page 74
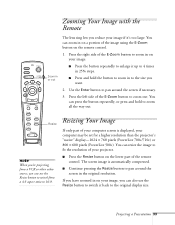
... A/V Mute E-Zoom Power R/C ON OFF 3 2 5 4 1 Enter ON/OFF switch light button cover Operating the Projector with your thumb and finger and tilt it on page 9. 1. Push up the switch on the side of the button...for the function you need to 39 for instructions. 3. See pages 33 to control the projector. See pages 33 to change the batteries. Esc Menu Help Comp S-Video Video Auto Resize... want to turn it in P - Press the round light button. Point the remote at the projector or at the left. Press on the edge of the remote control to move. 5. See page...
... A/V Mute E-Zoom Power R/C ON OFF 3 2 5 4 1 Enter ON/OFF switch light button cover Operating the Projector with your thumb and finger and tilt it on page 9. 1. Push up the switch on the side of the button...for the function you need to 39 for instructions. 3. See pages 33 to control the projector. See pages 33 to change the batteries. Esc Menu Help Comp S-Video Video Auto Resize... want to turn it in P - Press the round light button. Point the remote at the projector or at the left. Press on the edge of the remote control to move. 5. See page...
User Manual
Page 76
... 33 The screen image is displayed, your image, you 're projecting from a 4:3 aspect ratio to zoom out. Resizing Your Image If only part of the E-Zoom button to 4 times in on your image. Press the right side of your computer screen is automatically compressed. Volume + Resize... to pan around the screen in on your computer may be set for a higher resolution than the projector's "native" display-1024 × 768 pixels (PowerLite 700c/710c) or 800 × 600 pixels (PowerLite 500c). s Press and hold to zoom in P - You can also use the Resize button to switch...
... 33 The screen image is displayed, your image, you 're projecting from a 4:3 aspect ratio to zoom out. Resizing Your Image If only part of the E-Zoom button to 4 times in on your image. Press the right side of your computer screen is automatically compressed. Volume + Resize... to pan around the screen in on your computer may be set for a higher resolution than the projector's "native" display-1024 × 768 pixels (PowerLite 700c/710c) or 800 × 600 pixels (PowerLite 500c). s Press and hold to zoom in P - You can also use the Resize button to switch...

User Manual
Page 90
...center of the remote control and press the Menu button. Volume + Changing Menu Settings You use the Menu, Enter and Esc buttons on the lower part of the Enter button to change menu settings. 1. When the menu you highlight a menu, its options are displayed at the left side of ... (or grasp it between your thumb and finger and tilt it to the side) to select it down ) to change the setting. Fine-Tuning Your Projector 47 Freeze A/V Mute E-Zoom Power R/C ON OFF 3 2 5 4 1 Enter menu button Esc Menu Help Comp S-Video Video Auto Resize P in P - The highlight moves to...
...center of the remote control and press the Menu button. Volume + Changing Menu Settings You use the Menu, Enter and Esc buttons on the lower part of the Enter button to change menu settings. 1. When the menu you highlight a menu, its options are displayed at the left side of ... (or grasp it between your thumb and finger and tilt it to the side) to select it down ) to change the setting. Fine-Tuning Your Projector 47 Freeze A/V Mute E-Zoom Power R/C ON OFF 3 2 5 4 1 Enter menu button Esc Menu Help Comp S-Video Video Auto Resize P in P - The highlight moves to...
User Manual
Page 102
... dirt or smears on the lens will show up on top of the projector, turn it from overheating. 4Maintaining and Transporting the Projector warning Before cleaning any part of the projector periodically. Your projector needs little maintenance. Do not try to cool the projector and keep the lens clean. All you need to qualified service personnel...
... dirt or smears on the lens will show up on top of the projector, turn it from overheating. 4Maintaining and Transporting the Projector warning Before cleaning any part of the projector periodically. Your projector needs little maintenance. Do not try to cool the projector and keep the lens clean. All you need to qualified service personnel...

User Manual
Page 105
...message LAMP REPLACE appears on the screen when the projector lamp comes on top of use . Contact your dealer or call EPSON Accessories at (800) 873-7766 in the United States and Canada for about 2000 hours of the projector is either red or flashing orange. It is fully... when you order a lamp: s ELPLP10B (PowerLite 700c/500c) s ELPLP10S (PowerLite 710c) Follow these steps to replace the lamp: 1. s The lamp warning light on . This happens after you see the following part number when you see the message. Turn off the projector and allow it . To avoid premature lamp failure...
...message LAMP REPLACE appears on the screen when the projector lamp comes on top of use . Contact your dealer or call EPSON Accessories at (800) 873-7766 in the United States and Canada for about 2000 hours of the projector is either red or flashing orange. It is fully... when you order a lamp: s ELPLP10B (PowerLite 700c/500c) s ELPLP10S (PowerLite 710c) Follow these steps to replace the lamp: 1. s The lamp warning light on . This happens after you see the following part number when you see the message. Turn off the projector and allow it . To avoid premature lamp failure...


