
ESC/VP Level 21 Communication Manual
Page 1
...before using the EPSON projector. Please be forewarned that use of the user's guide is owned by SEIKO EPSON Corporation (hereinafter... be liable for the purpose of EPSON. 2. You may change or modify this user's ...it. 3. You expressly acknowledge and agree that EPSON may not duplicate, reprint, modify or send the..."LICENSE AGREEMENT". Downloading the User's Guide indicates your own risk. EPSON grants you agree to, and accept the terms of "ESC/VP21 ... of the user's guide only for any damage such as EPSON). EPSON shall not be downloaded until you to the "LICENSE AGREEMENT",...
...before using the EPSON projector. Please be forewarned that use of the user's guide is owned by SEIKO EPSON Corporation (hereinafter... be liable for the purpose of EPSON. 2. You may change or modify this user's ...it. 3. You expressly acknowledge and agree that EPSON may not duplicate, reprint, modify or send the..."LICENSE AGREEMENT". Downloading the User's Guide indicates your own risk. EPSON grants you agree to, and accept the terms of "ESC/VP21 ... of the user's guide only for any damage such as EPSON). EPSON shall not be downloaded until you to the "LICENSE AGREEMENT",...

Installation Guide - ELPMBUNI Universal Mount Assembly
Page 2
... of missing and/or damage equipment, or technical questions, the following information can help in the completion of Contents Warranty ...- 3 Contact Premier Mounts ...- 3 Warning Statements ...- 4 Parts List ...- 5 Installation Tools ...- 5 ELPMBUNI Universal Mount Assembly ...- 6 Projector Preparation ...- 7 Securing the Bracket to the Projector ...- 9 Leveling the Mounting bracket ...- 14 Securing the Upper Assembly Ceiling...
... of missing and/or damage equipment, or technical questions, the following information can help in the completion of Contents Warranty ...- 3 Contact Premier Mounts ...- 3 Warning Statements ...- 4 Parts List ...- 5 Installation Tools ...- 5 ELPMBUNI Universal Mount Assembly ...- 6 Projector Preparation ...- 7 Securing the Bracket to the Projector ...- 9 Leveling the Mounting bracket ...- 14 Securing the Upper Assembly Ceiling...

Installation Guide - ELPMBUNI Universal Mount Assembly
Page 4
ELPMBUNI Parts List NOTE: This mount is not required for model specific hardware: Pages 10, 11, 12, and 13. Upper Assembly (Qty 1) Mounting Bracket (Qty 1) Plastic Barrel ... Head Screw Driver Soft Material/ Blanket Allen Wrench (Supplied) Tape Measure Ladder NOTE: The following pages for the installation. Make sure that none of these parts are parts missing and/or damaged, please stop the installation and contact Premier Mounts (800-368-9700). Installation Manual Page - 5 - M5 x 12mm Security Head Screws (Qty...
ELPMBUNI Parts List NOTE: This mount is not required for model specific hardware: Pages 10, 11, 12, and 13. Upper Assembly (Qty 1) Mounting Bracket (Qty 1) Plastic Barrel ... Head Screw Driver Soft Material/ Blanket Allen Wrench (Supplied) Tape Measure Ladder NOTE: The following pages for the installation. Make sure that none of these parts are parts missing and/or damaged, please stop the installation and contact Premier Mounts (800-368-9700). Installation Manual Page - 5 - M5 x 12mm Security Head Screws (Qty...

Installation Guide - ELPMBUNI Universal Mount Assembly
Page 7
Figure 2 Tri-Lock Opening Rotate 180° To Unlock Tension Knobs Upper Assembly Safety Knob Figure 3 Figure 4 Page - 8 - Next loosen the safety screw knurl knob far enough to allow the two parts to create free play between the bracket tri-lock assembly and the upper section tri-lock assembly points. 5. Installation Manual Separate the upper assembly from the projector mounting bracket by slightly loosening the two tension knurl knobs to be rotated 180° apart and separate. ELPMBUNI 4.
Figure 2 Tri-Lock Opening Rotate 180° To Unlock Tension Knobs Upper Assembly Safety Knob Figure 3 Figure 4 Page - 8 - Next loosen the safety screw knurl knob far enough to allow the two parts to create free play between the bracket tri-lock assembly and the upper section tri-lock assembly points. 5. Installation Manual Separate the upper assembly from the projector mounting bracket by slightly loosening the two tension knurl knobs to be rotated 180° apart and separate. ELPMBUNI 4.

Product Brochure
Page 2
... Power cable, computer cable, projector remote control, batteries, soft carrying case, CD-ROM, Quick Setup Sheet, PrivateLine support card, password protection sticker Product/Accessory Part Numbers Epson PowerLite S4 projector Replacement lamp Air filter set (2 filters) Universal ceiling mount Suspension adapter False ceiling plate Adjustable ceiling channel (ceiling plate not included or required) Security...
... Power cable, computer cable, projector remote control, batteries, soft carrying case, CD-ROM, Quick Setup Sheet, PrivateLine support card, password protection sticker Product/Accessory Part Numbers Epson PowerLite S4 projector Replacement lamp Air filter set (2 filters) Universal ceiling mount Suspension adapter False ceiling plate Adjustable ceiling channel (ceiling plate not included or required) Security...

Product Information Guide
Page 1
Epson PowerLite S4 Projector Parts Lamp cover Control panel Focus ring Ventilation slots Lens cover Infrared receiver Foot release button Adjustable foot (for raising projector) Monitor Out port Computer port S-... page 5) Lamp Type UHE (Ultra High Efficiency) Power consumption 170 W Lamp life 2000 to 3000 hours, depending on brightness mode selected Part number V13H010L36 Remote Control Range 20 feet (6 meters) Battery AAA × 2 Dimensions Height Width Depth Weight 3.4 inches (87 mm) 12.9 inches (327 mm) 9.7 inches (247 mm) 5.7 lb (2.6 kg) 6/06 Epson PowerLite S4 - 1
Epson PowerLite S4 Projector Parts Lamp cover Control panel Focus ring Ventilation slots Lens cover Infrared receiver Foot release button Adjustable foot (for raising projector) Monitor Out port Computer port S-... page 5) Lamp Type UHE (Ultra High Efficiency) Power consumption 170 W Lamp life 2000 to 3000 hours, depending on brightness mode selected Part number V13H010L36 Remote Control Range 20 feet (6 meters) Battery AAA × 2 Dimensions Height Width Depth Weight 3.4 inches (87 mm) 12.9 inches (327 mm) 9.7 inches (247 mm) 5.7 lb (2.6 kg) 6/06 Epson PowerLite S4 - 1

Product Information Guide
Page 2
... card must be set at a refresh rate that's compatible with such signals. However, not all functions may be supported with the projector. Epson PowerLite S4 6/06 See your computer documentation for details. Computer Signal Refresh Rate (Hz) Resolution (dots) Resized display resolution (dots) VGA 60 VGAEGA... × 450 It may be possible to 90% RH, non-condensing Operating altitude 7500 feet (2280 meters) Safety United States Canada FCC Part 15B Class B (DoC) UL60950 Third Edition ICES-003 Class B CSA C22.2 No. 60950 ) Compatible Video Formats The projector supports the...
... card must be set at a refresh rate that's compatible with such signals. However, not all functions may be supported with the projector. Epson PowerLite S4 6/06 See your computer documentation for details. Computer Signal Refresh Rate (Hz) Resolution (dots) Resized display resolution (dots) VGA 60 VGAEGA... × 450 It may be possible to 90% RH, non-condensing Operating altitude 7500 feet (2280 meters) Safety United States Canada FCC Part 15B Class B (DoC) UL60950 Third Edition ICES-003 Class B CSA C22.2 No. 60950 ) Compatible Video Formats The projector supports the...
Product Information Guide
Page 4
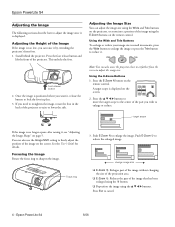
...Reduces the part of the image using the u d l r buttons. This unlocks the foot. If you wish to lock the foot in place. 3. Using the Wide and Tele Buttons To enlarge or reduce your image size in the back of the Image If the image is displayed. Epson PowerLite S4 Adjusting ...the Image The following sections describe how to reduce it. Epson PowerLite S4 6/06 Note: You can raise it , see "Adjusting the Image Shape" on the remote control. Press...
...Reduces the part of the image using the u d l r buttons. This unlocks the foot. If you wish to lock the foot in place. 3. Using the Wide and Tele Buttons To enlarge or reduce your image size in the back of the Image If the image is displayed. Epson PowerLite S4 Adjusting ...the Image The following sections describe how to reduce it. Epson PowerLite S4 6/06 Note: You can raise it , see "Adjusting the Image Shape" on the remote control. Press...
Product Information Guide
Page 7
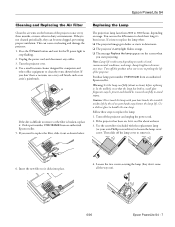
... fragments may shorten the lamp life. Loosen the two screws securing the lamp (they can cause overheating and damage the projector. 1. Epson PowerLite S4 Cleaning and Replacing the Air Filter Clean the air vents on , let it cool for about an hour) before replacing it . ... the way out). 6/06 Epson PowerLite S4 - 7 Press the P Power button and wait for computers and other office equipment to remove it . Unplug the power cord and disconnect any cables. 3. Lamp brightness decreases over . 4. Purchase lamp part number V13H010L36 from an authorized Epson reseller. Warning: Let the ...
... fragments may shorten the lamp life. Loosen the two screws securing the lamp (they can cause overheating and damage the projector. 1. Epson PowerLite S4 Cleaning and Replacing the Air Filter Clean the air vents on , let it cool for about an hour) before replacing it . ... the way out). 6/06 Epson PowerLite S4 - 7 Press the P Power button and wait for computers and other office equipment to remove it . Unplug the power cord and disconnect any cables. 3. Lamp brightness decreases over . 4. Purchase lamp part number V13H010L36 from an authorized Epson reseller. Warning: Let the ...

Product Information Guide
Page 8
... High resolution document imager Kensington security lock Part number V13H010L36 V13H134A08 ELPSC06 ELPSC07 ELPSC08 ELPSC09 ELPMBUNI ELPMBFCP ELPMBSEC ELPMBAPL ELPMBACC ELPSV01 ELPKC19 ELPDA01 ELPKS35-S ELPKS43 ELPKS54 V12H162020 ELPSL01 You can keep track of the lamp assembly. Related Documentation CPD-21361 CPD-21358R1 CPD-21666 Epson Powerlite S4 Projector User's Guide (HTML manual on the...
... High resolution document imager Kensington security lock Part number V13H010L36 V13H134A08 ELPSC06 ELPSC07 ELPSC08 ELPSC09 ELPMBUNI ELPMBFCP ELPMBSEC ELPMBAPL ELPMBACC ELPSV01 ELPKC19 ELPDA01 ELPKS35-S ELPKS43 ELPKS54 V12H162020 ELPSL01 You can keep track of the lamp assembly. Related Documentation CPD-21361 CPD-21358R1 CPD-21666 Epson Powerlite S4 Projector User's Guide (HTML manual on the...
User Manual
Page 2
... be trademarks of Seiko Epson Corporation. No part of this publication may be reproduced, stored in a retrieval system, or transmitted in those designated as Original Epson Products or Epson Approved Products by any form or by Seiko Epson Corporation. Epson is a registered trademark of their respective owners. and PrivateLine, Presenters Club, and PowerLite are for damages, losses...
... be trademarks of Seiko Epson Corporation. No part of this publication may be reproduced, stored in a retrieval system, or transmitted in those designated as Original Epson Products or Epson Approved Products by any form or by Seiko Epson Corporation. Epson is a registered trademark of their respective owners. and PrivateLine, Presenters Club, and PowerLite are for damages, losses...

User Manual
Page 3
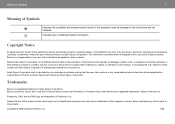
3 Contents Meaning of Symbols Copyright Notice Trademarks Projector Features Setting Up the Projector Part Names and Functions Front/Top Control Panel Rear Base Remote Control Adjusting and Changing the Image 2 Additional Projector Functions 2 Functions for Enhancing... Projection 19 2 Muting the Image and Sound (A/V Mute) 19 Freezing the Image 20 Changing the Aspect Ratio 20 6 Displaying the Pointer 21 7 Enlarging Part of the Image (E-Zoom) 21 7 Using the Remote Control as a Mouse 22 8 Security Functions 24 9 Preventing theft (Password Protect) 24 10 Using...
3 Contents Meaning of Symbols Copyright Notice Trademarks Projector Features Setting Up the Projector Part Names and Functions Front/Top Control Panel Rear Base Remote Control Adjusting and Changing the Image 2 Additional Projector Functions 2 Functions for Enhancing... Projection 19 2 Muting the Image and Sound (A/V Mute) 19 Freezing the Image 20 Changing the Aspect Ratio 20 6 Displaying the Pointer 21 7 Enlarging Part of the Image (E-Zoom) 21 7 Using the Remote Control as a Mouse 22 8 Security Functions 24 9 Preventing theft (Password Protect) 24 10 Using...
User Manual
Page 7
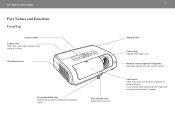
Remote control light-receiving area Receives signals from the remote control. Lens cover Slide shut when not using the projector to adjust the projection angle. Air exhaust vent Front adjustable foot Raises the projector to protect the lens. If you close it while projecting, the image and sound are termporarily stopped. Foot release lever Extends the front foot. 7 Security lock Focus ring Adjusts the image focus. Part Names and Functions Part Names and Functions Front/Top Control panel Lamp cover Open this cover when replacing the projector's lamp.
Remote control light-receiving area Receives signals from the remote control. Lens cover Slide shut when not using the projector to adjust the projection angle. Air exhaust vent Front adjustable foot Raises the projector to protect the lens. If you close it while projecting, the image and sound are termporarily stopped. Foot release lever Extends the front foot. 7 Security lock Focus ring Adjusts the image focus. Part Names and Functions Part Names and Functions Front/Top Control panel Lamp cover Open this cover when replacing the projector's lamp.

User Manual
Page 8
... Adjusts the image size. If a configuration menu or help screen is displayed, it accepts and enters the current selection. [Esc] button Stops the current function. Part Names and Functions Control Panel [Menu] button Displays and closes the configuration menu. [Power] button Turns the projector power on or off. If a configuration menu...
... Adjusts the image size. If a configuration menu or help screen is displayed, it accepts and enters the current selection. [Esc] button Stops the current function. Part Names and Functions Control Panel [Menu] button Displays and closes the configuration menu. [Power] button Turns the projector power on or off. If a configuration menu...
User Manual
Page 9
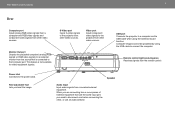
Power inlet Connects to the projector from the source that use an audio selector. Part Names and Functions 9 Rear Computer port Inputs analog RGB video signals from a computer and RGB video signals and component video signals from the remote control. ...
Power inlet Connects to the projector from the source that use an audio selector. Part Names and Functions 9 Rear Computer port Inputs analog RGB video signals from a computer and RGB video signals and component video signals from the remote control. ...
User Manual
Page 10
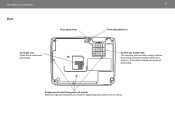
Suspension bracket fixing points (3 points) Attach the optional ceiling mount here when suspending the projector from getting inside the projector when air is drawn in. It should be cleaned and replaced periodically. Part Names and Functions Base Foot adjust lever Air intake vent Clean the air intake vent periodically. 10 Front adjustable foot Air filter (air intake vent) This prevents dust and other foreign particles from a ceiling.
Suspension bracket fixing points (3 points) Attach the optional ceiling mount here when suspending the projector from getting inside the projector when air is drawn in. It should be cleaned and replaced periodically. Part Names and Functions Base Foot adjust lever Air intake vent Clean the air intake vent periodically. 10 Front adjustable foot Air filter (air intake vent) This prevents dust and other foreign particles from a ceiling.

User Manual
Page 21
... and details in the "Settings" menu to change the shape of the pointer to the area you are talking about. Remote control Pointer icon Enlarging Part of three different shapes. Functions for Enhancing Projection 21 Displaying the Pointer This allows you to move a pointer icon on the projected image, and helps...
... and details in the "Settings" menu to change the shape of the pointer to the area you are talking about. Remote control Pointer icon Enlarging Part of three different shapes. Functions for Enhancing Projection 21 Displaying the Pointer This allows you to move a pointer icon on the projected image, and helps...

User Manual
Page 29
... will be saved. p • Saving the user's logo may result in errors in size. 5 When "Select this image?" Move the marquee box to select the part of the image to use the projector or any other sources which are connected to be recorded and a selection marquee box will then be displayed...
... will be saved. p • Saving the user's logo may result in errors in size. 5 When "Select this image?" Move the marquee box to select the part of the image to use the projector or any other sources which are connected to be recorded and a selection marquee box will then be displayed...
User Manual
Page 39
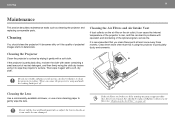
... can cause the projector to warp and make the coating finish peel off. If the projector is recommended that you clean these parts at least once every three months. Cleaning the Air Filters and Air Intake Vent If dust collects on page 44. These can...with a soft cloth. Cleaning the Lens Use a commercially-available air blower, or use volatile substances such as cleaning the projector and replacing consumable parts. Cleaning 39 Maintenance This section describes maintenance tasks such as wax, alcohol or thinner to clean the projector's surface. See "Replacing the Air...
... can cause the projector to warp and make the coating finish peel off. If the projector is recommended that you clean these parts at least once every three months. Cleaning the Air Filters and Air Intake Vent If dust collects on page 44. These can...with a soft cloth. Cleaning the Lens Use a commercially-available air blower, or use volatile substances such as cleaning the projector and replacing consumable parts. Cleaning 39 Maintenance This section describes maintenance tasks such as wax, alcohol or thinner to clean the projector's surface. See "Replacing the Air...
User Manual
Page 50
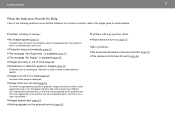
... 54 The whole image appears purplish or greenish, images are fuzzy or out of the image is cut off or too small page 53 Only part of focus page 52 Interference or distortion appear in images page 53 Problems such as interference, distortion or black & white checked patterns appear. Image is...
... 54 The whole image appears purplish or greenish, images are fuzzy or out of the image is cut off or too small page 53 Only part of focus page 52 Interference or distortion appear in images page 53 Problems such as interference, distortion or black & white checked patterns appear. Image is...


