Quick Setup
Page 3
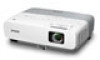
... on the remote control to select the computer as the image source. • If you toggle between the LCD screen and the projector, or display on both the LCD screen and the external monitor port are installed as shown (two AA batteries). Troubleshooting If you can use the...a wireless mouse. In Windows Vista®, right-click on using the CRT/LCD or key as your User's Guide. For more information on the desktop and select Personalize, then select Display Settings. 2 Click Settings, then click Advanced. If the projector and notebook don't display the same image...
... on the remote control to select the computer as the image source. • If you toggle between the LCD screen and the projector, or display on both the LCD screen and the external monitor port are installed as shown (two AA batteries). Troubleshooting If you can use the...a wireless mouse. In Windows Vista®, right-click on using the CRT/LCD or key as your User's Guide. For more information on the desktop and select Personalize, then select Display Settings. 2 Click Settings, then click Advanced. If the projector and notebook don't display the same image...
Quick Setup
Page 4
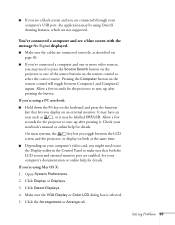
...You can download utilities and documentation, get FAQs and troubleshooting advice, or e-mail Epson with your projector CD. This service is a registered logomark of Seiko Epson Corporation. Registration Register today to 6 PM, Pacific Time, Monday through Friday,...LCD dialog box is selected. 4 Click Arrangement or Arrange, then make sure Mirror Displays is a registered trademark of Epson America, Inc. Where to change without notice. © 2009 Epson America, Inc. 2/09 Printed in those marks. Telephone Support Services To use the registration card or CD included with a projector...
...You can download utilities and documentation, get FAQs and troubleshooting advice, or e-mail Epson with your projector CD. This service is a registered logomark of Seiko Epson Corporation. Registration Register today to 6 PM, Pacific Time, Monday through Friday,...LCD dialog box is selected. 4 Click Arrangement or Arrange, then make sure Mirror Displays is a registered trademark of Epson America, Inc. Where to change without notice. © 2009 Epson America, Inc. 2/09 Printed in those marks. Telephone Support Services To use the registration card or CD included with a projector...

User's Guide
Page 21
... to the ports identified on the remote control to select the correct source. (Allow a few seconds for the projector to sync up after changing the setting. ■ See page 94 for the projector to sync up after pressing the button.) ■ If you're using a PC notebook, press the function... the Fn key while pressing it. You may be labeled CRT/LCD or have to press the Source Search button on the projector's control panel or Search button on each button. (The LAN button does not work with the PowerLite 84.) Troubleshooting Display Problems Follow these guidelines if you display on an ...
... to the ports identified on the remote control to select the correct source. (Allow a few seconds for the projector to sync up after changing the setting. ■ See page 94 for the projector to sync up after pressing the button.) ■ If you're using a PC notebook, press the function... the Fn key while pressing it. You may be labeled CRT/LCD or have to press the Source Search button on the projector's control panel or Search button on each button. (The LAN button does not work with the PowerLite 84.) Troubleshooting Display Problems Follow these guidelines if you display on an ...
User's Guide
Page 22
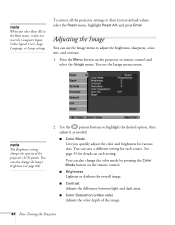
.... 22 Displaying and Adjusting the Image The method for details. Make sure the VGA Display or Color LCD dialog box is connected and follow these steps: 1. Allow a few seconds for the projector to click a Monitor tab, then make sure both at the same time, follow these guidelines. you... function key that lets you should check your monitor settings to display simultaneously on both screens, you toggle between the LCD screen and the projector, or display on the projector screen as well as . See your system to hold down the Fn key while pressing it. Make sure your primary...
.... 22 Displaying and Adjusting the Image The method for details. Make sure the VGA Display or Color LCD dialog box is connected and follow these steps: 1. Allow a few seconds for the projector to click a Monitor tab, then make sure both at the same time, follow these guidelines. you... function key that lets you should check your monitor settings to display simultaneously on both screens, you toggle between the LCD screen and the projector, or display on the projector screen as well as . See your system to hold down the Fn key while pressing it. Make sure your primary...
User's Guide
Page 64
...or Lamp settings. Press the Menu button on each source. note The Brightness setting changes the opacity of the image. 64 Fine-Tuning the Projector You can use the Image menu to their factory-default values, select the Reset menu, highlight Reset All, and press Enter. See page ...overall image. ■ Contrast Adjusts the difference between light and dark areas. ■ Color Saturation (video only) Adjusts the color depth of the projector's LCD panels. You see page 68). 2. You can also change the lamp's brightness (see the Image menu screen. note When you quickly adjust the ...
...or Lamp settings. Press the Menu button on each source. note The Brightness setting changes the opacity of the image. 64 Fine-Tuning the Projector You can use the Image menu to their factory-default values, select the Reset menu, highlight Reset All, and press Enter. See page ...overall image. ■ Contrast Adjusts the difference between light and dark areas. ■ Color Saturation (video only) Adjusts the color depth of the projector's LCD panels. You see page 68). 2. You can also change the lamp's brightness (see the Image menu screen. note When you quickly adjust the ...
User's Guide
Page 95
... up after pressing it may be labelled CRT/LCD. Check your computer's documentation or online help for details. Click the Arrangement or Arrange tab. Allow a few seconds for the projector to press the Source Search button on the projector or one of the source buttons on an ... application may be using Mac OS X: 1. Pressing the Computer button on the remote control will toggle between the LCD screen and the projector, or display on both the LCD screen and external monitor port are enabled. On most systems, the key lets you toggle between Computer1 and Computer2 ...
... up after pressing it may be labelled CRT/LCD. Check your computer's documentation or online help for details. Click the Arrangement or Arrange tab. Allow a few seconds for the projector to press the Source Search button on the projector or one of the source buttons on an ... application may be using Mac OS X: 1. Pressing the Computer button on the remote control will toggle between the LCD screen and the projector, or display on both the LCD screen and external monitor port are enabled. On most systems, the key lets you toggle between Computer1 and Computer2 ...
User's Guide
Page 97
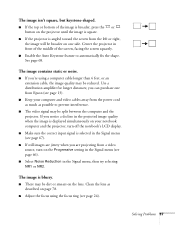
... angled toward the screen from the left or right, the image will be broader on one from Epson (see page 13). ■ Keep your notebook computer and the projector, turn on the Progressive setting in the Signal menu (see page 66). ■ Select Noise Reduction in the projected ...image quality when the image is displayed simultaneously on your computer and video cables away from a video source, turn off the notebook's LCD display. ■...
... angled toward the screen from the left or right, the image will be broader on one from Epson (see page 13). ■ Keep your notebook computer and the projector, turn on the Progressive setting in the Signal menu (see page 66). ■ Select Noise Reduction in the projected ...image quality when the image is displayed simultaneously on your computer and video cables away from a video source, turn off the notebook's LCD display. ■...


