
Product Information Guide
Page 1
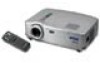
EPSON Powerlite 51c/71c control panel focus ring power and error lights lens lens cap infrared receiver for remote control feet AC inlet foot lever Computer/Component Video port Mouse/Com port USB mouse port In and Out Audio ports R and L Audio ports (for Video source) Video port S-Video port Projector Specifications General Type of display Poly-silicon Thin Film Transistor (TFT) Size of liquid crystal panels Diagonal: 0.7 inch (17.8 mm) Lens F=1.5, f=26.3 mm Focus adjustment Manual Zoom ratio Digital 0.8 to 1.0, lens at maximum size, 100% to 83% (smallest) Resolution ...
EPSON Powerlite 51c/71c control panel focus ring power and error lights lens lens cap infrared receiver for remote control feet AC inlet foot lever Computer/Component Video port Mouse/Com port USB mouse port In and Out Audio ports R and L Audio ports (for Video source) Video port S-Video port Projector Specifications General Type of display Poly-silicon Thin Film Transistor (TFT) Size of liquid crystal panels Diagonal: 0.7 inch (17.8 mm) Lens F=1.5, f=26.3 mm Focus adjustment Manual Zoom ratio Digital 0.8 to 1.0, lens at maximum size, 100% to 83% (smallest) Resolution ...
Product Information Guide
Page 5
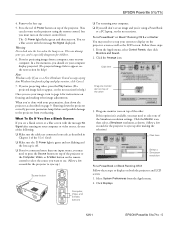
... in Chapter 1 of the Simulscan resolution settings. Remove the lens cap. 5. Drag one of the User's Guide. ❏ Make sure the Power light is green and not flashing and the lens cap is especially dangerous for instructions on . If this option isn't available, you 're using the remote control, but you must turn on the remote control first.) The Power light flashes green and then stays on focusing and making the selection.) Click...
... in Chapter 1 of the Simulscan resolution settings. Remove the lens cap. 5. Drag one of the User's Guide. ❏ Make sure the Power light is green and not flashing and the lens cap is especially dangerous for instructions on . If this option isn't available, you 're using the remote control, but you must turn on the remote control first.) The Power light flashes green and then stays on focusing and making the selection.) Click...
Product Information Guide
Page 8
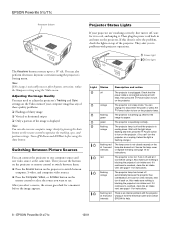
... and turn on the Video menu if your projector isn't working correctly, first turn it back on top of the image is too hot. There is warming up to optimize the tracking, sync, and position settings. After you select a source, the screen goes dark for instructions. The projector is an internal problem with projector operations. The projector lamp is off orange flashing green green flashing orange flashing red at 1-second intervals red flashing orange flashing red at the same time. EPSON Powerlite 51c/71c Keystone button Projector Status Lights If...
... and turn on the Video menu if your projector isn't working correctly, first turn it back on top of the image is too hot. There is warming up to optimize the tracking, sync, and position settings. After you select a source, the screen goes dark for instructions. The projector is an internal problem with projector operations. The projector lamp is off orange flashing green green flashing orange flashing red at 1-second intervals red flashing orange flashing red at the same time. EPSON Powerlite 51c/71c Keystone button Projector Status Lights If...
Product Information Guide
Page 9
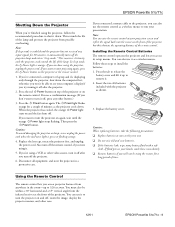
... Power light is orange. Follow these steps to start projecting again, press the Power button on top of the lamp and protects the projector from possible overheating. If you access its setup menus. If you want to turn it off after you turn the projector on the remote control. Replace the lens cap, retract the projector feet, and unplug the power cord. If you connected a mouse cable to the projector, you can also use the remote control...
... Power light is orange. Follow these steps to start projecting again, press the Power button on top of the lamp and protects the projector from possible overheating. If you access its setup menus. If you want to turn it off after you turn the projector on the remote control. Replace the lens cap, retract the projector feet, and unplug the power cord. If you connected a mouse cable to the projector, you can also use the remote control...
Product Information Guide
Page 10
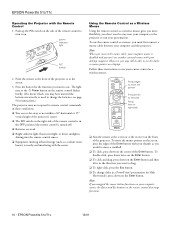
... near your computer or the projector to run your desktop computer. The light next to the Power button on the remote control flashes briefly. (If it on. Note: If you swapped the mouse button functions on your thumb, as a wireless mouse gives you more flexibility; power indicator light R/C switch 2. EPSON Powerlite 51c/71c Operating the Projector with the sensor Using the Remote Control as a Wireless Mouse Using the remote control as you would to move...
... near your computer or the projector to run your desktop computer. The light next to the Power button on the remote control flashes briefly. (If it on. Note: If you swapped the mouse button functions on your thumb, as a wireless mouse gives you more flexibility; power indicator light R/C switch 2. EPSON Powerlite 51c/71c Operating the Projector with the sensor Using the Remote Control as a Wireless Mouse Using the remote control as you would to move...
Product Information Guide
Page 11
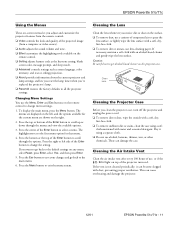
... lens surface. EPSON Powerlite 51c/71c Using the Menus These on-screen menus let you adjust and customize the projector features from the remote control: ❏ Video controls the look and quality of the projected image (from a computer or video source). ❏ Audio adjusts the sound volume and tone. ❏ Effect customizes the highlighting tools available on the remote control. ❏ Setting adjusts features such as the keystone setting, blank screen color, message prompt, and sleep mode. ❏ Advanced controls settings...
... lens surface. EPSON Powerlite 51c/71c Using the Menus These on-screen menus let you adjust and customize the projector features from the remote control: ❏ Video controls the look and quality of the projected image (from a computer or video source). ❏ Audio adjusts the sound volume and tone. ❏ Effect customizes the highlighting tools available on the remote control. ❏ Setting adjusts features such as the keystone setting, blank screen color, message prompt, and sleep mode. ❏ Advanced controls settings...
Product Information Guide
Page 12
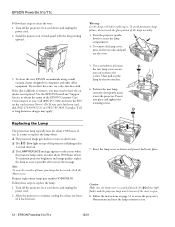
.... EPSON Powerlite 51c/71c 12/01 Use the EPSON PrivateLine® Support Service to clean the vent: 1. Turn off the projector, let it . If the dirt is securely fastened; Position the new lamp correctly, then gently insert it back into place and tighten the retaining screws. To maintain projector brightness and image quality, replace the lamp as soon as shown and press it into the projector. Follow the instructions...
.... EPSON Powerlite 51c/71c 12/01 Use the EPSON PrivateLine® Support Service to clean the vent: 1. Turn off the projector, let it . If the dirt is securely fastened; Position the new lamp correctly, then gently insert it back into place and tighten the retaining screws. To maintain projector brightness and image quality, replace the lamp as soon as shown and press it into the projector. Follow the instructions...
Quick Start
Page 1
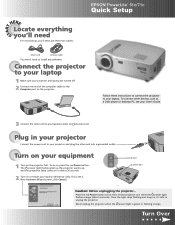
... two cables: EPSON® PowerLite® 51c/71c Quick Setup power cord computer cable You won't need to unplug the projector. To do so, press the red Power button. Turn Over Never unplug the projector when the power light is green or flashing orange. Connect the projector to your laptop 1 Make sure your projector and laptop are turned off. 2 Connect one end of the computer cable to your laptop's video or monitor port. and the projection lamp comes on in your projector Connect the power cord...
... two cables: EPSON® PowerLite® 51c/71c Quick Setup power cord computer cable You won't need to unplug the projector. To do so, press the red Power button. Turn Over Never unplug the projector when the power light is green or flashing orange. Connect the projector to your laptop 1 Make sure your projector and laptop are turned off. 2 Connect one end of the computer cable to your laptop's video or monitor port. and the projection lamp comes on in your projector Connect the power cord...
Quick Start
Page 2
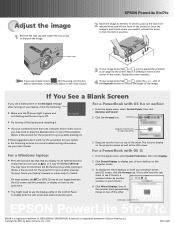
...'t work, try the procedure for your system in front of the center of the screen, facing the screen squarely. 4 If your desktop on top of the other . Adjust the image 1 Remove the lens cap and rotate the focus ring to sync up after pressing the key.) Check your laptop's manual or online help for details. For more than one computer and/or video source, you display on...
...'t work, try the procedure for your system in front of the center of the screen, facing the screen squarely. 4 If your desktop on top of the other . Adjust the image 1 Remove the lens cap and rotate the focus ring to sync up after pressing the key.) Check your laptop's manual or online help for details. For more than one computer and/or video source, you display on...
User Manual
Page 16
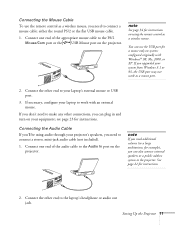
... the USB Mouse port on using audio through your equipment; You can also connect external speakers or a public address system to the projector. Connecting the Audio Cable If you'll be using the remote control as a wireless mouse. Connect one end of the audio cable to the Audio In port on the projector. Connect the other end to your laptop's external mouse or USB port. 3. Setting Up the Projector 11 If you upgraded your laptop to work as a mouse port. 2. Connect...
... the USB Mouse port on using audio through your equipment; You can also connect external speakers or a public address system to the projector. Connecting the Audio Cable If you'll be using the remote control as a wireless mouse. Connect one end of the audio cable to the Audio In port on the projector. Connect the other end to your laptop's external mouse or USB port. 3. Setting Up the Projector 11 If you upgraded your laptop to work as a mouse port. 2. Connect...

User Manual
Page 18
... USB port may not work as a wireless mouse. Connect the other end to connect a stereo, mini-jack audio cable (not included). 1. Connecting the Mouse Cable To use the USB port for a mouse only on systems configured originally with Windows 98, Me, 2000, or XP. note See page 34 for instructions on using audio through your projector's speakers, you upgraded your computer. 3. Connect one end of the audio cable to make any other connections...
... USB port may not work as a wireless mouse. Connect the other end to connect a stereo, mini-jack audio cable (not included). 1. Connecting the Mouse Cable To use the USB port for a mouse only on systems configured originally with Windows 98, Me, 2000, or XP. note See page 34 for instructions on using audio through your projector's speakers, you upgraded your computer. 3. Connect one end of the audio cable to make any other connections...

User Manual
Page 43
... orange Power light stays on the projector or the remote control. If you 're using the projector, follow the recommended procedure to start projecting again, press the Power button on and the fan shuts off confirmation message caution To avoid damaging the projector or lamp, never unplug the power cord when the Power light is green or flashing orange. 3. In sleep mode, the Power light is enabled and the projector has not received any other video source, turn off , press any input signals...
... orange Power light stays on the projector or the remote control. If you 're using the projector, follow the recommended procedure to start projecting again, press the Power button on and the fan shuts off confirmation message caution To avoid damaging the projector or lamp, never unplug the power cord when the Power light is green or flashing orange. 3. In sleep mode, the Power light is enabled and the projector has not received any other video source, turn off , press any input signals...

User Manual
Page 50
... the refresh rate of the computer's video output. use this when you've replaced the projector lamp, as the input source. ** Available only when Video is approximately 1500 hours. Video source menu Computer or component video source menu About menu Menu item Lamp Reset Lamp Timer Video Source Input Signal* Frequency* Sync Polarity* Sync Mode* Resolution* Refresh Rate* Video Signal** Description Displays the number of the projector lamp is selected as the input source. Displays the computer's sync mode. Displays the input image signal mode. * Available only when Computer is...
... the refresh rate of the computer's video output. use this when you've replaced the projector lamp, as the input source. ** Available only when Video is approximately 1500 hours. Video source menu Computer or component video source menu About menu Menu item Lamp Reset Lamp Timer Video Source Input Signal* Frequency* Sync Polarity* Sync Mode* Resolution* Refresh Rate* Video Signal** Description Displays the number of the projector lamp is selected as the input source. Displays the computer's sync mode. Displays the input image signal mode. * Available only when Computer is...

User Manual
Page 55
... cool down to access the lamp compartment. 4. Turn the projector upside-down , and unplug the power cord. 2. It is flashing red in 1-second intervals. To order a replacement lamp (part number V13H010L16), contact your lamp has been used, check the About menu; Follow these steps to deteriorate. I The LAMP REPLACE message appears on the screen when the projector lamp comes on ). 3. sales only). Allow the projector to replace the lamp when: I The Error light on the two tabs...
... cool down to access the lamp compartment. 4. Turn the projector upside-down , and unplug the power cord. 2. It is flashing red in 1-second intervals. To order a replacement lamp (part number V13H010L16), contact your lamp has been used, check the About menu; Follow these steps to deteriorate. I The LAMP REPLACE message appears on the screen when the projector lamp comes on ). 3. sales only). Allow the projector to replace the lamp when: I The Error light on the two tabs...

User Manual
Page 56
... the new lamp correctly, then gently insert it back into place. the Error light flashes and the projector lamp won't turn on if the cover is securely fastened; Then pull out the lamp by the two notches. 6. caution Make sure the lamp cover is open. 8. Maintaining and Transporting the Projector 51 you can't remove the screws. 5. Follow the instructions in Chapter 3 to access the projector's About menu and reset the lamp counter...
... the new lamp correctly, then gently insert it back into place. the Error light flashes and the projector lamp won't turn on if the cover is securely fastened; Then pull out the lamp by the two notches. 6. caution Make sure the lamp cover is open. 8. Maintaining and Transporting the Projector 51 you can't remove the screws. 5. Follow the instructions in Chapter 3 to access the projector's About menu and reset the lamp counter...
User Manual
Page 60
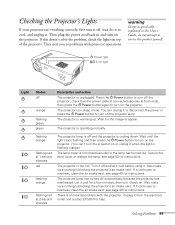
... the projector. flashing orange flashing red at 1-second intervals red flashing orange flashing red at 2-second intervals The projector lamp is off orange flashing green green Description and action The projector is connected securely at both ends, then press the Power button again to turn on the projector. see page 50 for the image to service this doesn't solve the problem, check the lights on the projector lamp. Also make sure nothing is cooling down. There is in sleep mode. warning...
... the projector. flashing orange flashing red at 1-second intervals red flashing orange flashing red at 2-second intervals The projector lamp is off orange flashing green green Description and action The projector is connected securely at both ends, then press the Power button again to turn on the projector. see page 50 for the image to service this doesn't solve the problem, check the lights on the projector lamp. Also make sure nothing is cooling down. There is in sleep mode. warning...
User Manual
Page 62
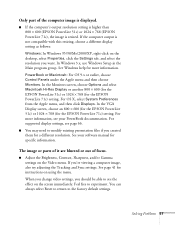
... focus. For OS X, select System Preferences from the Apple menu, and then click Displays. In the VGA Display screen, choose an 800 × 600 (for the EPSON PowerLite 51c) or 1024 × 768 (for the EPSON PowerLite 71c) setting. See your PowerBook documentation. For more information. When you change video settings, you want. In Windows 3.x, use Windows Setup in the Main program group. See page 41 for a different resolution. Solving Problems...
... focus. For OS X, select System Preferences from the Apple menu, and then click Displays. In the VGA Display screen, choose an 800 × 600 (for the EPSON PowerLite 51c) or 1024 × 768 (for the EPSON PowerLite 71c) setting. See your PowerBook documentation. For more information. When you change video settings, you want. In Windows 3.x, use Windows Setup in the Main program group. See page 41 for a different resolution. Solving Problems...
User Manual
Page 84
... connecting to video source, 18 to 20 distance from screen, 7 to 8 feet, 30 focusing, 29 hanging from the ceiling, 44 lamp specifications, 64 lights, 55 menu system, using, 39 to 40 options, 6 to 7 positioning, 7 to 8 positioning image, 41 problems, 55 to 60 shutting off, 38 software, 4 specifications, 63 to 67 status lights, 55 transporting, 52 turning on, 23 to 24 unpacking, 5 viewing information, 45 Prompt setting, 44 PS/2 mouse cable/port, 11, 13 R Raising image...
... connecting to video source, 18 to 20 distance from screen, 7 to 8 feet, 30 focusing, 29 hanging from the ceiling, 44 lamp specifications, 64 lights, 55 menu system, using, 39 to 40 options, 6 to 7 positioning, 7 to 8 positioning image, 41 problems, 55 to 60 shutting off, 38 software, 4 specifications, 63 to 67 status lights, 55 transporting, 52 turning on, 23 to 24 unpacking, 5 viewing information, 45 Prompt setting, 44 PS/2 mouse cable/port, 11, 13 R Raising image...

User Manual
Page 85
... using as wireless mouse, 34 Replacing the lamp, 50 to 51 Reset All menu, 46 Reset Lamp Timer setting, 45 Resetting menu options, 40 Resizing images, 29 problems, 57 Resolution pixels, 1 PowerBook, selecting, 26 problems, 57 specifications, 63 S Safety instructions, 47, 69 to 70 Screen, distance from projector, 7 to 8 Select button, 54 Setting menu, 44 Sharpness setting, 42 Shutting off projector, 38 SizeWise technology, 1 Sleep mode, 24, 38, 44 Software, 4 Sound adjusting, 36, 43 help, 53 to 54 problems, 59 turning off, 36 Sound system, connecting...
... using as wireless mouse, 34 Replacing the lamp, 50 to 51 Reset All menu, 46 Reset Lamp Timer setting, 45 Resetting menu options, 40 Resizing images, 29 problems, 57 Resolution pixels, 1 PowerBook, selecting, 26 problems, 57 specifications, 63 S Safety instructions, 47, 69 to 70 Screen, distance from projector, 7 to 8 Select button, 54 Setting menu, 44 Sharpness setting, 42 Shutting off projector, 38 SizeWise technology, 1 Sleep mode, 24, 38, 44 Software, 4 Sound adjusting, 36, 43 help, 53 to 54 problems, 59 turning off, 36 Sound system, connecting...

Product Support Bulletin(s)
Page 1
... Signal message and will allow the Elmo HV-110XG Document Camera to sync and display the image properly to any other connected Epson projector without having to change the projector setting from Component to RGB then to display the image of 1 Problem: When attempting to display content from the menu. To eliminate the pink cast, change the projector settings. This will blink off and on and connected to the projector via the VGA...
... Signal message and will allow the Elmo HV-110XG Document Camera to sync and display the image properly to any other connected Epson projector without having to change the projector setting from Component to RGB then to display the image of 1 Problem: When attempting to display content from the menu. To eliminate the pink cast, change the projector settings. This will blink off and on and connected to the projector via the VGA...


