
Installation Guide - ELPMBUNI Universal Mount Assembly
Page 2
... Warranty All Premier Mounts products carry a limited lifetime warranty from ship date against defects in the completion of Contents Warranty ...- 3 Contact Premier Mounts ...- 3 Warning Statements ...- 4 Parts List ...- 5 Installation Tools ...- 5 ELPMBUNI Universal Mount Assembly ...- 6 Projector Preparation ...- 7 Securing the Bracket to the Projector ...- 9 Leveling the Mounting bracket ...- 14 Securing the Upper Assembly Ceiling...
... Warranty All Premier Mounts products carry a limited lifetime warranty from ship date against defects in the completion of Contents Warranty ...- 3 Contact Premier Mounts ...- 3 Warning Statements ...- 4 Parts List ...- 5 Installation Tools ...- 5 ELPMBUNI Universal Mount Assembly ...- 6 Projector Preparation ...- 7 Securing the Bracket to the Projector ...- 9 Leveling the Mounting bracket ...- 14 Securing the Upper Assembly Ceiling...

Installation Guide - ELPMBUNI Universal Mount Assembly
Page 4
... 4) Note: Must be used with all proper installation hardware and components. Make sure that none of these parts are parts missing and/or damaged, please stop the installation and contact Premier Mounts (800-368-9700). ELPMBUNI Parts List NOTE: This mount is not required for model specific hardware: Pages 10, 11, 12, and...
... 4) Note: Must be used with all proper installation hardware and components. Make sure that none of these parts are parts missing and/or damaged, please stop the installation and contact Premier Mounts (800-368-9700). ELPMBUNI Parts List NOTE: This mount is not required for model specific hardware: Pages 10, 11, 12, and...

Installation Guide - ELPMBUNI Universal Mount Assembly
Page 7
Installation Manual Figure 2 Tri-Lock Opening Rotate 180° To Unlock Tension Knobs Upper Assembly Safety Knob Figure 3 Figure 4 Page - 8 - Next loosen the safety screw knurl knob far enough to allow the two parts to create free play between the bracket tri-lock assembly and the upper section tri-lock assembly points. 5. Separate the upper assembly from the projector mounting bracket by slightly loosening the two tension knurl knobs to be rotated 180° apart and separate. ELPMBUNI 4.
Installation Manual Figure 2 Tri-Lock Opening Rotate 180° To Unlock Tension Knobs Upper Assembly Safety Knob Figure 3 Figure 4 Page - 8 - Next loosen the safety screw knurl knob far enough to allow the two parts to create free play between the bracket tri-lock assembly and the upper section tri-lock assembly points. 5. Separate the upper assembly from the projector mounting bracket by slightly loosening the two tension knurl knobs to be rotated 180° apart and separate. ELPMBUNI 4.
Product Information Guide
Page 1
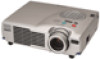
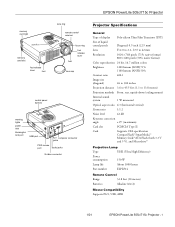
EPSON PowerLite 505c/715c Projector memory card light speaker memory card slot foot release lever foot lens ring remote control receiver focus ring foot release lever foot lens cap ...; Memory Stick™ , ATA Flash (both 3.3 V and 5 V), and Microdrive™ Projection Lamp Type UHE (Ultra High Efficiency) Power consumption 150 W Lamp life About 1000 hours Part number ELPLP14 Remote Control Range 32.8 feet (10 meters) Batteries Alkaline AA (2) Mouse Compatibility Supports PS/2, USB, ADB 1/01 EPSON PowerLite 505c/715c Projector - 1
EPSON PowerLite 505c/715c Projector memory card light speaker memory card slot foot release lever foot lens ring remote control receiver focus ring foot release lever foot lens cap ...; Memory Stick™ , ATA Flash (both 3.3 V and 5 V), and Microdrive™ Projection Lamp Type UHE (Ultra High Efficiency) Power consumption 150 W Lamp life About 1000 hours Part number ELPLP14 Remote Control Range 32.8 feet (10 meters) Batteries Alkaline AA (2) Mouse Compatibility Supports PS/2, USB, ADB 1/01 EPSON PowerLite 505c/715c Projector - 1

Product Information Guide
Page 2
...10802 1920 x 10802 1920 x 10802 1920 x 10802 640 x 4802 720 x 5402 720 x 5402 1 The image is resized so that 's compatible with the projector; EPSON PowerLite 505c/715c Projector Dimensions Height Width Depth Weight 2.8 to 3.4 inches (72 to 87 mm) 8.4 inches (213 mm) 10.5 inches (267 mm) 6 lb (2.7 kg) Electrical Rated...60 °C), Humidity Operating: 20 to 80% RH, non-condensing Storage: 10 to 90% RH, non-condensing Safety United States Canada CE Marking FCC Part 15B Class B UL1950 Rev. 3 DOC ICES003 Class B CSA C22.2 No. 950 Rev. 3 Directive 89/336/EEC, 92/31/EEC EN 60950 ...
...10802 1920 x 10802 1920 x 10802 1920 x 10802 640 x 4802 720 x 5402 720 x 5402 1 The image is resized so that 's compatible with the projector; EPSON PowerLite 505c/715c Projector Dimensions Height Width Depth Weight 2.8 to 3.4 inches (72 to 87 mm) 8.4 inches (213 mm) 10.5 inches (267 mm) 6 lb (2.7 kg) Electrical Rated...60 °C), Humidity Operating: 20 to 80% RH, non-condensing Storage: 10 to 90% RH, non-condensing Safety United States Canada CE Marking FCC Part 15B Class B UL1950 Rev. 3 DOC ICES003 Class B CSA C22.2 No. 950 Rev. 3 Directive 89/336/EEC, 92/31/EEC EN 60950 ...

Product Information Guide
Page 9
...in this product yourself, except as an artist's camel-hair brush). To clean the filter, EPSON recommends using a very soft brush (such as specifically explained in place. 1/01 EPSON PowerLite 505c/715c Projector - 9 Cleaning the Projector To clean the projector, first unplug the power cord. Follow ...clean any cover on end to clean the filter: 1. If the filter is included. EPSON PowerLite 505c/715c Projector Cleaning the Lens Warning: Before you replace the lamp. 4. Never open any part of the projector, turn off the projector and unplug the power cord. If necessary, moisten...
...in this product yourself, except as an artist's camel-hair brush). To clean the filter, EPSON recommends using a very soft brush (such as specifically explained in place. 1/01 EPSON PowerLite 505c/715c Projector - 9 Cleaning the Projector To clean the projector, first unplug the power cord. Follow ...clean any cover on end to clean the filter: 1. If the filter is included. EPSON PowerLite 505c/715c Projector Cleaning the Lens Warning: Before you replace the lamp. 4. Never open any part of the projector, turn off the projector and unplug the power cord. If necessary, moisten...
Product Information Guide
Page 10
...the lamp compartment. 4. Touching the glass portion of the lamp assembly. Turn off the lamp cover. ) 6. Gently insert the new lamp. 8. EPSON PowerLite 505c/715c Projector 1/01 Allow the projector to cool down to deteriorate. ❏ The lamp warning light on ). Turn the projector upside-down for a replacement..., replace the lamp as soon as shown, and pull the lamp straight out. Contact your dealer or call EPSON at least half an hour (if it . Request part number ELPLP14. Use a screwdriver to loosen the two screws holding the lamp in the United States and Canada ...
...the lamp compartment. 4. Touching the glass portion of the lamp assembly. Turn off the lamp cover. ) 6. Gently insert the new lamp. 8. EPSON PowerLite 505c/715c Projector 1/01 Allow the projector to cool down to deteriorate. ❏ The lamp warning light on ). Turn the projector upside-down for a replacement..., replace the lamp as soon as shown, and pull the lamp straight out. Contact your dealer or call EPSON at least half an hour (if it . Request part number ELPLP14. Use a screwdriver to loosen the two screws holding the lamp in the United States and Canada ...
Product Information Guide
Page 11
Related Documentation CPD-11736 CPD-11737 Service Manual Parts Price Lists EPSON PowerLite 505c/715c User's Guide EPSON PowerLite 505c/715c Quick Setup sheet TM-505c/715c PL-EMP505c, PL-EMP715c EPSON PowerLite 505c/715c Projector 1/01 EPSON PowerLite 505c/715c Projector - 11 sales only). or visit the EPSON Store™ at (800) 873-7766; In Canada, please call (800) 873-7766 for connecting ... ELPMB34 ELPMBAPS ELPMBAST ELPSL01 ELPSC06 ELPSC07 ELPSC08 ELPCVS1 ELPPAS1 ELPAP01 ELPKC06 ELPKC19 You can purchase these accessories from your dealer or by calling EPSON at www.epson.com (U.S.
Related Documentation CPD-11736 CPD-11737 Service Manual Parts Price Lists EPSON PowerLite 505c/715c User's Guide EPSON PowerLite 505c/715c Quick Setup sheet TM-505c/715c PL-EMP505c, PL-EMP715c EPSON PowerLite 505c/715c Projector 1/01 EPSON PowerLite 505c/715c Projector - 11 sales only). or visit the EPSON Store™ at (800) 873-7766; In Canada, please call (800) 873-7766 for connecting ... ELPMB34 ELPMBAPS ELPMBAST ELPSL01 ELPSC06 ELPSC07 ELPSC08 ELPCVS1 ELPPAS1 ELPAP01 ELPKC06 ELPKC19 You can purchase these accessories from your dealer or by calling EPSON at www.epson.com (U.S.

User Manual
Page 4
...Dangerous electrical voltages inside the projector can damage your bare hands; Except as specifically explained in any form or by Epson America, Inc. No part of this product or unauthorized modifications, repairs, or alterations to this product, or (excluding the U.S.) failure to... servicing to handle the new lamp. Caution: When you . EPSON is turned on; and PrivateLine, Presenters Club, and PowerLite are registered trademarks of SEIKO EPSON CORPORATION. Keep plastic bags away from the use of SEIKO EPSON CORPORATION. Use a cloth or glove to qualified service personnel. ...
...Dangerous electrical voltages inside the projector can damage your bare hands; Except as specifically explained in any form or by Epson America, Inc. No part of this product or unauthorized modifications, repairs, or alterations to this product, or (excluding the U.S.) failure to... servicing to handle the new lamp. Caution: When you . EPSON is turned on; and PrivateLine, Presenters Club, and PowerLite are registered trademarks of SEIKO EPSON CORPORATION. Keep plastic bags away from the use of SEIKO EPSON CORPORATION. Use a cloth or glove to qualified service personnel. ...
User Manual
Page 15
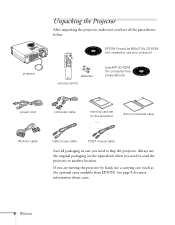
... the projector) PS/2 MOUSE dummy card and case USB mouse cable PS/2® mouse cable Save all the parts shown below: Freeze A/V Mute E-Zoom Power R/C ON OFF 3 2 5 4 1 Enter Esc batteries remote control EPSON PowerLite 505c/715c CD-ROM (not needed to use your projector) EasyMP CD-ROM (for more information about cases. 6 Welcome If... AV cable computer cable memory card set (in case you need to another location. Always use a carrying case (such as the optional cases available from EPSON).
... the projector) PS/2 MOUSE dummy card and case USB mouse cable PS/2® mouse cable Save all the parts shown below: Freeze A/V Mute E-Zoom Power R/C ON OFF 3 2 5 4 1 Enter Esc batteries remote control EPSON PowerLite 505c/715c CD-ROM (not needed to use your projector) EasyMP CD-ROM (for more information about cases. 6 Welcome If... AV cable computer cable memory card set (in case you need to another location. Always use a carrying case (such as the optional cases available from EPSON).
User Manual
Page 43
If only part of the screen, describing how to move and resize the image. 2. The screen image is displayed, you can open a small video window on the screen. ... have connected your VCR or other video source using S-Video, you 've zoomed in the projector's native format-1024 × 768 pixels (PowerLite 715c) or 800 × 600 pixels (PowerLite 505c). Use the Enter button to display in on your computer image is automatically compressed. Volume + Resize Resizing the Image Some computer images...
If only part of the screen, describing how to move and resize the image. 2. The screen image is displayed, you can open a small video window on the screen. ... have connected your VCR or other video source using S-Video, you 've zoomed in the projector's native format-1024 × 768 pixels (PowerLite 715c) or 800 × 600 pixels (PowerLite 505c). Use the Enter button to display in on your computer image is automatically compressed. Volume + Resize Resizing the Image Some computer images...

User Manual
Page 46
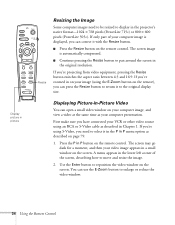
To remove the spotlight, press Esc. Using Horizontal and Vertical Highlights With the bar tool, you can place a square highlight on part of light appears on the remote control. Use the Enter button to move the spotlight where you want it from horizontal to vertical-using the ... to move the bar up and down the screen. 3. To cancel the bar drawing feature, press Esc. To activate the bar tool, press button 4 on part of the Spotlight using the Effect menu. Spotlighting Your Image With the Spotlight tool, you can draw bold horizontal lines on the screen to underline...
To remove the spotlight, press Esc. Using Horizontal and Vertical Highlights With the bar tool, you can place a square highlight on part of light appears on the remote control. Use the Enter button to move the spotlight where you want it from horizontal to vertical-using the ... to move the bar up and down the screen. 3. To cancel the bar drawing feature, press Esc. To activate the bar tool, press button 4 on part of the Spotlight using the Effect menu. Spotlighting Your Image With the Spotlight tool, you can draw bold horizontal lines on the screen to underline...

User Manual
Page 92
Never open any part of the projector. This chapter covers the following: s Cleaning the lens s Cleaning the projector case s Cleaning and replacing the air filter s Replacing the lamp s Transporting ... in this product yourself, except as specifically explained in the projector can injure you should replace are the lamp and air filter. Refer all other part needs replacing, contact your projected image. You also need to qualified service personnel. The only...
Never open any part of the projector. This chapter covers the following: s Cleaning the lens s Cleaning the projector case s Cleaning and replacing the air filter s Replacing the lamp s Transporting ... in this product yourself, except as specifically explained in the projector can injure you should replace are the lamp and air filter. Refer all other part needs replacing, contact your projected image. You also need to qualified service personnel. The only...

User Manual
Page 95
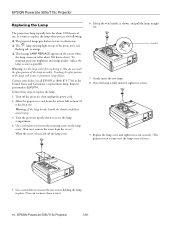
... used. To install the new filter, first insert the tab, then press down until it off. See page 81. 5. Contact your dealer or call EPSON at (800) 873-7766 in place. note You can check to pry it clicks in the United States and Canada for about 900 hours of... use ). Replacing the Lamp The projection lamp typically lasts for a replacement lamp. Request part number ELPLP14. 86 Maintaining and Transporting the Projector 4. s The message LAMP REPLACE appears on the screen when the lamp comes on (after about 1000 hours...
... used. To install the new filter, first insert the tab, then press down until it off. See page 81. 5. Contact your dealer or call EPSON at (800) 873-7766 in place. note You can check to pry it clicks in the United States and Canada for about 900 hours of... use ). Replacing the Lamp The projection lamp typically lasts for a replacement lamp. Request part number ELPLP14. 86 Maintaining and Transporting the Projector 4. s The message LAMP REPLACE appears on the screen when the lamp comes on (after about 1000 hours...

User Manual
Page 97
...lamp cover is loose.) note EPSON shall not be liable for any damages incurred during transportation. Replace the lamp cover and tighten its screws. 9. Gently insert the new lamp. 8. Transporting the Projector The projector contains many glass and precision parts. This prevents the batteries ...from discharging if something presses against one of the lamp assembly. Touching the glass could result in a carrying case (such as an optional EPSON case). If you need to transport it, please ...
...lamp cover is loose.) note EPSON shall not be liable for any damages incurred during transportation. Replace the lamp cover and tighten its screws. 9. Gently insert the new lamp. 8. Transporting the Projector The projector contains many glass and precision parts. This prevents the batteries ...from discharging if something presses against one of the lamp assembly. Touching the glass could result in a carrying case (such as an optional EPSON case). If you need to transport it, please ...

User Manual
Page 105
...need to select a different resolution. Place the projector directly in front of the center of the projector until the image is correct on the PowerLite 505c). s Press the Resize button on page 124. s Windows: Right-click the desktop, select Properties, click the Settings tab, and ...the Video menu. Select a different resolution. s If you created them for more information. side of the Keystone button on the Video menu. Only part of the computer image is correct. s Make sure your software documentation for more information. The image isn't square, but trapezoid-shaped. s Make...
...need to select a different resolution. Place the projector directly in front of the center of the projector until the image is correct on the PowerLite 505c). s Press the Resize button on page 124. s Windows: Right-click the desktop, select Properties, click the Settings tab, and ...the Video menu. Select a different resolution. s If you created them for more information. side of the Keystone button on the Video menu. Only part of the computer image is correct. s Make sure your software documentation for more information. The image isn't square, but trapezoid-shaped. s Make...

User Manual
Page 127
... the standards. Operation is identical to the representative unit tested and found to be within the variation accepted, due to 47CFR, Part 2 and 15 Class B Personal Computers and Peripherals; Trade Name: EPSON Type of Conformity According to quantity production and testing on a statistical basis as a Class B digital device. Records maintained continue to...
... the standards. Operation is identical to the representative unit tested and found to be within the variation accepted, due to 47CFR, Part 2 and 15 Class B Personal Computers and Peripherals; Trade Name: EPSON Type of Conformity According to quantity production and testing on a statistical basis as a Class B digital device. Records maintained continue to...

User Manual
Page 128
... tested and found to comply with the limits for help. s Consult the dealer or an experienced radio/TV technician for a Class B digital device, pursuant to Part 15 of the user to obtain and use a shielded equipment interface cable with the instructions, may cause interference levels which the receiver is the responsibility...
... tested and found to comply with the limits for help. s Consult the dealer or an experienced radio/TV technician for a Class B digital device, pursuant to Part 15 of the user to obtain and use a shielded equipment interface cable with the instructions, may cause interference levels which the receiver is the responsibility...

User Manual
Page 131
Projection Lamp Type UHE (Ultra High Efficiency) Power consumption 150 W Lamp life About 1000 hours Part number ELPLP14 Remote Control Range 32.8 feet (10 meters) Batteries Alkaline AA (2) Mouse Compatibility Supports PS/2, USB, ADB Dimensions Height Width Depth Weight 2.8 to 3.4 inches (72 to 87 mm) 8.4 inches (213 mm) 10.5 inches (267 mm) 6 lb (2.7 kg) Electrical Rated frequency Power supply Power consumption 50/60 Hz 100 to 120 VAC, 1.9 A 200 to 240 VAC, 1.0 A Operating: 230 W Standby: 5 W 122 Appendix C: Technical Specifications
Projection Lamp Type UHE (Ultra High Efficiency) Power consumption 150 W Lamp life About 1000 hours Part number ELPLP14 Remote Control Range 32.8 feet (10 meters) Batteries Alkaline AA (2) Mouse Compatibility Supports PS/2, USB, ADB Dimensions Height Width Depth Weight 2.8 to 3.4 inches (72 to 87 mm) 8.4 inches (213 mm) 10.5 inches (267 mm) 6 lb (2.7 kg) Electrical Rated frequency Power supply Power consumption 50/60 Hz 100 to 120 VAC, 1.9 A 200 to 240 VAC, 1.0 A Operating: 230 W Standby: 5 W 122 Appendix C: Technical Specifications

User Manual
Page 132
Environmental Temperature Humidity Operating: 41 to 95 °F (5 to 35 °C) Storage: 14 to 140 °F (-10 to 60 °C) Operating: 20 to 80% RH, non-condensing Storage: 10 to 90% RH, non-condensing Safety United States Canada CE Marking FCC Part 15B Class B UL1950 Rev. 3 DOC ICES003 Class B CSA C22.2 No. 950 Rev. 3 Directive 89/336/EEC, 92/31/EEC EN 60950 Appendix C: Technical Specifications 123
Environmental Temperature Humidity Operating: 41 to 95 °F (5 to 35 °C) Storage: 14 to 140 °F (-10 to 60 °C) Operating: 20 to 80% RH, non-condensing Storage: 10 to 90% RH, non-condensing Safety United States Canada CE Marking FCC Part 15B Class B UL1950 Rev. 3 DOC ICES003 Class B CSA C22.2 No. 950 Rev. 3 Directive 89/336/EEC, 92/31/EEC EN 60950 Appendix C: Technical Specifications 123


