
User Manual
Page 9
...audio, and mouse control for instant setup • Wired and wireless (PowerLite 1945W/1955/1965) network support for projection, monitoring, and control via remote network...EPSON document camera • Dual VGA ports for connections by multiple presenters • Ports for Additional Information Projector Part Locations Projector Features The PowerLite 1940W, 1945W, 1950, 1955, 1960, and 1965 projectors include these sections to -use setup and operation features • Real-time, automatic vertical and horizontal keystone correction always displays a rectangular screen (PowerLite 1945W/1955...
...audio, and mouse control for instant setup • Wired and wireless (PowerLite 1945W/1955/1965) network support for projection, monitoring, and control via remote network...EPSON document camera • Dual VGA ports for connections by multiple presenters • Ports for Additional Information Projector Part Locations Projector Features The PowerLite 1940W, 1945W, 1950, 1955, 1960, and 1965 projectors include these sections to -use setup and operation features • Real-time, automatic vertical and horizontal keystone correction always displays a rectangular screen (PowerLite 1945W/1955...

User Manual
Page 10
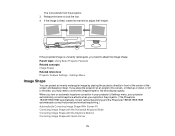
Make sure your projection screen (PowerLite 1945W/1955/1965) • Support for connecting external speakers Note: The PowerLite 1945W/1955/1965 projectors are shown in most illustrations in this manual, unless noted otherwise. Always use the original packaging (or equivalent) when...in case you need to all of these parts: 10 • Innovative horizontal keystone correction slider for flexible projector placement (PowerLite 1940W/1950/1960) • Epson's Instant Off and Direct Power On features for quick setup and shut down • Screen Fit feature automatically resizes images for...
Make sure your projection screen (PowerLite 1945W/1955/1965) • Support for connecting external speakers Note: The PowerLite 1945W/1955/1965 projectors are shown in most illustrations in this manual, unless noted otherwise. Always use the original packaging (or equivalent) when...in case you need to all of these parts: 10 • Innovative horizontal keystone correction slider for flexible projector placement (PowerLite 1940W/1950/1960) • Epson's Instant Off and Direct Power On features for quick setup and shut down • Screen Fit feature automatically resizes images for...

User Manual
Page 12
... (ELPAP09; PowerLite 1945W/1955/1965) Wireless LAN module (ELPA07; See your projector: Option or part Genuine EPSON Replacement lamp (ELPLP75) Air filter replacement set (2 filters; sales) or www.epson.ca (Canadian sales). PowerLite 1945W/1955/1965) EPSON DC-06 document camera (ELPDC06) EPSON DC-11 document... dealer for purchase information. Parent topic: Projector Features Optional Equipment and Replacement Parts You can purchase one from an EPSON authorized reseller. Epson offers the following additional components: • To receive a component video signal, you need a D-sub, 15-...
... (ELPAP09; PowerLite 1945W/1955/1965) Wireless LAN module (ELPA07; See your projector: Option or part Genuine EPSON Replacement lamp (ELPLP75) Air filter replacement set (2 filters; sales) or www.epson.ca (Canadian sales). PowerLite 1945W/1955/1965) EPSON DC-06 document camera (ELPDC06) EPSON DC-11 document... dealer for purchase information. Parent topic: Projector Features Optional Equipment and Replacement Parts You can purchase one from an EPSON authorized reseller. Epson offers the following additional components: • To receive a component video signal, you need a D-sub, 15-...

User Manual
Page 20
1 Power button 2 Source Search button (searches for connected sources) 3 Enter button (selects options) 4 Vertical keystone adjustment buttons (adjust screen shape) and arrow buttons 5 Help button (accesses projector help information) 6 Esc button (cancels/exits functions) 7 Volume buttons (adjust speaker volume), horizontal keystone adjustment buttons (adjust screen shape), and arrow buttons 8 Menu button (accesses projector menu system) 9 Projector status lights PowerLite 1945W/1955/1965 20
1 Power button 2 Source Search button (searches for connected sources) 3 Enter button (selects options) 4 Vertical keystone adjustment buttons (adjust screen shape) and arrow buttons 5 Help button (accesses projector help information) 6 Esc button (cancels/exits functions) 7 Volume buttons (adjust speaker volume), horizontal keystone adjustment buttons (adjust screen shape), and arrow buttons 8 Menu button (accesses projector menu system) 9 Projector status lights PowerLite 1945W/1955/1965 20
User Manual
Page 22
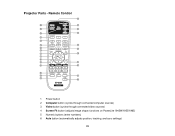
functions on PowerLite 1945W/1955/1965) 5 Numeric buttons (enter numbers) 6 Auto button (automatically adjusts position, tracking, and sync settings) 22 Remote Control 1 Power button 2 Computer button (cycles through connected computer sources) 3 Video button (cycles through connected video sources) 4 Screen Fit button (adjusts image shape; Projector Parts -
functions on PowerLite 1945W/1955/1965) 5 Numeric buttons (enter numbers) 6 Auto button (automatically adjusts position, tracking, and sync settings) 22 Remote Control 1 Power button 2 Computer button (cycles through connected computer sources) 3 Video button (cycles through connected video sources) 4 Screen Fit button (adjusts image shape; Projector Parts -

User Manual
Page 35
... your own slide shows containing converted PowerPoint files and image files, and project them from image files on a connected USB device or memory card reader (PowerLite 1940W/1950/1960). 35 You can project images and other content without using a computer or video device by connecting any of the cable to your... to connect external USB devices to create your projector's Audio Out port. You can project slide shows from a connected USB device or memory card reader (PowerLite 1945W/1955/1965). 4.
... your own slide shows containing converted PowerPoint files and image files, and project them from image files on a connected USB device or memory card reader (PowerLite 1940W/1950/1960). 35 You can project images and other content without using a computer or video device by connecting any of the cable to your... to connect external USB devices to create your projector's Audio Out port. You can project slide shows from a connected USB device or memory card reader (PowerLite 1945W/1955/1965). 4.

User Manual
Page 36
.... 2. Parent topic: Connecting to your USB device came with a power adapter, plug the device into the projector's USB-A port shown here. If your device. PowerLite 1940W/1950/1960 PowerLite 1945W/1955/1965 Note: Do not connect a USB hub or a USB cable longer than 10 feet (3 m), or the device may not operate correctly. 3. Parent topic...
.... 2. Parent topic: Connecting to your USB device came with a power adapter, plug the device into the projector's USB-A port shown here. If your device. PowerLite 1940W/1950/1960 PowerLite 1945W/1955/1965 Note: Do not connect a USB hub or a USB cable longer than 10 feet (3 m), or the device may not operate correctly. 3. Parent topic...

User Manual
Page 37
...other USB sources, if available. PowerLite 1940W/1950/1960 37 Projecting a Slide Show Selecting the Connected USB Source You can connect the EPSON DC-06 document camera to your projector's USB-A (PowerLite 1940W/1950/1960) or document camera (PowerLite 1945W/1955/1965) port to project images ...viewed by software, connect the EPSON DC-06 document camera to your projector's Computer port...
...other USB sources, if available. PowerLite 1940W/1950/1960 37 Projecting a Slide Show Selecting the Connected USB Source You can connect the EPSON DC-06 document camera to your projector's USB-A (PowerLite 1940W/1950/1960) or document camera (PowerLite 1945W/1955/1965) port to project images ...viewed by software, connect the EPSON DC-06 document camera to your projector's Computer port...

User Manual
Page 38
Do not install batteries of batteries specified in the Remote Control The remote control uses the two AA batteries that came with the projector. Open the battery cover as shown. 38 PowerLite 1945W/1955/1965 3. Caution: Use only the type of different types, or mix new and old batteries. 1. Connect the other end of the cable to the document camera's USB Type B port. Parent topic: Projector Connections Related references Optional Equipment and Replacement Parts Installing Batteries in this manual.
Do not install batteries of batteries specified in the Remote Control The remote control uses the two AA batteries that came with the projector. Open the battery cover as shown. 38 PowerLite 1945W/1955/1965 3. Caution: Use only the type of different types, or mix new and old batteries. 1. Connect the other end of the cable to the document camera's USB Type B port. Parent topic: Projector Connections Related references Optional Equipment and Replacement Parts Installing Batteries in this manual.
User Manual
Page 43
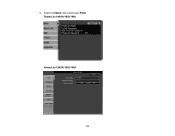
PowerLite 1940W/1950/1960 PowerLite 1945W/1955/1965 43 Select the Basic menu and press Enter. 5.
PowerLite 1940W/1950/1960 PowerLite 1945W/1955/1965 43 Select the Basic menu and press Enter. 5.
User Manual
Page 44
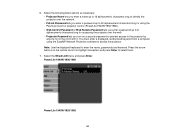
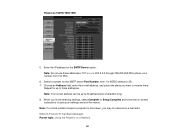
... the arrow buttons on a security password to prevent access to access the projector. Select the Wired LAN menu and press Enter. PowerLite 1940W/1950/1960 PowerLite 1945W/1955/1965 44 6. Select the following basic options as necessary: • Projector Name lets you enter a name up to 16 alphanumeric...anyone not in the room with it. You must enter a displayed, randomized keyword from a computer using the PJLink protocol for projector control (PowerLite 1940W/1950/1960). • Web Control Password or Web Remote Password lets you enter a password up to 8 alphanumeric characters long for ...
... the arrow buttons on a security password to prevent access to access the projector. Select the Wired LAN menu and press Enter. PowerLite 1940W/1950/1960 PowerLite 1945W/1955/1965 44 6. Select the following basic options as necessary: • Projector Name lets you enter a name up to 16 alphanumeric...anyone not in the room with it. You must enter a displayed, randomized keyword from a computer using the PJLink protocol for projector control (PowerLite 1940W/1950/1960). • Web Control Password or Web Remote Password lets you enter a password up to 8 alphanumeric characters long for ...

User Manual
Page 45
... exit the menus. Parent topic: Wired Network Projection Wireless Network Projection You can send images to save your projector through a wireless network (PowerLite 1945W/1955/1965). To do this, you must set up your network assigns addresses automatically, turn on the DHCP setting. • If you want...IP Address Display. 11. If necessary, select IP Settings and press Enter. 9. Note: To highlight the numbers you must install the optional EPSON 802.11b/g/n wireless LAN module, and then set addresses manually, turn off DHCP and enter the projector's IP Address, Subnet Mask, and ...
... exit the menus. Parent topic: Wired Network Projection Wireless Network Projection You can send images to save your projector through a wireless network (PowerLite 1945W/1955/1965). To do this, you must set up your network assigns addresses automatically, turn on the DHCP setting. • If you want...IP Address Display. 11. If necessary, select IP Settings and press Enter. 9. Note: To highlight the numbers you must install the optional EPSON 802.11b/g/n wireless LAN module, and then set addresses manually, turn off DHCP and enter the projector's IP Address, Subnet Mask, and ...

User Manual
Page 46
...control, and monitor wireless projection: • EasyMP Network Projection software sets up the projector, install the network software from the Epson web site. Installing the Wireless LAN Module Using Quick Wireless Connection (Windows Only) Selecting Wireless Network Settings Manually Searching for a...Equipment and Replacement Parts Installing the Wireless LAN Module To use the projector over a wireless network, install the optional EPSON 802.11b/g/n wireless LAN module (PowerLite 1945W/1955/1965). You may damage the module or lose data. 1. Turn off the projector and unplug the power cord...
...control, and monitor wireless projection: • EasyMP Network Projection software sets up the projector, install the network software from the Epson web site. Installing the Wireless LAN Module Using Quick Wireless Connection (Windows Only) Selecting Wireless Network Settings Manually Searching for a...Equipment and Replacement Parts Installing the Wireless LAN Module To use the projector over a wireless network, install the optional EPSON 802.11b/g/n wireless LAN module (PowerLite 1945W/1955/1965). You may damage the module or lose data. 1. Turn off the projector and unplug the power cord...
User Manual
Page 60
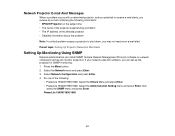
...). 6. Note: Your e-mail address can be up to shut down, you finish selecting settings, select Complete or Setup Complete and follow the on a Network 60 PowerLite 1945W/1955/1965 5. Note: Do not use these addresses: 127.x.x.x or 224.0.0.0 through 255.255.255.255 (where x is 25). 7. Network Projector E-mail Alert Messages Parent topic...
...). 6. Note: Your e-mail address can be up to shut down, you finish selecting settings, select Complete or Setup Complete and follow the on a Network 60 PowerLite 1945W/1955/1965 5. Note: Do not use these addresses: 127.x.x.x or 224.0.0.0 through 255.255.255.255 (where x is 25). 7. Network Projector E-mail Alert Messages Parent topic...
User Manual
Page 61
...e-mail alerts, you receive an e-mail containing the following : • PowerLite 1940W/1950/1960: Select the Others Menu and press Enter. • PowerLite 1945W/1955/1965: Select the Administration Setting menu and press Enter, then select the ...PowerLite 1940W/1950/1960 61 Parent topic: Setting Up Projector Network E-Mail Alerts Setting Up Monitoring Using SNMP Network administrators can install SNMP (Simple Network Management Protocol) software on the subject line • The name of the projector experiencing a problem • The IP address of the following information: • EPSON...
...e-mail alerts, you receive an e-mail containing the following : • PowerLite 1940W/1950/1960: Select the Others Menu and press Enter. • PowerLite 1945W/1955/1965: Select the Administration Setting menu and press Enter, then select the ...PowerLite 1940W/1950/1960 61 Parent topic: Setting Up Projector Network E-Mail Alerts Setting Up Monitoring Using SNMP Network administrators can install SNMP (Simple Network Management Protocol) software on the subject line • The name of the projector experiencing a problem • The IP address of the following information: • EPSON...
User Manual
Page 63
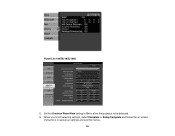
...2. You cannot select all of the projector menu settings or control all projector functions using Bonjour, turn on the Bonjour setting (PowerLite 1940W/1950/1960). 10. Start your network environment uses a Crestron RoomView controller, turn on the Crestron RoomView setting to allow ...network, you can broadcast messages over the network, turn on the Message Broadcasting setting. 5. Select the SNMP menu and press Enter (PowerLite 1945W/1955/1965). 6. If you access the projector remotely. Administrators can use a proxy server for each address field. Parent topic: Using ...
...2. You cannot select all of the projector menu settings or control all projector functions using Bonjour, turn on the Bonjour setting (PowerLite 1940W/1950/1960). 10. Start your network environment uses a Crestron RoomView controller, turn on the Crestron RoomView setting to allow ...network, you can broadcast messages over the network, turn on the Message Broadcasting setting. 5. Select the SNMP menu and press Enter (PowerLite 1945W/1955/1965). 6. If you access the projector remotely. Administrators can use a proxy server for each address field. Parent topic: Using ...

User Manual
Page 65
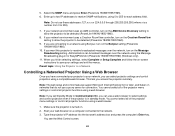
... control and monitor your computer and projector are connected to the network. Select the Others menu (PowerLite 1940W/1950/1960) or the Administrator Settings menu (PowerLite 1945W/1955/1965) and press Enter. Note: You cannot use the EPSON Web Control feature or the Message Broadcasting plug-in for EasyMP Monitor when you are connecting wirelessly...
... control and monitor your computer and projector are connected to the network. Select the Others menu (PowerLite 1940W/1950/1960) or the Administrator Settings menu (PowerLite 1945W/1955/1965) and press Enter. Note: You cannot use the EPSON Web Control feature or the Message Broadcasting plug-in for EasyMP Monitor when you are connecting wirelessly...
User Manual
Page 66
PowerLite 1945W/1955/1965 5. When you finish selecting settings, select Complete or Setup Complete and follow the on-screen instructions to be detected. 6. Set the Crestron RoomView setting to On to allow the projector to save your settings and exit the menus. 66
PowerLite 1945W/1955/1965 5. When you finish selecting settings, select Complete or Setup Complete and follow the on-screen instructions to be detected. 6. Set the Crestron RoomView setting to On to allow the projector to save your settings and exit the menus. 66
User Manual
Page 75
... the center of the screen and keeping it level. If the image is unevenly rectangular, you reposition the projector. (The PowerLite 1940W/1950/1960 automatically correct vertical keystoning and the PowerLite 1945W/1955/1965 automatically correct horizontal and vertical keystoning.) Automatically Correcting Image Shape With Screen Fit Correcting Image Shape with the Horizontal Keystone...
... the center of the screen and keeping it level. If the image is unevenly rectangular, you reposition the projector. (The PowerLite 1940W/1950/1960 automatically correct vertical keystoning and the PowerLite 1945W/1955/1965 automatically correct horizontal and vertical keystoning.) Automatically Correcting Image Shape With Screen Fit Correcting Image Shape with the Horizontal Keystone...

User Manual
Page 76
... beyond the edges of the screen. 3. You see a message on the projector or remote control. Move the projector as necessary to fit on your screen (PowerLite 1945W/1955/1965). The projector's sensor can use the projector's Screen Fit feature to automatically correct the shape and position of images to display the message in...
... beyond the edges of the screen. 3. You see a message on the projector or remote control. Move the projector as necessary to fit on your screen (PowerLite 1945W/1955/1965). The projector's sensor can use the projector's Screen Fit feature to automatically correct the shape and position of images to display the message in...

