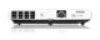
User's Guide
Page 4
... ...61 Turning On the Projector ...61 Turning Off the Projector ...63 Selecting the Language for the Projector Menus 65 Adjusting the Image Height ...66 Image Shape...68 Automatically Correcting Image Shape With Screen Fit 68 Correcting Image Shape With Quick Corner 70 Correcting Image Shape With the Keystone Buttons 71 Resizing the...
... ...61 Turning On the Projector ...61 Turning Off the Projector ...63 Selecting the Language for the Projector Menus 65 Adjusting the Image Height ...66 Image Shape...68 Automatically Correcting Image Shape With Screen Fit 68 Correcting Image Shape With Quick Corner 70 Correcting Image Shape With the Keystone Buttons 71 Resizing the...
User's Guide
Page 18
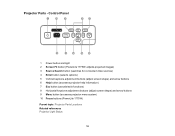
Control Panel 1 Power button and light 2 Screen Fit button (PowerLite 1775W; adjusts projected images) 3 Source Search button (searches for connected video sources) 4 Enter button (selects options) 5 Vertical keystone adjustment buttons (adjust screen shape) and arrow buttons 6 Help button (accesses projector help information) 7 Esc button (cancels/exits functions) 8 Horizontal keystone adjustment buttons (adjust screen shape) and arrow buttons 9 Menu button (accesses...
Control Panel 1 Power button and light 2 Screen Fit button (PowerLite 1775W; adjusts projected images) 3 Source Search button (searches for connected video sources) 4 Enter button (selects options) 5 Vertical keystone adjustment buttons (adjust screen shape) and arrow buttons 6 Help button (accesses projector help information) 7 Esc button (cancels/exits functions) 8 Horizontal keystone adjustment buttons (adjust screen shape) and arrow buttons 9 Menu button (accesses...
User's Guide
Page 19
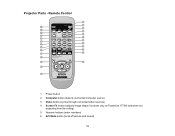
functions only on PowerLite 1775W and when not projecting from the ceiling) 5 Numeric buttons (enter numbers) 6 A/V Mute button (turns off picture and sound) 19 Remote Control 1 Power button 2 Computer button (selects connected computer source) 3 Video button (cycles through connected video sources) 4 Screen Fit button (adjusts image shape; Projector Parts -
functions only on PowerLite 1775W and when not projecting from the ceiling) 5 Numeric buttons (enter numbers) 6 A/V Mute button (turns off picture and sound) 19 Remote Control 1 Power button 2 Computer button (selects connected computer source) 3 Video button (cycles through connected video sources) 4 Screen Fit button (adjusts image shape; Projector Parts -
User's Guide
Page 20
... through on-screen options and control wireless mouse functions) 14 Enter button (selects options and controls wireless mouse functions) 15 Esc button (cancels/exits functions and controls wireless mouse functions) 16 Volume up and down buttons (adjust speaker volume) 17 Help button (accesses projector help information) 18 Pointer button (activates on PowerLite 1775W...
... through on-screen options and control wireless mouse functions) 14 Enter button (selects options and controls wireless mouse functions) 15 Esc button (cancels/exits functions and controls wireless mouse functions) 16 Volume up and down buttons (adjust speaker volume) 17 Help button (accesses projector help information) 18 Pointer button (activates on PowerLite 1775W...
User's Guide
Page 68
Settings Menu Related tasks Adjusting the Image Height Automatically Correcting Image Shape With Screen Fit You can use the projector's Screen Fit feature to automatically correct the shape and position of the screen and keeping it level. Image Shape You can project ... keystone effects when you reposition the projector. (The PowerLite 1750/1760W/1770W automatically correct vertical keystoning and the PowerLite 1775W automatically corrects horizontal and vertical keystoning.) Automatically Correcting Image Shape With Screen Fit Correcting Image Shape With Quick Corner Correcting Image ...
Settings Menu Related tasks Adjusting the Image Height Automatically Correcting Image Shape With Screen Fit You can use the projector's Screen Fit feature to automatically correct the shape and position of the screen and keeping it level. Image Shape You can project ... keystone effects when you reposition the projector. (The PowerLite 1750/1760W/1770W automatically correct vertical keystoning and the PowerLite 1775W automatically corrects horizontal and vertical keystoning.) Automatically Correcting Image Shape With Screen Fit Correcting Image Shape With Quick Corner Correcting Image ...

User's Guide
Page 71
...the arrow buttons to correct the shape of the image you are finished, press Esc. Turn on the projector or the remote control to adjust. Select the Quick Corner setting and press Enter. Parent topic: Image Shape Correcting Image Shape With the Keystone Buttons You can use the... projector's keystone correction buttons to adjust the image shape as necessary. 8. 5. Then press Enter. 7. When you want to select the corner of an image that is unevenly rectangular...
...the arrow buttons to correct the shape of the image you are finished, press Esc. Turn on the projector or the remote control to adjust. Select the Quick Corner setting and press Enter. Parent topic: Image Shape Correcting Image Shape With the Keystone Buttons You can use the... projector's keystone correction buttons to adjust the image shape as necessary. 8. 5. Then press Enter. 7. When you want to select the corner of an image that is unevenly rectangular...

User's Guide
Page 84
... your input signal, press the Color Mode button repeatedly. To cycle through all the available Color Modes for presentations onto a green chalkboard (adjusts the colors accordingly) 84 Turn on the screen. 4. 1. The image quality changes and the name of the Color Mode appears briefly on the projector and switch to the image...
... your input signal, press the Color Mode button repeatedly. To cycle through all the available Color Modes for presentations onto a green chalkboard (adjusts the colors accordingly) 84 Turn on the screen. 4. 1. The image quality changes and the name of the Color Mode appears briefly on the projector and switch to the image...
User's Guide
Page 86
... Related tasks Connecting a USB Device or Camera to lower or raise the volume. To set the volume using the projector's remote control. Turn on the screen. 3. You must adjust the volume separately for an input source, you can use the Volume buttons on the remote control to... adjust the volume as necessary to the Projector Slideshow Presentations Your projector's Slideshow feature lets you do the following: • Display individual images 86 A volume gauge ...
... Related tasks Connecting a USB Device or Camera to lower or raise the volume. To set the volume using the projector's remote control. Turn on the screen. 3. You must adjust the volume separately for an input source, you can use the Volume buttons on the remote control to... adjust the volume as necessary to the Projector Slideshow Presentations Your projector's Slideshow feature lets you do the following: • Display individual images 86 A volume gauge ...

User's Guide
Page 92
... cannot resume projection at the point that you stopped it on the screen. Extended Menu Stopping Video Action Temporarily You can draw attention to stop the action in progress, press Freeze again. Related references Projector Setup Settings - Parent topic: Adjusting Projector Features Zooming Into and Out of the image and enlarging it... Images You can temporarily stop the video action. 2. To restart the video action in a video or computer presentation and keep the current image on the screen. 92
... cannot resume projection at the point that you stopped it on the screen. Extended Menu Stopping Video Action Temporarily You can draw attention to stop the action in progress, press Freeze again. Related references Projector Setup Settings - Parent topic: Adjusting Projector Features Zooming Into and Out of the image and enlarging it... Images You can temporarily stop the video action. 2. To restart the video action in a video or computer presentation and keep the current image on the screen. 92

User's Guide
Page 93
... on the remote control to adjust the zoomed image: • Use the arrow buttons to position the crosshair in place. Use the following security features: • Password security to prevent the projector from being turned on, and prevent changes to the startup screen and other settings. •...into the image area, enlarging it up to block operation of the projector using the buttons on the remote control. Parent topic: Adjusting Projector Features Projector Security Features You can secure your projector to the original image size, press Esc. Password Security Types Locking the ...
... on the remote control to adjust the zoomed image: • Use the arrow buttons to position the crosshair in place. Use the following security features: • Password security to prevent the projector from being turned on, and prevent changes to the startup screen and other settings. •...into the image area, enlarging it up to block operation of the projector using the buttons on the remote control. Parent topic: Adjusting Projector Features Projector Security Features You can secure your projector to the original image size, press Esc. Password Security Types Locking the ...

User's Guide
Page 94
...button on or when you use password security, you see the Password Protect menu. Installing a Security Cable Parent topic: Adjusting Projector Features Password Security Types You can display when it turns on the remote control until you must set up these types... password prevents anyone from using the projector without first entering a password. • User's Logo Protect password prevents anyone from changing the custom screen the projector can set a password. 1. This takes about five seconds. 2. Setting a Password Selecting Password Security Types Entering a Password to ...
...button on or when you use password security, you see the Password Protect menu. Installing a Security Cable Parent topic: Adjusting Projector Features Password Security Types You can display when it turns on the remote control until you must set up these types... password prevents anyone from using the projector without first entering a password. • User's Logo Protect password prevents anyone from changing the custom screen the projector can set a password. 1. This takes about five seconds. 2. Setting a Password Selecting Password Security Types Entering a Password to ...

User's Guide
Page 104
... display so it matches the lighter display, and press Enter. (You may need to match more projectors, repeat these steps.) 11. Adjust the Brightness Correct. Select the Multi-screen setting and press Enter. 7. setting on each projector in all the levels on the second projector and set the... Set the remote control ID to 1 and press Enter. 8. Access the Extended menu Multi-screen setting on both projectors in the same way. 13. 5. Adjust the green-to-red (G/R) and blue-to 1. 10. Adjust the Brightness Correct. setting on . If you need to switch the remote control ID back...
... display so it matches the lighter display, and press Enter. (You may need to match more projectors, repeat these steps.) 11. Adjust the Brightness Correct. Select the Multi-screen setting and press Enter. 7. setting on each projector in all the levels on the second projector and set the... Set the remote control ID to 1 and press Enter. 8. Access the Extended menu Multi-screen setting on both projectors in the same way. 13. 5. Adjust the green-to-red (G/R) and blue-to 1. 10. Adjust the Brightness Correct. setting on . If you need to switch the remote control ID back...

User's Guide
Page 105
Extended Menu Projector Network Settings - Using the Projector's Menus Image Quality Settings - Network Menu Projector Information Display - Adjusting the Menu Settings Follow the instructions in these sections to adjust the settings that control how your projector works. Image Menu Input Signal Settings - Settings Menu Projector Setup Settings - Signal Menu Projector Feature ...and change projector settings. The projector displays the menus on non-network projector models. Note: The Network menu does not appear on the screen. 105 Info Menu Projector Reset Options -
Extended Menu Projector Network Settings - Using the Projector's Menus Image Quality Settings - Network Menu Projector Information Display - Adjusting the Menu Settings Follow the instructions in these sections to adjust the settings that control how your projector works. Image Menu Input Signal Settings - Settings Menu Projector Setup Settings - Signal Menu Projector Feature ...and change projector settings. The projector displays the menus on non-network projector models. Note: The Network menu does not appear on the screen. 105 Info Menu Projector Reset Options -

User's Guide
Page 107
Parent topic: Adjusting the Menu Settings Image Quality Settings - Note: The available settings depend on the left. Press Esc or Menu to their default values, select Reset. 7. Press .... 4. 2. Computer input source Video input source 107 To return all the menu settings to exit the menu system. The settings for the input source you adjust the quality of the menu screens. 6. Change the settings using .
Parent topic: Adjusting the Menu Settings Image Quality Settings - Note: The available settings depend on the left. Press Esc or Menu to their default values, select Reset. 7. Press .... 4. 2. Computer input source Video input source 107 To return all the menu settings to exit the menu system. The settings for the input source you adjust the quality of the menu screens. 6. Change the settings using .

User's Guide
Page 112
Setting Position Progressive Noise Reduction HDMI Video Range (PowerLite 1760W/1770W/1775W) Input Signal Video Signal Options Up, down, left, right Off Video Film/Auto Off NR1 NR2 Normal Expanded Auto Auto RGB Component Auto Various video standards Description Adjusts the image location on the screen Sets whether to convert interlaced-to-progressive signals for...
Setting Position Progressive Noise Reduction HDMI Video Range (PowerLite 1760W/1770W/1775W) Input Signal Video Signal Options Up, down, left, right Off Video Film/Auto Off NR1 NR2 Normal Expanded Auto Auto RGB Component Auto Various video standards Description Adjusts the image location on the screen Sets whether to convert interlaced-to-progressive signals for...
User's Guide
Page 114
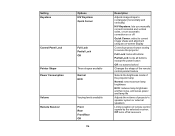
Off turns off Quick Corner: select to correct image shape and alignment using an on-screen display Controls projector button locking to rectangular (horizontally and vertically) H/V Keystone: lets you manually correct horizontal and vertical sides, or turn automatic ...brightness mode of the projector lamp Normal: sets maximum lamp brightness ECO: reduces lamp brightness and fan noise, and saves power and lamp life Adjusts the volume of projector's speaker system or external speakers Limits reception of remote control signals by the selected receiver; Setting Keystone Control Panel Lock...
Off turns off Quick Corner: select to correct image shape and alignment using an on-screen display Controls projector button locking to rectangular (horizontally and vertically) H/V Keystone: lets you manually correct horizontal and vertical sides, or turn automatic ...brightness mode of the projector lamp Normal: sets maximum lamp brightness ECO: reduces lamp brightness and fan noise, and saves power and lamp life Adjusts the volume of projector's speaker system or external speakers Limits reception of remote control signals by the selected receiver; Setting Keystone Control Panel Lock...

User's Guide
Page 115
... projector setup features that control its operation. 115 Setting User Button Test Pattern Options Power Consumption Info Progressive Closed Caption Test Pattern Multi-screen Resolution On Off Description Assigns a menu option to cancel pattern display) Parent topic: Adjusting the Menu Settings Related tasks Correcting Image Shape With Quick Corner Projector Setup Settings -
... projector setup features that control its operation. 115 Setting User Button Test Pattern Options Power Consumption Info Progressive Closed Caption Test Pattern Multi-screen Resolution On Off Description Assigns a menu option to cancel pattern display) Parent topic: Adjusting the Menu Settings Related tasks Correcting Image Shape With Quick Corner Projector Setup Settings -

User's Guide
Page 118
Color Correct. Various languages available Description Matches display qualities and colors of multiple projectors Selects the language for monitoring and control over a network (PowerLite 1760W/1770W/1775W). 118 Network Menu Settings on the Network menu let you view network information and set up the projector for projector menu and message displays (not changed by Reset option) Parent topic: Adjusting the Menu Settings Projector Network Settings - Setting Multi-screen Language Options Adjustment Level (1 to 9) Brightness Correct.
Color Correct. Various languages available Description Matches display qualities and colors of multiple projectors Selects the language for monitoring and control over a network (PowerLite 1760W/1770W/1775W). 118 Network Menu Settings on the Network menu let you view network information and set up the projector for projector menu and message displays (not changed by Reset option) Parent topic: Adjusting the Menu Settings Projector Network Settings - Setting Multi-screen Language Options Adjustment Level (1 to 9) Brightness Correct.
User's Guide
Page 124
You cannot reset the following settings using the Reset All option: • Input Signal • User's Logo • Language • Network menu items • Lamp Hours • Password • User Button • Multi-screen Parent topic: Adjusting the Menu Settings 124
You cannot reset the following settings using the Reset All option: • Input Signal • User's Logo • Language • Network menu items • Lamp Hours • Password • User Button • Multi-screen Parent topic: Adjusting the Menu Settings 124

User's Guide
Page 143
... connected and the power is on for the current video source. • Adjust the Brightness setting or select the Normal Power Consumption setting. • Check ... from the Applications folder. • With Windows Media Center, reduce the screen size from standby or sleep mode. Extended Menu Image Quality Settings - Also see... if your connected computer is in sleep mode or displaying a blank screen saver. • If you press buttons on the remote control, make ... power button to wake it from full screen mode. • With Windows DirectX, turn off DirectX functions. •...
... connected and the power is on for the current video source. • Adjust the Brightness setting or select the Normal Power Consumption setting. • Check ... from the Applications folder. • With Windows Media Center, reduce the screen size from standby or sleep mode. Extended Menu Image Quality Settings - Also see... if your connected computer is in sleep mode or displaying a blank screen saver. • If you press buttons on the remote control, make ... power button to wake it from full screen mode. • With Windows DirectX, turn off DirectX functions. •...


