User's Guide
Page 17
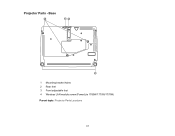
Base 1 Mounting bracket holes 2 Rear feet 3 Front adjustable foot 4 Wireless LAN module screw (PowerLite 1760W/1770W/1775W) Parent topic: Projector Parts Locations 17 Projector Parts -
Base 1 Mounting bracket holes 2 Rear feet 3 Front adjustable foot 4 Wireless LAN module screw (PowerLite 1760W/1770W/1775W) Parent topic: Projector Parts Locations 17 Projector Parts -
User's Guide
Page 21
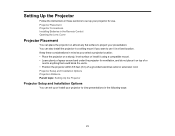
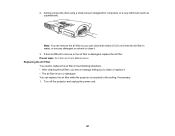
... Distance Parent topic: Setting Up the Projector Projector Setup and Installation Options You can set up or install your presentation. Projector Placement Projector Connections Installing Batteries in the Remote Control Opening the Lens Cover Projector Placement You can also install the projector in a ceiling mount if you select a projector location: • Place the projector on a sturdy, level surface or...
... Distance Parent topic: Setting Up the Projector Projector Setup and Installation Options You can set up or install your presentation. Projector Placement Projector Connections Installing Batteries in the Remote Control Opening the Lens Cover Projector Placement You can also install the projector in a ceiling mount if you select a projector location: • Place the projector on a sturdy, level surface or...
User's Guide
Page 39
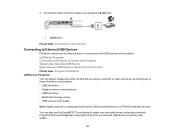
... card reader. 39 2. Connect the other content without using a computer or video device by connecting any of the cable to the projector's Audio port. 1 Audio port Parent topic: Connecting to Video Sources Connecting to External USB Devices Follow the instructions in these devices to the... use the EasyMP PC Free feature to create your projector: • USB flash drive • Digital camera or camera phone • USB hard drive • Multimedia storage viewer • USB memory card reader Note: Digital cameras or camera phones must be USB-mounted devices, not TWAIN-compliant devices.
... card reader. 39 2. Connect the other content without using a computer or video device by connecting any of the cable to the projector's Audio port. 1 Audio port Parent topic: Connecting to Video Sources Connecting to External USB Devices Follow the instructions in these devices to the... use the EasyMP PC Free feature to create your projector: • USB flash drive • Digital camera or camera phone • USB hard drive • Multimedia storage viewer • USB memory card reader Note: Digital cameras or camera phones must be USB-mounted devices, not TWAIN-compliant devices.
User's Guide
Page 68
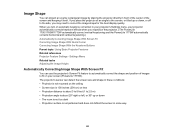
...and position of the screen and keeping it level. Image Shape You can detect the screen size and shape in these conditions: • Projector is not mounted on the ceiling • Screen size is 100 inches (254 cm) or less • Projection distance is about 3 to 8 ...of the center of images to fit on your projector automatically corrects keystone effects when you may need to the side, you reposition the projector. (The PowerLite 1750/1760W/1770W automatically correct vertical keystoning and the PowerLite 1775W automatically corrects horizontal and vertical keystoning.) Automatically ...
...and position of the screen and keeping it level. Image Shape You can detect the screen size and shape in these conditions: • Projector is not mounted on the ceiling • Screen size is 100 inches (254 cm) or less • Projection distance is about 3 to 8 ...of the center of images to fit on your projector automatically corrects keystone effects when you may need to the side, you reposition the projector. (The PowerLite 1750/1760W/1770W automatically correct vertical keystoning and the PowerLite 1775W automatically corrects horizontal and vertical keystoning.) Automatically ...
User's Guide
Page 79
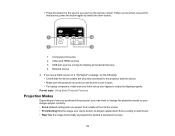
... over top-to-bottom to project upside-down from a ceiling or wall mount. • Rear flips the image horizontally to project from behind a translucent screen. 79 Parent topic: Using Basic Projector Features Projection Modes Depending on how you positioned the projector, you may need to change the projection mode so your laptop to.... • Front (default setting) lets you want on the remote control. • Press the button for that the device cables are securely connected to the projector and the device. • Make sure the projector is turned on and its display properly.
... over top-to-bottom to project upside-down from a ceiling or wall mount. • Rear flips the image horizontally to project from behind a translucent screen. 79 Parent topic: Using Basic Projector Features Projection Modes Depending on how you positioned the projector, you may need to change the projection mode so your laptop to.... • Front (default setting) lets you want on the remote control. • Press the button for that the device cables are securely connected to the projector and the device. • Make sure the projector is turned on and its display properly.
User's Guide
Page 127
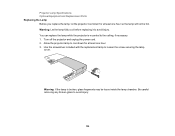
... the air filter in the following situations: • After cleaning the air filter, you see a message telling you can replace the air filter while the projector is damaged, replace the air filter. Parent topic: Air Filter and Vent Maintenance Replacing the Air Filter You need to replace the air filter in... to clean it . If dust is difficult to remove or the air filter is mounted to clean or replace it • The air filter is torn or damaged You can clean both sides of it . 3. Turn off the projector and unplug the power cord. 127 2. Note: You can remove the air filter...
... the air filter in the following situations: • After cleaning the air filter, you see a message telling you can replace the air filter while the projector is damaged, replace the air filter. Parent topic: Air Filter and Vent Maintenance Replacing the Air Filter You need to replace the air filter in... to clean it . If dust is difficult to remove or the air filter is mounted to clean or replace it • The air filter is torn or damaged You can clean both sides of it . 3. Turn off the projector and unplug the power cord. 127 2. Note: You can remove the air filter...
User's Guide
Page 130
... lamp to avoid injury. 130 Warning: If the lamp is mounted to the ceiling, if necessary. 1. Allow the projector lamp to avoid injury. Turn off the projector and unplug the power cord. 2. You can replace the lamp while the projector is broken, glass fragments may be hot. Be careful removing ...lamp fully cool before replacing it to cool down for at least one hour. 3. Projector Lamp Specifications Optional Equipment and Replacement Parts Replacing the Lamp Before you replace the lamp, let the projector cool down for at least one hour so the lamp will not be loose inside the...
... lamp to avoid injury. 130 Warning: If the lamp is mounted to the ceiling, if necessary. 1. Allow the projector lamp to avoid injury. Turn off the projector and unplug the power cord. 2. You can replace the lamp while the projector is broken, glass fragments may be hot. Be careful removing ...lamp fully cool before replacing it to cool down for at least one hour. 3. Projector Lamp Specifications Optional Equipment and Replacement Parts Replacing the Lamp Before you replace the lamp, let the projector cool down for at least one hour so the lamp will not be loose inside the...
User's Guide
Page 162
... extended length of the power available, consult your dealer or power company. • Place the projector near a wall outlet where the plug can block ventilation needed to prevent the screws from its ceiling mount. Insert the plug firmly into a dusty outlet. Do not pull the power cord when disconnecting...and vent. Never spill liquid of any kind through the cabinet slots. This could cause serious injury to anyone under the mount and could damage the projector. • Do not use the projector near a wall, leave at least 2 feet (60 cm) of power source indicated on . This may need to ...
... extended length of the power available, consult your dealer or power company. • Place the projector near a wall outlet where the plug can block ventilation needed to prevent the screws from its ceiling mount. Insert the plug firmly into a dusty outlet. Do not pull the power cord when disconnecting...and vent. Never spill liquid of any kind through the cabinet slots. This could cause serious injury to anyone under the mount and could damage the projector. • Do not use the projector near a wall, leave at least 2 feet (60 cm) of power source indicated on . This may need to ...
User's Guide
Page 164
... antenna. • Increase the separation between the equipment and receiver. • Connect the equipment into an outlet on , the user is mounted overhead and the lamp breaks, be determined by the FCC for a Class B digital device, pursuant to obtain and use a shielded equipment ...designed to provide reasonable protection against harmful interference in contact with this equipment. Please consult your eyes or mouth. • If the projector is encouraged to try to correct the interference by the manufacturer could void the user's authority to operate the equipment. 164 •...
... antenna. • Increase the separation between the equipment and receiver. • Connect the equipment into an outlet on , the user is mounted overhead and the lamp breaks, be determined by the FCC for a Class B digital device, pursuant to obtain and use a shielded equipment ...designed to provide reasonable protection against harmful interference in contact with this equipment. Please consult your eyes or mouth. • If the projector is encouraged to try to correct the interference by the manufacturer could void the user's authority to operate the equipment. 164 •...


