Basics
Page 2
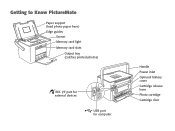
I/F port for external devices USB port for computer Handle Power inlet Optional battery cover Cartridge release lever Photo cartridge Cartridge door Getting to Know PictureMate Paper support (load photo paper here) Edge guides Screen Memory card light Memory card slots Output tray (catches printed photos) EXT.
I/F port for external devices USB port for computer Handle Power inlet Optional battery cover Cartridge release lever Photo cartridge Cartridge door Getting to Know PictureMate Paper support (load photo paper here) Edge guides Screen Memory card light Memory card slots Output tray (catches printed photos) EXT.
Basics
Page 6
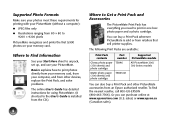
... Make sure your photos meet these requirements for using PictureMate. (A shortcut to the User's Guide is sold or from retailers that sell printer supplies. To find the nearest reseller, call 800-GO-EPSON (800-463-7766). Where to Find Information See your Start Here sheet to print in one box: photo paper and a photo cartridge. You can...
... Make sure your photos meet these requirements for using PictureMate. (A shortcut to the User's Guide is sold or from retailers that sell printer supplies. To find the nearest reseller, call 800-GO-EPSON (800-463-7766). Where to Find Information See your Start Here sheet to print in one box: photo paper and a photo cartridge. You can...
Basics
Page 8
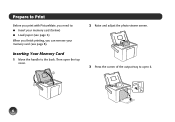
Then open the top cover. 2 Raise and adjust the photo viewer screen. 3 Press the corner of the output tray to the back. Inserting Your Memory Card 1 Move the handle to open it. 6 Prepare to Print Before you print with PictureMate, you need to: ● Insert your memory card (below) ● Load paper (see page 6) When you finish printing, you can remove your memory card (see page 8).
Then open the top cover. 2 Raise and adjust the photo viewer screen. 3 Press the corner of the output tray to the back. Inserting Your Memory Card 1 Move the handle to open it. 6 Prepare to Print Before you print with PictureMate, you need to: ● Insert your memory card (below) ● Load paper (see page 6) When you finish printing, you can remove your memory card (see page 8).
Basics
Page 10
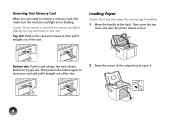
... may damage PictureMate. 1 Move the handle to remove a memory card, first make sure the memory card light is flashing; you are ready to the back. Top slot: Push in the card and release it, then pull it straight out of the output tray to eject your card. Loading Paper Caution: Don...'t load plain paper; Bottom slot: Push in the button again to open the top cover and raise the photo viewer screen. this may lose photos on your card and pull it straight out of the slot. 2 Press ...
... may damage PictureMate. 1 Move the handle to remove a memory card, first make sure the memory card light is flashing; you are ready to the back. Top slot: Push in the card and release it, then pull it straight out of the output tray to eject your card. Loading Paper Caution: Don...'t load plain paper; Bottom slot: Push in the button again to open the top cover and raise the photo viewer screen. this may lose photos on your card and pull it straight out of the slot. 2 Press ...

Basics
Page 11
... of up to prevent curling. See page 28 for more paper, order a PictureMate Print Pack. 3 Slide the edge guides outward. Note: Load a maximum of paper and separate the sheets slightly by fanning them. 5 Place your paper glossy or whiter side up . Load your paper into the slot between the edge guides with the glossy or...
... of up to prevent curling. See page 28 for more paper, order a PictureMate Print Pack. 3 Slide the edge guides outward. Note: Load a maximum of paper and separate the sheets slightly by fanning them. 5 Place your paper glossy or whiter side up . Load your paper into the slot between the edge guides with the glossy or...

Basics
Page 14
... Menu. Tip: You can print all the photos on the screen before printing. 2 Press OK to choose Select Photos, then press OK again to choose Select All Photos. 3 If you change your mind, press the Stop/Clear button. 7 Make sure you have enough paper loaded, then press Print to start printing. ...If you want more information about print settings, see page 16. 6 Press l or r to review your selected photos. If you change your mind, press the Stop/Clear button. 12 The...
... Menu. Tip: You can print all the photos on the screen before printing. 2 Press OK to choose Select Photos, then press OK again to choose Select All Photos. 3 If you change your mind, press the Stop/Clear button. 7 Make sure you have enough paper loaded, then press Print to start printing. ...If you want more information about print settings, see page 16. 6 Press l or r to review your selected photos. If you change your mind, press the Stop/Clear button. 12 The...
Basics
Page 15
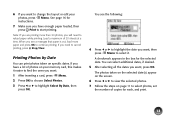
... the steps on specific dates. See page 16 for the selected date. You see a message that paper is out, load more than 20 photos, you want, press OK. If you see the following: 4 Press l or r to highlight the date you want, then press Menu to select it easier to ... all the dates you will need to cancel printing, press Stop/Clear. You can print photos taken on page 11 to select photos, set the number of 20 sheets at a time. Note: If you are printing more paper and press OK to continue printing. A checkmark appears in the box for instructions. 7 Make sure...
... the steps on specific dates. See page 16 for the selected date. You see a message that paper is out, load more than 20 photos, you want, press OK. If you see the following: 4 Press l or r to highlight the date you want, then press Menu to select it easier to ... all the dates you will need to cancel printing, press Stop/Clear. You can print photos taken on page 11 to select photos, set the number of 20 sheets at a time. Note: If you are printing more paper and press OK to continue printing. A checkmark appears in the box for instructions. 7 Make sure...

Basics
Page 16
... want to select it for instructions. 3 Make sure you have PictureMate display all the photos on your memory card in PictureMate. Then press Print to change any time, press Stop/Clear. ● If you see a photo you want to preview, and press Print again. 14 See page...to print. PictureMate automatically reads your memory card as a continuously playing slide show. ● To stop the show at any print settings from the defaults, press Menu. Printing Camera-Selected DPOF Photos If your camera supports DPOF (Digital Print Order Format), you can have enough paper loaded, then ...
... want to select it for instructions. 3 Make sure you have PictureMate display all the photos on your memory card in PictureMate. Then press Print to change any time, press Stop/Clear. ● If you see a photo you want to preview, and press Print again. 14 See page...to print. PictureMate automatically reads your memory card as a continuously playing slide show. ● To stop the show at any print settings from the defaults, press Menu. Printing Camera-Selected DPOF Photos If your camera supports DPOF (Digital Print Order Format), you can have enough paper loaded, then ...
Basics
Page 17
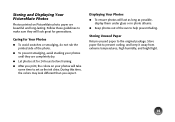
... possible, display them under glass or in photo albums. ● Keep photos out of the photo. ● To prevent smudging, avoid stacking your photos will look different than you print, the colors on PictureMate photo paper are completely dry. ● Let photos sit for 24 hours before framing. ●... this time, the colors may look great for generations. Store paper flat to the original package. Follow these guidelines to help prevent fading. Storing and Displaying Your PictureMate Photos Photos printed on your photos until they will take some time to set as the ink dries...
... possible, display them under glass or in photo albums. ● Keep photos out of the photo. ● To prevent smudging, avoid stacking your photos will look different than you print, the colors on PictureMate photo paper are completely dry. ● Let photos sit for 24 hours before framing. ●... this time, the colors may look great for generations. Store paper flat to the original package. Follow these guidelines to help prevent fading. Storing and Displaying Your PictureMate Photos Photos printed on your photos until they will take some time to set as the ink dries...

Basics
Page 18
...pressing the Menu button, you can learn how to improve print quality or handle memory cards, paper, or photo cartridges. 1 Press Menu. 2 Press l or r to highlight Help, then press OK... for borderless printing (see page 20) ● Print in this section do not change or replace the original digital photo file; Getting Help You can : ● Choose from a variety of layouts (see page 17) ● Print... a proof sheet (see page 18) ● Remove red eyes from your photos (see page 21) Note: The features described in black-and-white or sepia (see page 20) ● Print...
...pressing the Menu button, you can learn how to improve print quality or handle memory cards, paper, or photo cartridges. 1 Press Menu. 2 Press l or r to highlight Help, then press OK... for borderless printing (see page 20) ● Print in this section do not change or replace the original digital photo file; Getting Help You can : ● Choose from a variety of layouts (see page 17) ● Print... a proof sheet (see page 18) ● Remove red eyes from your photos (see page 21) Note: The features described in black-and-white or sepia (see page 20) ● Print...

Basics
Page 19
... are printed at the full 4 × 6 size, without borders. Then choose Mini-wallet as the layout setting. 6 Press l or r to select additional photos if you want. 7 Adjust any other settings you want to start printing. 17 For example, if you can control the amount of... paper, you want , then press OK. This may cause part of photo B. Choosing a Layout By default, your photos are automatically expanded and cropped around the edges. You have these choices: Borderless Wallet Border Mini...
... are printed at the full 4 × 6 size, without borders. Then choose Mini-wallet as the layout setting. 6 Press l or r to select additional photos if you want. 7 Adjust any other settings you want to start printing. 17 For example, if you can control the amount of... paper, you want , then press OK. This may cause part of photo B. Choosing a Layout By default, your photos are automatically expanded and cropped around the edges. You have these choices: Borderless Wallet Border Mini...

Basics
Page 30
...photo paper (150 sheets) and photo cartridge Matte photo paper (100 sheets) and photo cartridge Part number T5846 T5845-M Supported PictureMate models All PictureMate 200/ 300 Series models You can also buy a PictureMatePrint Pack wherever PictureMate is sold or from an Epson authorized reseller. sales) or www.epson...a PictureMate Print Pack (to the right) ● Replace the photo cartridge (see a replacement message while printing, you want to your photo cartridge, see a message on the package. Note: Use your photo cartridge within six months of your printer not covered by Epson's...
...photo paper (150 sheets) and photo cartridge Matte photo paper (100 sheets) and photo cartridge Part number T5846 T5845-M Supported PictureMate models All PictureMate 200/ 300 Series models You can also buy a PictureMatePrint Pack wherever PictureMate is sold or from an Epson authorized reseller. sales) or www.epson...a PictureMate Print Pack (to the right) ● Replace the photo cartridge (see a replacement message while printing, you want to your photo cartridge, see a message on the package. Note: Use your photo cartridge within six months of your printer not covered by Epson's...

Basics
Page 34
..., pack it carefully to carry short distances. Take PictureMate With You PictureMate's handle makes it easy to help protect it from the power outlet. 3 Remove all paper and printed photos. 32 4 Lower the screen, then close the paper support and output tray. 5 Unplug the power adapter...or other location where it can use PictureMate just about anywhere, even if an electrical outlet is installed. Tip: You can order an optional PictureMate Carrying Case (part number PMBAG06) or rechargeable battery (part number C12C831082) from Epson. Do not remove the photo cartridge before transporting.
..., pack it carefully to carry short distances. Take PictureMate With You PictureMate's handle makes it easy to help protect it from the power outlet. 3 Remove all paper and printed photos. 32 4 Lower the screen, then close the paper support and output tray. 5 Unplug the power adapter...or other location where it can use PictureMate just about anywhere, even if an electrical outlet is installed. Tip: You can order an optional PictureMate Carrying Case (part number PMBAG06) or rechargeable battery (part number C12C831082) from Epson. Do not remove the photo cartridge before transporting.

Basics
Page 39
Printer Care and Troubleshooting If you have problems with your PictureMate, or you want to improve print quality, read these steps to clean the print head: 1 Load paper in PictureMate so you can print a nozzle check pattern after cleaning the print head. 2 Press Menu. 3 Press l or r to highlight Maintenance, then press ...OK. 4 Press l or r to be able to clean the print head until you may not be -if photos are too light...
Printer Care and Troubleshooting If you have problems with your PictureMate, or you want to improve print quality, read these steps to clean the print head: 1 Load paper in PictureMate so you can print a nozzle check pattern after cleaning the print head. 2 Press Menu. 3 Press l or r to highlight Maintenance, then press ...OK. 4 Press l or r to be able to clean the print head until you may not be -if photos are too light...

Basics
Page 40
When cleaning is complete, PictureMate prompts you see an Auto Cleaning message. You see if there are any gaps or missing lines. PictureMate makes some noise and you to load paper and print a nozzle check pattern. 6 Press Print. 7 Check the pattern to see a confirmation screen: PictureMate prints a nozzle check pattern and displays this screen: 5 Select Yes, then press OK to clean the print head. Cleaning takes about 60 seconds. OK Needs cleaning 38
When cleaning is complete, PictureMate prompts you see an Auto Cleaning message. You see if there are any gaps or missing lines. PictureMate makes some noise and you to load paper and print a nozzle check pattern. 6 Press Print. 7 Check the pattern to see a confirmation screen: PictureMate prints a nozzle check pattern and displays this screen: 5 Select Yes, then press OK to clean the print head. Cleaning takes about 60 seconds. OK Needs cleaning 38

Basics
Page 41
...-you may need to select Head Alignment, then press OK. ● If the pattern is printed: Best pattern Misaligned pattern 39 If you have moved PictureMate and print quality is not as good as it two times before you can print the head alignment pattern. 2 Press Menu. 3 Press l or r to... highlight Maintenance, then press OK. 4 Press l or r to align the print head. 1 Load paper in PictureMate so you clean the print head. The alignment pattern is OK, select Yes and press OK to finish. ● If the pattern has gaps or...
...-you may need to select Head Alignment, then press OK. ● If the pattern is printed: Best pattern Misaligned pattern 39 If you have moved PictureMate and print quality is not as good as it two times before you can print the head alignment pattern. 2 Press Menu. 3 Press l or r to... highlight Maintenance, then press OK. 4 Press l or r to align the print head. 1 Load paper in PictureMate so you clean the print head. The alignment pattern is OK, select Yes and press OK to finish. ● If the pattern has gaps or...

Basics
Page 42
... no streaks or white lines. (You may need to use a "cleaning sheet" to clean inside the printer. If the paper has ink marks, select Yes and press OK, then press OK again to feed a clean sheet of PictureMate paper. 1 Press Menu. 2 Press l or r to highlight Maintenance, then press OK. 3 Press l or r to... feed the paper. 5 If the paper is done only if you notice lines of ink smearing on the front and back of ...
... no streaks or white lines. (You may need to use a "cleaning sheet" to clean inside the printer. If the paper has ink marks, select Yes and press OK, then press OK again to feed a clean sheet of PictureMate paper. 1 Press Menu. 2 Press l or r to highlight Maintenance, then press OK. 3 Press l or r to... feed the paper. 5 If the paper is done only if you notice lines of ink smearing on the front and back of ...
Basics
Page 43
... and photo viewer screen don't turn on. ● Press the P On button to turn on PictureMate. ● Make sure the power cable and AC adapter are securely connected at its best, you should clean it back on it is not used . Press any dust or dirt from the paper feeder ... the P On button to clean the PictureMate photo viewer screen. Don't get water on . 41 The photo viewer screen goes blank. The screen shuts off PictureMate, unplug the power cable, and disconnect the power adapter and any USB cable or device. 2 Remove all paper, then use a hard or abrasive brush, or alcohol ...
... and photo viewer screen don't turn on. ● Press the P On button to turn on PictureMate. ● Make sure the power cable and AC adapter are securely connected at its best, you should clean it back on it is not used . Press any dust or dirt from the paper feeder ... the P On button to clean the PictureMate photo viewer screen. Don't get water on . 41 The photo viewer screen goes blank. The screen shuts off PictureMate, unplug the power cable, and disconnect the power adapter and any USB cable or device. 2 Remove all paper, then use a hard or abrasive brush, or alcohol ...
Basics
Page 44
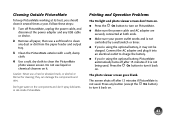
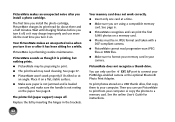
... User's Guide for a while. The printer lid (paper support) snaps off , or it may charge improperly and use PictureMate to connect your computer. To print photos stored on the paper. PictureMate sounds as though it is printing, but nothing prints. ● PictureMate may need cleaning. PictureMate does not recognize a thumb drive. Your PictureMate makes an unexpected noise when you...
... User's Guide for a while. The printer lid (paper support) snaps off , or it may charge improperly and use PictureMate to connect your computer. To print photos stored on the paper. PictureMate sounds as though it is printing, but nothing prints. ● PictureMate may need cleaning. PictureMate does not recognize a thumb drive. Your PictureMate makes an unexpected noise when you...
Basics
Page 45
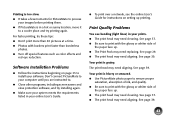
... up . ● The print head may need cleaning. Your print is grainy. Your print is blurry or smeared. ● Use PictureMate photo paper to ensure proper saturation, absorption of ink, and quality. ● Be sure to . ● Close other programs, including screen savers and virus protection ...it to a cooler place and try printing again. See page 39. See page 39. See page 39. 43 Don't connect PictureMate to print with borders print faster than borderless photos. ● Turn off special features such as color effects and red-eye reduction. See page 37. ● Be sure to ...
... up . ● The print head may need cleaning. Your print is grainy. Your print is blurry or smeared. ● Use PictureMate photo paper to ensure proper saturation, absorption of ink, and quality. ● Be sure to . ● Close other programs, including screen savers and virus protection ...it to a cooler place and try printing again. See page 39. See page 39. See page 39. 43 Don't connect PictureMate to print with borders print faster than borderless photos. ● Turn off special features such as color effects and red-eye reduction. See page 37. ● Be sure to ...

