Technical Brief (Digital Cameras)
Page 6
...Sierra Imaging Image Expert software, Windows users can use the Save to Floppy command to create a diskette or ZIP disk containing the selected image files, their respective owners. EPSON Sales Training EPSON and EPSON Stylus are saved with the image in .WAV format. PhotoPC is still in the camera...listen to the message right on the camera. 1. The slide show player. Technical Brief-Digital cameras Page 5 Versatility-Voice recording Several EPSON digital cameras have built-in microphones which allow you to record a voice message for each image and play the attached audio message. ...
...Sierra Imaging Image Expert software, Windows users can use the Save to Floppy command to create a diskette or ZIP disk containing the selected image files, their respective owners. EPSON Sales Training EPSON and EPSON Stylus are saved with the image in .WAV format. PhotoPC is still in the camera...listen to the message right on the camera. 1. The slide show player. Technical Brief-Digital cameras Page 5 Versatility-Voice recording Several EPSON digital cameras have built-in microphones which allow you to record a voice message for each image and play the attached audio message. ...
Product Brochure
Page 2
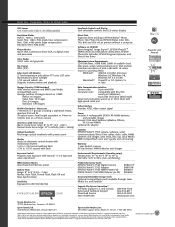
...Windows) 8 pin DIN serial port (Macintosh) Serial communication speed up to 230.4 kbps with high-speed serial port Video Interface Provides NTSC video output signal Power Includes 4 rechargeable EPSON AA NiMH batteries and portable charger Accepts 4 AA sized batteries (alkaline, lithium, Ni-Cd and NiMH) Optional AC adapter Contents EPSON PhotoPC 750Z... Equivalent to ISO 90/180/360 Product/Accessory Codes EPSON PhotoPC 750Z Digital Camera EPSON PhotoPC 750Z Adapter EPSON PhotoPC 750Z NiMH Power Pak EPSON PhotoPC 750Z NiMH Batteries (4x AA) B080011F B867038 B818051 B818061 Accessory...
...Windows) 8 pin DIN serial port (Macintosh) Serial communication speed up to 230.4 kbps with high-speed serial port Video Interface Provides NTSC video output signal Power Includes 4 rechargeable EPSON AA NiMH batteries and portable charger Accepts 4 AA sized batteries (alkaline, lithium, Ni-Cd and NiMH) Optional AC adapter Contents EPSON PhotoPC 750Z... Equivalent to ISO 90/180/360 Product/Accessory Codes EPSON PhotoPC 750Z Digital Camera EPSON PhotoPC 750Z Adapter EPSON PhotoPC 750Z NiMH Power Pak EPSON PhotoPC 750Z NiMH Batteries (4x AA) B080011F B867038 B818051 B818061 Accessory...

Product Information Guide
Page 4
...batteries a third time by opening and closing the charger. EPSON PhotoPC 750Z Minimum System Requirements Processor Operating System RAM Ports Display Hard drive space CD-ROM drive Windows® 486 or higher Windows 95, Windows 98, Windows NT® 3.51 or Windows NT 4.0 (Service Pack 3) At least 16MB Serial port ... over and flip the two prongs out of children. Note: The charger lights flash to flash for the first time: 1. EPSON PhotoPC 750Z 1/99 Warning: Shock hazard. To avoid the danger of the charger and insert all safety and handling instructions before they will ...
...batteries a third time by opening and closing the charger. EPSON PhotoPC 750Z Minimum System Requirements Processor Operating System RAM Ports Display Hard drive space CD-ROM drive Windows® 486 or higher Windows 95, Windows 98, Windows NT® 3.51 or Windows NT 4.0 (Service Pack 3) At least 16MB Serial port ... over and flip the two prongs out of children. Note: The charger lights flash to flash for the first time: 1. EPSON PhotoPC 750Z 1/99 Warning: Shock hazard. To avoid the danger of the charger and insert all safety and handling instructions before they will ...

Product Information Guide
Page 8
Connecting to a Windows PC Before you start , turn off the camera and your Macintosh. Line up the arrow on the cable connector with the mark on your Macintosh. ... AppleTalk is turned off the camera and your camera. Then insert the connector. . 3. Open the connector cover on . 2. EPSON PhotoPC 750Z 1/99 EPSON PhotoPC 750Z 5. The last picture you are displayed on your computer to Play. The EPSON Photo File Uploader lets you can display on TV. Anything you transfer images from your computer screen can connect...
Connecting to a Windows PC Before you start , turn off the camera and your Macintosh. Line up the arrow on the cable connector with the mark on your Macintosh. ... AppleTalk is turned off the camera and your camera. Then insert the connector. . 3. Open the connector cover on . 2. EPSON PhotoPC 750Z 1/99 EPSON PhotoPC 750Z 5. The last picture you are displayed on your computer to Play. The EPSON Photo File Uploader lets you can display on TV. Anything you transfer images from your computer screen can connect...

User Manual
Page 5
Contents Introduction PhotoPC 750Z Features Optional Accessories Minimum System Requirements Windows Systems Macintosh Systems Where To Get Help Software Support Software Licensing Registration Safety Instructions 1 Using Advanced Camera Features Taking Pictures With the Timer Using Macro ...
Contents Introduction PhotoPC 750Z Features Optional Accessories Minimum System Requirements Windows Systems Macintosh Systems Where To Get Help Software Support Software Licensing Registration Safety Instructions 1 Using Advanced Camera Features Taking Pictures With the Timer Using Macro ...

User Manual
Page 6
...) 3-8 Deleting Annotations 4-13 Getting Images With the Camio Viewer Displaying Albums as Slide Shows 4-14 (Windows 95, Windows 98, and Using an Album as a Screen Saver 4-15 Windows NT 4.0) 3-10 Setting an Image as Wallpaper 4-15 Dragging and Dropping a Picture Into Copying to Diskette or Zip Disk 4-16 a Document 3-11 Viewing the Pictures...
...) 3-8 Deleting Annotations 4-13 Getting Images With the Camio Viewer Displaying Albums as Slide Shows 4-14 (Windows 95, Windows 98, and Using an Album as a Screen Saver 4-15 Windows NT 4.0) 3-10 Setting an Image as Wallpaper 4-15 Dragging and Dropping a Picture Into Copying to Diskette or Zip Disk 4-16 a Document 3-11 Viewing the Pictures...

User Manual
Page 7
...Uploading Images to the Camera 7-1 Uploading Existing Images From Your Windows PC 7-2 Uploading Images From Your Macintosh 7-5 Converting Presentations 7-7 Capturing Windows Screens 7-8 Capturing Macintosh Screens 7-9 Projecting Your Presentation 7-10 ...Taking Pictures From Your Computer With Image Expert 6-1 8 Using CompactFlash Memory Cards Using the Self Timer 6-3 Installing a Memory Card 8-2 Setting the Shutter Speed 6-4 Formatting a Memory Card 8-3 Taking Pictures With EPSON...
...Uploading Images to the Camera 7-1 Uploading Existing Images From Your Windows PC 7-2 Uploading Images From Your Macintosh 7-5 Converting Presentations 7-7 Capturing Windows Screens 7-8 Capturing Macintosh Screens 7-9 Projecting Your Presentation 7-10 ...Taking Pictures From Your Computer With Image Expert 6-1 8 Using CompactFlash Memory Cards Using the Self Timer 6-3 Installing a Memory Card 8-2 Setting the Shutter Speed 6-4 Formatting a Memory Card 8-3 Taking Pictures With EPSON...
User Manual
Page 10
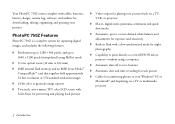
PhotoPC 750Z Features PhotoPC 750Z is a complete system for capturing digital images, and includes the following features: Resolutions up to 1280 × 960 pixels, and up to 1600 × ... picture Cables for downloading, editing, organizing, and printing your Windows® PC or Macintosh® and displaying on a TV or multimedia projector 2 Introduction Your PhotoPC 750Z comes complete with a slow synchronized mode for night photography Capability to print directly to several EPSON ink jet printers-without using HyPict mode 3× true...
PhotoPC 750Z Features PhotoPC 750Z is a complete system for capturing digital images, and includes the following features: Resolutions up to 1280 × 960 pixels, and up to 1600 × ... picture Cables for downloading, editing, organizing, and printing your Windows® PC or Macintosh® and displaying on a TV or multimedia projector 2 Introduction Your PhotoPC 750Z comes complete with a slow synchronized mode for night photography Capability to print directly to several EPSON ink jet printers-without using HyPict mode 3× true...

User Manual
Page 12
... images to your computer and edit them, make sure your system meets these minimum requirements: Windows Systems IBM®-compatible PC with 486 or higher processor Microsoft® Windows 98, Windows 95, Windows NT® 4.0 or Windows NT 3.51 (with Service Pack 3) Serial port with standard RS-232C interface ...129; VGA monitor with at least 256 colors Macintosh modem/printer serial port (19,200 bps, or higher) Where To Get Help EPSON provides technical assistance through electronic support services and automated telephone services 24 hours a day. 4 Introduction
... images to your computer and edit them, make sure your system meets these minimum requirements: Windows Systems IBM®-compatible PC with 486 or higher processor Microsoft® Windows 98, Windows 95, Windows NT® 4.0 or Windows NT 3.51 (with Service Pack 3) Serial port with standard RS-232C interface ...129; VGA monitor with at least 256 colors Macintosh modem/printer serial port (19,200 bps, or higher) Where To Get Help EPSON provides technical assistance through electronic support services and automated telephone services 24 hours a day. 4 Introduction
User Manual
Page 14
... Imaging Image Expert software questions (for Windows 95, Windows 98, and Windows NT 4.0 users, make sure you check the Quick Tour first) (310) 974-1983 for the PhotoPC 750Z digital camera and mail it back to us. Registration Please take a minute to fill out the registration card for the EPSON Photo!2 application and TWAIN driver...
... Imaging Image Expert software questions (for Windows 95, Windows 98, and Windows NT 4.0 users, make sure you check the Quick Tour first) (310) 974-1983 for the PhotoPC 750Z digital camera and mail it back to us. Registration Please take a minute to fill out the registration card for the EPSON Photo!2 application and TWAIN driver...

User Manual
Page 31
... Auto/Manual advanced settings icon and press the SEL button. 5 Press until the exposure icon is useful when your picture has a bright A background, for example, windows facing the sun.
... Auto/Manual advanced settings icon and press the SEL button. 5 Press until the exposure icon is useful when your picture has a bright A background, for example, windows facing the sun.

User Manual
Page 49
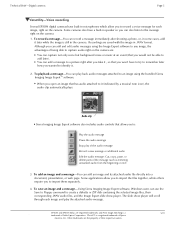
... Getting images with the Camio Viewer NOTE Although most of the instructions and illustrations in this chapter apply to Windows 95 or Windows 98, you can transfer your pictures directly into your program from the File menu. Getting Photos Into Applications and Documents ... Select TWAIN_32 Source (or B Acquire, then TWAIN Select Source) from the camera. . 3 Getting Photos Into Applications and 3 Documents P hotoPC 750Z provides several methods for getting your application. You can drag and drop a picture from an Image Expert album into TWAIN applications Getting images...
... Getting images with the Camio Viewer NOTE Although most of the instructions and illustrations in this chapter apply to Windows 95 or Windows 98, you can transfer your pictures directly into your program from the File menu. Getting Photos Into Applications and Documents ... Select TWAIN_32 Source (or B Acquire, then TWAIN Select Source) from the camera. . 3 Getting Photos Into Applications and 3 Documents P hotoPC 750Z provides several methods for getting your application. You can drag and drop a picture from an Image Expert album into TWAIN applications Getting images...

User Manual
Page 51
...can use the export feature of transferring images from your camera. 8 If necessary, click Close to exit the EPSON Photo!2 screen and return to Programs, PhotoPC 750Z, EPSON Photo!2. 2 Click the picture you want to remove the picture(s) from the camera save your pictures as you ...processor or other application doesn't support the JPEG format, you have to transfer and export your pictures with EPSON Photo!2: 1 Start your EPSON Photo!2 software. Under Windows 98, Windows 95, or Windows NT 4.0, click Start, and then point to your application. You see page 3-5.) 3 Click to transfer...
...can use the export feature of transferring images from your camera. 8 If necessary, click Close to exit the EPSON Photo!2 screen and return to Programs, PhotoPC 750Z, EPSON Photo!2. 2 Click the picture you want to remove the picture(s) from the camera save your pictures as you ...processor or other application doesn't support the JPEG format, you have to transfer and export your pictures with EPSON Photo!2: 1 Start your EPSON Photo!2 software. Under Windows 98, Windows 95, or Windows NT 4.0, click Start, and then point to your application. You see page 3-5.) 3 Click to transfer...

User Manual
Page 58
... Startup Options dialog box: NOTE Dragging and dropping an image with the Camio Viewer works only with OLE-2.0-compliant applications running under Windows 95, Windows 98, or Windows NT4.0, is a quick and easy way to your computer, or just display the pictures in the camera. If you can...need to connect the camera to access the images on editing images.) Getting Images With the Camio Viewer (Windows 95, Windows 98, and Windows NT 4.0) The Camio Viewer, which runs under Windows 95, Windows 98, and Windows NT 4.0. 2 If you are using a PC card slot, select Connect Via PC Card. 3-10 Getting...
... Startup Options dialog box: NOTE Dragging and dropping an image with the Camio Viewer works only with OLE-2.0-compliant applications running under Windows 95, Windows 98, or Windows NT4.0, is a quick and easy way to your computer, or just display the pictures in the camera. If you can...need to connect the camera to access the images on editing images.) Getting Images With the Camio Viewer (Windows 95, Windows 98, and Windows NT 4.0) The Camio Viewer, which runs under Windows 95, Windows 98, and Windows NT 4.0. 2 If you are using a PC card slot, select Connect Via PC Card. 3-10 Getting...

User Manual
Page 61
On Windows systems, you can also record sounds for each image, copy an album to diskette, use Image Expert albums to organize and display your images as ...
On Windows systems, you can also record sounds for each image, copy an album to diskette, use Image Expert albums to organize and display your images as ...

User Manual
Page 65
NOTE To print from Windows NT 3.51, click the Page Setup button or choose Page Setup from a variety of images per page for your images. 4 When you're finished designing ... printed area for albums. However, you want to print. 2 Click the Print Layout button Layout from the file menu. or choose Print The Print Layout window appears: Click to display next Click to display list or previous page of sizes and layouts Click to adjust margins The image in the center...
NOTE To print from Windows NT 3.51, click the Page Setup button or choose Page Setup from a variety of images per page for your images. 4 When you're finished designing ... printed area for albums. However, you want to print. 2 Click the Print Layout button Layout from the file menu. or choose Print The Print Layout window appears: Click to display next Click to display list or previous page of sizes and layouts Click to adjust margins The image in the center...

User Manual
Page 66
.... Follow these steps: 1 Click the Print Setup button if you want , you can click the Print button or follow the instructions in the layout window. 5 When the preview shows the layout you want per page. Otherwise, all layouts are set up for your picture or size it interactively in the... 4 Choose the size and number of contact sheets. 4-6 Working With Photos and Albums You can then enter exact dimensions for a standard letter-size sheet. 2 In Windows, click the Portrait button or Landscape button to change the orientation of the page. 3 Click the down arrow next to the size box to your...
.... Follow these steps: 1 Click the Print Setup button if you want , you can click the Print button or follow the instructions in the layout window. 5 When the preview shows the layout you want per page. Otherwise, all layouts are set up for your picture or size it interactively in the... 4 Choose the size and number of contact sheets. 4-6 Working With Photos and Albums You can then enter exact dimensions for a standard letter-size sheet. 2 In Windows, click the Portrait button or Landscape button to change the orientation of the page. 3 Click the down arrow next to the size box to your...

User Manual
Page 69
... steps to add sound: 1 Select the image you want , you can add voice or musical annotations to enlarge and crop it . If you're using Windows and your system includes a microphone and a 16-bit sound card with speakers, you can click the Print button to produce your pictures. Adding Sound to... an Image (Windows Only) 2 Click the Zoom In tool and then click on an image to move it and choose the portion you want to display. 4 Click the...
... steps to add sound: 1 Select the image you want , you can add voice or musical annotations to enlarge and crop it . If you're using Windows and your system includes a microphone and a 16-bit sound card with speakers, you can click the Print button to produce your pictures. Adding Sound to... an Image (Windows Only) 2 Click the Zoom In tool and then click on an image to move it and choose the portion you want to display. 4 Click the...

User Manual
Page 70
Otherwise, click Cancel to delete the new recording and exit the Record window. (You can start over with step 1, if you want.) Playing Back Sounds When you open an image that has audio attached to it (indicated by a ...
Otherwise, click Cancel to delete the new recording and exit the Record window. (You can start over with step 1, if you want.) Playing Back Sounds When you open an image that has audio attached to it (indicated by a ...

User Manual
Page 71
... with sound and use the Audio buttons on the left side of your audio system, select System Properties from the Annotation menu. The sound wave window opens: Deleting Sounds A To delete an audio clip, follow these steps: NOTE To adjust recording or playback volume, or modify other features of your ...Audio 1 Select an image that has an audio clip. 2 Click the Edit Audio button , or choose Edit Audio menu. Use the volume control on your Windows task bar. You can also select the image with the sound you selected. 4 Click Cut to remove the section. Click Copy to ...
... with sound and use the Audio buttons on the left side of your audio system, select System Properties from the Annotation menu. The sound wave window opens: Deleting Sounds A To delete an audio clip, follow these steps: NOTE To adjust recording or playback volume, or modify other features of your ...Audio 1 Select an image that has an audio clip. 2 Click the Edit Audio button , or choose Edit Audio menu. Use the volume control on your Windows task bar. You can also select the image with the sound you selected. 4 Click Cut to remove the section. Click Copy to ...
