
User Manual
Page 5
... Card Installing Your PhotoPC 650 Software 2 Installing on a Windows PC 3 Installing on a Macintosh 3 Identifying Camera Parts 3 3 2 Taking Pictures 4 Getting Ready to Take Pictures 4 Turning the Camera On and Off Saving Battery Power with Auto Shut-off Using the Status Display Panel 1-2 Checking the Battery 1-2 Picture-Taking Guidelines 1-3 Taking Pictures with the Viewfinder 1-4 Taking Pictures with the LCD Monitor 1-5 Checking the Picture Counter 1-5 Setting Image Quality 1-5 Using Macro Mode to Take Close-ups 1-7 Using the Flash Taking Pictures with the Timer...
... Card Installing Your PhotoPC 650 Software 2 Installing on a Windows PC 3 Installing on a Macintosh 3 Identifying Camera Parts 3 3 2 Taking Pictures 4 Getting Ready to Take Pictures 4 Turning the Camera On and Off Saving Battery Power with Auto Shut-off Using the Status Display Panel 1-2 Checking the Battery 1-2 Picture-Taking Guidelines 1-3 Taking Pictures with the Viewfinder 1-4 Taking Pictures with the LCD Monitor 1-5 Checking the Picture Counter 1-5 Setting Image Quality 1-5 Using Macro Mode to Take Close-ups 1-7 Using the Flash Taking Pictures with the Timer...
User Manual
Page 6
...Back Pictures Using Playback Mode Menus Playing Back Pictures One-by-One Playing Back Multiple Pictures Playing Your Pictures as a Slide Show Turning Off Picture Information Erasing Pictures Erasing the Currently Displayed Picture Selecting Pictures to Erase Locking Photos Unlocking Photos Playing Back Pictures on TV or Video Setting the Video Standard Playing Back Pictures Changing Camera Settings Setting the Date and Time Setting the Alert Beep Selecting Quick Review Mode Setting the LCD Monitor Brightness Setting the Language iv 4 Getting Photos Into Your Computer 3-2 Transferring Photos...
...Back Pictures Using Playback Mode Menus Playing Back Pictures One-by-One Playing Back Multiple Pictures Playing Your Pictures as a Slide Show Turning Off Picture Information Erasing Pictures Erasing the Currently Displayed Picture Selecting Pictures to Erase Locking Photos Unlocking Photos Playing Back Pictures on TV or Video Setting the Video Standard Playing Back Pictures Changing Camera Settings Setting the Date and Time Setting the Alert Beep Selecting Quick Review Mode Setting the LCD Monitor Brightness Setting the Language iv 4 Getting Photos Into Your Computer 3-2 Transferring Photos...
User Manual
Page 10
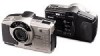
... flash with red-eye reduction mode Automatic shut-off to save battery power Lexar Media™ JumpShot™ USB cable for transferring photos to your USB-compatible Windows 98 PC, iMac, or Power Macintosh G3 directly from the USB CompactFlash card Serial cable for transferring photos from your camera to your Windows PC or PowerPC™ Macintosh Video cable for displaying photos on a TV or videotaping them Your camera comes with cables, batteries, USB CompactFlash card, and software for transferring...
... flash with red-eye reduction mode Automatic shut-off to save battery power Lexar Media™ JumpShot™ USB cable for transferring photos to your USB-compatible Windows 98 PC, iMac, or Power Macintosh G3 directly from the USB CompactFlash card Serial cable for transferring photos from your camera to your Windows PC or PowerPC™ Macintosh Video cable for displaying photos on a TV or videotaping them Your camera comes with cables, batteries, USB CompactFlash card, and software for transferring...
User Manual
Page 12
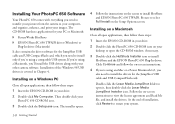
... the registration card for the PhotoPC 650 digital camera and mail it back to us. Your operating system already includes full support for extended periods of time. Don't use the camera where inflammable or volatile gas is stored. If the camera shows unusual signs such as instructed in the camera. Don't expose the camera to install iMac Update 1.0. To find out which operating system your...
... the registration card for the PhotoPC 650 digital camera and mail it back to us. Your operating system already includes full support for extended periods of time. Don't use the camera where inflammable or volatile gas is stored. If the camera shows unusual signs such as instructed in the camera. Don't expose the camera to install iMac Update 1.0. To find out which operating system your...
User Manual
Page 21
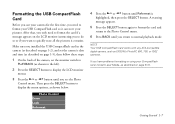
... playback mode. NOTE Your USB CompactFlash card works with any ATA-compatible digital camera, such as EPSON's PhotoPC 600, 700, or 750Z cameras. 1 On the back of the camera, set the camera's date and time (as shown below: A Photo Control Erase Lock B Reformat Getting Started 1-7 After that, you only need to format your USB CompactFlash card so it contains. Formatting the USB CompactFlash Card Before you use your camera for the first time, you need to format the card if a message appears on the LCD monitor instructing...
... playback mode. NOTE Your USB CompactFlash card works with any ATA-compatible digital camera, such as EPSON's PhotoPC 600, 700, or 750Z cameras. 1 On the back of the camera, set the camera's date and time (as shown below: A Photo Control Erase Lock B Reformat Getting Started 1-7 After that, you only need to format your USB CompactFlash card so it contains. Formatting the USB CompactFlash Card Before you use your camera for the first time, you need to format the card if a message appears on the LCD monitor instructing...
User Manual
Page 22
... print your images. Double-click the Lexar Media JumpShot folder to install HotShots and EPSON PhotoPC 650 TWAIN. Then double-click your PC or Macintosh: PictureWorks HotShots EPSON PhotoPC 650 TWAIN driver (Windows) or Plug-In driver (Macintosh) It also contains the driver software for the JumpShot USB cable and USB CompactFlash card. The installer opens. 4 Follow the instructions on the screen to open applications, then follow the on-screen instructions. 4 If you're using...
... print your images. Double-click the Lexar Media JumpShot folder to install HotShots and EPSON PhotoPC 650 TWAIN. Then double-click your PC or Macintosh: PictureWorks HotShots EPSON PhotoPC 650 TWAIN driver (Windows) or Plug-In driver (Macintosh) It also contains the driver software for the JumpShot USB cable and USB CompactFlash card. The installer opens. 4 Follow the instructions on the screen to open applications, then follow the on-screen instructions. 4 If you're using...

User Manual
Page 30
... offcenter if you want. 2-6 Taking Pictures monitor switch 2 Center your subject on the monitor. While holding the shutter button down, you can adjust the LCD brightness setting to make viewing easier (see a band of washed-out color in the image on the monitor and hold the shutter button halfway down to lock the auto focus. When your subject is slightly smaller than the image that will not affect...
... offcenter if you want. 2-6 Taking Pictures monitor switch 2 Center your subject on the monitor. While holding the shutter button down, you can adjust the LCD brightness setting to make viewing easier (see a band of washed-out color in the image on the monitor and hold the shutter button halfway down to lock the auto focus. When your subject is slightly smaller than the image that will not affect...

User Manual
Page 32
... pictures you change these settings, the number may also change. To free up the image. If you can play back your pictures on your pictures before you erase them, you need to transfer the images to the other. Setting Image Quality The PhotoPC 650 has four image quality (resolution) settings. The status light on the back of the camera's memory, you can take, depending on the LCD monitor and erase the ones you press the shutter button. Your eye...
... pictures you change these settings, the number may also change. To free up the image. If you can play back your pictures on your pictures before you erase them, you need to transfer the images to the other. Setting Image Quality The PhotoPC 650 has four image quality (resolution) settings. The status light on the back of the camera's memory, you can take, depending on the LCD monitor and erase the ones you press the shutter button. Your eye...

User Manual
Page 36
... delete the picture before the camera takes the picture, the red timer light flashes. The camera beeps when the image is saved when the status light stops flashing and turns green. 6 Once you 're taking a timed, macro mode picture, press the / timer button three times. Taking Pictures with the Timer Setting the timer creates a 10-second delay between the time you don't see how your camera saves it on.) Quick Review gauge The Quick Review image remains on the monitor for tripod instructions.) 2 Turn on the image shows you the time...
... delete the picture before the camera takes the picture, the red timer light flashes. The camera beeps when the image is saved when the status light stops flashing and turns green. 6 Once you 're taking a timed, macro mode picture, press the / timer button three times. Taking Pictures with the Timer Setting the timer creates a 10-second delay between the time you don't see how your camera saves it on.) Quick Review gauge The Quick Review image remains on the monitor for tripod instructions.) 2 Turn on the image shows you the time...

User Manual
Page 42
... Erase this photo? Erasing the Currently Displayed Picture Make sure the monitor switch is displayed. Selecting Pictures to Erase You select pictures to erase using Quick Review. Then follow these steps: 1 Hold down the FUNCTION button and press the BACK button. The monitor returns to clear the message. Press any button to playback mode. You can also erase stored photos through your software when you take them to your camera, using the Photo Control menu. Erasing Pictures The LCD monitor provides different methods for deleting images...
... Erase this photo? Erasing the Currently Displayed Picture Make sure the monitor switch is displayed. Selecting Pictures to Erase You select pictures to erase using Quick Review. Then follow these steps: 1 Hold down the FUNCTION button and press the BACK button. The monitor returns to clear the message. Press any button to playback mode. You can also erase stored photos through your software when you take them to your camera, using the Photo Control menu. Erasing Pictures The LCD monitor provides different methods for deleting images...

User Manual
Page 50
... button once to open the settings menu, then press button twice to select the Quick Review mode icon. 4 Press the SELECT button to playback mode. You can turn Quick Review mode on the LCD monitor and delete it, if necessary, before your camera stores it in bright light to make it . Set the monitor switch to PLAYBACK, then follow these steps to adjust the LCD brightness: 1 Press the SELECT button to save additional battery power or if you'd rather not use...
... button once to open the settings menu, then press button twice to select the Quick Review mode icon. 4 Press the SELECT button to playback mode. You can turn Quick Review mode on the LCD monitor and delete it, if necessary, before your camera stores it in bright light to make it . Set the monitor switch to PLAYBACK, then follow these steps to adjust the LCD brightness: 1 Press the SELECT button to save additional battery power or if you'd rather not use...

User Manual
Page 55
Make sure the pin holes on your computer system. Then connect it 's connected to a USB port on transferring your pictures. If you have a Macintosh, see the next section for instructions on installing the USB CompactFlash card and USB cable drivers. A If you have a Windows 98 computer, see page 4-7 for instructions on your computer instead. 2 Position the JumpShot USB cable connector so the side shown here faces in the...
Make sure the pin holes on your computer system. Then connect it 's connected to a USB port on transferring your pictures. If you have a Macintosh, see the next section for instructions on installing the USB CompactFlash card and USB cable drivers. A If you have a Windows 98 computer, see page 4-7 for instructions on your computer instead. 2 Position the JumpShot USB cable connector so the side shown here faces in the...

User Manual
Page 63
... have problems connecting to the printer port, use the modem port instead. Your Macintosh may not recognize To transfer your Macintosh. and the EPSON PhotoPC 650 TWAIN (Windows) or PlugIn driver (Macintosh), follow the steps in these sections: 2 Connect the long serial cable to a folder, or B Transferring pictures into the camera's serial port. A Opening the EPSON PhotoPC 650 TWAIN or Plug-In driver Saving pictures to the short Macintosh adapter cable, then...
... have problems connecting to the printer port, use the modem port instead. Your Macintosh may not recognize To transfer your Macintosh. and the EPSON PhotoPC 650 TWAIN (Windows) or PlugIn driver (Macintosh), follow the steps in these sections: 2 Connect the long serial cable to a folder, or B Transferring pictures into the camera's serial port. A Opening the EPSON PhotoPC 650 TWAIN or Plug-In driver Saving pictures to the short Macintosh adapter cable, then...

User Manual
Page 130
... pages. If that doesn't work, replace the batteries. If you 're not using the AC adapter, make sure they are installed correctly and that the battery cover is open the lens cover to strong vibrations or magnetic fields Solving Camera Problems Check for long periods of time, remove the batteries and store them (see Chapter 3), or transfer them to your problem and possible solutions on a car dashboard...
... pages. If that doesn't work, replace the batteries. If you 're not using the AC adapter, make sure they are installed correctly and that the battery cover is open the lens cover to strong vibrations or magnetic fields Solving Camera Problems Check for long periods of time, remove the batteries and store them (see Chapter 3), or transfer them to your problem and possible solutions on a car dashboard...

User Manual
Page 131
... your picture unless you turn the flash off setting. Check your picture quality. Your LCD monitor flickers. Check the lights around you use the camera's controls. Your LCD monitor image is displayed on . The flash doesn't work. Make sure the flash is connected to format or eject your CompactFlash card. This won 't affect your television if you need to your computer with the serial cable, you can't use a flash mode (see if a message...
... your picture unless you turn the flash off setting. Check your picture quality. Your LCD monitor flickers. Check the lights around you use the camera's controls. Your LCD monitor image is displayed on . The flash doesn't work. Make sure the flash is connected to format or eject your CompactFlash card. This won 't affect your television if you need to your computer with the serial cable, you can't use a flash mode (see if a message...

User Manual
Page 134
... updated driver from IBM: 1 Download the files from the cable. Your system hangs or crashes when you 're transferring pictures via the serial cable, check the port speed setting in the Control Panel/System/Device Manager. If your system has less than 16MB RAM, the transfer speed may be sure to drag the card icon into the Trash folder first-don't use the Windows default ESDI/IDE HDD Controller driver...
... updated driver from IBM: 1 Download the files from the cable. Your system hangs or crashes when you 're transferring pictures via the serial cable, check the port speed setting in the Control Panel/System/Device Manager. If your system has less than 16MB RAM, the transfer speed may be sure to drag the card icon into the Trash folder first-don't use the Windows default ESDI/IDE HDD Controller driver...

User Manual
Page 135
... halogen lighting-the colors in 24-bit color (16.7 million colors). Try changing the focus. When you take macro close as close -ups, make sure you may need to take a picture without the flash, and 3.2 feet away to adjust some of the pictures you get from the PhotoPC 650, you have a yellow or green color cast. When you print them out, you press A the shutter button (until the red light starts to flash), and...
... halogen lighting-the colors in 24-bit color (16.7 million colors). Try changing the focus. When you take macro close as close -ups, make sure you may need to take a picture without the flash, and 3.2 feet away to adjust some of the pictures you get from the PhotoPC 650, you have a yellow or green color cast. When you print them out, you press A the shutter button (until the red light starts to flash), and...

User Manual
Page 153
...B-3 PhotoPC 650 camera AC adapter, using with, 1-4, 2-3, A-1 to A-2 auto shut-off, 2-2 cleaning, 9-1 connecting to Macintosh, 4-9 to 4-11 connecting to PC, 4-9 to 4-10 date, setting, 1-5 to 1-6, 3-12 to 3-13 display panel, status, 2-2, 2-8, 9-4 features, Intro-2 to Intro-3 language, setting, 3-15 maintaining, 9-1 to 9-2 parts, identifying, 1-9 to 1-10 picture counter, 2-8 plastic, removing protective, 1-5 problems, solving, 4-23 to 4-24, 9-2 to 9-6 specifications, B-1 to B-3 storing, 9-2 time, setting, 1-5 to 1-6, 3-12 to 3-13 PhotoPC 650 camera (continued) tripod, attaching to, A-3 turning...
...B-3 PhotoPC 650 camera AC adapter, using with, 1-4, 2-3, A-1 to A-2 auto shut-off, 2-2 cleaning, 9-1 connecting to Macintosh, 4-9 to 4-11 connecting to PC, 4-9 to 4-10 date, setting, 1-5 to 1-6, 3-12 to 3-13 display panel, status, 2-2, 2-8, 9-4 features, Intro-2 to Intro-3 language, setting, 3-15 maintaining, 9-1 to 9-2 parts, identifying, 1-9 to 1-10 picture counter, 2-8 plastic, removing protective, 1-5 problems, solving, 4-23 to 4-24, 9-2 to 9-6 specifications, B-1 to B-3 storing, 9-2 time, setting, 1-5 to 1-6, 3-12 to 3-13 PhotoPC 650 camera (continued) tripod, attaching to, A-3 turning...
User Manual
Page 155
... 7-15 Serial cable, 4-9 to 4-11 Service card and JumpShot USB cable, 9-10 EPSON, 9-9 software, 9-10 Settings menu, 3-2, 3-12 to 3-15 Sharpness, adjusting image, 7-8 to 7-10 Shut-off, automatic, 2-2, 2-5, 2-7 Shutter, using, 2-4 to 2-7, 2-10, 2-12 Slide shows, 3-5, 6-18 to 6-19 Smart Print, HotShots, 6-11 to 6-12 SmartPix, HotShots, 7-6 to 7-8 Smudge tool, HotShots, 7-19 to 7-20 Software HotShots, see HotShots software installing, 1-8, 4-4 to 4-5 support, 9-10 TWAIN, see TWAIN, EPSON PhotoPC 650 SoundAdvice, EPSON, 9-9 Special Effects...
... 7-15 Serial cable, 4-9 to 4-11 Service card and JumpShot USB cable, 9-10 EPSON, 9-9 software, 9-10 Settings menu, 3-2, 3-12 to 3-15 Sharpness, adjusting image, 7-8 to 7-10 Shut-off, automatic, 2-2, 2-5, 2-7 Shutter, using, 2-4 to 2-7, 2-10, 2-12 Slide shows, 3-5, 6-18 to 6-19 Smart Print, HotShots, 6-11 to 6-12 SmartPix, HotShots, 7-6 to 7-8 Smudge tool, HotShots, 7-19 to 7-20 Software HotShots, see HotShots software installing, 1-8, 4-4 to 4-5 support, 9-10 TWAIN, see TWAIN, EPSON PhotoPC 650 SoundAdvice, EPSON, 9-9 Special Effects...
User Manual
Page 157
... defective unit, without charge for warranty repair instructions and return authorization, if required. LIMITED WARRANTY What is required, EPSON will, at (310) 974-1983 for parts or labor. If repair is Covered: Epson America, Inc. ("EPSON") warrants to the first end-user customer that the EPSON PhotoPC 650 Digital Camera enclosed with this limited warranty. Packaging and shipping costs incurred in service, you . SOME LAWS...
... defective unit, without charge for warranty repair instructions and return authorization, if required. LIMITED WARRANTY What is required, EPSON will, at (310) 974-1983 for parts or labor. If repair is Covered: Epson America, Inc. ("EPSON") warrants to the first end-user customer that the EPSON PhotoPC 650 Digital Camera enclosed with this limited warranty. Packaging and shipping costs incurred in service, you . SOME LAWS...


