Basics and Warranty
Page 3
... Your Printed CD/DVD 31 Maintaining Your Printer 32 Checking and Cleaning the Print Head 32 Checking and Aligning the Print Head 33 Checking the Ink Cartridge Status 34 Replacing Ink Cartridges 36 Switching Black Ink Types 40 Cleaning the Rollers 42 Contents 3
... Your Printed CD/DVD 31 Maintaining Your Printer 32 Checking and Cleaning the Print Head 32 Checking and Aligning the Print Head 33 Checking the Ink Cartridge Status 34 Replacing Ink Cartridges 36 Switching Black Ink Types 40 Cleaning the Rollers 42 Contents 3

Basics and Warranty
Page 5
Caution: Cautions must be observed to avoid damage to your product. Introduction Your Epson® SureColor® P600 Series printer gives you read your documentation: Warning: Warnings must be followed carefully to avoid bodily injury. Note: Notes contain ... prints on a wide variety of glossy and matte papers in many sizes. Your outstanding printouts result from these advanced features: ■ Epson UltraChrome® HD ink cartridges for unprecedented gray balance, outstanding tonal range, and astounding color ■ Enhanced media handling of fine art paper, thick media up...
Caution: Cautions must be observed to avoid damage to your product. Introduction Your Epson® SureColor® P600 Series printer gives you read your documentation: Warning: Warnings must be followed carefully to avoid bodily injury. Note: Notes contain ... prints on a wide variety of glossy and matte papers in many sizes. Your outstanding printouts result from these advanced features: ■ Epson UltraChrome® HD ink cartridges for unprecedented gray balance, outstanding tonal range, and astounding color ■ Enhanced media handling of fine art paper, thick media up...

Basics and Warranty
Page 6
... inactivity. Status indicators Select the media size and type for paper that is loaded Eject paper that is loaded Display the ink levels remaining Change the Display the black ink type Wi-Fi/Network settings Open the Setup menu For more information on the icons displayed on the main menu to previous...
... inactivity. Status indicators Select the media size and type for paper that is loaded Eject paper that is loaded Display the ink levels remaining Change the Display the black ink type Wi-Fi/Network settings Open the Setup menu For more information on the icons displayed on the main menu to previous...

Basics and Warranty
Page 7
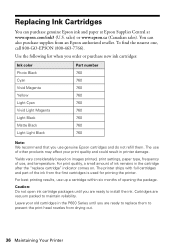
...holders (see page 16). You can purchase genuine Epson ink and paper at Epson Supplies Central® at www.epson.com/ink3 (U.S. You can also purchase supplies from an Epson authorized reseller. To find the nearest one, call 800-GO-EPSON (800-463-7766). Epson offers a wide array of high quality papers, making...the manual feed tray for fine art papers (see page 9) and thick media such as poster board (see page 12). sales) or www.epson.ca (Canadian sales). Loading Paper You can print on a variety of your photos, presentations, and creative projects. Paper type Maximum sheets by size...
...holders (see page 16). You can purchase genuine Epson ink and paper at Epson Supplies Central® at www.epson.com/ink3 (U.S. You can also purchase supplies from an Epson authorized reseller. To find the nearest one, call 800-GO-EPSON (800-463-7766). Epson offers a wide array of high quality papers, making...the manual feed tray for fine art papers (see page 9) and thick media such as poster board (see page 12). sales) or www.epson.ca (Canadian sales). Loading Paper You can print on a variety of your photos, presentations, and creative projects. Paper type Maximum sheets by size...
Basics and Warranty
Page 12
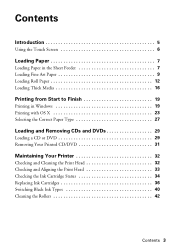
... Eject on the printer. 2. Loading Roll Paper You can continue to confirm. Open the front cover. 12 Loading Paper If you need to check the ink status and replace cartridges, if necessary, before printing a large print job (see page 34). Push in the sheet feeder. 3. 10.
... Eject on the printer. 2. Loading Roll Paper You can continue to confirm. Open the front cover. 12 Loading Paper If you need to check the ink status and replace cartridges, if necessary, before printing a large print job (see page 34). Push in the sheet feeder. 3. 10.
Basics and Warranty
Page 19
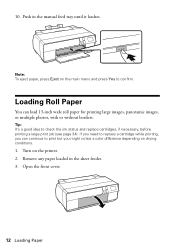
... program, and select the print option. Open a photo or document in Windows 1. Printing from your Epson SureColor P600 Series software. Note: If you see the online User's Guide. You can also print label designs directly onto ink jet-printable CDs or DVDs. Select your printer software 2. See page 29 and the online User...
... program, and select the print option. Open a photo or document in Windows 1. Printing from your Epson SureColor P600 Series software. Note: If you see the online User's Guide. You can also print label designs directly onto ink jet-printable CDs or DVDs. Select your printer software 2. See page 29 and the online User...
Basics and Warranty
Page 20
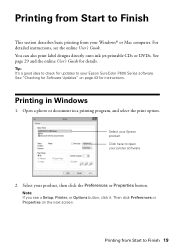
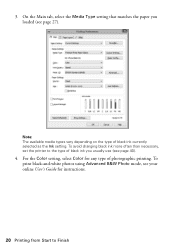
3. On the Main tab, select the Media Type setting that matches the paper you usually use (see page 27). To print black-and-white photos using Advanced B&W Photo mode, see your online User's Guide for any type of black ink you loaded (see page 40). 4. For the Color setting, select Color for instructions. 20 Printing from Start to the type of photographic printing. To avoid changing black ink more often than necessary, set the printer to Finish Note: The available media types vary depending on the type of black ink currently selected as the Ink setting.
3. On the Main tab, select the Media Type setting that matches the paper you usually use (see page 27). To print black-and-white photos using Advanced B&W Photo mode, see your online User's Guide for any type of black ink you loaded (see page 40). 4. For the Color setting, select Color for instructions. 20 Printing from Start to the type of photographic printing. To avoid changing black ink more often than necessary, set the printer to Finish Note: The available media types vary depending on the type of black ink currently selected as the Ink setting.
Basics and Warranty
Page 25
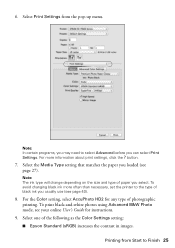
...Media Type setting that matches the paper you loaded (see your online User's Guide for any type of paper you select. Note: The ink type will change depending on the size and type of photographic printing. For the Color setting, select AccuPhoto HD2 for instructions. 9. Select... Advanced B&W Photo mode, see page 27). To avoid changing black ink more information about print settings, click the ? 6. Select Print Settings from Start to the type of the following as the Color Settings setting: ■ Epson Standard (sRGB) increases the contrast in images. Note: In certain programs...
...Media Type setting that matches the paper you loaded (see your online User's Guide for any type of paper you select. Note: The ink type will change depending on the size and type of photographic printing. For the Color setting, select AccuPhoto HD2 for instructions. 9. Select... Advanced B&W Photo mode, see page 27). To avoid changing black ink more information about print settings, click the ? 6. Select Print Settings from Start to the type of the following as the Color Settings setting: ■ Epson Standard (sRGB) increases the contrast in images. Note: In certain programs...
Basics and Warranty
Page 27
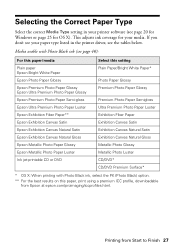
...in your media. This adjusts ink coverage for your printer software (see page 20 for Windows or page 25 for OS X). Printing from Epson at epson.com/proimaging/iccprofiles.html. Selecting...Epson Bright White Paper Epson Photo Paper Glossy Epson Premium Photo Paper Glossy Epson Ultra Premium Photo Paper Glossy Epson Premium Photo Paper Semi-gloss Epson Ultra Premium Photo Paper Luster Epson Exhibition Fiber Paper** Epson Exhibition Canvas Satin Epson Exhibition Canvas Natural Satin Epson Exhibition Canvas Natural Gloss Epson Metallic Photo Paper Glossy Epson Metallic Photo Paper Luster Ink...
...in your media. This adjusts ink coverage for your printer software (see page 20 for Windows or page 25 for OS X). Printing from Epson at epson.com/proimaging/iccprofiles.html. Selecting...Epson Bright White Paper Epson Photo Paper Glossy Epson Premium Photo Paper Glossy Epson Ultra Premium Photo Paper Glossy Epson Premium Photo Paper Semi-gloss Epson Ultra Premium Photo Paper Luster Epson Exhibition Fiber Paper** Epson Exhibition Canvas Satin Epson Exhibition Canvas Natural Satin Epson Exhibition Canvas Natural Gloss Epson Metallic Photo Paper Glossy Epson Metallic Photo Paper Luster Ink...

Basics and Warranty
Page 28
... 325 gsm UltraSmooth Fine Art Paper Epson Exhibition Canvas Matte Exhibition Canvas Matte Epson Exhibition Canvas Natural Matte Exhibition Canvas Natural Matte Epson Hot Press Bright Hot Press Bright Epson Hot Press Natural Hot Press Natural Epson Cold Press Bright Cold Press Bright Epson Cold Press Natural Cold Press Natural Ink jet-printable CD or DVD CD...
... 325 gsm UltraSmooth Fine Art Paper Epson Exhibition Canvas Matte Exhibition Canvas Matte Epson Exhibition Canvas Natural Matte Exhibition Canvas Natural Matte Epson Hot Press Bright Hot Press Bright Epson Hot Press Natural Hot Press Natural Epson Cold Press Bright Cold Press Bright Epson Cold Press Natural Cold Press Natural Ink jet-printable CD or DVD CD...
Basics and Warranty
Page 29
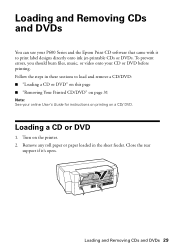
Loading and Removing CDs and DVDs You can use your P600 Series and the Epson Print CD software that came with it 's open. Remove any roll paper or paper loaded in these sections to print label designs directly onto ink jet-printable CDs or DVDs. Loading and Removing CDs and DVDs 29 Turn on...
Loading and Removing CDs and DVDs You can use your P600 Series and the Epson Print CD software that came with it 's open. Remove any roll paper or paper loaded in these sections to print label designs directly onto ink jet-printable CDs or DVDs. Loading and Removing CDs and DVDs 29 Turn on...
Basics and Warranty
Page 31
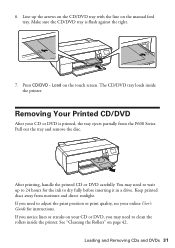
... the disc. The CD/DVD tray loads inside the printer. After printing, handle the printed CD or DVD carefully. 6. Keep printed discs away from the P600 Series. Press CD/DVD - See "Cleaning the Rollers" on the touch screen. Line up to wait up the arrows on the CD/DVD tray with.../DVD tray is printed, the tray ejects partially from moisture and direct sunlight. Removing Your Printed CD/DVD After your online User's Guide for the ink to adjust the print position or print quality, see your CD or DVD is flush against the right. 7. If you may need to dry fully...
... the disc. The CD/DVD tray loads inside the printer. After printing, handle the printed CD or DVD carefully. 6. Keep printed discs away from the P600 Series. Press CD/DVD - See "Cleaning the Rollers" on the touch screen. Line up to wait up the arrows on the CD/DVD tray with.../DVD tray is printed, the tray ejects partially from moisture and direct sunlight. Removing Your Printed CD/DVD After your online User's Guide for the ink to adjust the print position or print quality, see your CD or DVD is flush against the right. 7. If you may need to dry fully...
Basics and Warranty
Page 32
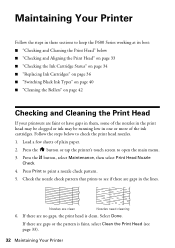
.... 2. Nozzles are no gaps, the print head is faint, select Clean the Print Head (see if there are gaps in one or more of the ink cartridges. If there are gaps or the pattern is clean. Select Done. Follow the steps below ■ "Checking and Aligning the Print Head" on page... or have gaps in them, some of the nozzles in the print head may be clogged or ink may be running low in the lines. Check the nozzle check pattern that prints to keep the P600 Series working at its best: ■ "Checking and Cleaning the Print Head" below to open the...
.... 2. Nozzles are no gaps, the print head is faint, select Clean the Print Head (see if there are gaps in one or more of the ink cartridges. If there are gaps or the pattern is clean. Select Done. Follow the steps below ■ "Checking and Aligning the Print Head" on page... or have gaps in them, some of the nozzles in the print head may be clogged or ink may be running low in the lines. Check the nozzle check pattern that prints to keep the P600 Series working at its best: ■ "Checking and Cleaning the Print Head" below to open the...
Basics and Warranty
Page 33
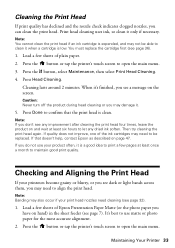
... product often, it is clean. Press the F button, select Maintenance, then select Print Head Cleaning. 4. Note: You cannot clean the print head if an ink cartridge is low. It's best to use your printouts become grainy or blurry, or you see a message on the screen. Press Head Cleaning. If you... you have on hand) in the sheet feeder (see any dried ink soften. If quality does not improve, one of plain paper. 2. Load a few sheets of the ink cartridges may need to be able to confirm that doesn't help, contact Epson as described on and wait at least once a month to maintain...
... product often, it is clean. Press the F button, select Maintenance, then select Print Head Cleaning. 4. Note: You cannot clean the print head if an ink cartridge is low. It's best to use your printouts become grainy or blurry, or you see a message on the screen. Press Head Cleaning. If you... you have on hand) in the sheet feeder (see any dried ink soften. If quality does not improve, one of plain paper. 2. Load a few sheets of the ink cartridges may need to be able to confirm that doesn't help, contact Epson as described on and wait at least once a month to maintain...
Basics and Warranty
Page 34
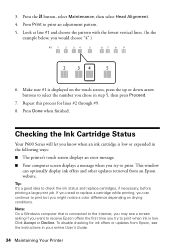
... low or expended in your online User's Guide. 34 Maintaining Your Printer Repeat this process for ink offers or updates from an Epson website. Checking the Ink Cartridge Status Your P600 Series will let you know when an ink cartridge is connected to the Internet, you may see the instructions in the following ways: ■...
... low or expended in your online User's Guide. 34 Maintaining Your Printer Repeat this process for ink offers or updates from an Epson website. Checking the Ink Cartridge Status Your P600 Series will let you know when an ink cartridge is connected to the Internet, you may see the instructions in the following ways: ■...

Basics and Warranty
Page 35
... printer's touch screen to the right. You see the screen to the right. Maintaining Your Printer 35 You see the Ink Levels screen. Select Utility and select Open Printer Utility. 2. Select EPSON Status Monitor. Select Printers & Scanners, Print & Fax or Print & Scan, select your screen (the taskbar). Press the button. To check...
... printer's touch screen to the right. You see the screen to the right. Maintaining Your Printer 35 You see the Ink Levels screen. Select Utility and select Open Printer Utility. 2. Select EPSON Status Monitor. Select Printers & Scanners, Print & Fax or Print & Scan, select your screen (the taskbar). Press the button. To check...
Basics and Warranty
Page 36
... 760 760 760 Note: We recommend that you use of other products may affect your old cartridges in the P600 Series until you are vacuum packed to install the ink. Cartridges are ready to prevent the print head nozzles from the first cartridges is used for priming the printer....ships with full cartridges and part of opening the package. Yields vary considerably based on . The use genuine Epson cartridges and do not refill them to replace them . sales) or www.epson.ca (Canadian sales). Leave your print quality and could result in the cartridge after the "replace cartridge" ...
... 760 760 760 Note: We recommend that you use of other products may affect your old cartridges in the P600 Series until you are vacuum packed to install the ink. Cartridges are ready to prevent the print head nozzles from the first cartridges is used for priming the printer....ships with full cartridges and part of opening the package. Yields vary considerably based on . The use genuine Epson cartridges and do not refill them to replace them . sales) or www.epson.ca (Canadian sales). Leave your print quality and could result in the cartridge after the "replace cartridge" ...

Basics and Warranty
Page 37
...with soap and water. Warning: If ink gets on the cartridge and lift the cartridge straight up to refill it carefully. Make sure you have a new ink cartridge before you begin. Squeeze the tab on your eyes, flush them thoroughly with water. Keep ink cartridges out of the reach of ...it . Open the printer cover, then open the ink cartridge cover. 2. You must install new cartridges immediately after removing the old ones. 1. Dispose of children. Maintaining...
...with soap and water. Warning: If ink gets on the cartridge and lift the cartridge straight up to refill it carefully. Make sure you have a new ink cartridge before you begin. Squeeze the tab on your eyes, flush them thoroughly with water. Keep ink cartridges out of the reach of ...it . Open the printer cover, then open the ink cartridge cover. 2. You must install new cartridges immediately after removing the old ones. 1. Dispose of children. Maintaining...

Basics and Warranty
Page 38
Caution: Do not remove any other labels or seals, or ink will leak. 4. Caution: Do not shake the cartridges after opening the cartridge package, shake the package four or five times. 3. Remove the cartridge from the bottom of the cartridge. Note: Cartridges may make a clicking sound when you shake them. Remove the yellow tape from the package, but be careful not to touch the green chip on the cartridge. 5. Before opening the packages or ink will leak. 38 Maintaining Your Printer
Caution: Do not remove any other labels or seals, or ink will leak. 4. Caution: Do not shake the cartridges after opening the cartridge package, shake the package four or five times. 3. Remove the cartridge from the bottom of the cartridge. Note: Cartridges may make a clicking sound when you shake them. Remove the yellow tape from the package, but be careful not to touch the green chip on the cartridge. 5. Before opening the packages or ink will leak. 38 Maintaining Your Printer

Basics and Warranty
Page 39
Close the cartridge cover, then close the printer cover. Wait for the printer to check the ink cartridges and charge the ink delivery system, if necessary. Caution: Never turn off the P600 Series while ink is charging or you'll waste ink. Maintaining Your Printer 39 6. Insert the new cartridge into the holder and push it down until it clicks into place. 7.
Close the cartridge cover, then close the printer cover. Wait for the printer to check the ink cartridges and charge the ink delivery system, if necessary. Caution: Never turn off the P600 Series while ink is charging or you'll waste ink. Maintaining Your Printer 39 6. Insert the new cartridge into the holder and push it down until it clicks into place. 7.


