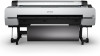
User Manual
Page 2
Contents Unpacking and assembling the printer 2 Assembling the stand ...3 Mounting the printer on the stand 6 Attaching the support bar ...9 Attaching the paper basket ...12 Completing setup and connecting the power cord 16 Installing ink ...18 Installing the internal print server 21 Loading roll paper ...23 Loading roll paper in the printer 23 Aligning the print head ...29 Connecting to your system ...29 Installing the software ...31 Updating your printer firmware ...31 Checking the current firmware version 31 Updating the firmware ...31 Configuring the printer for your network 32
Contents Unpacking and assembling the printer 2 Assembling the stand ...3 Mounting the printer on the stand 6 Attaching the support bar ...9 Attaching the paper basket ...12 Completing setup and connecting the power cord 16 Installing ink ...18 Installing the internal print server 21 Loading roll paper ...23 Loading roll paper in the printer 23 Aligning the print head ...29 Connecting to your system ...29 Installing the software ...31 Updating your printer firmware ...31 Checking the current firmware version 31 Updating the firmware ...31 Configuring the printer for your network 32
User Manual
Page 3
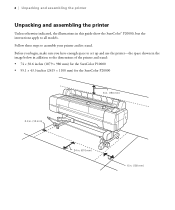
... shown in the image below in addition to the dimensions of the printer and stand: • 74 × 38.6 inches (1879 × 980 mm) for the SureColor P10000 • 95.1 × 43.3 inches (2415 × 1100 mm) for the SureColor P20000 6 in. (150 mm) 0.4 in. (10 mm) 24 in. (610 mm) 6... in this guide show the SureColor® P20000, but the instructions apply to assemble your printer and its stand. Follow these steps to all models.
... shown in the image below in addition to the dimensions of the printer and stand: • 74 × 38.6 inches (1879 × 980 mm) for the SureColor P10000 • 95.1 × 43.3 inches (2415 × 1100 mm) for the SureColor P20000 6 in. (150 mm) 0.4 in. (10 mm) 24 in. (610 mm) 6... in this guide show the SureColor® P20000, but the instructions apply to assemble your printer and its stand. Follow these steps to all models.
User Manual
Page 4
...19 × 19 feet (5.8 × 5.8 m) for easy access and ventilation. Assembling the stand | 3 When choosing a place for the printer, choose a flat, stable location with adequate room for the SureColor P20000 and stand Note: Make sure you save the box and packaging in the path of an air conditioner, or the... print head nozzles may dry out and clog. You need to unpack and install the printer. Avoid locations subject to prepare a ...
...19 × 19 feet (5.8 × 5.8 m) for easy access and ventilation. Assembling the stand | 3 When choosing a place for the printer, choose a flat, stable location with adequate room for the SureColor P20000 and stand Note: Make sure you save the box and packaging in the path of an air conditioner, or the... print head nozzles may dry out and clog. You need to unpack and install the printer. Avoid locations subject to prepare a ...
User Manual
Page 7
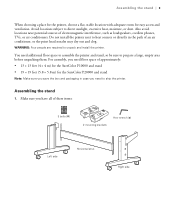
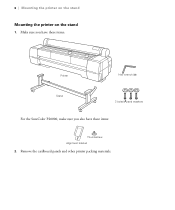
Make sure you have these items: Printer Hex wrench (a) Stand 3 bolts (A) and washers For the SureColor P20000, make sure you also have these items: Thumbscrew Alignment bracket 2. 6 | Mounting the printer on the stand Mounting the printer on the stand 1. Remove the cardboard panels and other printer packing materials.
Make sure you have these items: Printer Hex wrench (a) Stand 3 bolts (A) and washers For the SureColor P20000, make sure you also have these items: Thumbscrew Alignment bracket 2. 6 | Mounting the printer on the stand Mounting the printer on the stand 1. Remove the cardboard panels and other printer packing materials.
User Manual
Page 8
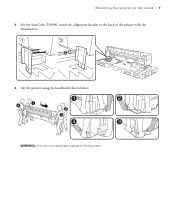
Lift the printer using the handholds shown below. For the SureColor P20000, attach the alignment bracket to lift the printer. Mounting the printer on the stand | 7 3. WARNING: Four or more people are required to the back of the printer with the thumbscrew. 4.
Lift the printer using the handholds shown below. For the SureColor P20000, attach the alignment bracket to lift the printer. Mounting the printer on the stand | 7 3. WARNING: Four or more people are required to the back of the printer with the thumbscrew. 4.
User Manual
Page 9
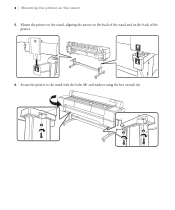
Secure the printer to the stand with the bolts (A) and washers using the hex wrench (a). 8 | Mounting the printer on the back of the printer. 6. Mount the printer on the stand, aligning the arrows on the back of the stand and on the stand 5.
Secure the printer to the stand with the bolts (A) and washers using the hex wrench (a). 8 | Mounting the printer on the back of the printer. 6. Mount the printer on the stand, aligning the arrows on the back of the stand and on the stand 5.
User Manual
Page 11
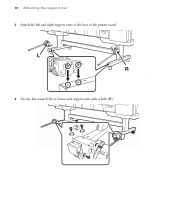
10 | Attaching the support bar 2. Use the hex wrench (b) to the base of the printer stand. 3. Attach the left and right support arms to fasten each support arm with 4 bolts (B).
10 | Attaching the support bar 2. Use the hex wrench (b) to the base of the printer stand. 3. Attach the left and right support arms to fasten each support arm with 4 bolts (B).
User Manual
Page 13
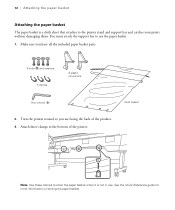
...clamps to store the paper basket when it is a cloth sheet that attaches to use . You must attach the support bar to the printer stand and support bar and catches your prints without damaging them. See the Quick Reference guide for more information on storing the paper basket.... Turn the printer around so you have all the included paper basket parts. 4 bolts (B) and washers 3 clamps 2 plastic connectors Hex wrench (b) Cloth basket 2. ...
...clamps to store the paper basket when it is a cloth sheet that attaches to use . You must attach the support bar to the printer stand and support bar and catches your prints without damaging them. See the Quick Reference guide for more information on storing the paper basket.... Turn the printer around so you have all the included paper basket parts. 4 bolts (B) and washers 3 clamps 2 plastic connectors Hex wrench (b) Cloth basket 2. ...
User Manual
Page 14
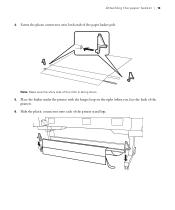
Slide the plastic connectors onto each of the printer). 6. Attaching the paper basket | 13 4. Place the basket under the printer with the longer loop on the right (when you face the back of the printer stand legs. Fasten the plastic connectors onto both ends of the cloth is facing down. 5. Note: Make sure the shiny side of the paper basket pole.
Slide the plastic connectors onto each of the printer). 6. Attaching the paper basket | 13 4. Place the basket under the printer with the longer loop on the right (when you face the back of the printer stand legs. Fasten the plastic connectors onto both ends of the cloth is facing down. 5. Note: Make sure the shiny side of the paper basket pole.

User Manual
Page 17
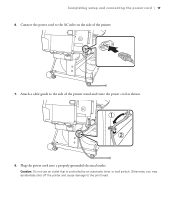
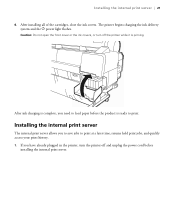
... 3. Close the front cover. 16 | Completing setup and connecting the power cord Completing setup and connecting the power cord 1. Lock the casters after moving the printer a short distance over smooth surfaces. 2. Open the front cover and remove the tape and packing material. Open the roll paper cover and remove the tape... and packing material. 4. Note: The casters are only meant for moving the printer. Note: Save the packing material in case you need to its final location. Unlock the casters and move the...
... 3. Close the front cover. 16 | Completing setup and connecting the power cord Completing setup and connecting the power cord 1. Lock the casters after moving the printer a short distance over smooth surfaces. 2. Open the front cover and remove the tape and packing material. Open the roll paper cover and remove the tape... and packing material. 4. Note: The casters are only meant for moving the printer. Note: Save the packing material in case you need to its final location. Unlock the casters and move the...
User Manual
Page 18
Attach a cable guide to the side of the printer. 7. Caution: Do not use an outlet that is controlled by an automatic timer or wall switch. Plug the power cord into a properly grounded electrical outlet. Otherwise, you may accidentally shut off the printer and cause damage to the AC inlet on the side of the printer stand and route the power cord as shown. 8. Completing setup and connecting the power cord | 17 6. Connect the power cord to the print head.
Attach a cable guide to the side of the printer. 7. Caution: Do not use an outlet that is controlled by an automatic timer or wall switch. Plug the power cord into a properly grounded electrical outlet. Otherwise, you may accidentally shut off the printer and cause damage to the AC inlet on the side of the printer stand and route the power cord as shown. 8. Completing setup and connecting the power cord | 17 6. Connect the power cord to the print head.
User Manual
Page 19
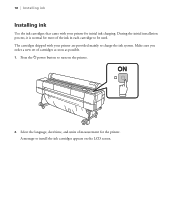
Press the P power button to install the ink cartridges appears on the printer. 2. 18 | Installing ink Installing ink Use the ink cartridges that came with your printer for initial ink charging. The cartridges shipped with your printer are provided mainly to be used. A message to turn on the LCD screen. Make sure you order a new set of measurement for most of the ink in each cartridge to charge the ink system. During the initial installation process, it is normal for the printer. Select the language, date/time, and units of cartridges as soon as possible. 1.
Press the P power button to install the ink cartridges appears on the printer. 2. 18 | Installing ink Installing ink Use the ink cartridges that came with your printer for initial ink charging. The cartridges shipped with your printer are provided mainly to be used. A message to turn on the LCD screen. Make sure you order a new set of measurement for most of the ink in each cartridge to charge the ink system. During the initial installation process, it is normal for the printer. Select the language, date/time, and units of cartridges as soon as possible. 1.
User Manual
Page 21
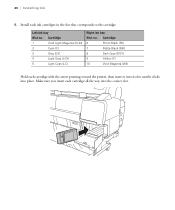
Cartridge 1 Vivid Light Magenta (VLM) 2 Cyan (C) 3 Gray (GY) 4 Light Gray (LGY) 5 Light Cyan (LC) Right ink bay Slot no . Install each cartridge all the way into place. 20 | Installing ink 5. Make sure you insert each ink cartridges in the slot that corresponds to the cartridge. Cartridge 6 Photo Black (PK) 7 Matte Black (MK) 8 Dark Gray (DGY) 9 Yellow (Y) 10 Vivid Magenta (VM) Hold each cartridge with the arrow pointing toward the printer, then insert it into its slot until it clicks into the correct slot. Left ink bay Slot no .
Cartridge 1 Vivid Light Magenta (VLM) 2 Cyan (C) 3 Gray (GY) 4 Light Gray (LGY) 5 Light Cyan (LC) Right ink bay Slot no . Install each cartridge all the way into place. 20 | Installing ink 5. Make sure you insert each ink cartridges in the slot that corresponds to the cartridge. Cartridge 6 Photo Black (PK) 7 Matte Black (MK) 8 Dark Gray (DGY) 9 Yellow (Y) 10 Vivid Magenta (VM) Hold each cartridge with the arrow pointing toward the printer, then insert it into its slot until it clicks into the correct slot. Left ink bay Slot no .
User Manual
Page 22
Installing the internal print server The internal print server allows you have already plugged in the printer, turn off and unplug the power cord before the product is priming. The printer begins charging the ink delivery system and the P power light flashes. Caution: Do not open the front cover or the ink... covers, or turn the printer off the printer while it is ready to print. After ink charging is complete, you need to print at a later time, resume held print jobs, and ...
Installing the internal print server The internal print server allows you have already plugged in the printer, turn off and unplug the power cord before the product is priming. The printer begins charging the ink delivery system and the P power light flashes. Caution: Do not open the front cover or the ink... covers, or turn the printer off the printer while it is ready to print. After ink charging is complete, you need to print at a later time, resume held print jobs, and ...
User Manual
Page 23
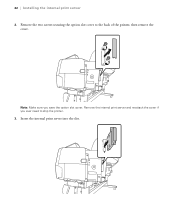
Note: Make sure you ever need to the back of the printer, then remove the cover. Insert the internal print server into the slot. Remove the internal print server and re-attach the cover if you save the option slot cover. 22 | Installing the internal print server 2. Remove the two screws securing the option slot cover to ship the printer. 3.
Note: Make sure you ever need to the back of the printer, then remove the cover. Insert the internal print server into the slot. Remove the internal print server and re-attach the cover if you save the option slot cover. 22 | Installing the internal print server 2. Remove the two screws securing the option slot cover to ship the printer. 3.
User Manual
Page 24
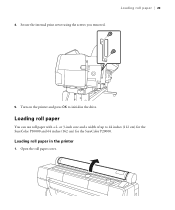
Loading roll paper in the printer 1. Open the roll paper cover. Loading roll paper You can use roll paper with a 2- 4. Secure the internal print server using the screws you removed. Turn on the printer and press OK to 44 inches (112 cm) for the SureColor P10000 and 64 inches (162 cm) for the SureColor P20000. or 3-inch core and a width of up to initialize the drive. Loading roll paper | 23 5.
Loading roll paper in the printer 1. Open the roll paper cover. Loading roll paper You can use roll paper with a 2- 4. Secure the internal print server using the screws you removed. Turn on the printer and press OK to 44 inches (112 cm) for the SureColor P10000 and 64 inches (162 cm) for the SureColor P20000. or 3-inch core and a width of up to initialize the drive. Loading roll paper | 23 5.
User Manual
Page 25
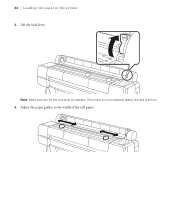
Adjust the paper guides to the width of the roll paper. Lift the lock lever. Note: Make sure you lift the lock lever completely. If the lever is not completely raised, the lock is still on. 3. 24 | Loading roll paper in the printer 2.
Adjust the paper guides to the width of the roll paper. Lift the lock lever. Note: Make sure you lift the lock lever completely. If the lever is not completely raised, the lock is still on. 3. 24 | Loading roll paper in the printer 2.
User Manual
Page 26
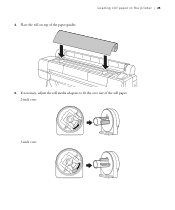
If necessary, adjust the roll media adapters to fit the core size of the paper guides. 4. Loading roll paper in the printer | 25 5. Place the roll on top of the roll paper. 2-inch core: 3-inch core:
If necessary, adjust the roll media adapters to fit the core size of the paper guides. 4. Loading roll paper in the printer | 25 5. Place the roll on top of the roll paper. 2-inch core: 3-inch core:
User Manual
Page 27
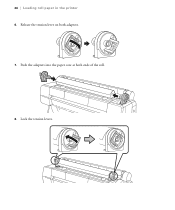
26 | Loading roll paper in the printer 6. Lock the tension levers. Push the adapters into the paper core at both adapters. 7. Release the tension lever on both ends of the roll. 8.
26 | Loading roll paper in the printer 6. Lock the tension levers. Push the adapters into the paper core at both adapters. 7. Release the tension lever on both ends of the roll. 8.

User Manual
Page 28
Continue feeding the paper all the way through the paper path. Note: If the Auto Loading option is selected, and press OK. 11. Slide the roll to Off, the printer will not beep. Make sure Roll Paper is set to the right until it hits the roll paper guide, then slide it forward into the slot until the printer beeps. Press the button on the control panel. Loading roll paper in the printer | 27 9. Insert the paper into position. 10. Lift the roll off of the roll stand.
Continue feeding the paper all the way through the paper path. Note: If the Auto Loading option is selected, and press OK. 11. Slide the roll to Off, the printer will not beep. Make sure Roll Paper is set to the right until it hits the roll paper guide, then slide it forward into the slot until the printer beeps. Press the button on the control panel. Loading roll paper in the printer | 27 9. Insert the paper into position. 10. Lift the roll off of the roll stand.


