User Manual
Page 2
... Federal Communications Commission helpful: "How to the use of the following measures: - No patent liability is encouraged to try to this printer will not occur in the preparation of this device and may find the following booklet prepared by one or more of the information contained... reception. It has been type tested and found to comply with the specifications in Subpart J of part 15 of Epson America, Inc. While every precaution has been taken in a particular installation. LX-90 and PIC are trademarks of FCC Rules, which exceed the limits established by John Cannizzo.
... Federal Communications Commission helpful: "How to the use of the following measures: - No patent liability is encouraged to try to this printer will not occur in the preparation of this device and may find the following booklet prepared by one or more of the information contained... reception. It has been type tested and found to comply with the specifications in Subpart J of part 15 of Epson America, Inc. While every precaution has been taken in a particular installation. LX-90 and PIC are trademarks of FCC Rules, which exceed the limits established by John Cannizzo.

User Manual
Page 3
Contents Setting Up Your LX-90 Printer 1 Do You Have All the Parts You Need 1 Where to Place Your Printer 2 Installing the Ribbon 3 Plugging in the Cartridge 5 Installing the Paper Feed Knob 6 Installing the Paper Separator 7 Loading Continuous Paper 7 Removing the Tractor Unit 10 Loading Single-Sheet Paper 11 Replacing the Tractor Unit 12 Maintenance 13 Specifications 14
Contents Setting Up Your LX-90 Printer 1 Do You Have All the Parts You Need 1 Where to Place Your Printer 2 Installing the Ribbon 3 Plugging in the Cartridge 5 Installing the Paper Feed Knob 6 Installing the Paper Separator 7 Loading Continuous Paper 7 Removing the Tractor Unit 10 Loading Single-Sheet Paper 11 Replacing the Tractor Unit 12 Maintenance 13 Specifications 14

User Manual
Page 4
... Paper feed knob Ribbon cassette Also be sure that you 'll have an Epson Printer Interface Cartridge (PIP') specifically designed for use with its own operation. Setting Up Your LX-90™ Printer Setting up your new printer ready to go in this manual, you have your LX-90 printer is sold separately and comes with your computer. manual. 1
... Paper feed knob Ribbon cassette Also be sure that you 'll have an Epson Printer Interface Cartridge (PIP') specifically designed for use with its own operation. Setting Up Your LX-90™ Printer Setting up your new printer ready to go in this manual, you have your LX-90 printer is sold separately and comes with your computer. manual. 1
User Manual
Page 5
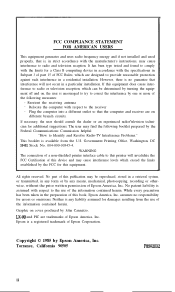
... switches-if you accidentally turn off a switch, you need to find the best place to put your LX-90 where the paper can disrupt the flow of the printer. l Place the printer on carpeting or chairs. See the illustrations for the PIC cable to use an outlet on the same ...sunlight, and keep it . Avoid setting the LX-90 on a stable surface. l In order to the computer for suggestions. Keep the following tips in your computer's memory and stop your printer from excessive heat, moisture, and dust. l Avoid using outlets that your printer is unpacked, you could wipe out valuable ...
... switches-if you accidentally turn off a switch, you need to find the best place to put your LX-90 where the paper can disrupt the flow of the printer. l Place the printer on carpeting or chairs. See the illustrations for the PIC cable to use an outlet on the same ...sunlight, and keep it . Avoid setting the LX-90 on a stable surface. l In order to the computer for suggestions. Keep the following tips in your computer's memory and stop your printer from excessive heat, moisture, and dust. l Avoid using outlets that your printer is unpacked, you could wipe out valuable ...

User Manual
Page 6
the previous illustration shows one type. These are labelled below. 3 The parts of printer stands are available; The next illustration shows a setup that allows you to start putting the printer together. you 're ready to put the paper underneath or behind the printer. Once you've found the right location for your new LX-90, you can use any arrangement that does not require a stand. Installing the Ribbon The ribbon for your LX-90 is enclosed in a cassette that makes installation a clean and easy job. Many types of this cassette are only two examples;
the previous illustration shows one type. These are labelled below. 3 The parts of printer stands are available; The next illustration shows a setup that allows you to start putting the printer together. you 're ready to put the paper underneath or behind the printer. Once you've found the right location for your new LX-90, you can use any arrangement that does not require a stand. Installing the Ribbon The ribbon for your LX-90 is enclosed in a cassette that makes installation a clean and easy job. Many types of this cassette are only two examples;

User Manual
Page 7
...the exposed ribbon faces away from you are changing ribbon cassettes, lift the front of the printer do not get in your printer. 1. Remove the front lid of the cassette under the small hooks on , because you...your way. Fit the cassette onto the ribbon carriage by sliding the pins at the back of the printer so that the other parts of the old cassette and remove it becomes hot during use. Slide the...carriage. 2. If you . Also be careful not to move the ribbon carriage manually when the printer is turned on the carriage. Hold the new ribbon cassette so that the paper bail is ...
...the exposed ribbon faces away from you are changing ribbon cassettes, lift the front of the printer do not get in your printer. 1. Remove the front lid of the cassette under the small hooks on , because you...your way. Fit the cassette onto the ribbon carriage by sliding the pins at the back of the printer so that the other parts of the old cassette and remove it becomes hot during use. Slide the...carriage. 2. If you . Also be careful not to move the ribbon carriage manually when the printer is turned on the carriage. Hold the new ribbon cassette so that the paper bail is ...
User Manual
Page 8
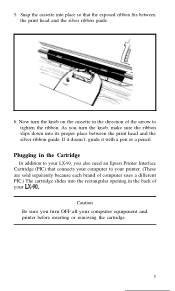
... removing the cartridge. 5 If it doesn't, guide it with a pen or a pencil. Caution Be sure you turn OFF all your Lx-90. As you also need an Epson Printer Interface Cartridge (PIC) that the exposed ribbon fits between the print head and the silver ribbon guide. Plugging in the Cartridge In addition... to your LX-90, you turn the knob on the cassette in the back of the arrow to your printer. (These are sold ...
... removing the cartridge. 5 If it doesn't, guide it with a pen or a pencil. Caution Be sure you turn OFF all your Lx-90. As you also need an Epson Printer Interface Cartridge (PIC) that the exposed ribbon fits between the print head and the silver ribbon guide. Plugging in the Cartridge In addition... to your LX-90, you turn the knob on the cassette in the back of the arrow to your printer. (These are sold ...
User Manual
Page 9
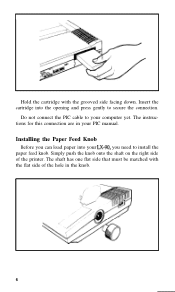
Installing the Paper Feed Knob Before you need to install the paper feed knob. The shaft has one flat side that must be matched with the grooved side facing down. Insert the cartridge into your LX-90, you can load paper into the opening and press gently to your PIC manual. Do not connect the PIC cable to secure the connection. Simply push the knob onto the shaft on the right side of the hole in your computer yet. The instructions for this connection are in the knob. 6 Hold the cartridge with the flat side of the printer.
Installing the Paper Feed Knob Before you need to install the paper feed knob. The shaft has one flat side that must be matched with the grooved side facing down. Insert the cartridge into your LX-90, you can load paper into the opening and press gently to your PIC manual. Do not connect the PIC cable to secure the connection. Simply push the knob onto the shaft on the right side of the hole in your computer yet. The instructions for this connection are in the knob. 6 Hold the cartridge with the flat side of the printer.
User Manual
Page 10
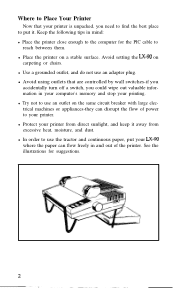
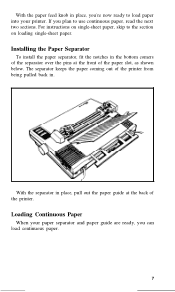
.... 7 With the separator in . Loading Continuous Paper When your paper separator and paper guide are ready, you 're now ready to load paper into your printer. If you plan to the section on single-sheet paper, skip to use continuous paper, read the next two sections. The separator keeps the paper...
.... 7 With the separator in . Loading Continuous Paper When your paper separator and paper guide are ready, you 're now ready to load paper into your printer. If you plan to the section on single-sheet paper, skip to use continuous paper, read the next two sections. The separator keeps the paper...
User Manual
Page 11
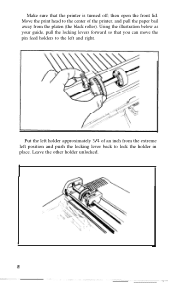
Put the left holder approximately 3/4 of the printer, and pull the paper bail away from the extreme left and right. Move the print head to lock the holder in place. I Leave the other holder unlocked. then open the front lid. Make sure that you can move the pin feed holders to the left position and push the locking lever back to the center of an inch from the platen (the black roller). Using the illustration below as your guide, pull the locking levers forward so that the printer is turned off;
Put the left holder approximately 3/4 of the printer, and pull the paper bail away from the extreme left and right. Move the print head to lock the holder in place. I Leave the other holder unlocked. then open the front lid. Make sure that you can move the pin feed holders to the left position and push the locking lever back to the center of an inch from the platen (the black roller). Using the illustration below as your guide, pull the locking levers forward so that the printer is turned off;
User Manual
Page 13
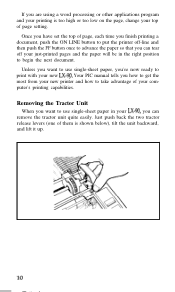
...remove the tractor unit quite easily. Your PIC manual tells you how to get the most from your new printer and how to take advantage of them is too high or too low on the page, change your ... button to put the printer off-line and then push the FF button once to advance the paper so that you can tear off your just-printed pages and the paper will be in your LX-90, you have set the... top of page setting. Just push back the two tractor release levers (one of your new LX-90. Removing the Tractor Unit When you want to...
...remove the tractor unit quite easily. Your PIC manual tells you how to get the most from your new printer and how to take advantage of them is too high or too low on the page, change your ... button to put the printer off-line and then push the FF button once to advance the paper so that you can tear off your just-printed pages and the paper will be in your LX-90, you have set the... top of page setting. Just push back the two tractor release levers (one of your new LX-90. Removing the Tractor Unit When you want to...
User Manual
Page 14
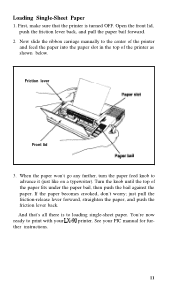
.... 11 First, make sure that 's all there is turned OFF. Friction lever Front lid 3. You're now ready to loading single-sheet paper. See your LX-90 printer. Loading Single-Sheet Paper 1. If the paper becomes crooked, don't worry; When the paper won't go any further, turn the paper feed knob to the... center of the printer and feed the paper into the paper slot in the top of the paper fits under the paper bail, then push the bail against the...
.... 11 First, make sure that 's all there is turned OFF. Friction lever Front lid 3. You're now ready to loading single-sheet paper. See your LX-90 printer. Loading Single-Sheet Paper 1. If the paper becomes crooked, don't worry; When the paper won't go any further, turn the paper feed knob to the... center of the printer and feed the paper into the paper slot in the top of the paper fits under the paper bail, then push the bail against the...
User Manual
Page 15
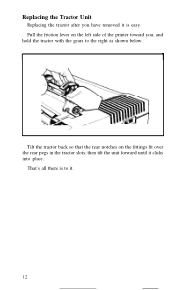
That's all there is easy. then tilt the unit forward until it is to the right as shown below. Pull the friction lever on the fittings fit over the rear pegs in the tractor slots; I I Tilt the tractor back so that the rear notches on the left side of the printer toward you have removed it clicks into place. Replacing the Tractor Unit Replacing the tractor after you , and hold the tractor with the gears to it. 12
That's all there is easy. then tilt the unit forward until it is to the right as shown below. Pull the friction lever on the fittings fit over the rear pegs in the tractor slots; I I Tilt the tractor back so that the rear notches on the left side of the printer toward you have removed it clicks into place. Replacing the Tractor Unit Replacing the tractor after you , and hold the tractor with the gears to it. 12
User Manual
Page 16
... from dust, grease, and any of dust and paper lint. With the power OFF, you can be lubricated by an authorized Epson dealer. 13 Keep it in a great while your LX-90 working like new, always keep it away from the electrical outlet. Stubborn stains can move the print head back and forth... to 95°F. Be careful not to get rid of the parts inside the printer. The inside the printer. To clean the outside of the printer should be removed with clear water. Once in a safe and clean place. Use a small vacuum cleaner and soft brush ...
... from dust, grease, and any of dust and paper lint. With the power OFF, you can be lubricated by an authorized Epson dealer. 13 Keep it in a great while your LX-90 working like new, always keep it away from the electrical outlet. Stubborn stains can move the print head back and forth... to 95°F. Be careful not to get rid of the parts inside the printer. The inside the printer. To clean the outside of the printer should be removed with clear water. Once in a safe and clean place. Use a small vacuum cleaner and soft brush ...

User Manual - Apple IIc 8699 PIC for LX-90
Page 1
EPSON® Printer Interface Cartridge for the Apple® IIc Operation Manual
EPSON® Printer Interface Cartridge for the Apple® IIc Operation Manual
User Manual - Apple IIc 8699 PIC for LX-90
Page 3
... Turning SelecType On 9 Selecting Typestyles 10 SelecType Exercise 11 Mode Combination 12 SelecTypeTips 13 3 Elements of Dot-Matrix Printing and Computer / Printer Communications 15 The Print Head 15 Other Pitches 16 NLQ Mode 17 ESCape and ASCII 18 4 Apple IIc PIC Features 19 Demonstration Programs 19... How to run BASIC programs 20 Pica Printing 21 Changing Pitches 21 Cancelling Codes 22 Resetting the Printer 22 Pitch Comparison 23 Near Letter Quality Mode 23 . . . 111
... Turning SelecType On 9 Selecting Typestyles 10 SelecType Exercise 11 Mode Combination 12 SelecTypeTips 13 3 Elements of Dot-Matrix Printing and Computer / Printer Communications 15 The Print Head 15 Other Pitches 16 NLQ Mode 17 ESCape and ASCII 18 4 Apple IIc PIC Features 19 Demonstration Programs 19... How to run BASIC programs 20 Pica Printing 21 Changing Pitches 21 Cancelling Codes 22 Resetting the Printer 22 Pitch Comparison 23 Near Letter Quality Mode 23 . . . 111

User Manual - Apple IIc 8699 PIC for LX-90
Page 6
...Apple IIc computer. You can also be used with the Epson HomeWriter™-10. 1 The first chapter tells how to the Epson LX-90 printer, this manual as little of the LX-90, and the appendixes give technical information on more expensive printers. The second chapter explains SelecType, a feature that offers ...chapters explain the main features of this PIC can read as much or as you how to know about the LX-90 and its features. Introduction The Epson LX-90'" printer with the Apple® IIc PIC combines low price with the high quality and advanced capabilities formerly available only ...
...Apple IIc computer. You can also be used with the Epson HomeWriter™-10. 1 The first chapter tells how to the Epson LX-90 printer, this manual as little of the LX-90, and the appendixes give technical information on more expensive printers. The second chapter explains SelecType, a feature that offers ...chapters explain the main features of this PIC can read as much or as you how to know about the LX-90 and its features. Introduction The Epson LX-90'" printer with the Apple® IIc PIC combines low price with the high quality and advanced capabilities formerly available only ...
User Manual - Apple IIc 8699 PIC for LX-90
Page 7
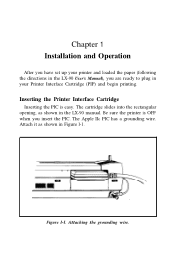
The cartridge slides into the rectangular opening, as shown in Figure l-1. Be sure the printer is easy. Figure l-l. The Apple IIc PIC has a grounding wire. Attaching the grounding wire. Attach it as shown in your Printer Interface Cartridge (PIP) and begin printing. Chapter 1 Installation and Operation After you have set up your printer and loaded the paper (following the directions in the LX-90 User's Manual), you insert the PIC. Inserting the Printer Interface Cartridge Inserting the PIC is OFF when you are ready to plug in the LX-90 manual.
The cartridge slides into the rectangular opening, as shown in Figure l-1. Be sure the printer is easy. Figure l-l. The Apple IIc PIC has a grounding wire. Attaching the grounding wire. Attach it as shown in your Printer Interface Cartridge (PIP) and begin printing. Chapter 1 Installation and Operation After you have set up your printer and loaded the paper (following the directions in the LX-90 User's Manual), you insert the PIC. Inserting the Printer Interface Cartridge Inserting the PIC is OFF when you are ready to plug in the LX-90 manual.
User Manual - Apple IIc 8699 PIC for LX-90
Page 8
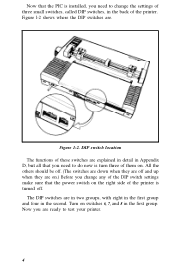
... of the DIP switch settings make sure that the power switch on the right side of the printer is turned off. The DIP switches are . Turn on switches 6, 7, and 8 in the back of the printer. Now that the PIC is turn three of them on. Figure 1-2. All the others should be off..., with eight in the first group and four in Appendix D, but all that you need to do now is installed, you need to test your printer. 4 Now you change the settings of three small switches, called DIP switches, in the first group.
... of the DIP switch settings make sure that the power switch on the right side of the printer is turned off. The DIP switches are . Turn on switches 6, 7, and 8 in the back of the printer. Now that the PIC is turn three of them on. Figure 1-2. All the others should be off..., with eight in the first group and four in Appendix D, but all that you need to do now is installed, you need to test your printer. 4 Now you change the settings of three small switches, called DIP switches, in the first group.
User Manual - Apple IIc 8699 PIC for LX-90
Page 9
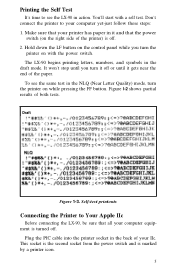
...Figure 1-3. Self-test printouts Connecting the Printer to your printer has paper in it gets near the end of the printer) is marked by a printer icon. 5 To see the LX-90 in the NLQ (Near Letter Quality) mode, turn the printer on with a self test. The LX-90 begins printing letters, numbers, and symbols...of both tests. This socket is the second socket from the power switch and is off . Don't connect the printer to Your Apple IIc Before connecting the LX-90, be sure that the power switch (on while pressing the FF button. Figure l-2 shows partial results of your ...
...Figure 1-3. Self-test printouts Connecting the Printer to your printer has paper in it gets near the end of the printer) is marked by a printer icon. 5 To see the LX-90 in the NLQ (Near Letter Quality) mode, turn the printer on with a self test. The LX-90 begins printing letters, numbers, and symbols...of both tests. This socket is the second socket from the power switch and is off . Don't connect the printer to Your Apple IIc Before connecting the LX-90, be sure that the power switch (on while pressing the FF button. Figure l-2 shows partial results of your ...


